
k0s is a simple and modern Kubernetes distribution used to swiftly set up and run the Kubernetes cluster. k0s is a 100% upstream vanilla Kubernetes distro that is widely used from local to large-scale production environments for the deployment of Kubernetes clusters since it runs anywhere and everywhere without dependencies. It is bundled into a single binary with all the required dependencies and thus installed with a single command. This eases the complexity of installing and configuring the Kubernetes cluster.
Why Zero(0)?
The zero in k0s has the connotation that, during the build of this ultimate Kubernetes distribution the following aspects were factored in:
- Zero Dependencies, no additional packages required.
- Zero overhead since it is designed to be ultra lightweight.
- Zero downtime as it comes with an automated cluster lifecycle management.
- Zero cost – k0s is free and open source.
- Zero friction as it reduces the complexity of deploying a fully comformant Kubernetes cluster.
k0s has the following features:
- Supports x86-64, ARM64 and ARMv7 architectures
- Supports all Linux OS distributions and Windows.
- It has supported storage & CSI providers i.e the Kubernetes-in-three storage providers, custom.
- It has in-built security and CIS conformance.
- Supports container runtime such as ContainerD
- Supported CNI providers i.e Calico, Kube-Router(Default), custom.
- Supports OpenID providers, RBAC, Network Policies, Pod Security Policies,Control Plane Isolation, and Micro VM Runtimes.
This guide demonstrates how to deploy the Kubernetes Cluster on Rocky Linux using k0s.
Step 1 – Set up k0s Control Node
We will begin by downloading the k0s binary on the machine you intend to use as the control node.
curl -sSLf https://get.k0s.sh | sudo shThis command will download and save the k0s binary to the /usr/local/bin path.
echo "export PATH=\$PATH:/usr/local/bin" | sudo tee -a /etc/profile
source /etc/profile
Verify if the path has been declared using the command:
$ echo $PATH
/home/thor/.local/bin:/home/thor/bin:/usr/local/bin:/usr/bin:/usr/local/sbin:/usr/sbin:/usr/local/bin
Now proceed and install k0s on the control node. First switch to the root user.
sudo su -Then install k0s and enable worker as below.
k0s install controller --enable-workerOnce the installation is complete, start and enable the k0s controller service.
systemctl start k0scontroller && systemctl enable k0scontrollerCheck the status of the service.
$ systemctl status k0scontroller
● k0scontroller.service - k0s - Zero Friction Kubernetes
   Loaded: loaded (/etc/systemd/system/k0scontroller.service; enabled; vendor preset: disabled)
   Active: active (running) since Fri 2024-08-09 18:14:34 UTC; 5s ago
     Docs: https://docs.k0sproject.io
 Main PID: 70985 (k0s)
    Tasks: 34
   Memory: 364.4M
   CGroup: /system.slice/k0scontroller.service
           ├─70985 /usr/local/bin/k0s controller --enable-worker=true
           ├─71021 /var/lib/k0s/bin/etcd --tls-min-version=TLS1.2 --data-dir=/var/lib/k0s/etcd --key-file=/var/lib/k0s/pki/etcd/server.key --peer-cert-file=/var/lib/k0s/pki/etcd/peer.crt --client-cert-auth=true --peer-client-cert-auth=true --listen-peer-urls=https://188.40.>
           ├─71030 /var/lib/k0s/bin/konnectivity-server --agent-namespace=kube-system --stderrthreshold=1 --cluster-key=/var/lib/k0s/pki/server.key --v=1 --server-id=9ef5c7161caa2bf24749f375c2290634 --mode=grpc --logtostderr=true --enable-profiling=false --delete-existing-u>
           └─71034 /var/lib/k0s/bin/kube-apiserver --service-account-jwks-uri=https://kubernetes.default.svc/openid/v1/jwks --service-account-key-file=/var/lib/k0s/pki/sa.pub --service-account-signing-key-file=/var/lib/k0s/pki/sa.key --v=1 --egress-selector-config-file=/var>

Aug 09 18:14:38 rocky8.cloudspinx.com k0s[70985]: time="2024-08-09 18:14:38" level=info msg="I0809 18:14:38.581767   71034 autoregister_controller.go:141] Starting autoregister controller" component=kube-apiserver stream=stderr
Aug 09 18:14:38 rocky8.cloudspinx.com k0s[70985]: time="2024-08-09 18:14:38" level=info msg="I0809 18:14:38.581771   71034 cache.go:32] Waiting for caches to sync for autoregister controller" component=kube-apiserver stream=stderr
Aug 09 18:14:38 rocky8.cloudspinx.com k0s[70985]: time="2024-08-09 18:14:38" level=info msg="I0809 18:14:38.581775   71034 cache.go:39] Caches are synced for autoregister controller" component=kube-apiserver stream=stderr
Aug 09 18:14:38 rocky8.cloudspinx.com k0s[70985]: time="2024-08-09 18:14:38" level=info msg="I0809 18:14:38.585901   71034 controller.go:615] quota admission added evaluator for: leases.coordination.k8s.io" component=kube-apiserver stream=stderr
Aug 09 18:14:38 rocky8.cloudspinx.com k0s[70985]: time="2024-08-09 18:14:38" level=info msg="I0809 18:14:38.588524   71034 cacher.go:898] cacher (apiservices.apiregistration.k8s.io): 1 objects queued in incoming channel." component=kube-apiserver stream=stderr
Aug 09 18:14:38 rocky8.cloudspinx.com k0s[70985]: time="2024-08-09 18:14:38" level=info msg="I0809 18:14:38.588539   71034 cacher.go:898] cacher (apiservices.apiregistration.k8s.io): 2 objects queued in incoming channel." component=kube-apiserver stream=stderr
Aug 09 18:14:38 rocky8.cloudspinx.com k0s[70985]: time="2024-08-09 18:14:38" level=info msg="I0809 18:14:38.588544   71034 cacher.go:898] cacher (apiservices.apiregistration.k8s.io): 3 objects queued in incoming channel." component=kube-apiserver stream=stderr
Aug 09 18:14:38 rocky8.cloudspinx.com k0s[70985]: time="2024-08-09 18:14:38" level=info msg="I0809 18:14:38.588547   71034 cacher.go:898] cacher (apiservices.apiregistration.k8s.io): 4 objects queued in incoming channel." component=kube-apiserver stream=stderr
Aug 09 18:14:38 rocky8.cloudspinx.com k0s[70985]: time="2024-08-09 18:14:38" level=info msg="I0809 18:14:38.597442   71034 cacher.go:898] cacher (apiservices.apiregistration.k8s.io): 5 objects queued in incoming channel." component=kube-apiserver stream=stderr
Aug 09 18:14:38 rocky8.cloudspinx.com k0s[70985]: time="2024-08-09 18:14:38" level=info msg="I0809 18:14:38.597456   71034 cacher.go:898] cacher (apiservices.apiregistration.k8s.io): 6 objects queued in incoming channel." component=kube-apiserver stream=stderr
Now that your k0s controller is working fine, you should be able to access your cluster using the command with the syntax below
k0s kubectl <command>For example to check if pods have started, use:
$ k0s kubectl get pods --all-namespaces
NAMESPACE     NAME                              READY   STATUS    RESTARTS   AGE
kube-system   coredns-85c69f454c-x9x2z          1/1     Running   0          68s
kube-system   konnectivity-agent-pz7rk          1/1     Running   0          67s
kube-system   kube-proxy-rd7t8                  1/1     Running   0          67s
kube-system   kube-router-4d7tb                 1/1     Running   0          67s
kube-system   metrics-server-7cc78958fc-ntsc7   1/1     Running   0          68s
Check the available nodes:
# k0s kubectl get nodes -o wide
NAME                    STATUS   ROLES           AGE     VERSION       INTERNAL-IP      EXTERNAL-IP   OS-IMAGE                            KERNEL-VERSION             CONTAINER-RUNTIME
rocky8.cloudspinx.com   Ready    control-plane   3m36s   v1.30.3+k0s   188.40.183.234   <none>        Rocky Linux 8.10 (Green Obsidian)   4.18.0-553.el8_10.x86_64   containerd://1.7.20
Allow the ports below through the firewall on the Control node:
sudo firewall-cmd --zone=trusted --add-interface=cni0 --permanent
sudo firewall-cmd --add-port=8090/tcp --permanent
sudo firewall-cmd --add-port=10250/tcp --permanent
sudo firewall-cmd --add-port=10255/tcp --permanent
sudo firewall-cmd --add-port=8472/udp --permanent
sudo firewall-cmd --add-port=6443/tcp --permanent
sudo firewall-cmd --add-port=9443/tcp --permanent
sudo firewall-cmd --reload
Step 2 – Add Worker Nodes to the k0s Cluster
To add a worker node to the cluster created above, we also need to download and install the k0s binary file on the intended worker node:
curl -sSLf https://get.k0s.sh | sudo shExport the binary path:
echo "export PATH=\$PATH:/usr/local/bin" | sudo tee -a /etc/profile
source /etc/profile
Allow the following ports through the firewall on the worker node:
sudo firewall-cmd --zone=trusted --add-interface=cni0 --permanent
sudo firewall-cmd --add-port=8090/tcp --permanent
sudo firewall-cmd --add-port=10250/tcp --permanent
sudo firewall-cmd --add-port=10255/tcp --permanent
sudo firewall-cmd --add-port=8472/udp --permanent
sudo firewall-cmd --reload
With k0s installed, generate the authentication token to be used to join the cluster. On the control node, issue the command:
k0s token create --role=workerThe command generates a string of characters that you are required to use to join the cluster. On the worker node, join the cluster as below.
k0s worker <login-token> &Replace login-token with the generated token on the control node. For example:
k0s worker "H4sIAAAAAAAC/2xV227jOhJ8z1f4B2YOZVk5YwP7EFqiHcpiwktTNt8kURPZ1C2yYjta7L8v4pkBdoHz1uwqVDUaRNdD1h91OZyPXbuaXbyHov44j+VwXj18m/2uVw+z2Wx2LodLOaxm1Tj259Vff3nL+Xfv8cf3OQq+z1ePi4/smBQcAAA==" &This will take a while since the pod’s network, proxy, and DNS are being initialized. Once the node has been added, you should see this:
k0s kubectl get nodes -o wideStep 3 – Add Control Nodes to the k0s Cluster
In case you want to have multiple control nodes, you are required to add them using a token just like the worker nodes. Download the k0s binary:
curl -sSLf https://get.k0s.sh | sudo shExport the binary path:
echo "export PATH=\$PATH:/usr/local/bin" | sudo tee -a /etc/profile
source /etc/profile
Generate the token from the existing control node:
sudo su -
k0s token create --role=controller
Once the token has been generated, use it to add a control node using the syntax below.
k0s controller "<token>"For example:
k0s controller "H4sIAAAAAAAC/RH7arpza9eLTdf+Or8+9EP5qxzKtijH9eLf/3n4FP7y/y3yDw5f9l+DTJ0r2/Xi58eyqK7fu24+1+7tfvX8NxScy4f/BgAA//8Hz5HuCwcAAA=="Once the authentication is complete, check the status of the added control node:
# k0s status
Version: v1.30.3+k0s.0
Process ID: 70985
Role: controller
Workloads: true
SingleNode: false
Kube-api probing successful: true
Kube-api probing last error:
As seen from the output, the node has been added with the role controller.
Step 4 – Deploy Applications on k0s
We have to test if the k0s cluster is working properly by deploying an application on it. In this guide, we will deploy Nginx Web Server.
k0s kubectl apply -f - <<EOF
apiVersion: apps/v1
kind: Deployment
metadata:
  name: nginx-server
spec:
  selector:
    matchLabels:
      app: nginx
  replicas: 3
  template:
    metadata:
      labels:
        app: nginx
    spec:
      containers:
      - name: nginx
        image: nginx:latest
        ports:
        - containerPort: 80
EOF
Check the status of the pod:
$ k0s kubectl get pods
NAME READY STATUS RESTARTS AGE
nginx-server-585449566-brzzb 1/1 Running 0 2m49s
nginx-server-585449566-dn5x4 1/1 Running 0 2m49s
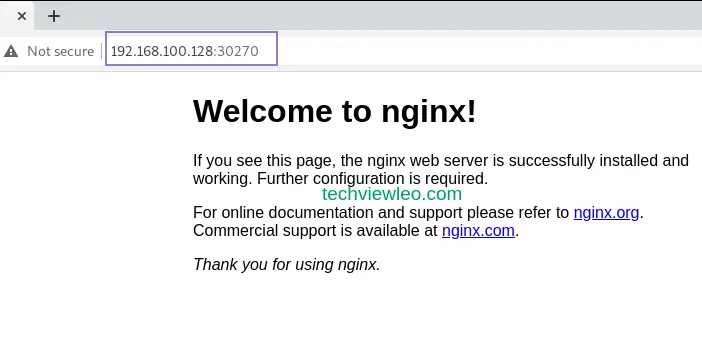
nginx-server-585449566-lrwnf 1/1 Running 0 2m49sFrom the output, we have deployed 3 Nginx pods running, as specified in the configuration file above. Now we need to expose the port on which the pod is running.
$ k0s kubectl expose deployment nginx-server --type=NodePort --port=80
service/nginx-server exposed
Confirm the port that the service has been exposed to:
$ k0s kubectl get svc
NAME           TYPE        CLUSTER-IP     EXTERNAL-IP   PORT(S)        AGE
kubernetes     ClusterIP   10.96.0.1      <none>        443/TCP        27m
nginx-server   NodePort    10.98.121.23   <none>        80:30270/TCP   30s
From the output above, the service is running on port 30270. Let’s access this application using a web browser with the URL http://control_node_IP_Adress:30270
Step 5 – Accessing k0s cluster Remotely
k0s stores its config file at /var/lib/k0s/pki/admin.conf, with this file, it is possible to manage the cluster remotely. We begin by copying the conf file to the user home directory:
sudo cp /var/lib/k0s/pki/admin.conf ~/k0s.confNow from the remote controller node, download the conf file.
scp <username>@<SERVER_IP>:~/k0s.conf .For example, if my remote control node is 192.168.1.51
scp root@192.168.1.51:~/k0s.conf .Then modify the IP in the conf file from localhost to the IP address of the existing control node. Finally, export the config file.
export KUBECONFIG=k0s.confThat is it, you can access and manage your k0s cluster remotely.
Step 6 – Uninstalling k0s Kubernetes Cluster
If you want to remove/uninstall the k0s cluster, follow the steps below.
Stop k0s on all the nodes:
sudo k0s stopThen uninstall the k0s cluster.
sudo k0s resetCongratulations! You have achieved the grail of setting up a Kubernetes cluster on Rocky Linux, and that marks the end of this guide. I hope this was significant.


