
A shell is a Command-Line Interface program that acts as an intermediary between the user and the operating systems in the sense that it parses and sends commands from the user to the operating system, and vise versa. It represents an operating system’s interactive interface and the kernel’s outermost layer. Developers have been able to come up with several major shells compatible with all the Linux distributions, each shell with it’s unique set of features.
There are a number of shells available for Linux and macOS. Some of the most popular shells include bash, fish, zsh, elvish, nushell, powershell, xonsh, and ngs. Bash comes pre-installed as the default shell for most Linux distributions and is well known for it’s wide range of features for editing and scripting.
1. Bash (Bourne-Again Shell)
The acronym “Bash” stands for “Bourne-Again Shell”. It was released in 1979 and became the first ever default shell on Unix systems. Bash is generally fast and perfectly packaged but has some downsides when it comes to features such as logical and arithmetic operations, command history, and autocomplete.
Bash ranks among the top open-source shells available for Linux Systems and comes pre-installed as the default shell in various Linux distributions like Arch Linux, Ubuntu, and several. Additionally, Bash is scriptable and is capable of interpreting and executing instructions from scripts.
Here are some of the key features of the bash shell:
- Tab Completion: Bash provides tab-completion functionality, which makes it easier to navigate the file system and execute commands by pressing the Tab key. It automatically completes commands, file paths, and other inputs.
- History: Command history helps you avoid retyping commands you’ve already executed since you can access them using the Up and Down arrow keys or you search them using the Ctrl+R shortcut.
- Shell Scripting: Bash offers scripting capabilities which is very crucial when ti comes to task automation. It allows you to create scripts that automate tasks and operations by combining commands and control structures.
- Variables: You can define and use variables in Bash to store and manipulate data which is are essential for parameterizing scripts and making them more dynamic.
- Control Structures: Bash supports various control structures like loops (for, while), conditionals (if-else), and case statements which enable the creation of more sophisticated scripts.
- I/O Redirection: You can redirect the input and output of commands using symbols like <, >, >>, and pipes (|). This enables you to control where the input comes from and where the output goes.
Installation on Linux Systems and macOS
Bash is usually pre-installed on almost all the Linux systems if it’s not already installed on your system,you can install it using the following command:
#Debian / Ubuntu Systems
sudo apt update
sudo apt install bash

#RHEL based  Systems
sudo yum install bash

#Arch Systems
sudo pacman -S bash

#FreeBSD Systems
sudo pkg install bash

#macOS
brew install macos
Basic Bash Usage
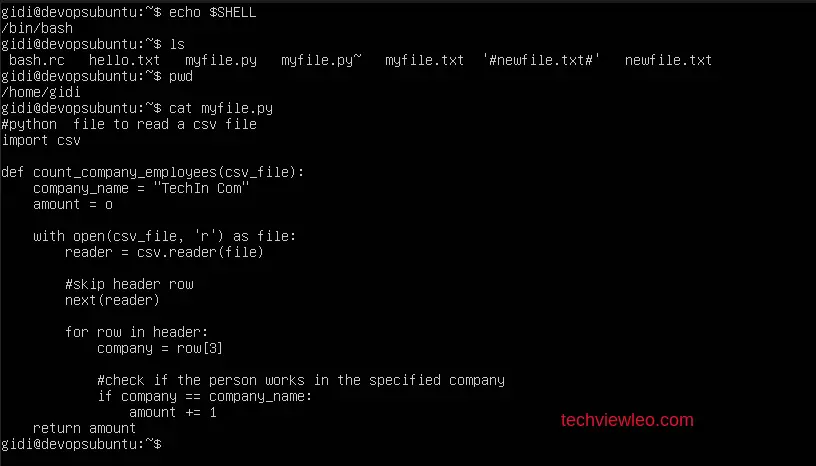
Since bash comes pre-installed in almost every Linux system, you have probably been using it everyday to execute your commands. Let’s take a look at a few commands like ls, pwd, and cat. You can check which shell you are running using the following command: echo $SHELL
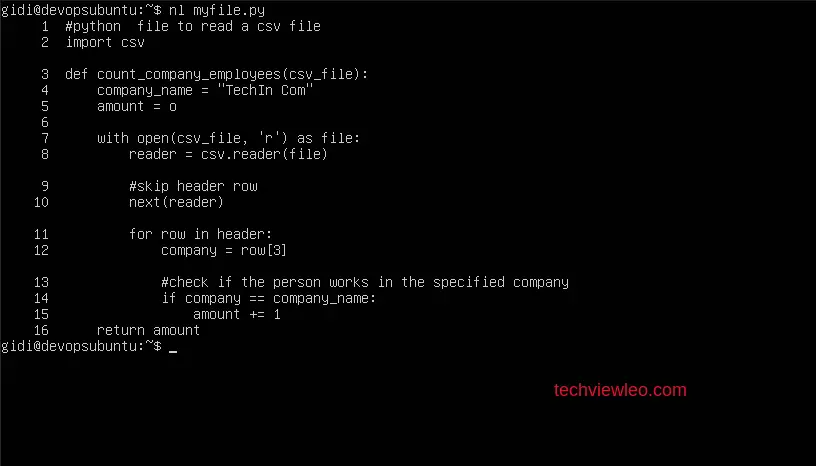
The nl <filename> command is used to display th contents of a file with line numbers:
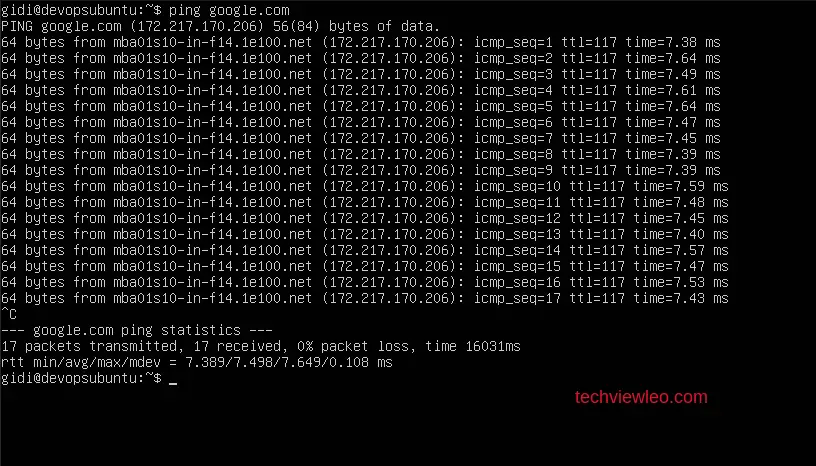
To test your network connectivity, you can ping a host using the ping command:
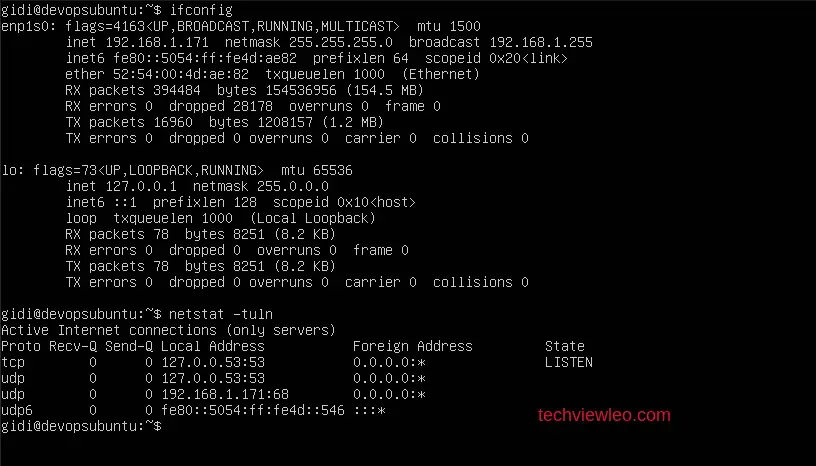
The ifconfig and netstat commands are both networking commands used to display network interfaces and open network ports:
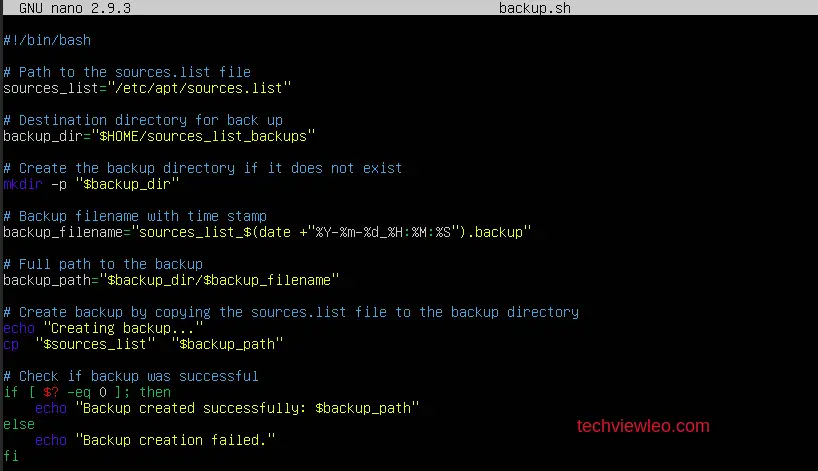
For scripting in bash, let’s use and example of a bash script that automates the process of creating a backup of a directory and compressing it. Here’s an example of a bash script that creates a backup of the sources.list file into the user’s home directory:
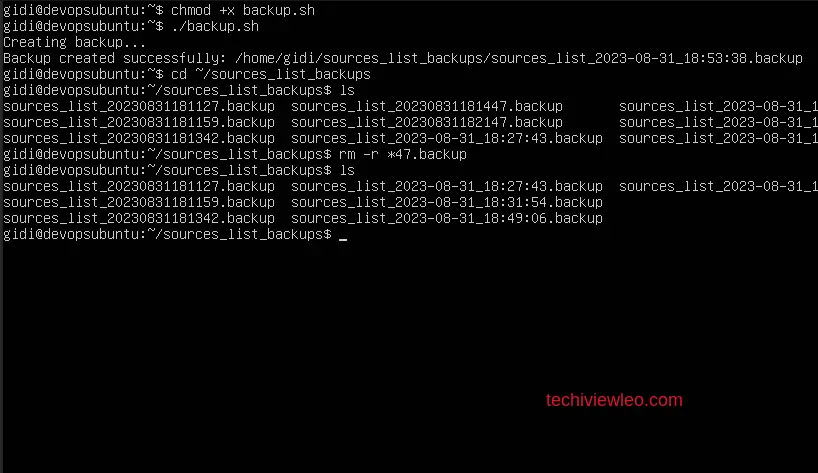
We make the script executable using the chmod command and run the script:
2. Fish (Friendly Interactive Shell)
The Fish shell, short for “Friendly Interactive Shell,” is a modern, user-friendly command-line interface for Unix-Systems. Fish, focuses on improving the command-line experience by offering a wide range of features and intuitive syntax to suit it’s user-friendly nature.
Here are some key features of Fish:
- Friendly UI: Fish is designed to be user-friendly and approachable, which makes it a great choice for both beginners and experienced users. It offers syntax highlighting, auto-suggestions, and friendly error messages.
- Syntax Highlighting: One of the standout features of Fish is its syntax highlighting. It highlights commands, arguments, variables, and other elements as you type, making it easier to visually distinguish different parts of the command. This feature enhances readability and helps prevent syntax errors.
- Auto-Suggestions: Fish provides auto-suggestions based on your command history and the commands you’re currently typing. This speeds up command entry and reduces the chances of typos.
- Smart Tab Completion: Fish understands the context of the command you’re typing and offers relevant completions, including options, files, and more. This can save you time and effort when navigating the file system and running commands.
Installation on Linux Systems and macOS
#Debian / Ubuntu Systems
sudo apt update && sudo apt get install fish

#RHEL based Systems
sudo yum install fish

#Arch Systems
sudo pacman -S fish

#FreeBSD Systems
sudo pkg install fish

#macOS
brew install fish
Configuration and Usage
Using fish is pretty exciting and simple. Fish has a totally different perspective when it comes to user interaction, it maximizes the ability to capture the user’s attention due to it’s appealing appearance.
Execute the fish command to start the fish shell:
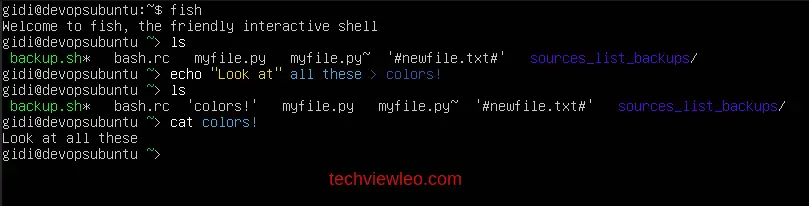
Fish also uses universal variables which can be used to store data for your session. After declaring a variable, you can call it whenever you want during your session:
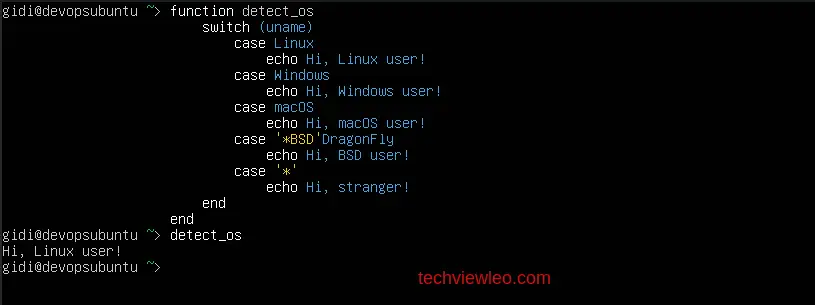
You can also work with functions in fish, since they are very straightforward. As you can see, commands, arguments, and options are color-coded to improve readability. Fish supports 24-bit true color, the state of the art in terminal technology.
When scripting in fish,we write scripts with a .fish extension using any editor.
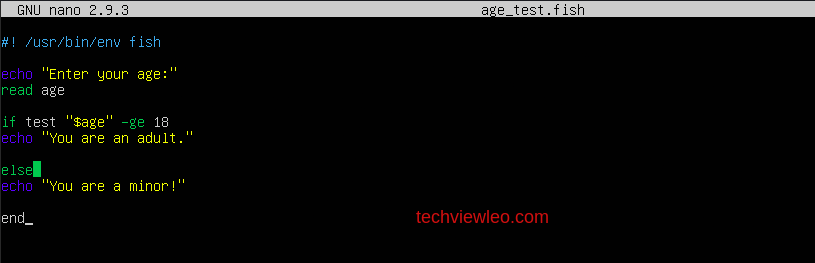
To run a script of any kind of shell, you have to make it executable first using the chmod +x command and then run it after:

If you’d prefer to make fish your default terminal, you can do so by editing the ~/.bashrc configuration file. Open the configuration file and add the following line to the end of the file:
chsh -s /usr/bin/fishSave the file and restart your shell to apply the changes.
3. Zsh Shell
Zsh, short for “Z Shell,” is a powerful command-line shell packed with features. Zsh serves as an enhanced alternative to the standard Bourne shell (sh) and Bourne-Again Shell (Bash). Zsh is designed for both interactive use and scripting, and it offers numerous advanced features that aim to improve the user experience and productivity.
Lets’s have a look at some features:
- Advanced Tab Completion: Zsh’s tab completion is highly advanced. It can complete not only commands and filenames but also options, variables, and more. The completions are context-aware and can be extended through plugins.
- Prompt Customization: Zsh also provides extensive options for customizing your shell prompt. It allows you to configure its appearance, by including information like current directory, time and even use third-party themes.
- Powerful Scripting Language: Zsh offers an advanced scripting language with features like associative arrays, regular expressions, and more, making it suitable for complex automation tasks.
- Bash Compatibility: Zsh provides excellent compatibility with Bash, making it relatively easy to transition from Bash to Zsh while retaining familiarity with existing scripts and workflows.
- Documentation: Zsh comes with comprehensive documentation that covers its features, configuration options, and usage. The documentation helps users take full advantage of the shell’s capabilities.
Installation on Linux Systems
#Debian / Ubuntu
sudo apt update && sudo apt install zsh

#RHEL based Systems
sudo yum install zsh

#Arch Systems
sudo pacman -S zsh

#FreeBSD Systems
sudo pkg install zsh

#macOS Systems
brew install zsh
Configuration and Usage
When you run Zsh for the first time, you will be prompted with a configuration menu with a couple options to choose if you’d like to continue and configure a few settings:
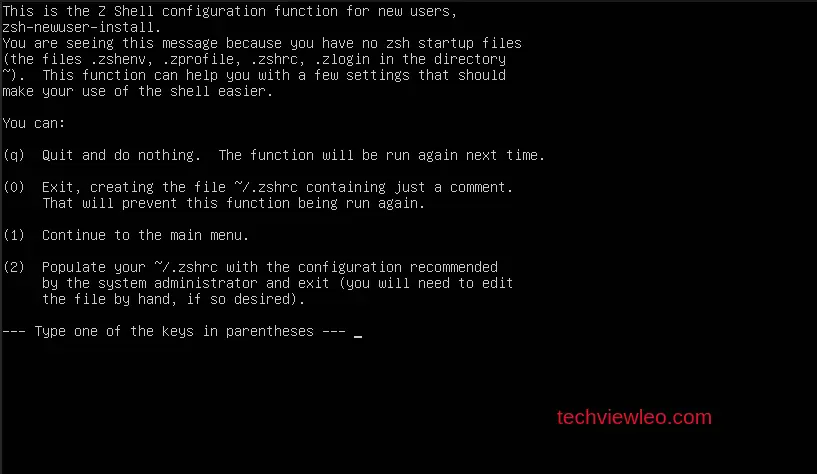
You can continue to the main menu and do the aided configurations using option (1) or create a ~/.zshrc file that you’ll edit to achieve your desired configurations:
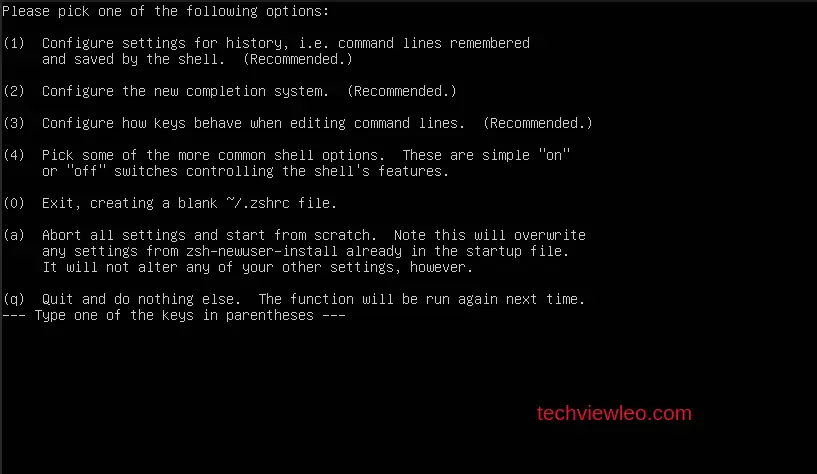
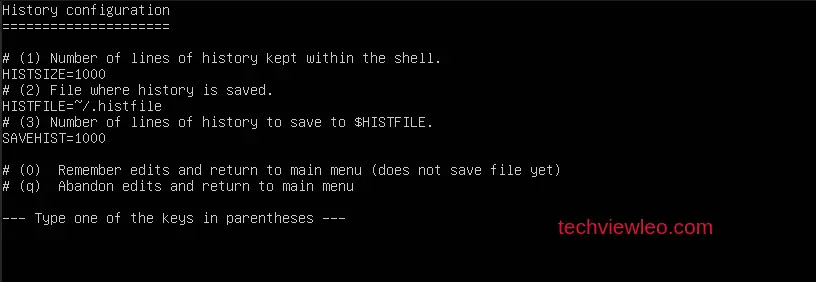
From the configurations menu, you can configure each of the recommended settings or just 1, or even neither and let the default configurations be set. For example, you can configure the history settings ans the default editing settings.
The history configurations:
The default editing configurations:

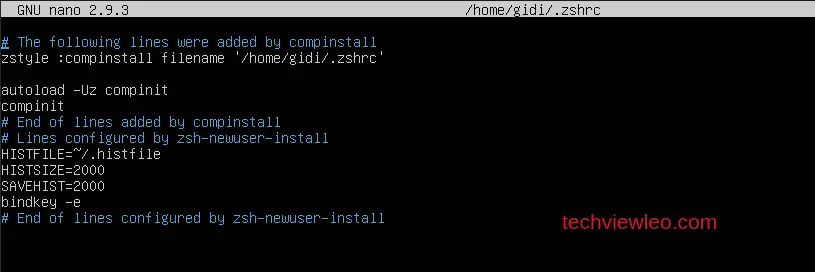
All the configurations performed are saved in the ~/.zshrc file and you can edit them anytime using an editor of your choice:
Now, the shell is ready for you! Go ahead and start using it:
4. Elvish Shell
Elvish is a new and innovative shell designed to provide a more user-friendly and extensible command-line experience. It’s different from traditional shells like Bash, Zsh, or Fish due to its unique features and design philosophy.
Elvish aims to improve the command-line interface by offering a clean and consistent syntax, powerful scripting capabilities, and a focus on interactive use. It was mainly developed for the purpose of addressing some of the major limitations and complexities encountered with traditional shells.
Key features of Elvish shell:
- Powerful Pipelines: Elvish offers powerful pipeline capabilities which can transport structured data. You can flow arrays, dictionaries, and even functions seamlessly through the pipeline.
- User-friendly Control Structures: Elvish offers control structures with a C-like syntax which reduces the need to remember different commands or options for different utilities such as reversing the spelling of “if”, which is common in most shells.
- Directory History: Elvish offers a feature called “directory history” which allows you to instantly navigate to any previously visited directory by pressing CTRL -L .
- Data as Interface: Elvish treats data as the primary interface. This means that the output of one command can be directly used as input for another, without the need for complex parsing and manipulation.
- Scriptable UI: Elvish introduces the concept of scriptable user interfaces, allowing you to build custom UI elements directly in the terminal. This is particularly useful for creating interactive scripts and tools.
- Structured Data Processing: Elvish utilizes structured data processing, making it easier to work with structured data formats like JSON, YAML, and more. This can simplify tasks such as parsing and extracting information from data.
- Built-in File Manager: Press Ctrl-N to explore directories and preview files, with the full power of a shell still under your fingertips.
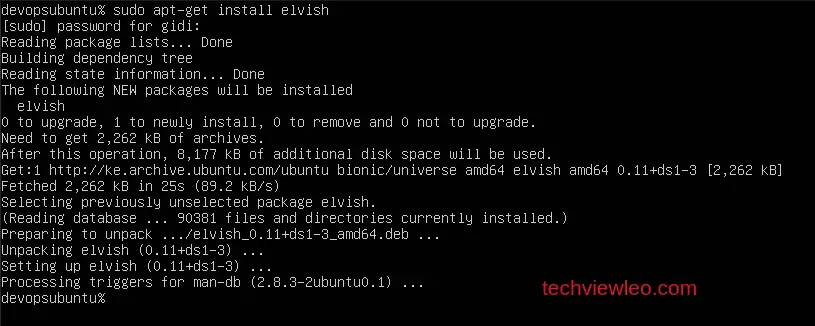
Installation on Linux Systems and macOS
#Debian / Ubuntu Systems
sudo apt update
sudo apt install elvish

#RHEL based Systems
sudo yum install elvish

#Arch Systems
sudo pacman -S elvish

#FreeBSD Systems
sudo pkg install elvish

#macOS Systems
brew install elvish
Configuration and Usage
Elvish is majorly a programming language shell, so let’s take a look at the fundamentals of shell programming such as using Elvish such as declaring variables and calling them:
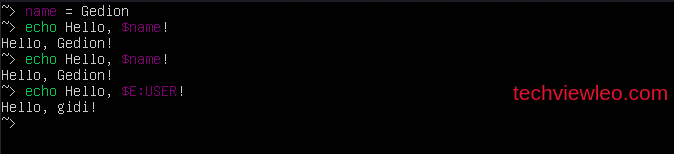
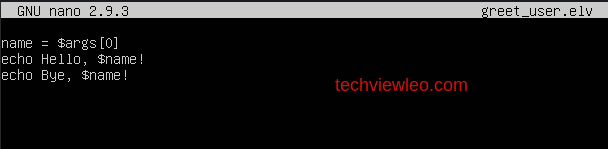
You can create a script that declares $args as a list, which can be retrieved using $args[0], $args[1], etc:
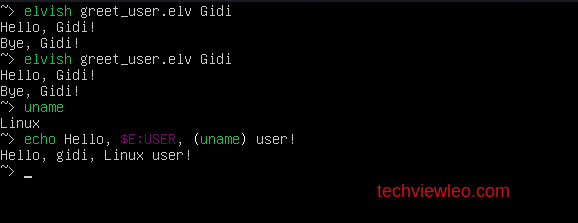
Then execute the script with the elvish command and pass the $name as an argument. Also, you can use the environmental variable $E:USER to display the name of the current user:
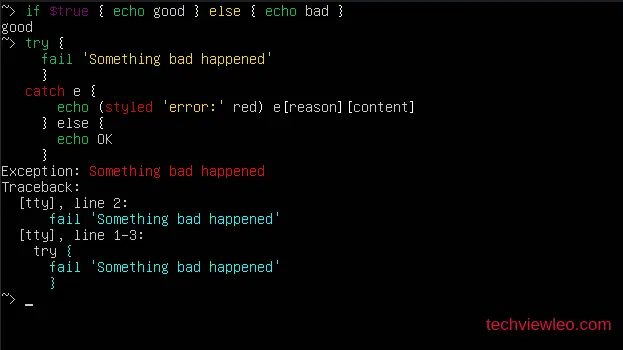
Control structures in Elvish have a familiar C-like syntax. You ca code from the shell as if you were coding from your favorite C-language editor:
Elvish offers first-class support for data structures such as lists and maps. Here is an example that uses a list:

In Elvish, you can store lists in variables and use them as command arguments. But wouldn’t it be much more effective if you could return them from a function? Well, you can do that by echoing and using output capture to recover it:
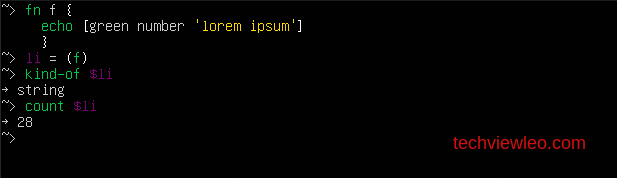
The echo command in Elvish, like in other shells, is string-oriented, hence it converts the list first into a string before echoing it. That is why it returns the wrong number of elements. To correct this, Elvish provides the put command, which outputs structured values as they are:

Pipelines in Elvish have two parts, and one of them is the value-oriented part. Data structures can flow in the value-oriented part of the pipeline. For instance, the each command takes input from the value-oriented channel, and apply a function to each value.
You can configure the ~/.bashrc configuration file to enable elvish run as your default shell every time you boot up your system. To do so, open the ~/.bashrc file with any editor of your choice and add the following line to the end of the script:
#Make elvish the default shell
chsh -s /usr/bin/elvish
Save the file and exit then restart your shell to apply the changes:
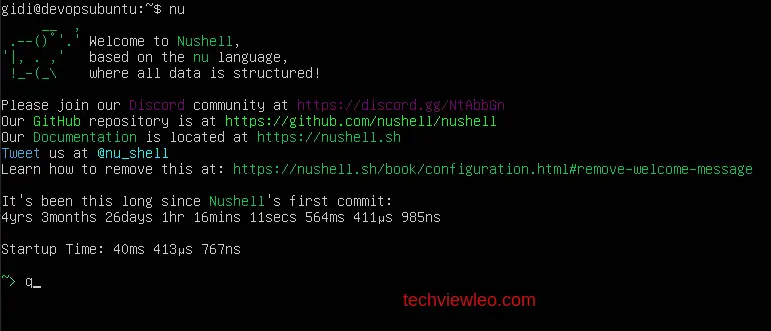
5. Nushell
Nushell, often referred to as “Nu,” is a modern command-line shell designed to focus on data manipulation, structured data processing, and a more user-friendly syntax. Nushell aims to integrate the power of programming languages, which eases the process of working with data in the command line.
Nushell is quite different from other CLI shells, mainly because it’s main focus drifts away from that of the common shells. It is typically a new addition to the world of command line shells. It treats data as “structured data” meaning that the data is organized and formatted in a way that allows for easy access and manipulation.
Here are some key features of Nushell:
- Structured Data Handling: Nushell treats data as tables of structured information, similar to a database table or a spreadsheet which allows you to work with data in an organized manner.
- Pipeline-Oriented: Like other shells, Nushell allows you to chain together commands using pipelines. However, in Nushell, pipelines are more tightly integrated with structured data, making it easier to transform and manipulate data as it flows through the pipeline.
- User-Friendly Syntax: Nushell aims to have a more user-friendly syntax that’s easy to adapt and use. It often uses commands and keywords that are similar to english words, which can be particularly helpful for newcomers.
- Context Awareness: Nushell maintains a contextual understanding of your data, which means that you can reference and manipulate data in a more natural way without having to write complex code.
- Scripting: While Nushell is oriented towards interactive use, it also supports scripting. You can write and save scripts to automate repetitive tasks involving data.
Installation
#Linux
/bin/bash -c "$(curl -fsSL https://raw.githubusercontent.com/Homebrew/install/HEAD/install.sh)"
(echo; echo 'eval "$(/home/linuxbrew/.linuxbrew/bin/brew shellenv)"') >> /home/$USER/.profile
eval "$(/home/linuxbrew/.linuxbrew/bin/brew shellenv)"

#install Homebrew on Your macOS
/bin/bash -c "$(curl -fsSL https://raw.githubusercontent.com/Homebrew/install/HEAD/install.sh)"

#install nushell using homebrew
brew install nushell

#Install using rust and cargo
#install rust using 'rustup' tool
curl  --proto '=https' --tlsv1.2 -sSf https://sh.rustup.rs | sh

#install required dependencies
sudo apt update
sudo apt install cmake libssl-dev pkg-config

#install nushell using cargo
cargo install nushell
Configuration and Usage
After installation, you can start NuShell by running nu in your terminal:
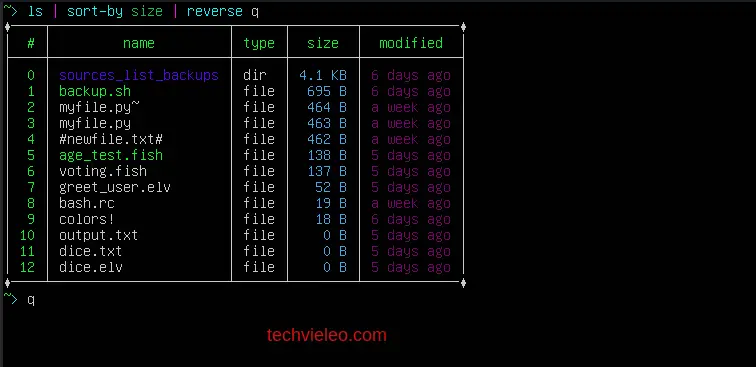
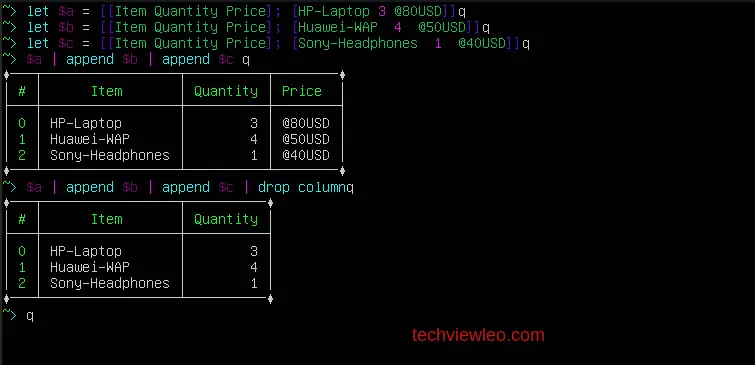
The first thing you’ll notice when you run a command like ls is that instead of a block of text coming back, you get a structured table.
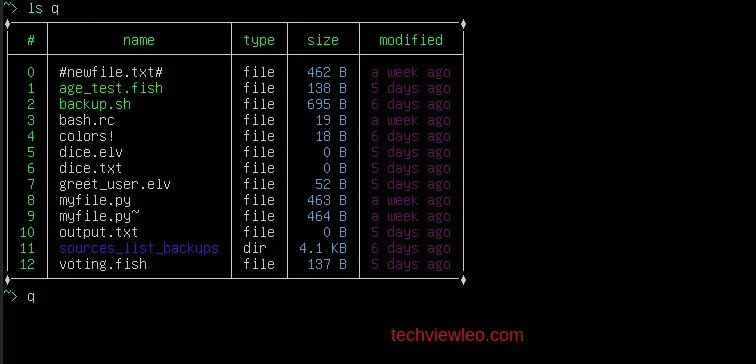
The table goes beyond simply presenting the directory in an alternative format. Similar to spreadsheet tables, this table enables us to engage with the data in a more interactive manner. The first thing we’ll do is to sort our table by size by taking the output from ls and feed it into a command that can sort tables based on the contents of a column.
Since Nushell focused more on data manipulation, it offers a lot of ways to handle data and treats them as structured data.
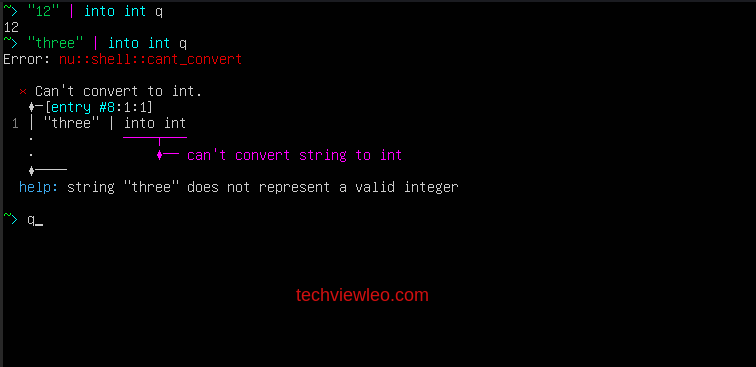
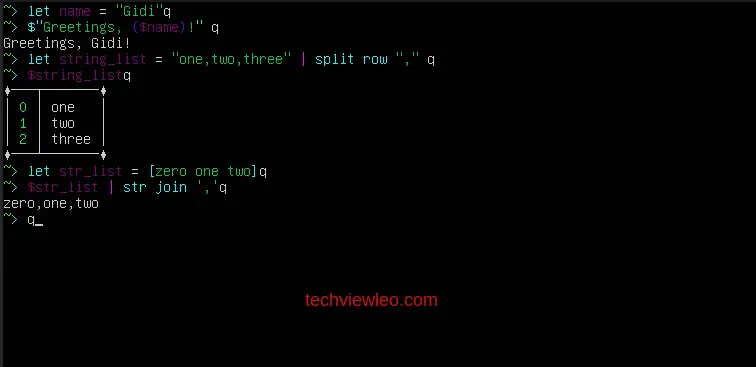
You can also work with strings in Nushell just as you would in a python programming environment. We can declare a string variable and call it whenever we wan to access it. Strings can also be split and joined using a specified delimiter and saved to a variable to be accessed later:
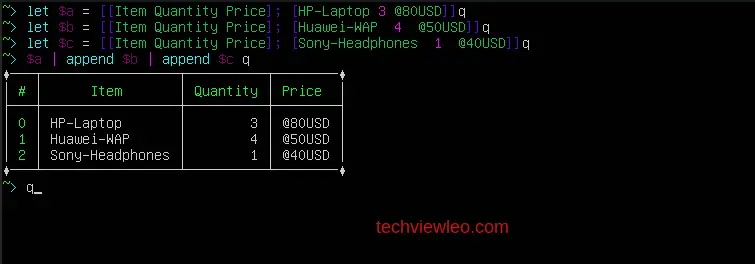
You might be wondering whether you can create tables from scratch in Nushell, and the answer is yes, it’s pretty amazing actually, it’s like working with database tables.
You can also delete the last column using the drop column command:
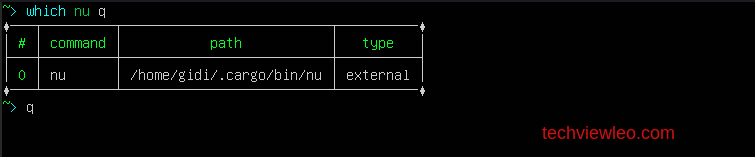
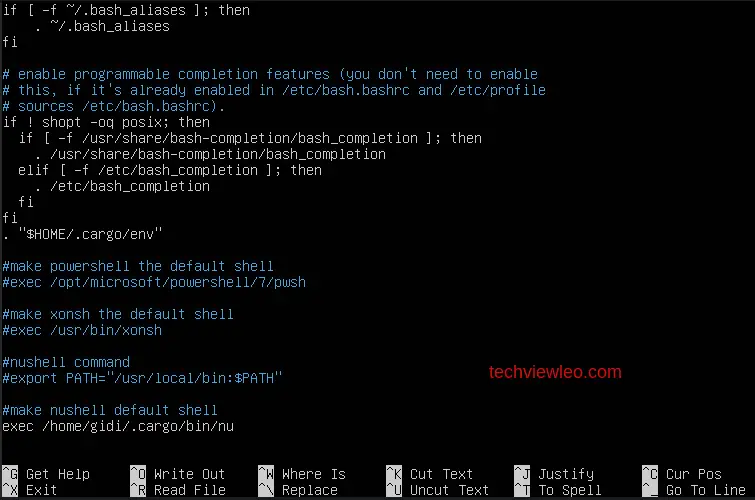
As I wrap up, lemme just guide you on how you can make Nushell your default shell. To achieve this, execute the which nu command to display the path that nu executable is located.
Once you’ve done that, open the ~/.bashrc configuration file and add the following line to the end of the file:
#Make nushell your default shell
chsh -s /home/gidi/.cargo/bin/nu
Save the file and restart your shell to apply the changes:
6. Powershell
PowerShell is a command line shell and at the same time a scripting language developed by Microsoft for managing and automating tasks in Windows systems. It is designed to provide a powerful, object-oriented way to interact with various system components and services. PowerShell is particularly known for its flexibility, robustness, and extensive automation capabilities.
Here are some key features of Powershell:
- Object-Oriented: PowerShell treats data as objects, meaning that command output can be manipulated using object properties and methods, making data manipulation more intuitive and powerful.
- Remoting: PowerShell Remoting allows you to execute commands on remote computers, which is particularly useful for managing multiple systems without needing to physically access each one.
- Automated Tasks: PowerShell excels at automating tasks such as system configuration, software deployment, user management, and data processing. This reduces manual effort and ensures consistency.
- Integration with .NET Framework: PowerShell can utilize the wide range of capabilities of the .NET Framework, allowing you to access and interact with .NET classes and libraries.
- Integrated Scripting Environment (ISE): The PowerShell ISE is a graphical interface designed for script development and debugging. It includes features like syntax highlighting, debugging tools, and a built-in console.
Installation on Linux
Use the following commands to install Powershell.
1. Debian / Ubuntu
# Update the list of packages
sudo apt update

# Install pre-requisite packages.
sudo apt install -y wget apt-transport-https software-properties-common

# Download the Microsoft repository GPG keys
wget -q "https://packages.microsoft.com/config/ubuntu/$(lsb_release -rs)/packages-microsoft-prod.deb"

# Register the Microsoft repository GPG keys
sudo dpkg -i packages-microsoft-prod.deb

# Delete the the Microsoft repository GPG keys file
rm packages-microsoft-prod.deb

# Update the list of packages after we added packages.microsoft.com
sudo apt update

# Install PowerShell
sudo apt install -y powershell

# Start PowerShell
pwsh
2. RHEL based Systems
CentOS
# Register the Microsoft RedHat repository
curl https://packages.microsoft.com/config/rhel/7/prod.repo | sudo tee /etc/yum.repos.d/microsoft.repo

# Install PowerShell
sudo yum install --assumeyes powershell

# Start PowerShell
pwsh
Fedora Linux
# Register the Microsoft RedHat repository
curl https://packages.microsoft.com/config/rhel/8/prod.repo | sudo tee /etc/yum.repos.d/microsoft.repo

# Install PowerShell
sudo dnf install --assumeyes powershell

# Start PowerShell
pwsh
3. Arch Linux
You can use pacman or yay:
sudo pacman -S powershell
# OR
yay -S powershell
Or install with snap package:
#Install and configure snapd
yay -S snapd

#enable the snapd socket
sudo systemctl enable --now snapd.socket

#install powershell using snap
sudo snap install powershell --classic

#reboot system
sudo reboot
4. Alpine Linux
# install the requirements
sudo apk add --no-cache \
    ca-certificates \
    less \
    ncurses-terminfo-base \
    krb5-libs \
    libgcc \
    libintl \
    libssl1.1 \
    libstdc++ \
    tzdata \
    userspace-rcu \
    zlib \
    icu-libs \
    curl

sudo apk -X https://dl-cdn.alpinelinux.org/alpine/edge/main add --no-cache \
    lttng-ust

# Download the powershell '.tar.gz' archive
VER=$(curl -s https://api.github.com/repos/PowerShell/PowerShell/releases/latest|grep tag_name|cut -d '"' -f 4|sed 's/v//')
curl -L https://github.com/PowerShell/PowerShell/releases/download/v${VER}/powershell-${VER}-linux-alpine-x64.tar.gz -o /tmp/powershell.tar.gz

# Create the target folder where powershell will be placed
sudo mkdir -p /opt/microsoft/powershell/7

# Expand powershell to the target folder
sudo tar zxf /tmp/powershell.tar.gz -C /opt/microsoft/powershell/7

# Set execute permissions
sudo chmod +x /opt/microsoft/powershell/7/pwsh

# Create the symbolic link that points to pwsh
sudo ln -s /opt/microsoft/powershell/7/pwsh /usr/bin/pwsh

# Start PowerShell
pwsh
5. macOS
brew install --cask powershell
/bin/bash -c "$(curl -fsSL https://raw.githubusercontent.com/Homebrew/install/HEAD/install.sh)"
pwsh
Configuration and Usage
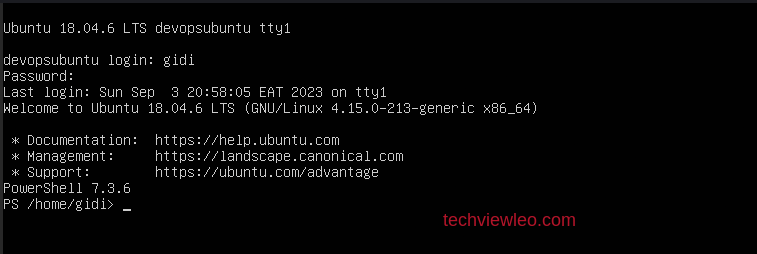
To start Powershell, simply run pwsh and you’ll be dropped into the poershell interactive console. Being a cross-platform scripting language, PowerShell on Linux supports all of the commonly known commands from CMD and Linux’s command line shell such as sudo apt update.
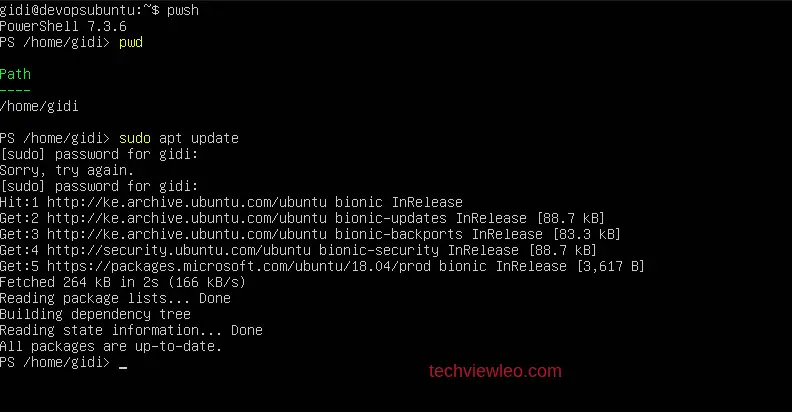
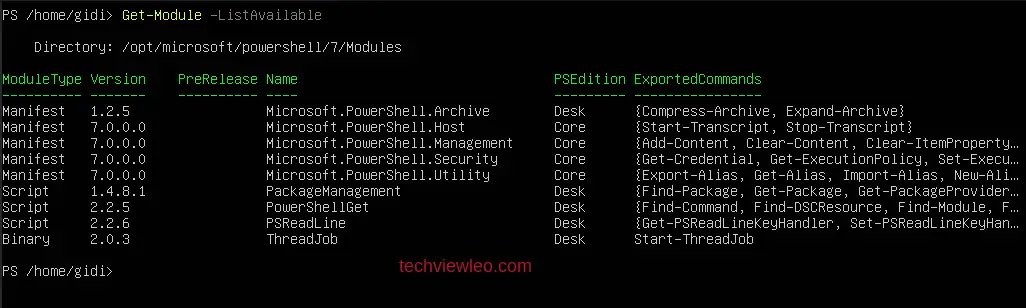
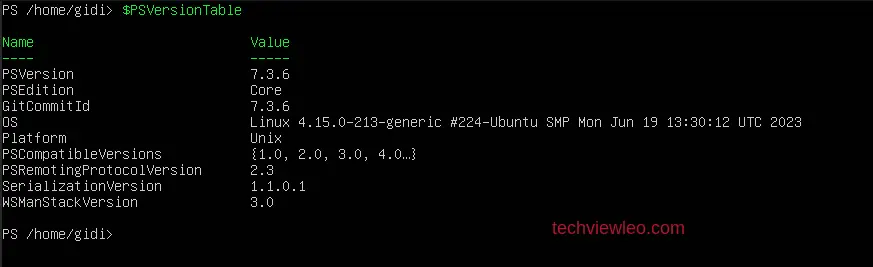
While you’re at it, check what version of PowerShell is installed using $PSVersionTable. You should see that the PSEdition shows as Core and Platform is Unix.
By default, PowerShell on Linux, like Windows, installs various modules. Find all of those modules by running the Get-Module command, as shown below. The ListAvailable parameter tells Get-Module to return all modules on the filesystem:

In Powershell, you can also change the current directory using the Set-Location command. The syntax is as easy as you would expect — just provide the desired path to the directory you’d like to change to.
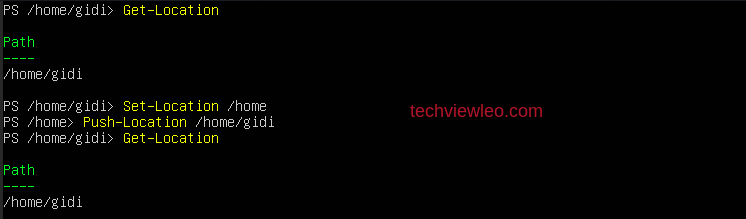
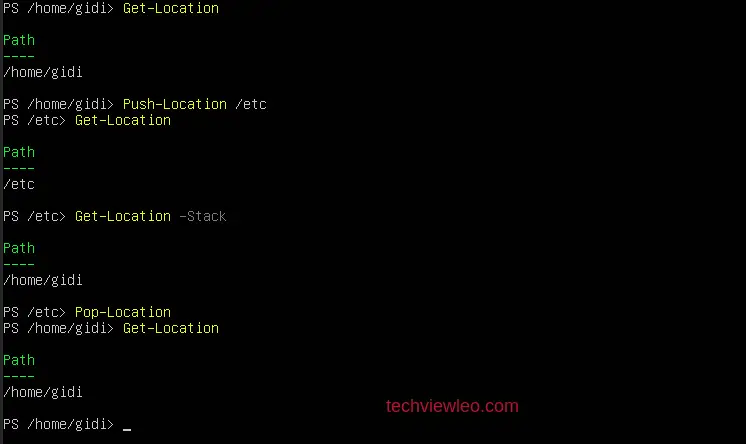
While you can use cd and Set-Location to change directory, you can also use Push-Location and Pop-Location to do the same task. The difference comes in when you use them to exploit their ability to support named stacks.
When using these commands without any parameters, they behave exactly as you would expect. Push-Location saves the current directory to a stack and changes it to whatever you typed in. Pop-Location does the exact opposite: it changes your current directory to whatever is on the top of your saved stack and removes that entry.
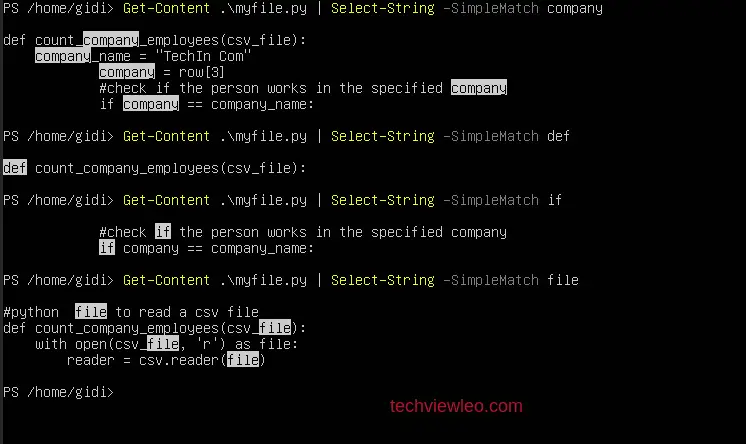
Displaying file contents can be done using the cat command but while using Powershell, you have an alternative, which is the Get-Contents command, and as suggested by the name, it exactly that.

When finding patterns in text while using Powershell, you can use the Select-String command, which is a direct replacement of the grep command you’d normally use in your bash shell.
That’s it for the Powershell.
If you’d like to change your default shell to PowerShell, you need to modify your user’s shell setting. This is typically done in the user’s home directory by editing the ~/.bashrc (for the Bash shell).
Before you open the .bashrc file, you need to know the path to your Powershell executable because you’ll need it when editing the configuration file. You can use the which pwsh command to find the path to your Powershell executable.

Now open the configuration file using the command nano ~/.bashrc and add the following line at the end of the file and save it.
#make Powershell the default shell
chsh -s /opt/microsoft/powershell/7/pwsh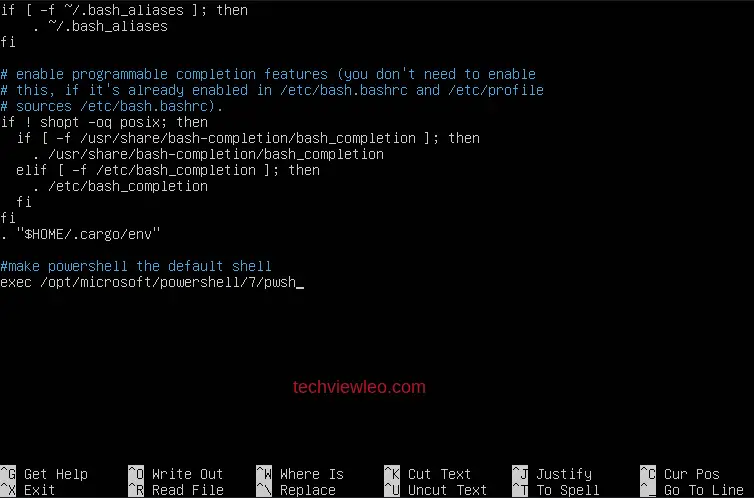
Now log out and login again to apply the changes. Powershell will run as your default shell when you start up your system.
7. Xonsh Shell
Xonsh is a unique shell that combines the capabilities of traditional command-line shells and integrates it with the power and flexibility of the Python programming language. It is designed to provide an interactive and scriptable environment for both system administration tasks and data manipulation using python. Xonsh is not just a shell, it’s a shell and a scripting language combined, allowing users to easily transition between writing scripts and interacting with the shell.
Key features:
- Python Integration: Xonsh is built on Python, making it easy for those familiar with Python to work within the shell environment since Python code can be directly executed in the shell, and Python libraries can also be imported.
- Scripting Capabilities: Scripting is also a main feature in Xonsh, just as it is in all the other shells.With Xonsh, you can write scripts with conditional statements, loops, and functions using Xonsh’s syntax, which closely resembles Python.
- Interactive Environment: Xonsh provides an interactive shell environment with features like tab completion, history navigation, and syntax highlighting, making it convenient for executing commands and exploring the file system.
- Command Aliases: Similar to other shells, Xonsh allows you to define aliases for frequently used commands or command sequences, saving you from repetitive typing.
Installation on Linux Systems
#Debian/Ubuntu Systems
sudo apt-get install xonsh

#Arch Linux Systems
sudo pacman -S xonsh

#RHEL Systems
sudo yum install xonsh
sudo dnf install xonsh

#macOS Systems
brew install xonsh
Configuration and Usage
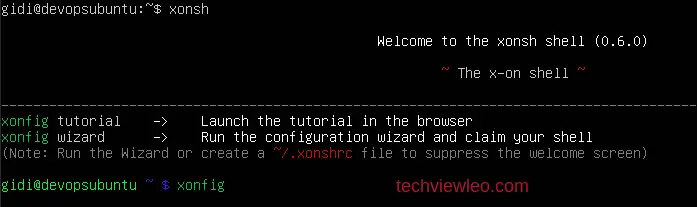
You can start up the Xonsh interpreter via the xonsh command.
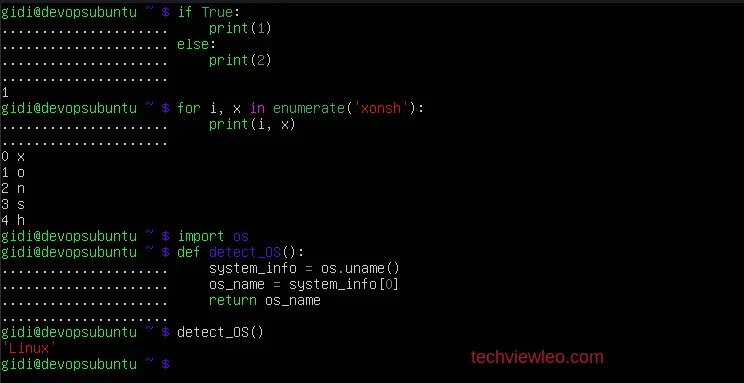
Since Xonsh is just Python, we are able to import modules, print values, and use other built-in Python functionality:

We can also create and use literal data types, such as ints, floats, lists, sets, and dictionaries. Everything that you are used to if you already know Python is there.
The Xonsh shell provides support for handling multi-line input, which is particularly useful for complex flow control. This mode is triggered automatically whenever the initial input line lacks proper syntax. To exit multi-line mode, you simply need to press the enter (or return) key when the cursor is positioned at the beginning of a line:
Environment variables are written as $ followed by a name. For example, $HOME, $PWD, and $PATH. You can set (and export) environment variables like you would set any other variable in Python. The same is true for deleting them too:
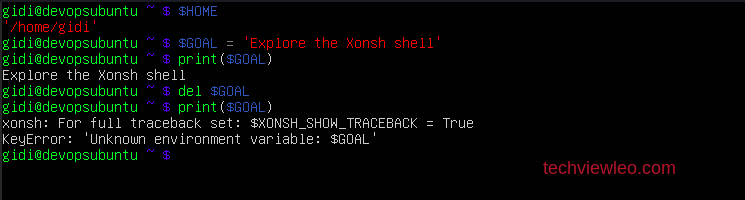
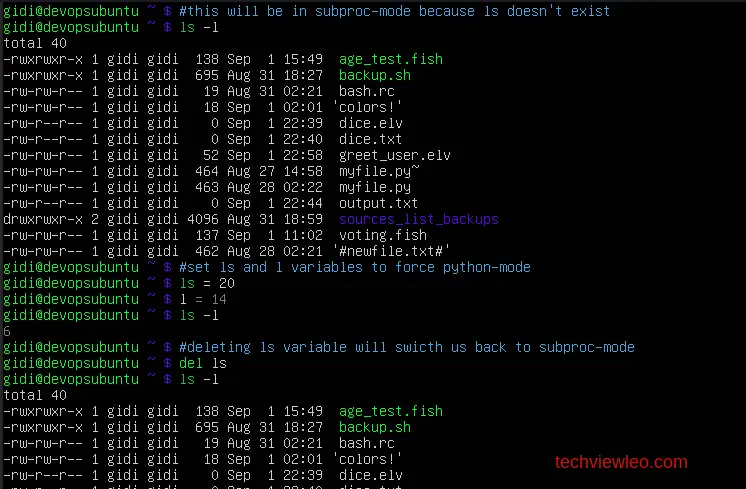
The Xonsh has got two major modes which are; the Python-mode and the Sub-processor-mode. At times it is crucial to make the distinction between lines that operate in pure Python mode and lines that use shell-specific syntax, edit the execution environment, and run commands.
Unfortunately, it’s not necessarily evident solely from the syntax which mode is intended. This can happen because many command-line tools closely resemble Python operators.
Xonsh addresses this issue using the following rule: For any given line that only contains an expression statement if all the names cannot be found as current variables Xonsh will try to parse the line as a sub-process command instead.
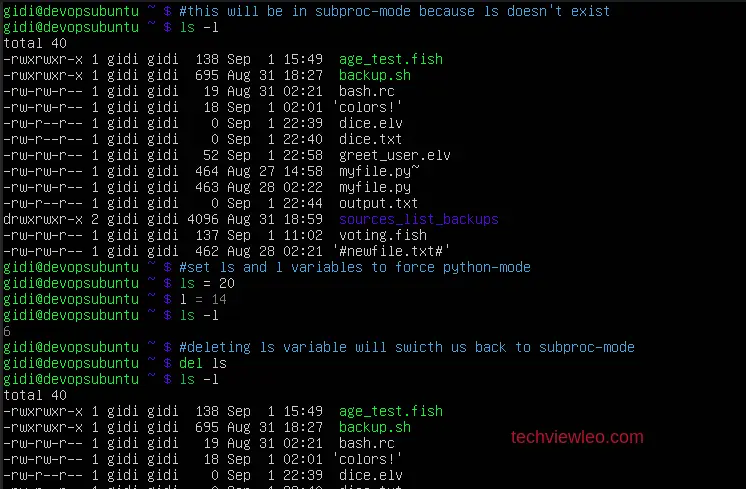
The decision to choose between Python mode and sub-process mode is always made in the most cautious manner. If any issues arise, it will prioritize Python mode.
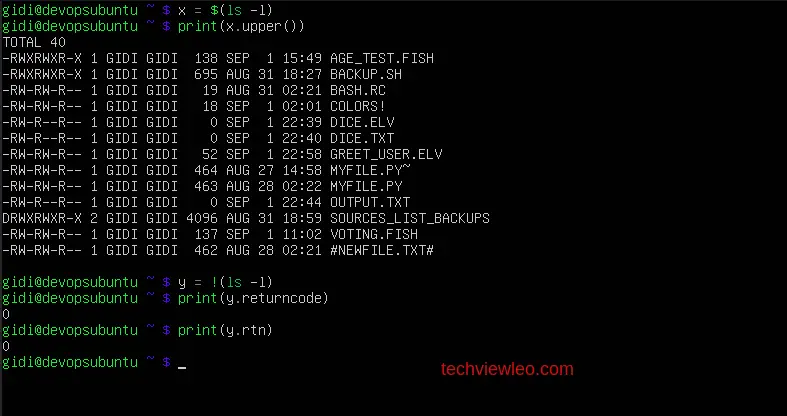
The $() and !() operators are expressions themselves. This means that we can assign the results to a variable or perform any other manipulations we want.
In IPython, xonsh enables you to examine objects using question marks. A lone question mark (?) is employed to exhibit standard help information, while a pair of question marks (??) is employed to reveal a more comprehensive level of assistance known as “superhelp.”
That’s it folks, there is a lot more you can do with xonsh, especially when it comes to Python privileges. I just gave you a hint of what you can do, for further usage of Xonsh, please visit Xonsh tutorial.
If you find that Xonsh shell is the one for you, then am going to show you how to make it your default shell. First, ensure that you know the path to the xonsh shell executable and add the following code to the ~/.bashrc configuration file.
#Make xonsh the default shell
chsh -s /usr/bin/xonsh 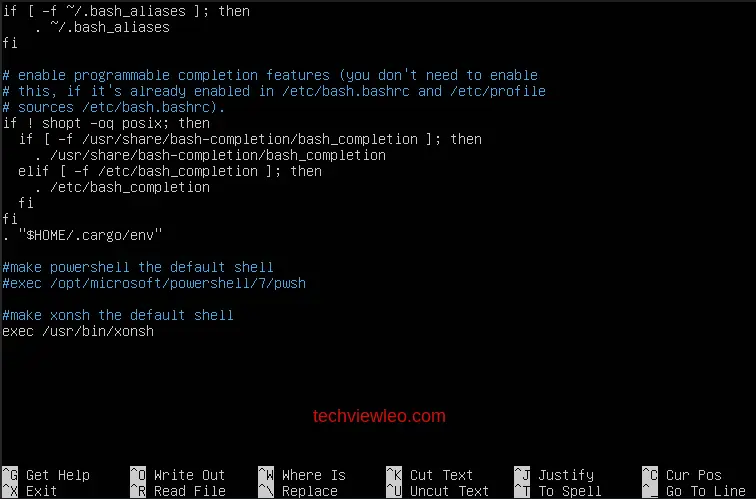
Save the file and restart your system to apply the changes.
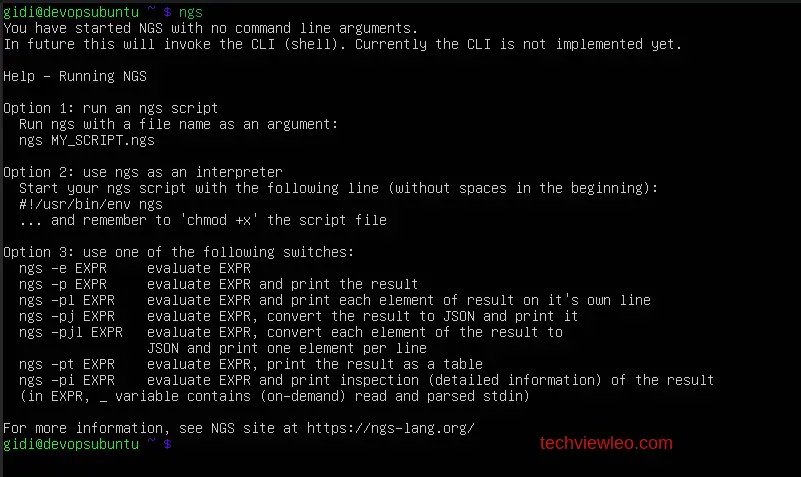
8. Ngs Shell
The NGS (Next Generation Shell) is an interesting and different command-line shell designed to smoothen data manipulation and analysis workflows. It introduces a more modern approach to interacting with data, with it’s data-focused features.
The NGS shell was created to address the growing need for efficient data processing directly within the command-line interface. Traditional shells often require external tools or complex scripts to handle data manipulation tasks, which can be time-consuming and error-prone. NGS takes a different approach by integrating data-processing capabilities directly into the shell, making it a powerful tool for data engineers, analysts, and researchers.
Key features:
- SQL-Like Syntax: NGS offers an intuitive and SQL-like syntax for querying and manipulating data. This makes it easier for users familiar with SQL to transition to NGS.
- Integrated Functions: NGS comes with a wide range of built-in functions optimized for data operations which allow you to perform calculations, conversions, and transformations directly on the data.
- Pipeable Commands: NGS supports a pipeline-oriented approach, where you can combine commands to build complex data-processing workflows and encourage a more efficient way of working with data.
- Scripting Capabilities: While NGS excels in interactive data analysis, it also supports scripting. You can write NGS scripts to automate repetitive data tasks and create reusable data-processing workflows.
Installation on Linux Systems
Make sure curl is installed on your system:
curl https://ngs-lang.org/install.sh | bash

# Using brew
brew install ngs

#you can aslo use snapd
sudo snap install ngs
Installation on macOS Systems
Make sure that brew is installed:
brew install ngsConfiguration and Usage
NGS shell project is an experimental shell environment designed to provide a new command-line interface (CLI) experience. However, it’s important to note that NGS it is still in its early stages of development at this time, and its features and capabilities may not have evolved or changed.
Concluding
In conclusion, exploring alternative shells for Linux can be an exciting experience for both veteran command-line users and those new to the world of shells. While the default Bash shell is powerful and widely used, it’s not the only option available. Each alternative shell we’ve discussed in this article offers unique features and capabilities, with each shell addressing different user preferences and requirements.
Remember that exploring different shells can be a fun and educational experience, and you’re not limited to using just one. Many Linux users find themselves switching between shells based on the task at hand.


3 thoughts on “8 Best Shells To Use on Your Linux / macOS”
There are wrong command to install powershell on Arch Linux. It shall be pacman -S or using yay/paru.
Snapd is default in Ubuntu.
Thank you!
Your method to switch user shell is wrong. You shouldn’t “exec” a shell from `~/.bashrc` file. Use `chsh -s `
For example `chsh /bin/zsh`
This will change the `/etc/passwd` file and set the default shell to the user.