
All Linux systems are designed to be Command-Line Interface (CLI) driven. If you’re new to Linux system, CLI is a text-based interface that is responsible for connecting a user with the Operating System internal components such kernel. With it you can navigate OS file system and interact with files and directories. The CLI operates in response to commands and among them, is the cd (Change Directory) command which is one of the most frequently used. With the cd command you can switch between directories effortlessly. However, as a Linux user, you probably know that there is more than one way to switch between directories without necessarily using the cd command.
Best cd alternative commands for Linux users
In this guide, we explore some of the best cd alternative commands available for Linux users. These commands may or may not provide added functionality, but you’d definitely want to explore them and see for yourself.
1. Zoxide
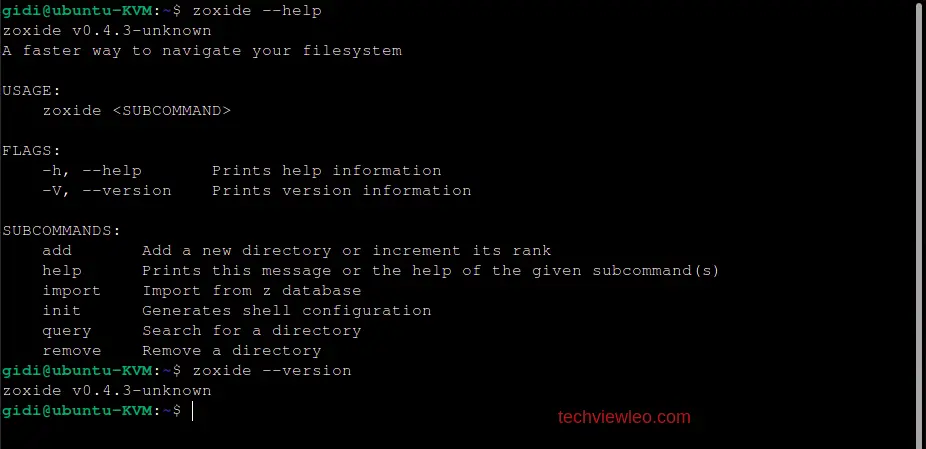
Zoxide is a shell command that offers a smarter alternative to the cd command. Zoxide is built on Rust and is particularly designed to offer more functionality and performance compared to similar commands. Zoxide also keeps a record of the directories you been to, so that you can be able to switch between them using just a few keystrokes.
Why use Zoxide
- Shell Integration: Zoxide can be integrated with various shells like Bash, Fish, Zsh, and Elvish. This particularly advantageous because most Linux users tend to switch between shells from time to time.
- Faster Navigation: Zoxide keeps track of the directories you have visited and ranks them based on how frequently you visit them hence allowing you to navigate your file system faster.
- Smarter Matching: Zoxide uses a feature called fuzzy string matching to predict the directory you want to navigate to based on your past directory history.
- Customization: Zoxide provides many configuration options that can be used to customize its behavior.
- Bookmarking: With zoxide, you are able to bookmark directories with custom aliases, making it simple to jump to frequently accessed folders using cutom names that are easily memorable.
Installation on Linux Systems
Zoxide is cross-platform and runs on all the major operating systems but today, we are focusing on it’s installation on Linux systems.
Step 1: Install Binary
The first step is to install the binary package. This can be done either using the install script or via your distributions package manager. The recommended method of installation is via install script by running the following command:
curl -sS https://raw.githubusercontent.com/ajeetdsouza/zoxide/main/install.sh | bashYou can also install it using your distribution’s package manager:
#Install on any Linux distribution using cargo
 cargo install zoxide --locked

#Install on any Linux distribution using Linuxbrew
 brew install zoxide

#Install on Debian/Ubuntu
 apt install zoxide

#Install on RHEL
 dnf install zoxide

#Install on Arch Linux
pacman -S oxide

#Install on Alpine Linux
 apk add zoxide
Step 2: Set up zoxide on your shell
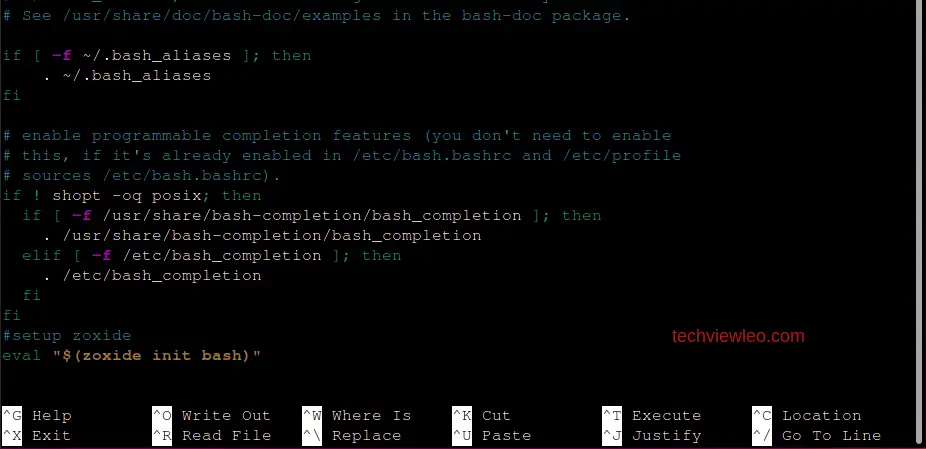
To start using zoxide, you need to add it to your shell. To do so, you need to edit the configuration file of your shell by adding some statements.
Add the following lines to your configuration file and save it.
#Bash config file (~/.bashrc)
 eval "$(zoxide init bash)"

#Elvish config file (~/.elvish/rc.elv)
 eval (zoxide init elvish | slurp)

#Fish config shell (~/.config/fish/config.fish)
 zoxide init fish | source

#Nushell env file (~/.config/nushell/env.nu)
 zoxide init nushell | save -f ~/.zoxide.nu
    #Add to the end of config file (~/.config/nushell/config.nu)
       source ~/.zoxide.nu

#Powershell config file (echo $profile in Powershell to find it)
 Invoke-Expression (& { (zoxide init powershell | Out-String) })

#Xonsh config file (~/.xonshrc)
 execx($(zoxide init xonsh), 'exec', __xonsh__.ctx, filename='zoxide')

#Zsh confgi file (~/.zshrc)
 eval "$(zoxide init zsh)"
Step 3: Install fzf
Fzf is a Command-Line fuzzy finder which provides the fuzzy search functionality. Fzf reads lines from standard input and filters them using the fuzzy logic and outputs the lines through standard output.
You can install fzf using the following commands:
#Install on any Linux distribution using linuxbrew
brew install fzf

# To install useful key bindings and fuzzy completion:
$(brew --prefix)/opt/fzf/install

#Install on Debian/Ubuntu
sudo apt install fzf

#Install on RHEL
sudo dnf install fzf

#Install on Arch Linux
sudo pacman -S fzf

#Install on Alpine Linux
sudo apk add fzf
Usage Examples
Here is a quick guide on how you can use the z command to navigate your file system:
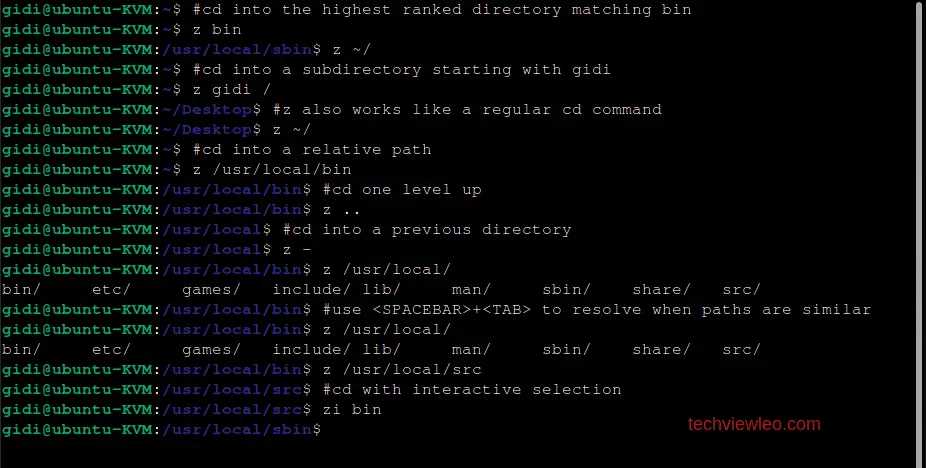
When using z to change directories interactively, it makes use of the fzf fuzzy finder. You will be prompted with a list of directories from which you can select one to change into:

You will change to whichever directory you choose.
2. Enhanced Command(enhancd)
Enhancd is a tool used in the Command-Line to navigate the system directories in a faster way. This command allows you to bookmark your frequently used directories using easily memorable aliases. It also has the ability to be be integrated with various shells out there. Enhancd provides configuration options that you can tweak to customize its behavior to suit your preference. Generally, with enhancd, you can navigate your file system faster and more efficiently than you would with the normal cd command.
Why the need for enhancd
- Faster Navigation: Enhancd allows you to navigate your file system faster by keeping record of the directories that you visit from time to time. This directories are accessible using short aliases which can save you time and reduce typing errors.
- Easy to use: Enhancd is very easy to use and requires minimal setup configurations to be up and running. Once installed, it can be used immediately.
- Shell Integration: Enhancd can be integrated with the popular shells such as Bash, Zsh, Fish, Elvish and many more. You can use enhancd regardless of which shell you are running on your system.
- Customization: Who doesn’t love something that can be adjusted solely to fit your preferences and match your working style. Well, enhancd provides some configuration options that you can use to customize it.
Installation on Linux Systems
Enhancd has a bunch of shell scripts. To install it on your shell, you can clone a github repository and to run an entrypoint script which enables you to try enhancd out. Run the following command to clone a repository:
git clone https://github.com/b4b4r07/enhancd
echo "source enhancd/init.sh" >>~/.bashrc
Configuration and Usage
Changing the order of each executables in the list, you can change the interactive filter command used by enhancd. Let’s configure it using the following:
echo 'export ENHANCD_FILTER="fzf --height 40%:fzy"' >>~/.bashrcThe usage of cd command powered by enhancd is almost same as built-in cd command. The syntax is as follows:
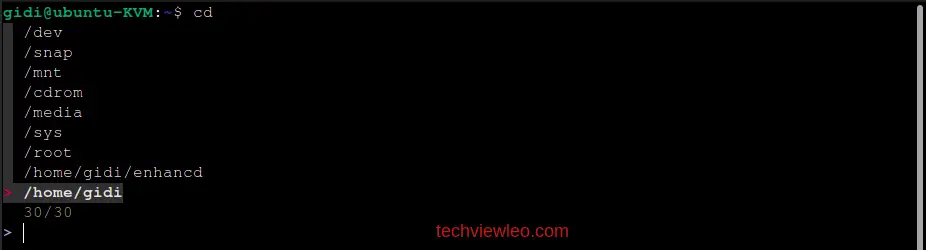
$ cd [-|..|.] <dir>When you run cd without any arguments, all the directories visited in the past are listed with the HOME always shown at a top of the list.
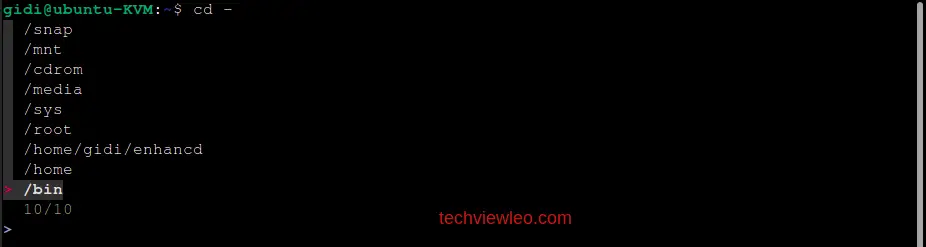
Instead of changing back to the previous directory, cd - lists the latest 10 directories that have been visited:
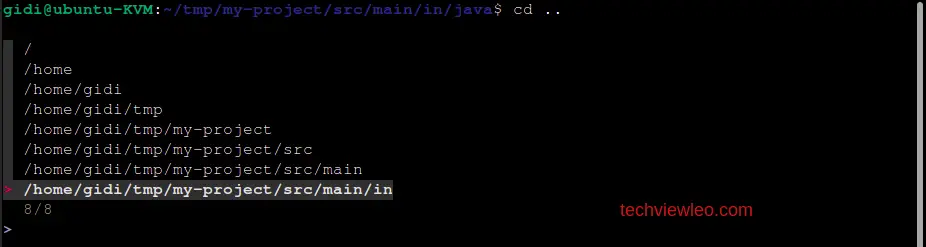
The cd .. list all parent directories of the current working directory. This saves you from typing cd ../../.. redundantly:
To list all sub directories recursively located under the current directory, cd with only one dot, cd . The built-in cd command does nothing even if a dot (.) is passed.
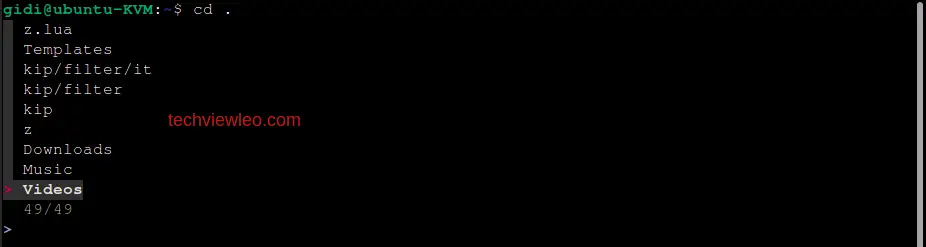
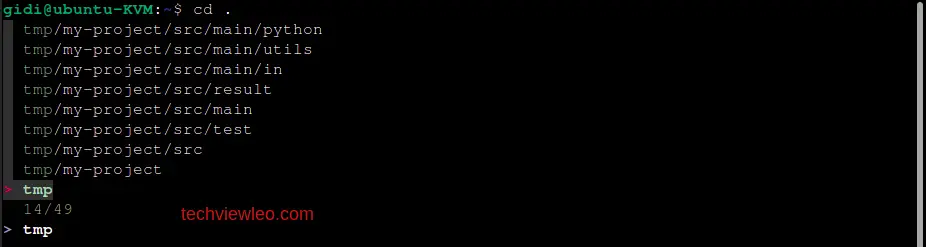
While using this command, you can filter the results by typing a letter or word in the prompt at the bottom:
3. Autojump
Sometimes, navigating through the Linux hierarchical file system is very painful and tiring since every time you’d like to switch directories, you have to retype the whole path of the directory you want to switch to. Lucky for you, there is a Command-Line tool called autojump, written in Python.
Autojump is a command-line tool that offers a faster way to navigate the Linux file system by keeping the database of directories that the user visits frequently. This command works by keeping track of the directories that the user visits and then assigning a level of importance to each one according to how frequently it is visited. This allows users to quickly jump to a frequently visited directory.
Why use autojump
- Faster Navigation: Since it is a self-learning utility, autojump allows users to quickly jump to the frequently visited directories using short aliases, which in turn saves time and reduces human error such as typing errors.
- Easy Installation: Autojump is available in the default repository for most standard Linux distributions and can be installed using a package manager or by cloning a GitHub repository. This makes installation and setup much faster and easy.
- Shell Integration: Autojump is compatible with the popular shells like Bash, Fish, and Zsh. This gives a variety of users a chance to install and autoump from any shell of their choice.
- More Productivity: This command is more productive because it reduces the general time it takes to navigate through the file system. This is especially useful for users such system administrators who file navigate the systems almost all the time.
Installation on Linux Systems
As we mentioned earlier above,autojump is already available in the repositories of most Linux distributions. You may just install it using the Package Manager.
#Debian, Ubuntu
sudo apt install autojump

#RHEL / CentOS / Fedora
sudo yum install autojump

#Alpine Linux
sudo apk add autojump

#Arch Linux
sudo pacman -S autojump

#OpenSUSE
sudo zypper install autojump

#if you have brew, you can also use it
brew install autojump
You can also install autojump manually by cloning a copy of it from github and then running the installation script:
#clonning a copy from github
git clone git://github.com/wting/autojump.git

#run the installation script
cd autojump
./install.py or ./uninstall.py
Configuration and Usage
After installing autojump, it cannot be recognized by the shell unless you activate the autojump utility. So let’s go ahead and activate it by adding the following initialization script to your shell’s configuration:
#open ~/.bashrc and add it manually
[[ -s /usr/share/autojump/autojump.sh ]] && . /usr/share/autojump/autojump.sh
OR
#echo the script into ~/.bashrc
echo '[[ -s /usr/share/autojump/autojump.sh ]] && . /usr/share/autojump/autojump.sh' >>~/.bashrc
Before running, autojump, ensure to cd around first to build up the autojump database. After that, you can quickly jump into an already visited directory:

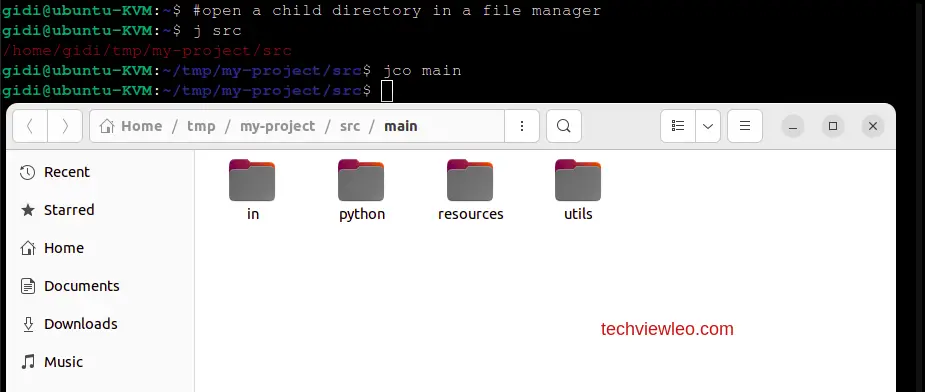
You can also jump into the child directory of the current working directory:

Instead of jumping into a directory, you can open it in a file manager directly from the terminal:

Autojump also allows you to open a child directory in a file manager instead of jumping into it:
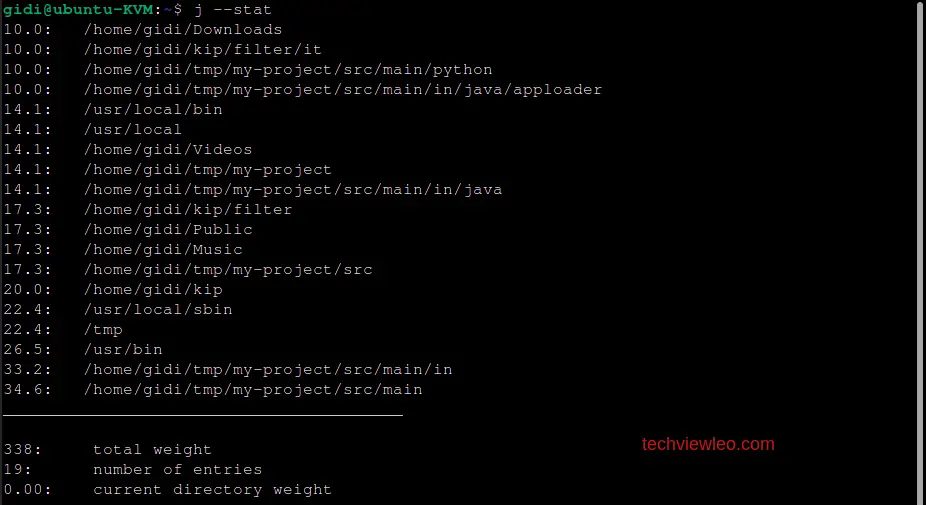
Check stats of each folder key weight and overall key weight along with total directory weight using j --stat. Folder key weight is the representation of the total time spent in that folder and directory weight is the number of directories in the list.
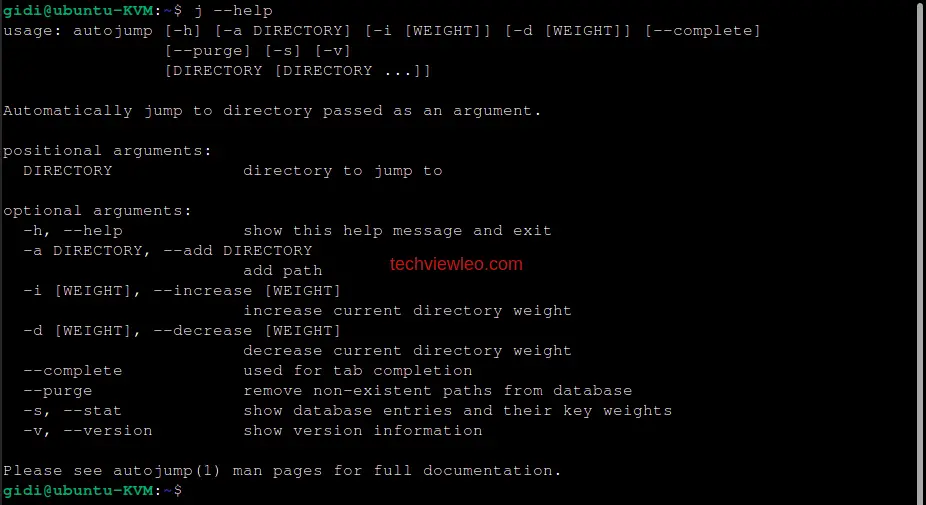
If you need further help on autojump, use j --help
4. z.lua
z.lua is a Command-Line tool which helps you navigate faster by learning your movements habits in the file system. It is a faster way to navigate your file system. It tracks your most used directories, based on ‘frecency’, a weighted rank that depends on how often and how recently something occurred . After a short learning phase, z will take you to the most ‘frecent’ directory that matches ALL of the regexes given on the command line, in order.
Using z.lua feels far more intuitive and it’s so incredibly convenient to be able to jump between folders you are working in without having to traverse an entire tree. The shell sometimes feels so constraining, but tools like this are gives users a break and so much more.
Why Use z.lua
- Faster Navigation: Technically, z.lua is 10X faster than autojump and 3X fatser than z.sh. It gives users a much faster execution time and saves up a lot of time.
- Shell compatibility: z.lua can be integrated with your favorite shell, whether it be bash, fish, sh, powershell, windows cmd and many more. This variety helps it reach a wider community and help many users.
- Enhanced Matching: Z.lua also provides an enhanced matching mode that allows for more flexible matching. In enhanced matching mode, the paths only need to match one of the regexes to be considered a match.
- Configuration: Enhanced matching mode can be enabled by setting the
_ZL_MATCH_MODEenvironment variable to1. - Command Completion: Z.lua supports command completion, which can be started by pressing the
<Tab>key. Command completion can help users navigate the file system faster and more efficiently.
Installation on Linux Systems
Lua can be installed using the package manager:
#Debian / Ubuntu Systems
sudo apt install lua5.4

#Arch-based distros
sudo pacman -S lua

#RHEL Systems
dnf install lua
Z.lua can be installed by cloning it from a github repository. Run the command below:
#Clone a github repository
git clone https://github.com/skywind3000/z.lua.git
When you use git clone command, it clones into the current directory.

Verify that z.lua has been installed by running the command lua -v

Add the following line to your shell’s configuration file (e.g., ~/.bashrc, ~/.zshrc, or ~/.config/fish/config.fish):
#replace '/path/to' with the actual path
eval "$(lua /path/to/z.lua/z.lua --init bash)"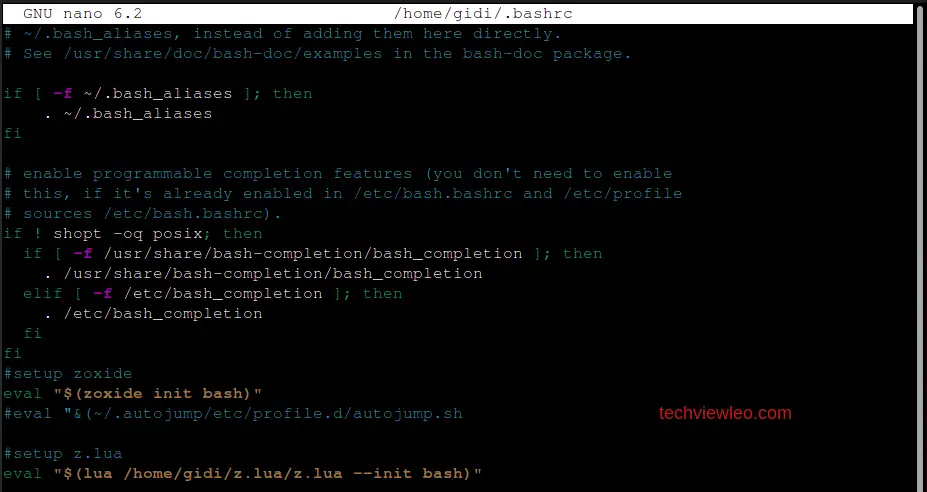
The path to z.lua will be the directory where you run the git clone command. Run pwd to find out. After this, restart your shell to load the z.lua configuration file.
Configuration and Usage
Enhanced Matching
Enhnaced matching can be enabled by appending an enhanced after --init xxx
eval "$(lua /path/to/z.lua/z.lua --init bash enhanced)"Completion
For zsh/fish, completion can be triggered by z foo<tab>. and a list of candidates will display in zsh / fish. Bash is not as powerful as zsh/fish, so we introduced fzf-completion for bash, initialize your z.lua and append fzf keyword after --init:
eval "$(lua /path/to/z.lua/z.lua --init bash enhanced once echo fzf)"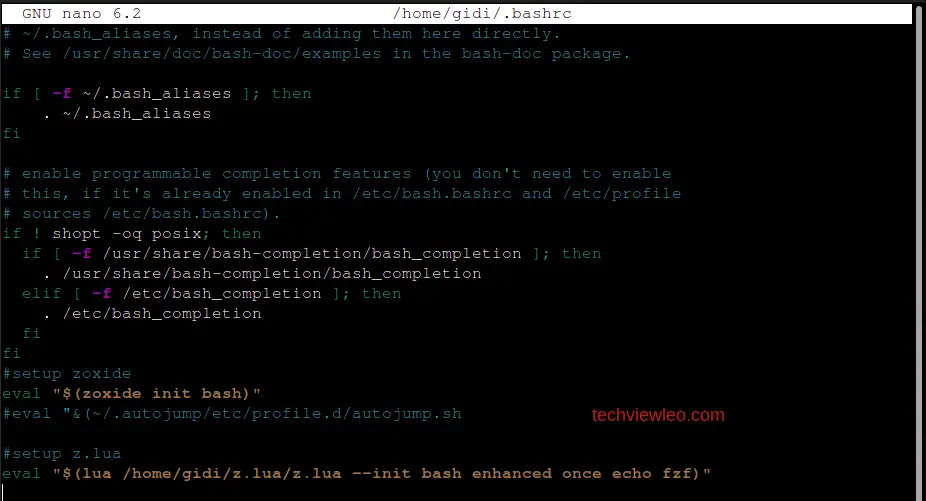
Let’s take a look at some usage examples for z.lua. I’ve explained what each command does before executing it. Before using z.lua, first cd around so as to build up the z.lua database.
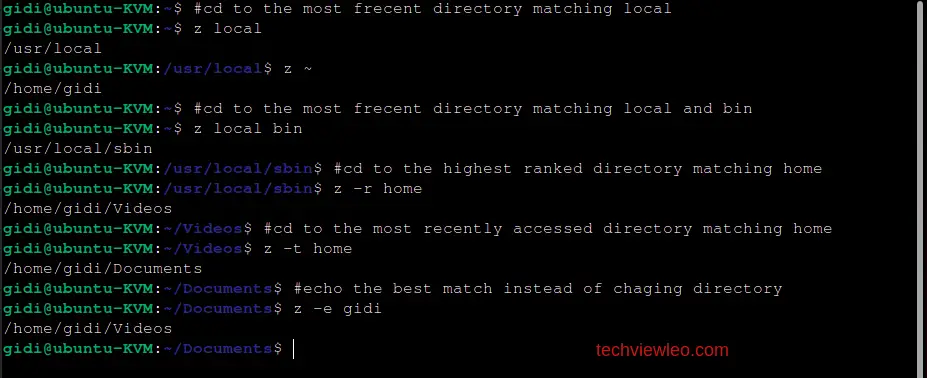
When there are multiple matches found, interactive selection comes very handy. You can use z -i to display a list of matched directories.
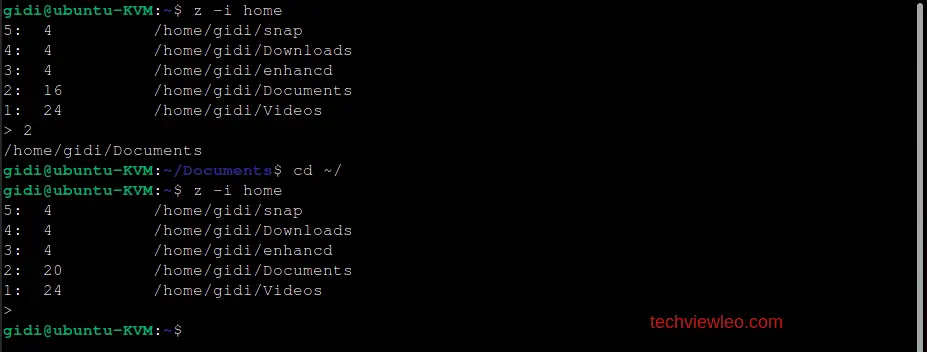
And then you can input the number and choose where to go before actual cd. eg. input 3 to cd to /home/data/software. And if you just press ENTER and input nothing, it will just quit and stay where you were.
For FZF support we added during configuration, we can use the new option z -I foo which will allow you to use FZ to select when there are multiple matches:
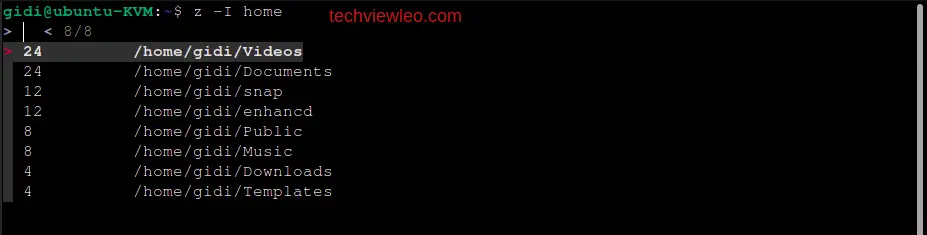
When we use "z -I home",12 paths containing the keyword “home” have been matched and ordered by their “frecent” value, the higher “frecent” lue, the higher the rank.
5. rupa/z
rupa/z is an amazing shell script that allows users to traverse a file system in no time flat. Use it if you spend any time at all changing directories in a Linux environment. It enhances productivity and spares you from clumsy mistakes such as typing errors and helps you work much faster.
Why use rupa/z
- Faster Navigation: rupa/z allows users to quickly switch between the most used directories as suggested by ‘frecency’ which we mentioned earlier as the rank level of how frequently and recently a directory is visited by the user.
- Learning capabilities: rupa/z is only able to help in faster transition between directories by learning your movement patterns within your file system.
- Customization: Just like any other cd command, rupa/z offers a bunch of configuration capabilities which enable you customize it’s behavior. It also plugins that enhance it’s functions and capabilities.
- Shell Integration: As a user, you can use rupa/z regardless of the shell you are running. rupa/z is compatible with shells such as bash, fish and Zsh.
Installation on Linux Systems
To install the rupa/z command, you can follow these steps:
Clone the rupa/z repository:
git clone https://github.com/rupa/z.git ~/zMake the z.sh script executable:
chmod +x ~/z/z.shAdd the following line to your shell’s configuration file (e.g., ~/.bashrc or ~/.zshrc) to load z on startup:
source ~/z/z.sh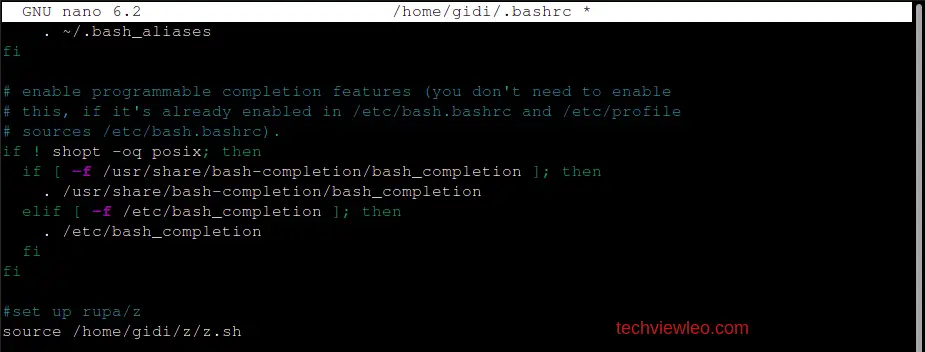
Now restart your shell to load and apply the changes made.
Configuration and Usage
Here are the options that you can use with the z command, and alongside them, exactly what they do:
-c #restrict matches to subdirectories of the current directory
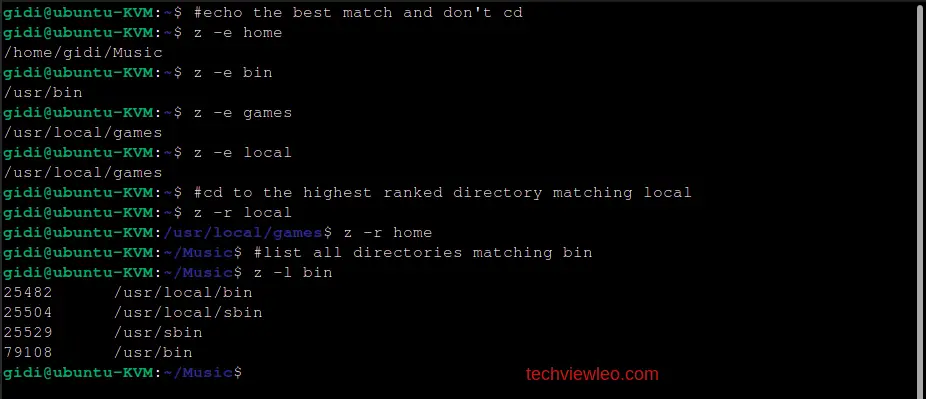
-e #echo the best match, don't cd
-h #show a brief help message
-l #list only
-r #match by rank only
-t # match by recent access only
-x #remove the current directory from the datafileThis command is an alternative to z.lua, and many might say that it’s almost an exact match. The only difference is that rupa/z does not support interactive mode and it also doesn’t offer FZF support.
Now, take a look at some usage examples before we move on. Ensure that you cd around first to build up the database for the command to work.
You can restrict matches to sub-directories of the current directory. This is handy when you are looking to change to a directory inside your current directory :
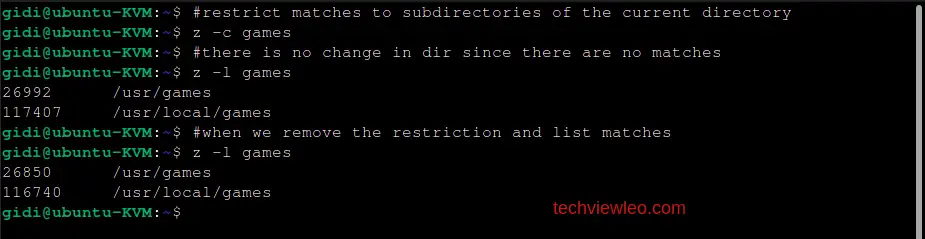
Here are some more examples:
6. bd command
The bd command is a Command-Line tool that provides enhanced directory navigation features. It is used to switch between the already visited directories in the file system. This command is a part of the (Better Directory Change) tool set, which is focused on providing improved directory management features.
Why use bd
- Directory Removal: You can delete directories from your command history using the command
bd -rand beside it, the index of the directory you want to remove. This feature helps you trim your command history to only the ones you desire. - Quick Directory Navigation:
bdallows you to change to a specific directory by specifying its numeric index as it is in your command history. - Interactive Mode: In interactive mode ,
bdhas a list of directories from your history, presented in a menu. From this menu you can select a directory interactively. You can enter this mode using the command, (bd -iorbd --interactive). - Tab Completion: Tab completion is supported in
bd. It completes directory indices, making it easier to select the directory you want to navigate to or remove.
Installation on Linux Systems
bd can be installed directly from the default repositories using a package manager, but only for macOS:
sudo port install bdFor the distributions that don’t have bd repositories on them, you can clone bd from GitHub using the following command:
sudo wget --no-check-certificate -O /usr/local/bin/bd https://raw.github.com/vigneshwaranr/bd/master/bd To install it, run the following command:
chmod +rx /usr/local/bin/bd After installing bd, use the following command to line to create an alias for bd in your shell’s configuration file (e.g., ~/.bashrc or ~/.zshrc):
echo 'alias bd=". bd -si"' >> ~/.bashrcYou have to restart your shell for any changes to the configuration file to be applied.
Configuration and Usage
If you’d like to configure autocomplete support, then you can do so using the following commands:
sudo wget -O /etc/bash_completion.d/bd https://raw.github.com/vigneshwaranr/bd/master/bash_completion.d/bd
source /etc/bash_completion.d/bd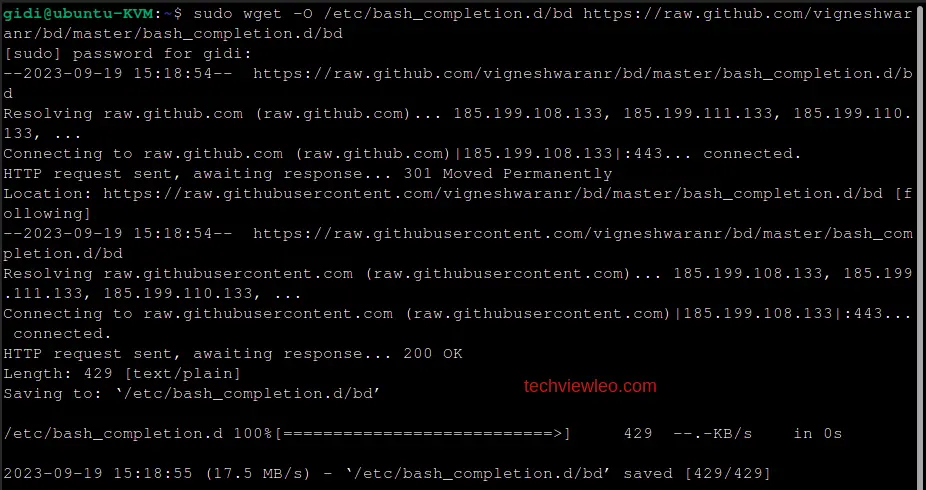
Usage Examples
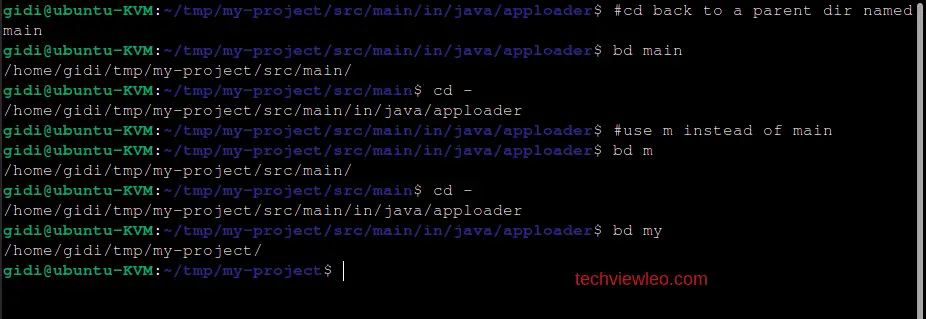
If you are in this path /home/user/tmp/my-project/src/org/main/in/utils/app/reader/balblabla and you want to go to main directory quickly, then you can just type bd main. You can even just type bd m .
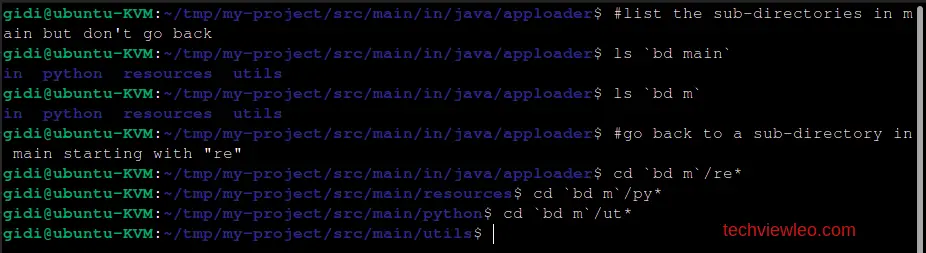
You can also list the sub-directories of a specific parent directory in your current path and cd to any of the sub-directories with a single command:
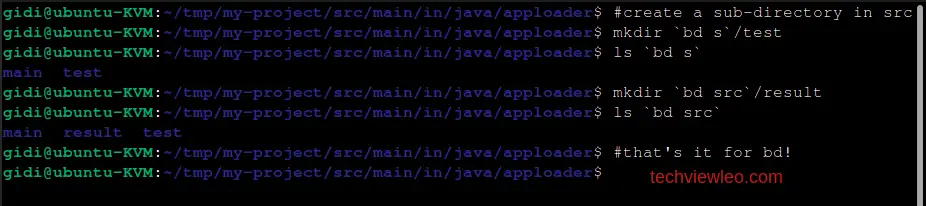
Directories can also be created into parent directories in the same path:
Conclusion
When working with Command -Line tools, all that is really taken to account is how well the works with the specified commands. The response time that a shell takes to communicate with the kernel really matters especially when working with time sensitive processes. Tasks such as changing the directory are time sensitive in the sense that the faster you can switch the better. This guide was all about showing you the different alternatives to the cd command and I hope it was of help.


