Hello and welcome to today’s guide on how to Run Kubernetes on Oracle Linux 9 using Minikube. Kubernetes is an open-source container orchestrator for managing and automatically deploying cloud-native applications. Google developed K8s in 2014 for deploying scalable, reliable container systems via application-oriented APIs. Developers prefer Kubernetes due to its velocity, scalability, abstraction, and reliability.
Who then is Minikube? Minikube is a cross-platform tool used by developers and system administrators to implement a local Kubernetes cluster on their local machines. Its primary goal is to aid the developer in developing a local Kubernetes application that supports all the features of Kubernetes.
Why Minikube?
Minikube has very good features that include the following:
- Has a load balancer using Minikube tunnel.
- Supports multi-cluster.
- Minikube is cross-platform (Linux, macOS, Windows)
- Supports Nodeports.
- supports the latest Kubernetes release.
- Supports persistent volumes
- supports filesystem mounts
- Supports ingress
- Has its own dashboard
- Supports CI environment.
- Supports container runtimes (CRI-O, containerd, docker)
- Configuration of apiserver and kubelet options via command line flags.
- Supports Addons
See more features on Github.
To install MInikube on Oracle Linux 9, ensure your system meets the following OS hardware requirements.
OS hardware requirements
The Prerequisites include the following:
- 2 CPUs (or more)
- A minimum of 2GB of memory.
- A minimum of 20GB of storage.
- Container or virtual machine manager e.g Docker, Podman, KVM, Hyper-V, VMware workstation, etc
- A non-root user account.
- Internet connection
Run Kubernetes on Oracle Linux 9 using minikube
In this section, we will now run Kubernetes on Oracle Linux 9 using Minikube.
Begin the process by ensuring that your DNF package index is up to date by running the following command.
sudo dnf update Once your system is ready, we will proceed with the process as below:
Step 1: Install container tools on Oracle Linux 9
Oracle Linux 9 container-tools meta-package is available and includes the following: Podman, Buildah, Skopeo, CRIU, Udica, and all required libraries. These can be installed by a single command:
$ sudo dnf install container-tools
....
Transaction Summary
================================================================================
Install  9 Packages

Total download size: 16 M
Installed size: 61 M
Is this ok [y/N]: y
You may also opt to install Conntrack tools that help to set up High-availability clusters.
Run the command below.
$ sudo dnf -y install conntrack
.....
Transaction Summary
================================================================================
Install  4 Packages

Total download size: 321 k
Installed size: 791 k
Step 2: Install virtualization software in Oracle Linux 9
KVM ( Kernel-based Virtual Machine ) is a virtualization solution for Linux on x86 hardware that contains virtualization extensions (Intel VT or AMD-V). It has a loadable kernel module (kvm.ko) that provides the virtualization infrastructure and a processor-specific module ( kvm-intel.ko or kvm-amd.ko ).
Choose your preferred Virtualization option and install it. For this blog spot, I will install KVM Virtualization software on Oracle Linux 9.
1. Confirm if the required virtualization extensions are available by this command:
$ lscpu | grep Virtualization
Virtualization:                  VT-x
Virtualization type:             full
The required virtualization extensions are available.
2. Install KVM tools on Oracle Linux 9.
By default, the KVM tools are not available on Oracle Linux 9. To install kvm tools, run the command below to install them.
sudo dnf install qemu-kvm libvirt virt-manager virt-install -yThe command above will install the KVM tools and all their dependencies.
3. Install other crucial packages to help KVM run properly.
sudo dnf install epel-release -y
sudo dnf -y install bridge-utils virt-top libguestfs-tools bridge-utils virt-viewer
Confirm if kernel modules are loaded:
$ lsmod | grep kvm
kvm_intel             385024  0
kvm                  1126400  1 kvm_intel
irqbypass              16384  1 kvm
4. Start and enable the service:
To make the KVM services on boot:
sudo systemctl start libvirtd
sudo systemctl enable libvirtd
Check the status.
$ systemctl status libvirtd
● libvirtd.service - Virtualization daemon
     Loaded: loaded (/usr/lib/systemd/system/libvirtd.service; enabled; vendor pr>
     Active: active (running) since Wed 2024-10-30 15:21:39 EAT; 1min 8s ago
TriggeredBy: ● libvirtd-admin.socket
             ○ libvirtd-tcp.socket
             ● libvirtd-ro.socket
             ● libvirtd.socket
             ○ libvirtd-tls.socket
       Docs: man:libvirtd(8)
             https://libvirt.org
   Main PID: 95594 (libvirtd)
      Tasks: 21 (limit: 32768)
     Memory: 16.1M
        CPU: 366ms
     CGroup: /system.slice/libvirtd.service
             ├─95594 /usr/sbin/libvirtd --timeout 120
             ├─95692 /usr/sbin/dnsmasq --conf-file=/var/lib/libvirt/dnsmasq/defau>
             └─95693 /usr/sbin/dnsmasq --conf-file=/var/lib/libvirt/dnsmasq/defau>
5. Add the system user to the KVM group to allow them to execute the commands:
sudo usermod -aG libvirt $USER
newgrp libvirt
6. You can install your VM using virt-install or using GUI(Virt Manager).
To use virt manager, you can run the command below: (edit the disk path and cdrom path to match your actual path)
sudo virt-install
--virt-type kvm
--name Oracle-Linux-9
--ram 2048
--disk /var/lib/libvirt/images/Oracle9
--network network=default
--graphics vnc,listen=0.0.0.0
--noautoconsole
--os-type=linux
--os-variant=generic –cdrom=~/iso/OracleLinux-R9-U4-x86_64-dvd.iso
Once you have set up your KVM and installed the VM, validate the installation by the command below.
$ lsmod | grep kvm
kvm_intel             376832  4
kvm                  1101824  1 kvm_intel
irqbypass              16384  5 kvm
Next, validate that libvirt reports no errors: Use the command:
$ virt-host-validate
  QEMU: Checking for hardware virtualization                                 : PASS
  QEMU: Checking if device /dev/kvm exists                                   : PASS
  QEMU: Checking if device /dev/kvm is accessible                            : PASS
  QEMU: Checking if device /dev/vhost-net exists                             : PASS
  QEMU: Checking if device /dev/net/tun exists                               : PASS
  QEMU: Checking for cgroup 'cpu' controller support                         : PASS
  QEMU: Checking for cgroup 'cpuacct' controller support                     : PASS
  QEMU: Checking for cgroup 'cpuset' controller support                      : PASS
  QEMU: Checking for cgroup 'memory' controller support                      : PASS
  QEMU: Checking for cgroup 'devices' controller support                     : WARN (Enable 'devices' in kernel Kconfig file or mount/enable cgroup controller in your system)
  QEMU: Checking for cgroup 'blkio' controller support                       : PASS
  QEMU: Checking for device assignment IOMMU support                         : WARN (No ACPI DMAR table found, IOMMU either disabled in BIOS or not supported by this hardware platform)
  QEMU: Checking for secure guest support                                    : WARN (Unknown if this platform has Secure Guest support)
Ignore the warning messages.
Add the system user to the KVM group to allow them to execute the commands:
sudo usermod -aG libvirt $USER
newgrp libvirt
Oracle Linux 9 is running on my KVM.
Step 3: Install kubectl on Oracle Linux 9
With the KVM now set in your Oracle Linux 9, we will now install Kubectl which helps to manage Kubernetes clusters. To install kubectl on Oracle Linux 9:
1. Download the latest release with the command:
curl -LO "https://dl.k8s.io/release/$(curl -L -s https://dl.k8s.io/release/stable.txt)/bin/linux/amd64/kubectl"To download a specific version of kubectl, replace the $(curl -L -s https://dl.k8s.io/release/stable.txt) portion of the command with the specific version.
2. Optionally, you can Validate the binary by downloading the kubectl checksum file:
curl -LO "https://dl.k8s.io/$(curl -L -s https://dl.k8s.io/release/stable.txt)/bin/linux/amd64/kubectl.sha256"Validate the kubectl binary against the checksum file: Run the command.
$ echo "$(cat kubectl.sha256)  kubectl" | sha256sum --check
kubectl: OK
kubectl: OK tells us that our kubectl binary file is valid.
3. Install Kubectl on Oracle Linux 9:
sudo install -o root -g root -m 0755 kubectl /usr/local/bin/kubectl[ OPTIONAL: If you have no access to the root system, you can install kubectl by running the following commands:]
chmod +x kubectl
mkdir -p ~/.local/bin
mv ./kubectl ~/.local/bin/kubectl
Prepend the file to your $PATH
sudo mv kubectl /usr/local/bin/4. Validate the version installed:
$ kubectl version --client
WARNING: This version information is deprecated and will be replaced with the output from kubectl version --short.  Use --output=yaml|json to get the full version.
Client Version: version.Info{Major:"2", Minor:"47", GitVersion:"v2.47.0", GitCommit:"5835544ca568b757a8ecae5c153f317e5736700e", GitTreeState:"clean", BuildDate:"2024-09-21T14:33:49Z", GoVersion:"go1.23.2", Compiler:"gc", Platform:"linux/amd64"}
Kustomize Version: v5.4.2

OR
$ kubectl version --client -o json
{
  "clientVersion": {
    "major": "2",
    "minor": "47",
    "gitVersion": "v2.47.0",
    "gitCommit": "5835544ca568b757a8ecae5c153f317e5736700e",
    "gitTreeState": "clean",
    "buildDate": "2022-09-21T14:33:49Z",
    "goVersion": "go1.23.2",
    "compiler": "gc",
    "platform": "linux/amd64"
  },
  "kustomizeVersion": "v5.4.2"
}
For detailed output of the version, run the command:
$ kubectl version --client --output=yaml
clientVersion:
  buildDate: "2024-09-21T14:33:49Z"
  compiler: gc
  gitCommit: 5835544ca568b757a8ecae5c153f317e5736700e
  gitTreeState: clean
  gitVersion: v2.47.0
  goVersion: go1.23.2
  major: "2"
  minor: "47"
  platform: linux/amd64
kustomizeVersion: v5.4.2
Step 4: Install Minikube on Oracle Linux 9
Once you have installed KVM and Kubectl on Oracle Linux 9, You will now proceed to install Minikube on Oracle Linux 9. The latest releases of minikube can be found on the official GitHub releases page. Download the latest release by the following command.
wget https://storage.googleapis.com/minikube/releases/latest/minikube-linux-amd64 -O minikubeMove minikube to your $PATH
chmod +x minikube
sudo cp minikube /usr/local/bin/
Minikube is now installed in your system.
Download the required Docker drivers for KVM.
wget https://storage.googleapis.com/minikube/releases/latest/docker-machine-driver-kvm2Make the downloaded file executable:
chmod +x docker-machine-driver-kvm2move the files to your $PATH
sudo cp docker-machine-driver-kvm2 /usr/local/bin/Check the Minikube version installed.
$ minikube version
minikube version: v1.34.0
commit: fe869b5d4da11ba318eb84a3ac00f336411de7ba
Step 5: Run Kubernetes on Minikube
We now have Minikube successfully installed in our Oracle Linux 9. We will now start minikube by specifying the KVM driver. Run the command below.
$ minikube start --driver=kvm
😄  minikube v1.34.0 on Oracle 9.0 (kvm/amd64)
✨  Using the kvm2 driver based on user configuration
💿  Downloading VM boot image ...
    > minikube-v1.34.0-amd64.iso....:  65 B / 65 B [---------] 100.00% ? p/s 0s
    > minikube-v1.34.0-amd64.iso:  273.79 MiB / 273.79 MiB  100.00% 51.32 MiB p
👍  Starting control plane node minikube in cluster minikube
💾  Downloading Kubernetes v1.31.1 preload ...
    > preloaded-images-k8s-v18-v1...:  385.41 MiB / 385.41 MiB  100.00% 111.62
🔥  Creating kvm2 VM (CPUs=2, Memory=2200MB, Disk=20000MB) ...
🐳  Preparing Kubernetes v1.31.1 on Docker 20.10.18 ...
    ▪ Generating certificates and keys ...
    ▪ Booting up control plane ...
    ▪ Configuring RBAC rules ...
🔎  Verifying Kubernetes components...
    ▪ Using image gcr.io/k8s-minikube/storage-provisioner:v5
🌟  Enabled addons: storage-provisioner, default-storageclass
🏄  Done! kubectl is now configured to use "minikube" cluster and "default" namespace by default
For the VirtualBox driver, run the command :
minikube start --driver=virtualboxTo set KVM as the default driver:
minikube config set driver kvm2
minikube start
For VirtualBox:
minikube config set driver virtualbox
minikube start
The output of the command:
$ minikube config set driver kvm2
❗  These changes will take effect upon a minikube delete and then a minikube start

$ minikube start
😄  minikube v1.34.0 on Oracle 9.0 (kvm/amd64)
✨  Using the kvm2 driver based on existing profile
👍  Starting control plane node minikube in cluster minikube
🏃  Updating the running kvm2 "minikube" VM ...
🐳  Preparing Kubernetes v1.31.1 on Docker 20.10.18 ...
🔎  Verifying Kubernetes components...
    ▪ Using image gcr.io/k8s-minikube/storage-provisioner:v5
🌟  Enabled addons: storage-provisioner, default-storageclass
🏄  Done! kubectl is now configured to use "minikube" cluster and "default" namespace by default
From the command output, we can see that kubectl is now configured to use the minikube cluster.
Check minikube status.
$ minikube status
minikube
type: Control Plane
host: Running
kubelet: Running
apiserver: Running
kubeconfig: Configured
Check node status.
$ kubectl get nodes
NAME       STATUS   ROLES           AGE   VERSION
minikube   Ready    control-plane   10m   v1.34.0
Check the Docker environment:
$ minikube docker-env
export DOCKER_TLS_VERIFY="1"
export DOCKER_HOST="tcp://192.168.39.155:2376"
export DOCKER_CERT_PATH="/home/jil/.minikube/certs"
export MINIKUBE_ACTIVE_DOCKERD="minikube"

# To point your shell to minikube's docker-daemon, run:
# eval $(minikube -p minikube docker-env)
Step 6: Create pods using minikube
In this step, we will create a deployment. A Kubernetes pod is a group of one or more containers grouped together for administration and networking. A Kubernetes deployment checks on the health of the pods and restarts them when the container is terminated.
1. Use the kubectl create command to create a deployment to manage a pod. In this example, I will create an Nginx web server deployment.
$ kubectl create deployment webserver --image=nginx
deployment.apps/webserver created
2. view the created deployment.
$ kubectl get deployments
NAME        READY   UP-TO-DATE   AVAILABLE   AGE
webserver   1/1     1            1           17s
3. View the Pod:
$ kubectl get pods
NAME                         READY   STATUS    RESTARTS   AGE
webserver-67f557b648-kmwwz   1/1     Running   0          52s
To access the pod shell, issue the command:
$ kubectl exec -ti webserver-67f557b648-kmwwz  -- /bin/bash
root@webserver-67f557b648-kmwwz:/# exit
4. view cluster events.
$ kubectl get events
LAST SEEN   TYPE     REASON              OBJECT                            MESSAGE
3m54s       Normal   Scheduled           pod/webserver-67f557b648-x64n2    Successfully assigned default/webserver-67f557b648-x64n2 to minikube
3m53s       Normal   Pulling             pod/webserver-67f557b648-x64n2    Pulling image "nginx"
3m45s       Normal   Pulled              pod/webserver-67f557b648-x64n2    Successfully pulled image "nginx" in 8.009286909s
3m45s       Normal   Created             pod/webserver-67f557b648-x64n2    Created container nginx
3m45s       Normal   Started             pod/webserver-67f557b648-x64n2    Started container nginx
3m54s       Normal   SuccessfulCreate    replicaset/webserver-67f557b648   Created pod: webserver-67f557b648-x64n2
3m54s       Normal   ScalingReplicaSet   deployment/webserver              Scaled up replica set webserver-67f557b648 to 1
5. View the kubectl configuration.
$ kubectl config view
apiVersion: v1
clusters:
- cluster:
    certificate-authority: /home/jil/.minikube/ca.crt
    extensions:
    - extension:
        last-update: Wed, 30 Oct 2024 20:27:22 EAT
        provider: minikube.sigs.k8s.io
        version: v1.34.0
      name: cluster_info
    server: https://192.168.39.155:8443
  name: minikube
contexts:
- context:
    cluster: minikube
    extensions:
    - extension:
        last-update: Wed, 30 Oct 2024 20:27:22 EAT
        provider: minikube.sigs.k8s.io
        version: v1.34.0
      name: context_info
    namespace: default
    user: minikube
  name: minikube
current-context: minikube
kind: Config
preferences: {}
users:
- name: minikube
  user:
    client-certificate: /home/jil/.minikube/profiles/minikube/client.crt
client-key: /home/jil/.minikube/profiles/minikube/client.keyStep 7: Create a Service
A pod is only accessible within the Kubernetes cluster by its internal IP address. To make it available outside of the Kubernetes cluster, the pod must be exposed as a Kubernetes service. These services are ClusterIP, NodePort, and LoadBalancer.
In the previous step, we created a pod called webserver using minikube.
A: NodePort pod Kubernetes service.
This is the most primitive way of exposing traffic to your service.
1. Expose the webserver to the outside of Kubernetes as a NodePort service by this command:
$ kubectl expose deployment webserver --type="NodePort" --port 80
service/webserver exposed
The service is now exposed through port 80. The –type=NodePort indicates that a specific port on all the Nodes (the VMs) is opened, and any traffic that is sent to this port is forwarded to the service.
$ kubectl get services
NAME         TYPE           CLUSTER-IP      EXTERNAL-IP   PORT(S)          AGE
hello-node   LoadBalancer   10.99.255.234   <pending>     8080:30841/TCP   47h
kubernetes   ClusterIP      10.96.0.1       <none>        443/TCP          2d3h
webserver    NodePort       10.105.20.120   <none>        80:32216/TCP     8m19s
3. To see the external IP address to access the service, run the command:
$ kubectl get service webserver
NAME        TYPE       CLUSTER-IP      EXTERNAL-IP   PORT(S)        AGE
webserver   NodePort   10.105.20.120   <none>        80:32216/TCP   22m
4. To see the environment to which the pod service has been exposed:
$ kubectl exec webserver-67f557b648-x64n2  -- env
PATH=/usr/local/sbin:/usr/local/bin:/usr/sbin:/usr/bin:/sbin:/bin
HOSTNAME=webserver-67f557b648-x64n2
KUBERNETES_SERVICE_PORT=443
KUBERNETES_SERVICE_PORT_HTTPS=443
HELLO_NODE_PORT_8080_TCP=tcp://10.99.255.234:8080
HELLO_NODE_PORT_8080_TCP_PROTO=tcp
HELLO_NODE_PORT_8080_TCP_ADDR=10.99.255.234
KUBERNETES_PORT_443_TCP=tcp://10.96.0.1:443
HELLO_NODE_SERVICE_PORT=8080
KUBERNETES_PORT=tcp://10.96.0.1:443
KUBERNETES_PORT_443_TCP_PROTO=tcp
KUBERNETES_PORT_443_TCP_PORT=443
KUBERNETES_PORT_443_TCP_ADDR=10.96.0.1
HELLO_NODE_PORT=tcp://10.99.255.234:8080
HELLO_NODE_PORT_8080_TCP_PORT=8080
KUBERNETES_SERVICE_HOST=10.96.0.1
HELLO_NODE_SERVICE_HOST=10.99.255.234
NGINX_VERSION=1.23.1
NJS_VERSION=0.7.6
PKG_RELEASE=1~bullseye
HOME=/root
5. To generate the URL for the service:
$ minikube service webserver --url
http://192.168.39.155:32216
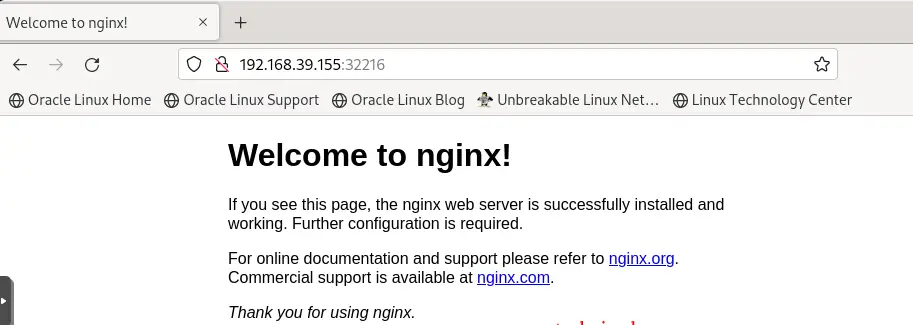
Visit your web browser and enter the following address on the URL: http://192.168.39.155:32216. You should see the Nginx welcome page.
B: A pod service as a Load Balancer.
This is the standard method for exposing a service to the internet. In this method, as the Load Balancer is spun, a single IP Address is generated that forwards all the traffic to the service. For this method to work, you need to enable the MetalLB addon which helps in setting the IP Address. Run the command below to list all the available add-ons.
minikube addons listOutput:
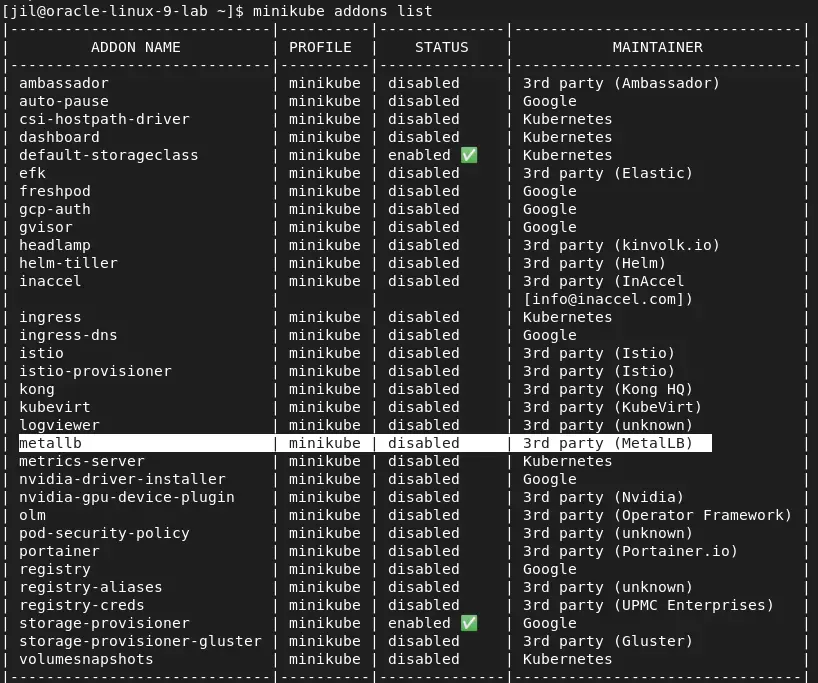
By default metallb is disabled. To enable the metallb addon, run the command.
$ minikube addons enable metallb
❗  metallb is a 3rd party addon and not maintained or verified by minikube maintainers, enable at your own risk.
    ▪ Using image docker.io/metallb/speaker:v0.14.8
    ▪ Using image docker.io/metallb/controller:v0.14.8
🌟  The 'metallb' addon is enabled
Obtain the minikube IP address by running the command:
$ minikube ip
192.168.39.155
Great, now set an IP range on the subnet above. Run the command:
$ minikube addons configure metallb
-- Enter Load Balancer Start IP: 192.168.39.19 <- Specify the Load Balancer Start IP Address
-- Enter Load Balancer End IP: 192.168.39.30 <- Specify the Load Balancer End IP Address.
    ▪ Using image docker.io/metallb/speaker:v0.14.8
    ▪ Using image docker.io/metallb/controller:v0.14.8
✅  metallb was successfully configured
Expose the service using the load balancer by running the command below.
$ kubectl delete svc webserver
service "webserver" deleted

$ kubectl expose deployment webserver --type="LoadBalancer" --port 80 --target-port 80
service/webserver exposed
$ kubectl delete svc webserver
service "webserver" deleted

$ kubectl expose deployment webserver --type="LoadBalancer" --port 80 --target-port 80
service/webserver exposed
Lets now verify the service:
$ kubectl get svc
NAME         TYPE           CLUSTER-IP      EXTERNAL-IP     PORT(S)          AGE
kubernetes   ClusterIP      10.96.0.1       <none>          443/TCP          3d3h
webserver    LoadBalancer   10.106.163.37   192.168.39.20   80:30259/TCP     2m30s
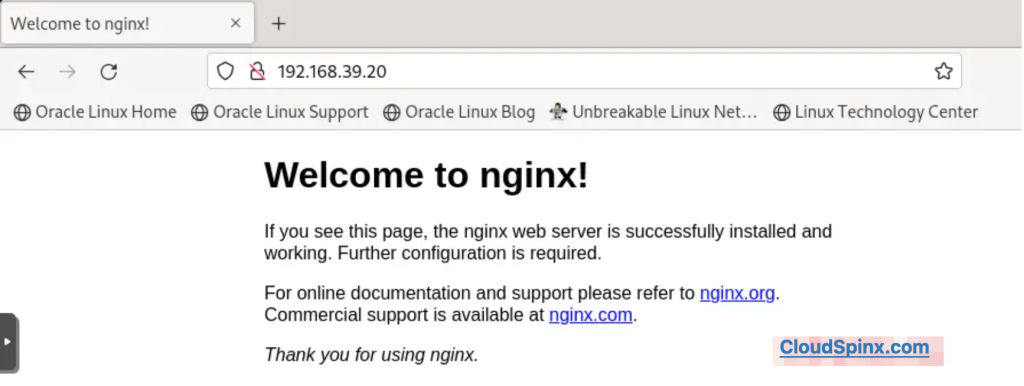
Our web server service is now exposed and can be accessed at http://192.168.39.20:80
Step 8: Using Ingress
Ingress is a Kubernetes API object that manages external access to the services in a cluster and provides load balancing, SSL termination, and name-based virtual hosting. Ingress exposes HTTP and HTTPS routes from outside the cluster to services within the cluster. For more information about Ingress | Kubernetes, visit the link. You must have an ingress controller to satisfy ingress. Ingress controllers should fit the reference specification.
A simple illustration of Ingress.

To use Ingress, you must begin by adding the Ingress addon.
1. List available add-ons by this command:
minikube addons list2. Enable the ingress addon by running the following command.
$ minikube addons enable ingress
💡  ingress is an addon maintained by Kubernetes. For any concerns contact minikube on GitHub.
You can view the list of minikube maintainers at: https://github.com/kubernetes/minikube/blob/master/OWNERS
    ▪ Using image k8s.gcr.io/ingress-nginx/controller:v1.12.0
    ▪ Using image k8s.gcr.io/ingress-nginx/kube-webhook-certgen:v1.3.0
    ▪ Using image k8s.gcr.io/ingress-nginx/kube-webhook-certgen:v1.3.0
🔎  Verifying ingress addon...
🌟  The 'ingress' addon is enabled
3. Check if the ingress controller is running.
$ kubectl get pods -n ingress-nginx
NAME                                                          READY       STATUS             RESTARTS      AGE
ingress-nginx-admission-create-ld5hh            0/1             Completed            0                   2m17s
ingress-nginx-admission-patch-5smzb           0/1             Completed            1                    2m17s
ingress-nginx-controller-5959f988fd-dntmd    1/1             Running               0                    2m17s
4 ) Create a minimal ingress resource.
using the text editor of your choice, create a yaml file say ingress.yaml, and paste the following contents.
vim ingress.yamlPaste this code:
apiVersion: networking.k8s.io/v1
kind: Ingress
metadata:
  name: example-ingress
  annotations:
    nginx.ingress.kubernetes.io/rewrite-target: /$1
spec:
  rules:
    - host: nginx.cloudspinx.com
      http:
        paths:
          - path: /
            pathType: Prefix
            backend:
              service:
                name: webserver
                port:
                  number: 80
Save and exit from the text editor.
5. Apply the manifest by this command.
$ kubectl create -f ingress.yaml
ingress.networking.k8s.io/example-ingress created
6. Verify if the manifest was created.
$ kubectl get ingress
NAME              CLASS           HOSTS                   ADDRESS          PORTS   AGE
example-ingress   nginx           nginx.cloudspinx.com   192.168.39.155   80      54s
7. We need to get the minikube IP that we will use to run our deployment on the web.
$ minikube ip
192.168.39.155
8. Edit the /etc/hosts with the host details created in the yaml file and the minikube IP address.
$ sudo vim /etc/hosts
192.168.39.155 nginx.cloudspinx.com
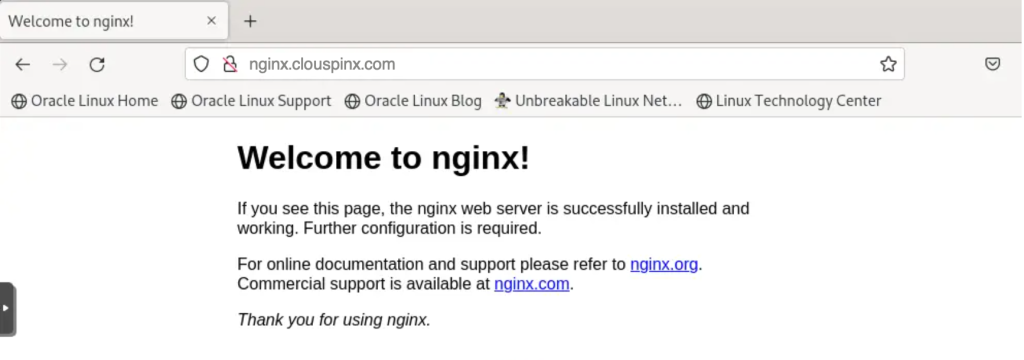
9. On your web browser, enter the address nginx.cloudspinx.com to test if the deployment via ingress is successful. You should see the default Nginx page.
To create replicas to handle large and multiple deployments for scalability purposes, run the command below.
$ kubectl scale deployment webserver --replicas=3
deployment.apps/webserver scaled
To verify if the replicas have been created, run the command:
$ kubectl get pods
NAME                         READY   STATUS    RESTARTS   AGE
webserver-67f557b648-4pst8   1/1     Running   0          69s
webserver-67f557b648-kmwwz   1/1     Running   0          2d20h
webserver-67f557b648-l6j27   1/1     Running   0          69s
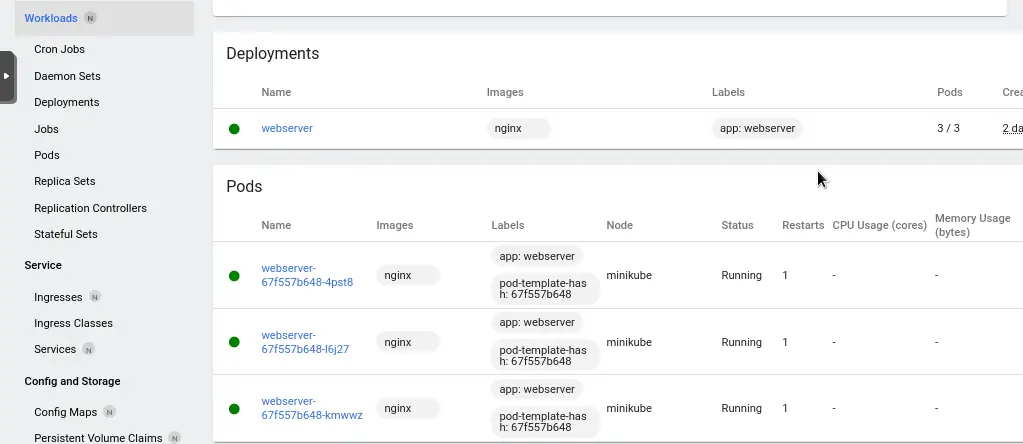
We now have 3 replicas. It’s important to note that 2 more replicas have been created. The existing one remains.
Step 9: Access the minikube dashboard.
Minikube has integrated support for Kubernetes Dashboard UI. The minikube dashboard is a web-based Kubernetes UI used to:-
- Deploy containerized applications to a K8s cluster.
- Troubleshoot containerized applications.
- Manage cluster resources.
- Getting an overview of the applications running in your cluster.
- Creating & modifying individual Kubernetes resources e.g deployments.
To access the minikube dashboard, execute the command below:
$ minikube dashboard
🤔  Verifying dashboard health ...
🚀  Launching proxy ...
🤔  Verifying proxy health ...
🎉  Opening http://127.0.0.1:44445/api/v1/namespaces/kubernetes-dashboard/services/http:kubernetes-dashboard:/proxy/ in your default browser...
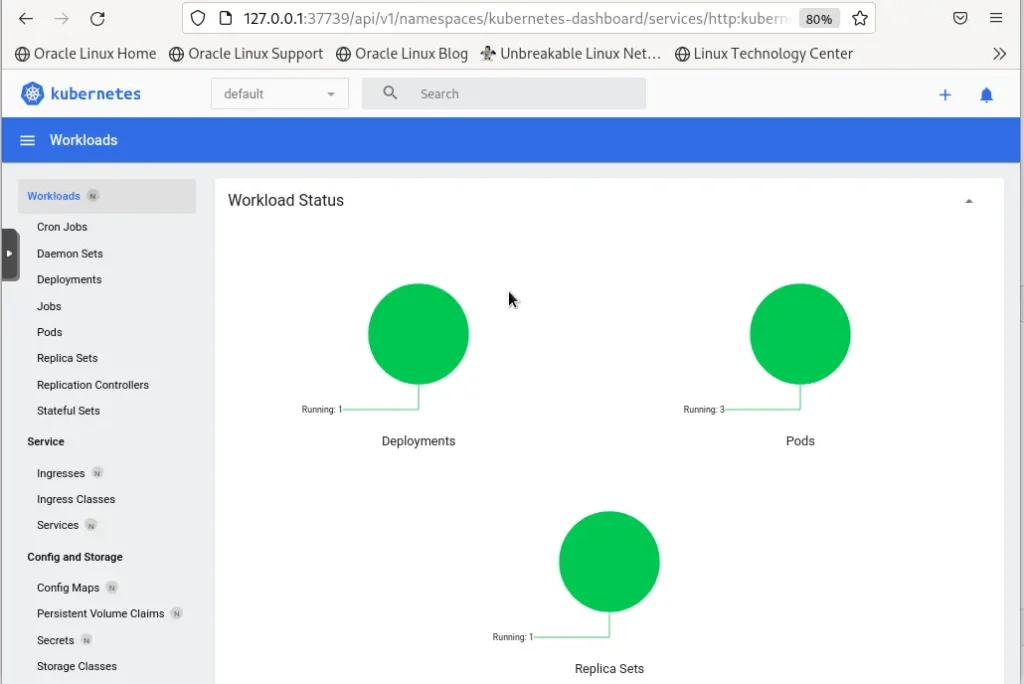
This command enables the dashboard add-on and opens the proxy in the default web browser. Screenshots will look like this :
Workloads:
Deployments and Pods:
Replica Sets:

If you do not want to open a dashboard, run the command as below:
$ minikube dashboard --url
🤔  Verifying dashboard health ...
🚀  Launching proxy ...
🤔  Verifying proxy health ...
http://127.0.0.1:36777/api/v1/namespaces/kubernetes-dashboard/services/http:kubernetes-dashboard:/proxy/
Step 10: Configure Persistent Volumes on Minikube
Minikube supports persistent volumes of the type hostpath out of the box. The persistent volumes are mapped to a directory inside the running minikube instance (usually a VM unless you use --driver=none, --driver=docker, or --driver=podman).
minikube is configured to persist files stored under the following directories:
- /data*
- /var/lib/minikube
- /var/lib/docker
- /var/lib/containerd
- /var/lib/buildkit
- /var/lib/containers
- /tmp/hostpath_pv*
- /tmp/hostpath-provisioner*
Read more on Persistent Volumes
Step 11: Runtime configuration
Container runtimes in minikube differ. The container runtimes include the following :
To explicitly select a container runtime e.g docker using minikube, run the command below.
$ minikube start --container-runtime=docker
😄  minikube v1.34.0 on Oracle 9.0 (kvm/amd64)
✨  Using the kvm2 driver based on existing profile
👍  Starting control plane node minikube in cluster minikube
🏃  Updating the running kvm2 "minikube" VM ...
🐳  Preparing Kubernetes v1.31.1 on Docker 20.10.18 ...
🔎  Verifying Kubernetes components...
    ▪ Using image docker.io/metallb/speaker:v0.14.8
    ▪ Using image docker.io/metallb/controller:v0.14.8
    ▪ Using image docker.io/kubernetesui/dashboard:v7.0.0
    ▪ Using image docker.io/kubernetesui/metrics-scraper:v1.0.8
    ▪ Using image gcr.io/k8s-minikube/storage-provisioner:v5
    ▪ Using image k8s.gcr.io/ingress-nginx/kube-webhook-certgen:v1.3.0
    ▪ Using image k8s.gcr.io/ingress-nginx/kube-webhook-certgen:v1.3.0
    ▪ Using image k8s.gcr.io/ingress-nginx/controller:v1.12.0
🔎  Verifying ingress addon...
🌟  Enabled addons: metallb, storage-provisioner, default-storageclass, ingress, dashboard
🏄  Done! kubectl is now configured to use "minikube" cluster and "default" namespace by default
To read more, visit Container Runtimes
Step 12: Managing minikube
To manage minikube, execute the commands below:
1. To SSH into minikube:
minikube ssh2. To see the available minikube add-ons.
minikube addons list3. To pause minikube:
$ minikube pause
⏸️  Pausing node minikube ...
⏯️  Paused 18 containers in: kube-system, kubernetes-dashboard, storage-gluster, istio-operator
4. To unpause minikube.
$ minikube unpause
⏸️  Unpausing node minikube ...
⏸️  Unpaused 18 containers in: kube-system, kubernetes-dashboard, storage-gluster, istio-operator
5. To start & stop minikube:
$ minikube stop
✋  Stopping node "minikube"  ...
🛑  1 node stopped.

$ minikube start
😄  minikube v1.27.1 on Oracle 9.0 (kvm/amd64)
✨  Using the kvm2 driver based on existing profile
👍  Starting control plane node minikube in cluster minikube
🔄  Restarting existing kvm2 VM for "minikube" ...
🐳  Preparing Kubernetes v1.25.2 on Docker 20.10.18 ...
🔎  Verifying Kubernetes components...
    ▪ Using image docker.io/kubernetesui/dashboard:v2.7.0
    ▪ Using image docker.io/kubernetesui/metrics-scraper:v1.0.8
    ▪ Using image docker.io/metallb/speaker:v0.9.6
    ▪ Using image docker.io/metallb/controller:v0.9.6
    ▪ Using image k8s.gcr.io/ingress-nginx/controller:v1.2.1
    ▪ Using image k8s.gcr.io/ingress-nginx/kube-webhook-certgen:v1.1.1
    ▪ Using image k8s.gcr.io/ingress-nginx/kube-webhook-certgen:v1.1.1
    ▪ Using image gcr.io/k8s-minikube/storage-provisioner:v5
🔎  Verifying ingress addon...
🌟  Enabled addons: storage-provisioner, default-storageclass, metallb, ingress, dashboard
🏄  Done! kubectl is now configured to use "minikube" cluster and "default" namespace by default
6. To delete minikube / purge minikube:
minikube deleteMinikube advanced features such as Load Balancing, filesystem mounts, and multiple add-ons to choose from make it one of the most preferred methods of deploying K8s clusters while using Ingress to expose applications to the outside world.

