There are a number of ways to deploy containers. You can use just Docker, Kubernetes, Microk8s, LXD and so on. In this guide, however, we are going to look at how to deploy docker containers with Ansible.
Ansible is a simple tool for IT automation. It uses ssh to run commands on remote servers. Ansible has been used in cloud automation, application deployment and configuration management among others. Ansible uses both playbooks and ad-hoc commands to run commands and deploy applications on remote servers.
Playbooks are yaml files that systematically define the remotes servers and the tasks to be performed. Ad-hoc commands on the other hand are single-line commands run on the terminal. We are going to use playbooks to deploy containers on remote servers.
My Lab Setup
In my set up, I have three servers running Ubuntu 24.04. One server has Ansible installed while the other two servers are the remote nodes where Docker containers will run.
- Ansible-server 192.168.50.2
- webserver-01 192.168.50.3
- webserver-02 192.168.50.4
Step 1: Install Ansible on your system
We need to install ansible on one of the servers. The Ansible server should reach the other remote servers via ssh. We will therefore generate ssh key and copy the public key to the remote servers. Ansible server should also have a user with root privileges.
Ubuntu / Debian
To install Ansible on Ubuntu/Debian, please run the below command:
sudo apt update && sudo apt install ansible -yCentOS / Rocky Linux / AlmaLinux
Run the commands below
sudo yum install epel-release
sudo yum install ansible
You can confirm that ansible us installed by checking on the version
$ ansible --version
ansible [core 2.16.3]
  config file = None
  configured module search path = ['/root/.ansible/plugins/modules', '/usr/share/ansible/plugins/modules']
  ansible python module location = /usr/lib/python3/dist-packages/ansible
  ansible collection location = /root/.ansible/collections:/usr/share/ansible/collections
  executable location = /usr/bin/ansible
  python version = 3.12.3 (main, Sep 11 2024, 14:17:37) [GCC 13.2.0] (/usr/bin/python3)
  jinja version = 3.1.2
  libyaml = True
Step 2: Generate ssh key
We need to generate ssh and copy the public key to the remote servers.
ssh key-genProvide the location to save your ssh keys and choose whether to use a passphrase. For my case, I choose the default location. Once saved, copy Public key to the remote servers with the below command:
ssh-copy-id user@remote-server-ipEnsue that you can ssh to your remote servers from Ansible server using ssh key. Also confirm you can reach all your remote servers through ping. For this we will need to define our remote servers in Ansible hostsfile. Ansible configuration files are in /etc/ansible
$ ls -alh
drwxr-xr-x  2 root root 4.0K Nov  6 15:29 .
drwxr-xr-x 93 root root 4.0K Nov  6 13:48 ..
-rw-r--r--  1 root root  20K Mar  5  2020 ansible.cfg
-rw-r--r--  1 root root  982 Dec 18  2018 hosts
Rename the hosts file and create another one as below
sudo mv /etc/ansible/hosts /etc/ansible/hosts.orig
sudo vim /etc/ansible/hosts
Add your remote servers so that your file appear as below:
[myservers]
192.168.50.3
192.168.50.4
Now ping all the servers with ansible command as below:
$ ansible -m ping all
192.168.50.3 | SUCCESS => {
   "ansible_facts": {
       "discovered_interpreter_python": "/usr/bin/python3"
   },
   "changed": false,
   "ping": "pong"
}
192.168.50.4 | SUCCESS => {
   "ansible_facts": {
       "discovered_interpreter_python": "/usr/bin/python3"
   },
   "changed": false,
   "ping": "pong"
}
Step 3: Install Docker CE on Linux
Since we need Docker for deploying containers, we are going to install Docker CE on our remote servers.
Refer to the guide in the link below:
Step 4: Create Docker container using Ansible
We have installed Docker CE on our remote hosts using Ansible. Next we are going to deploy an Nginx container using ansible. Define the variables that will be used in creating the container as below.
vars:
	create_containers: 1
	default_container_name: nginx
	default_container_image: nginx
Pull image from Docker hub.
- name: Pull default Docker image
   docker_image:
     name: "{{ default_container_image }}"
     source: pull
We then need to define container deployment in our playbook as below:
- name: Create default containers
  docker_container:
    name: "{{ default_container_name }}{{ item }}"
    image: "{{ default_container_image }}"
    state: present
  with_sequence: count={{ create_containers }}
Our Playbook should finally look as below:
$ vim create_docker_containers.yaml
---
- hosts: myservers
  become: true
  vars:
    create_containers: 1
    default_container_name: nginx
    default_container_image: nginx

  tasks:
    - name: Install Docker Module for Python
      pip:
        name: docker
    - name: Pull default docker image
      docker_image:
        name: "{{ default_container_image }}"
        source: pull
    - name: Create container
      docker_container:
        name: "{{ default_container_name }}{{ item }}"
        image: "{{ default_container_image }}"
        state: started
        ports: "8080:80"
      with_sequence: count={{ create_containers }}
Run the playbook:
$ ansible-playbook create_docker_containers.yaml --become --user=USER --become-user=root --become-method=sudo Where USER is replaced with the remote system user:
Go ahead and confirm if Docker is actually running using the below ad-hoc command:
$ ansible all -m shell -a 'systemctl status docker'
192.168.50.3 | CHANGED | rc=0 >>
● docker.service - Docker Application Container Engine
     Loaded: loaded (/lib/systemd/system/docker.service; enabled; vendor preset: enabled)
     Active: active (running) since Thu 2024-11-07 17:17:42 EAT; 17h ago
TriggeredBy: ● docker.socket
       Docs: https://docs.docker.com
   Main PID: 16327 (dockerd)
      Tasks: 11
     Memory: 22.0M
     CGroup: /system.slice/docker.service
             └─16327 /usr/bin/dockerd -H fd:// --containerd=/run/containerd/containerd.sock
192.168.50.3 | CHANGED | rc=0 >>
● docker.service - Docker Application Container Engine
     Loaded: loaded (/lib/systemd/system/docker.service; enabled; vendor preset: enabled)
     Active: active (running) since Thu 2024-11-07 17:17:52 EAT; 17h ago
TriggeredBy: ● docker.socket
       Docs: https://docs.docker.com
   Main PID: 15750 (dockerd)
      Tasks: 13
     Memory: 209.1M
     CGroup: /system.slice/docker.service
             └─15750 /usr/bin/dockerd -H fd:// --containerd=/run/containerd/containerd.sock
Confirm the pulled images on the remote servers with the below Ansible Ad-hoc command:
$ ansible all -m shell -a 'docker images'
192.168.50.3 | CHANGED | rc=0 >>
REPOSITORY          TAG                 IMAGE ID            CREATED             SIZE
nginx               latest              c39a868aad02        28 hours ago        133MB
192.168.50.4 | CHANGED | rc=0 >>
REPOSITORY          TAG                 IMAGE ID            CREATED             SIZE
nginx               latest              c39a868aad02        28 hours ago        133MB
Confirm running containers as well.
$ ansible all -m shell -a 'docker ps'
192.168.50.3 | CHANGED | rc=0 >>
CONTAINER ID        IMAGE               COMMAND                  CREATED             STATUS              PORTS                  NAMES
dde76d45b0c7        nginx               "/docker-entrypoint.…"   26 seconds ago      Up 23 seconds       0.0.0.0:8080->80/tcp   nginx1
192.168.50.4 | CHANGED | rc=0 >>
CONTAINER ID        IMAGE               COMMAND                  CREATED             STATUS              PORTS                  NAMES
c7b6e5381ed8        nginx               "/docker-entrypoint.…"   26 seconds ago      Up 24 seconds       0.0.0.0:8080->80/tcp   nginx1
You can use various Ad-hoc commands to manage containers in the individual remote nodes from the Ansible node. Examples below:
Let us open port 8080 on our remote nodes:
$ ansible all -m shell -a 'ufw allow 8080/tcp'
192.168.50.3 | CHANGED | rc=0 >>
Rule added
Rule added (v6)
192.168.50.4 | CHANGED | rc=0 >>
Rule added
Rule added (v6)
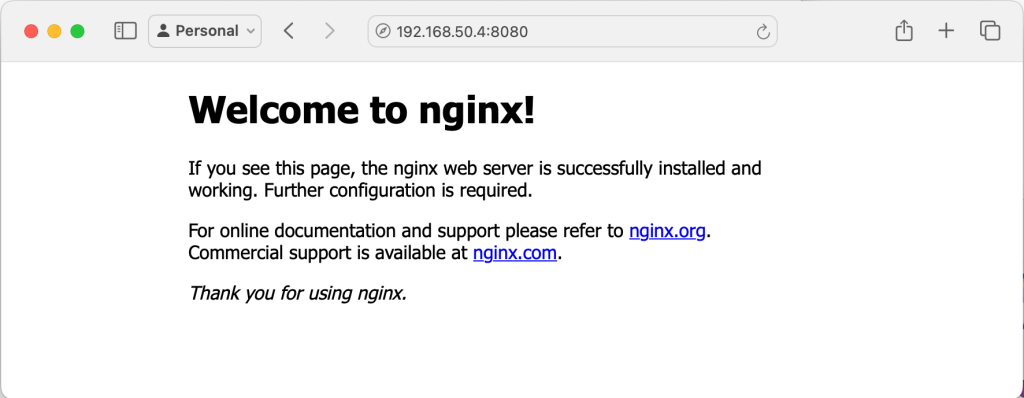
Now navigate to your browser, enter ‘http://<your-remote-host-ip>:8080. You should get Nginx welcome page from both of your remote servers.

List the IDs of all running containers:
$ ansible all -m shell -a '(docker ps -aq)'
192.168.50.3 | CHANGED | rc=0 >>
3e182d1f3a42
192.168.50.4 | CHANGED | rc=0 >>
0e6e05f18ec8
To stop all running containers:
$ ansible all -m shell -a 'docker stop $(docker ps -aq)'
192.168.50.3 | CHANGED | rc=0 >>
3e182d1f3a42
192.168.50.4 | CHANGED | rc=0 >>
0e6e05f18ec8
Delete all running containers in all nodes:
$ ansible all -m shell -a 'docker rm $(docker ps -aq)'
192.168.50.3 | CHANGED | rc=0 >>
3e182d1f3a42
192.168.50.3 | CHANGED | rc=0 >>
0e6e05f18ec8
This has been a step-by-step guide on how to manage Docker Containers with Ansible. Ansible is a very crucial tool for IT Engineers which helps in managing many remote servers from a centralized server. It is a tool you would want to learn about ease your IT operations.
Explore More with CloudSpinx
Looking to streamline your tech stack? Here at CloudSpinx, we deliver robust solutions tailored to your needs.


