We previously installed Asterisk LTS 18 on Rocky Linux 9 and we saw that it can only be administered from the command line. However, there is another tool called FreePBX that can help us manage Asterisk from a Web-based user interface. Just like Asterisk, FreePBX is free and opensource you can easily install it alongside your Asterisk installation. We are going to look at how to install FreePBX on Rocky Linux 9. You need to have Asterisk already installed and you can refer to our guide on how to install Asterisk on Rocky Linux 9|AlmaLinux 9.
The following steps will guide us through all we need to do to install FreePBX on Rocky Linux 9|AlmaLinux 9:
Step 1: Update system packages
As usual, start by ensuring that you are running the latest system packages. We also need to set SElinux in permissive mode or you might need to disable it. Reboot the system after as per the below commands:
# Upgrade system
sudo dnf -y update

# Disable SELinux
sudo setenforce 0
sudo sed -i 's/\(^SELINUX=\).*/\SELINUX=disabled/' /etc/selinux/config

# Reboot system
sudo reboot
Step 2: Install Required Dependencies
Proceed to install the packages necessary for FreePBX installation
sudo dnf -y groupinstall  "Development Tools"
sudo dnf install -y  wget ncurses-devel sendmail sendmail-cf newt-devel libxml2-devel libtiff-devel gtk2-devel subversion kernel-devel git crontabs cronie cronie-anacron wget vim sqlite-devel net-tools gnutls-devel unixODBC
Step 3: Install MariaDB Database Server
FreePBX requires a database to store it’s data and in this case we are using Mariadb. Install it and start as below:
sudo dnf -y install mariadb mariadb-server
sudo systemctl enable --now mariadb
Secure your MariaDb installation
$ sudo mysql_secure_installation
Set root password? [Y/n] n
New password: password
Re-enter new password: password
Remove anonymous users? [Y/n] Y
Disallow root login remotely? [Y/n] Y
Remove test database and access to it? [Y/n] Y
Reload privilege tables now? [Y/n] Y
Step 4: Install Node.js LTS
FreePBX also requires Node.js. Proceed to install it as shown:
sudo yum install -y curl
curl -fsSL https://rpm.nodesource.com/setup_18.x -o nodesource_setup.sh
sudo bash nodesource_setup.sh
sudo yum install -y nodejs
node -v
Step 5: Install Apache Web Server
Apache Web server is required to provide web access to freePBX that will help in managing Asterisk. Since we already had a user called ‘asterisk’ from our previous Asterisk installation, set this user to own /var/www/html directory where we will place FreePBX files.
#Install httpd
sudo dnf -y install httpd

#remove default index.html page
sudo rm -f /var/www/html/index.html

#Start httpd and  enable it to be starting automatically on system boot
sudo systemctl enable --now httpd

#If running an active firewall, ensure to open httpd
sudo firewall-cmd --add-service={http,https} --permanent
sudo firewall-cmd --reload
Step 6: Install php extensions as required
Add EPEL and REMI repositories:
sudo dnf -y install yum-utils
sudo dnf -y install https://dl.fedoraproject.org/pub/epel/epel-release-latest-9.noarch.rpm
sudo dnf -y install https://rpms.remirepo.net/enterprise/remi-release-9.rpm
sudo dnf module -y reset php
sudo dnf module -y install php:remi-7.4
Run the command below to install required php extensions:
sudo dnf install -y wget php php-pear php-cgi php-common php-curl php-mbstring php-gd php-mysqlnd php-gettext php-bcmath php-zip php-xml php-json php-process php-snmp

sudo pear install Console_Getopt
Set the maximum upload size for php:
$ sudo vi /etc/php.ini
upload_max_filesize = 20M
Then proceed to start php-fpm and httpd.
sudo systemctl restart php-fpm httpd
sudo systemctl enable php-fpm httpd
Step 7: Install FreePBX on Rocky Linux 9|AlmaLinux 9
Before installing FreePBX, make the following modifications for Apache
sudo sed -i 's/\(^memory_limit = \).*/\1128M/' /etc/php.ini
sudo sed -i 's/^\(User\|Group\).*/\1 asterisk/' /etc/httpd/conf/httpd.conf
sudo sed -i 's/AllowOverride None/AllowOverride All/' /etc/httpd/conf/httpd.conf
sudo sed -i 's/\(^user = \).*/\1asterisk/' /etc/php-fpm.d/www.conf
sudo sed -i 's/\(^group = \).*/\1asterisk/' /etc/php-fpm.d/www.conf
sudo sed -i 's/\(^listen.acl_users = \).*/\1apache,nginx,asterisk/' /etc/php-fpm.d/www.conf
Go ahead to download and install FreePBX on your Rocky Linux 9|AlmaLinux 9 using the below commands. We are installing FreePBX 16. Change into /var/www/ directory and download FreePBX there:
wget http://mirror.freepbx.org/modules/packages/freepbx/7.4/freepbx-16.0-latest.tgz
tar vxfz freepbx-16.0-latest.tgz
cd freepbx
sudo systemctl stop asterisk
sudo ./start_asterisk start
sudo ./install --webroot=/var/www/html -n
#or use this command if you have set root password for DB
#sudo ./install --webroot=/var/www/html -n --dbuser root --dbpass DBPassword
Sample Output:
...
Finished updating libraries!
Generating CSS...Done
Module pm2 version 16.0.5 successfully installed
Updating Hooks...Done
Chowning directories...Done

Installing recordings...
Updating tables recordings...Done
Generating CSS...Done
Module recordings version 16.0.5 successfully installed
Updating Hooks...Done
Chowning directories...Done

Done. All modules installed.
Updating Hooks...Done
Chowning directories...Done
Chowning directories...Done
Chowning directories...Done
Chowning directories...Done
Chowning directories...Done
Chowning directories...Done
Chowning directories...Done
Chowning directories...Done
Chowning directories...Done
Chowning directories...Done
Done installing all modules
Taking too long? Customize the chown command, See http://wiki.freepbx.org/display/FOP/FreePBX+Chown+Conf
Setting Permissions...
Setting base permissions...Done in 1 seconds
Setting specific permissions...
 45391 [============================]
Finished setting permissions
Taking too long? Customize the chown command, See http://wiki.freepbx.org/display/FOP/FreePBX+Chown+Conf
Setting Permissions...
Setting base permissions...Done in 0 seconds
Setting specific permissions...
 45391 [============================]
Finished setting permissions
Generating default configurations...
Finished generating default configurations
You have successfully installed FreePBX
[root@asterisk freepbx]#
Install all Freepbx modules:
sudo fwconsole ma disablerepo commercial
sudo fwconsole ma installall
sudo fwconsole ma delete firewall
sudo fwconsole reload
sudo fwconsole restart
Restart httpd and php-fpm services:
sudo systemctl restart httpd php-fpmCreate FreePBX systemd (startup script)
Create a systemd unit for auto-starting the service:
sudo tee /etc/systemd/system/freepbx.service<<EOF
[Unit]
Description=FreePBX VoIP Server
After=mariadb.service
[Service]
Type=oneshot
RemainAfterExit=yes
ExecStart=/usr/sbin/fwconsole start -q
ExecStop=/usr/sbin/fwconsole stop -q
[Install]
WantedBy=multi-user.target
EOF
Enable the service to autostart:
sudo systemctl daemon-reload
sudo systemctl enable freepbx
Step 8: Accessing FreePBX from the browser
Up to this point, you are done with installation of FreePBX which should enable us to manage Asterisk which we previously installed. We have also made asterisk user to own FreePBX files. Now head over to your browser and load FreePBX using your server IP address or hostname. You should get the below page:
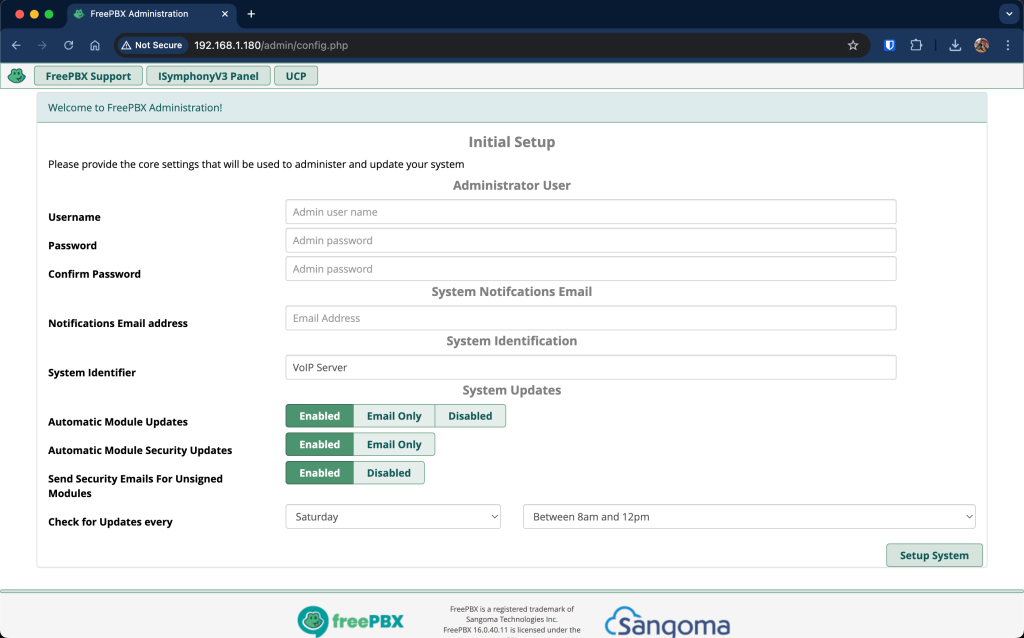
Set username, password and notification email as requested on the page, the click on ‘set up system’ at the bottom right. It should take you to this next page:
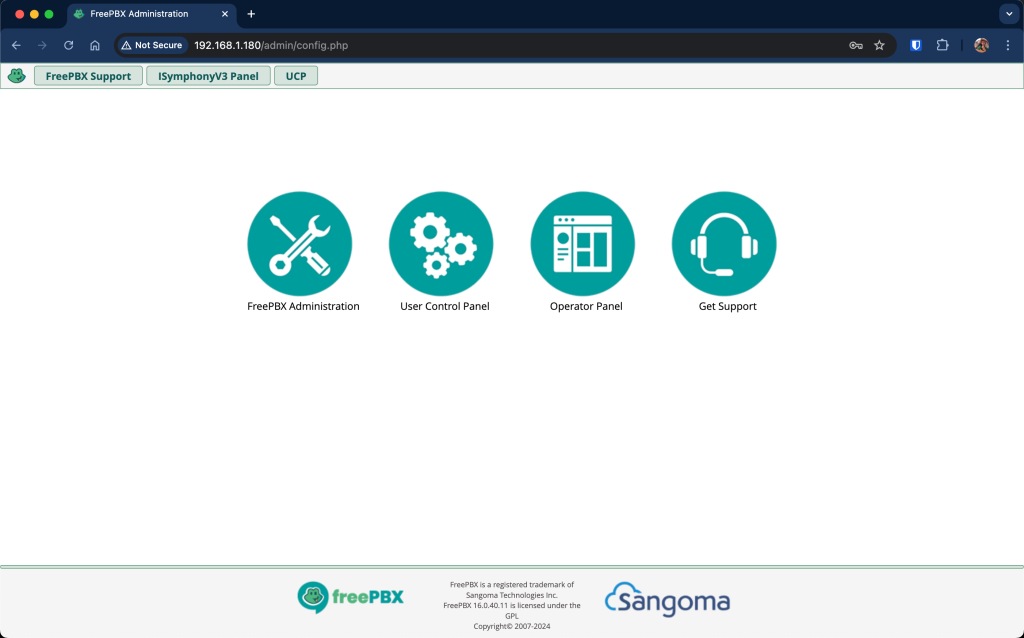
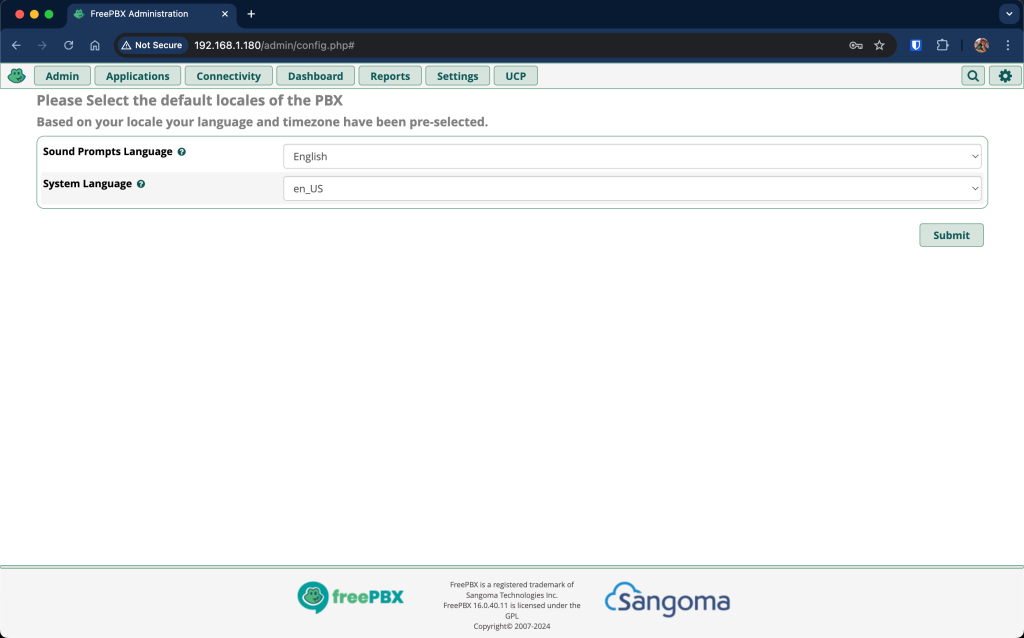
Since we are installing the FreePBX server, select ‘FreePBX administration‘. It will ask you to enter credentials. Enter the username and password as you had set in the first page. When you click ‘continue‘ it takes you to the page as shown. Select your language and submit.
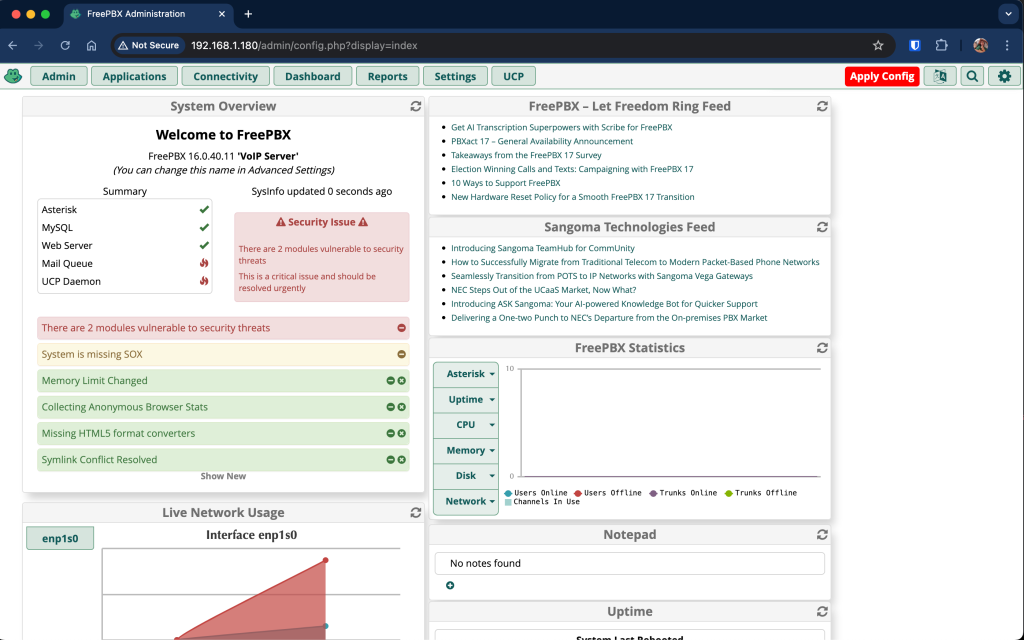
Once you submit your language, you are taken to the main configuration page.
Step 9: Configuring FreePBX on Rocky Linux 9|AlmaLinux 9
You can do a lot of configurations such as adding a DID (trunks), creating extensions, creating inbound and outbound rules, call recordings and many more.
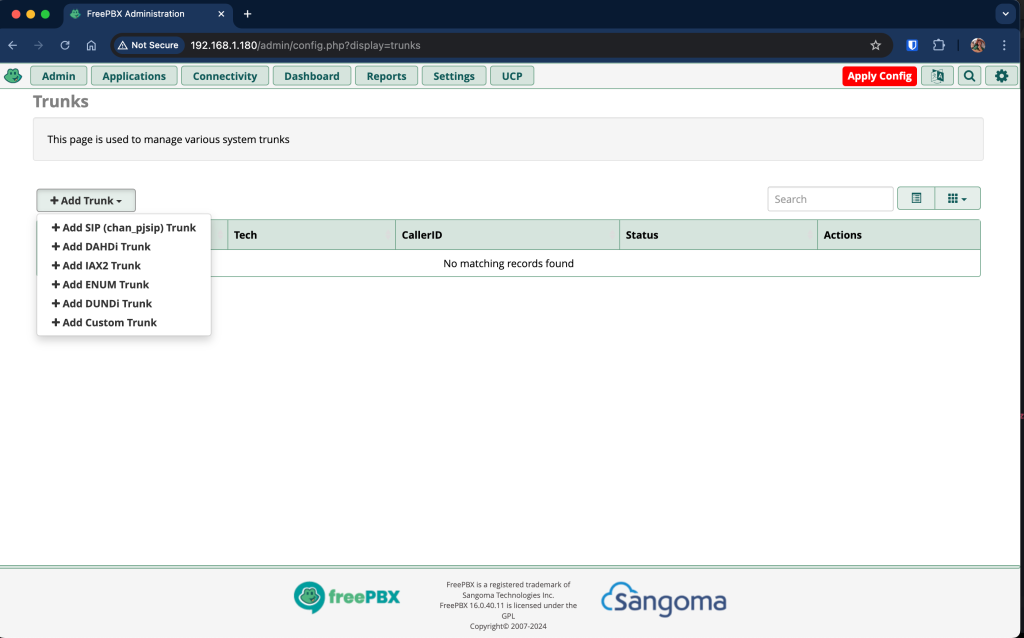
To add a trunk, click on Connectivity -> trunks -> Add trunk
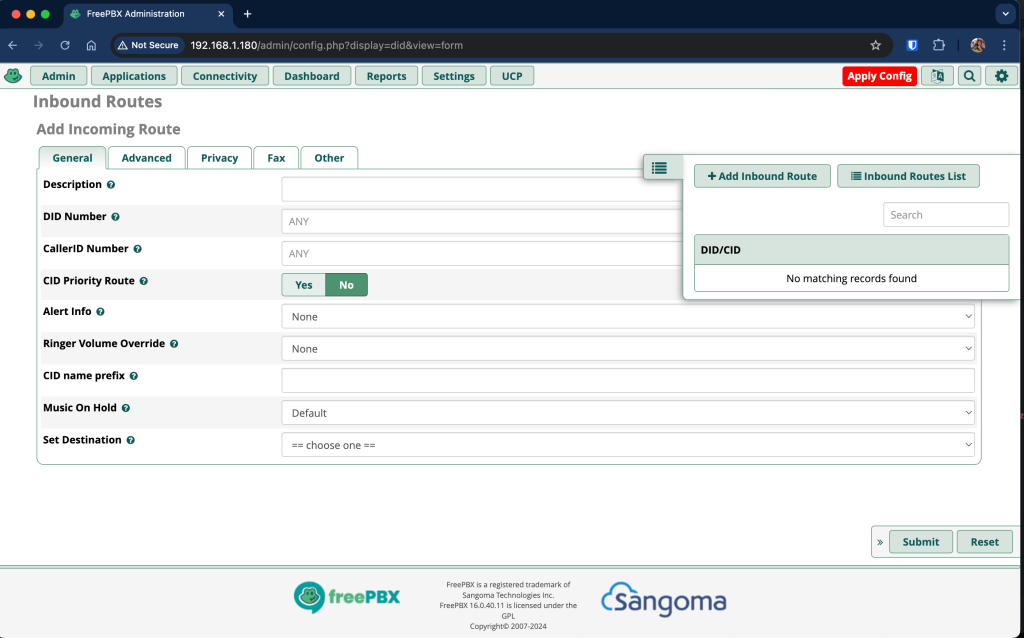
To add inbound and outbound rules, click connectivity and choose either inbound or outbound route, then click ‘add inbound/outbound route‘. I have selected inbound:
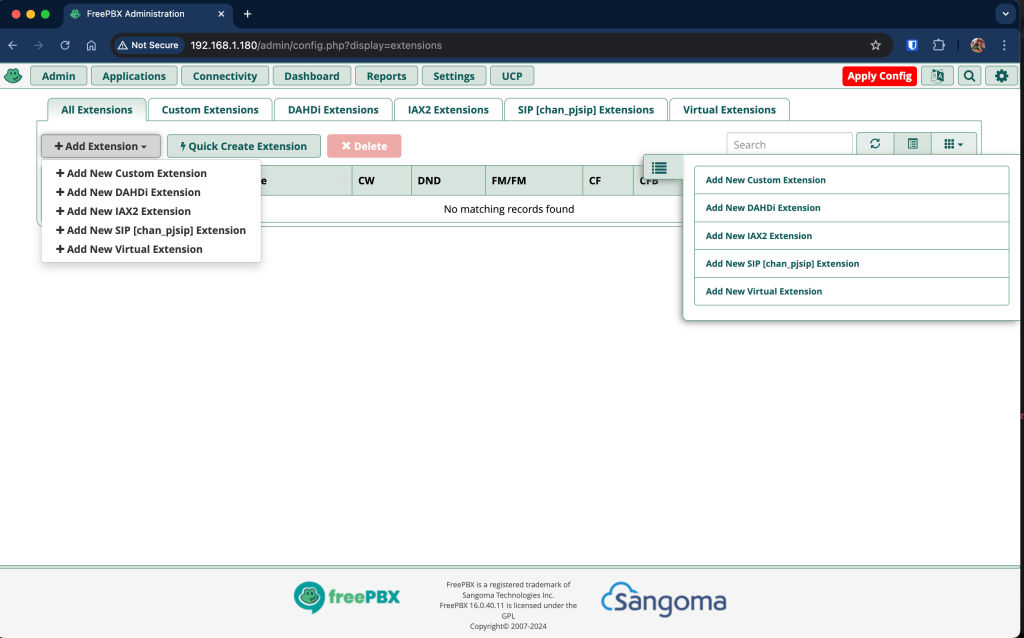
To create extensions, click on Applications –> Extensions –> add extensions
There are so many other configurations that you can play around with to make your communication effective. I hope the guide has been useful in enabling you to install FreePBX for managing your Asterisk installation. Make sure to visit our previous guide that explains how to install Asterisk on Rocky Linux 9|AlmaLinux 9 so that so that you can continue with this guide on setting up FreePBX.
Explore More with CloudSpinx
Looking to streamline your tech stack? At CloudSpinx, we deliver robust solutions tailored to your needs.


