Xfce is a lightweight desktop environment for UNIX-like operating systems designed to run fine on minimal system resources ie (small memory footprint and CPU usage) while being visually appealing and user friendly.
The Xfce desktop was developed in 1996 as an extension of the UNIX Common Desktop Environment (CDE) using the XForms graphical toolkit.
Over the years, Xfce has been rewritten and no longer uses code from XForms or CDE, but it has remained a solid lightweight graphical desktop for the Linux world.
Xfce features/components
Xfce Desktop Environment doesn’t have lots of fancy features. The following are the features/components of Xfce Desktop Environment.
- Display Manager – Xfce display manager is called LightDM.
- File Manager – called Thunar.
- Favorites bar – A single icon on the left of the panel that displays favorites, recent applications and application menu.
- Panels – A single panel located on the top of the window.
- System Tray – A set of icons on the right side of the panel.
- Windows Manager – The specialized Xfwm, which utilizes its own compositor manager.
In our previous article, we looked at the installation of KDE Desktop Environment on Rocky Linux 8.In this article we will discuss the installation of Xfce Desktop Environment on Rocky Linux 8.
Step 1: Update your system
On your terminal and as root run the command to update your Linux System.
sudo dnf updateStep 2: Install & Enable EPEL Repository
EPEL (Extra Package for Enterprise Linux ) packages allows you to use Centos high quality packages maintained on Red Hat Enterprise Linux (RHEL) and its compatible derivatives.
Run the command below to install latest EPEL packages.
sudo dnf install epel-releaseThe command below shows available package groups available for installation on your system.
sudo dnf --enablerepo=epel groupStep 3: Enable Power tools repository
Power tools repository allows administrators to use the standard Linux package management tools to deploy and maintain tools on Linux systems.
The command to enable packages from power tools repo is as shown below.
sudo dnf config-manager --set-enabled powertoolsThe command above has no output, but to check whether power tools are enabled, run the command below.
sudo dnf repolistStep 4: Check Xfce package in group
Check availability of packages to install Xfce Desktop Environment:
sudo dnf group listYou can check the version of Xfce Desktop Environment to be installed. This can be done by running the following command in your terminal.
sudo xfce4-panel --versionStep 5: Install Xfce package and Xorg display server
Open your favorite terminal session and execute below commands to install Xfce packages.
sudo dnf groupinstall "Xfce" "base-x"Step 6: Set default target system to graphical
Enable your system to default to graphical on the next login by setting the default Desktop Environment to graphical.
The command to set-default graphical.
sudo systemctl set-default graphicalVerify if default target is set to graphical by listing the units using the command below.
systemctl list-unitsFor minimal server installation you can just run below commands to start Desktop environment:
echo "exec /usr/bin/xfce4-session" >> ~/.xinitrc
startx
Step 7: Reboot your Linux system
Reboot your system with the command below:
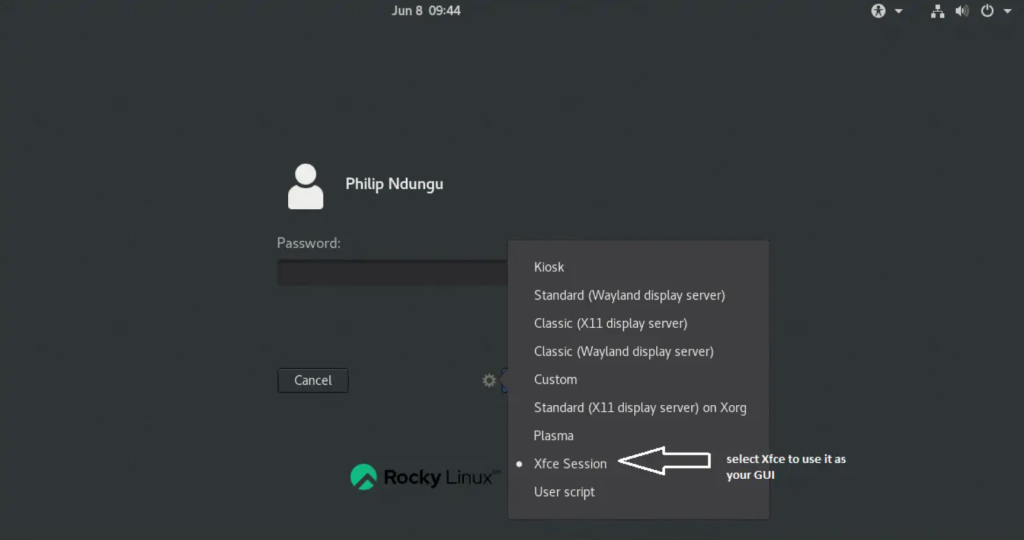
sudo systemctl rebootIn the login screen click the “settings” icon next to the “Sign In” button and select Xfce Session.

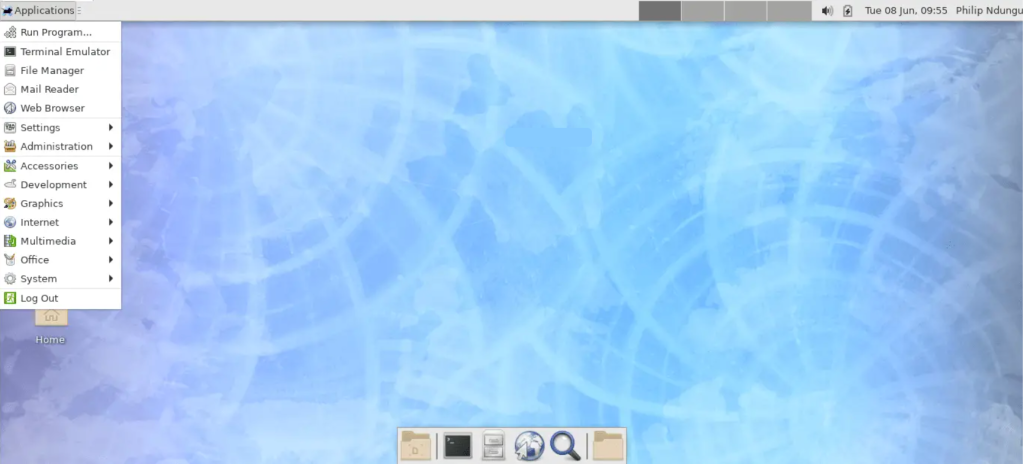
On login, your Xfce Desktop Environment looks this.

Enjoy using Xfce Desktop Environment on Rocky Linux. In the next article we will discuss the installation of VNC Server in Rocky Linux.
Checkout more articles:


