Terraform is an open-source infrastructure as code(IaC) software program created by HashiCorp. HashiCorp Configuration Language, or optionally JSON, a declarative configuration language, is used by users to define and deliver data center architecture. Terraform can manage both low-level and high-level components, such as compute, storage, and networking resources, as well as DNS records and SaaS capabilities. Terraform uses application programming interfaces to construct and manage resources on cloud platforms and other services (APIs).
Terraform use cases
Here, we’ll go over some common Terraform use cases.
- Terraform may be used to quickly deploy, release, scale, and monitor multi-tier applications’ infrastructure.
- Terraform can assist you in enforcing standards regarding the types of resources that teams are allowed to provide and use.
- Your centralized operations staff at a large company may receive a lot of recurring infrastructure requests.
- Terraform can work with Software Defined Networks (SDNs) to autonomously configure networks based on the requirements of the applications that operate on them.
- Kubernetes is a workload scheduler for containerized applications that is open-source. Terraform allows you to both deploy and manage a Kubernetes cluster e.g. pods, deployments, services, and many more.
- Using several clouds to provision infrastructure improves fault tolerance and allows for a more smooth recovery from cloud provider failures.
- Platform as a Service (PaaS) companies like Heroku let you build web applications and add-ons like databases and email providers.
Install Terraform on Linux
You can install Terraform in different Linux distribution as follows:
Install Terraform on Ubuntu|Debian
Install Terraform on Ubuntu/Debian as follows.
Add GPG key to your Ubuntu / Debian system:
sudo apt update && sudo apt install curl
curl -fsSL https://apt.releases.hashicorp.com/gpg | sudo apt-key add -
Add the repository to the system:
sudo apt-add-repository "deb [arch=$(dpkg --print-architecture)] https://apt.releases.hashicorp.com $(lsb_release -cs) main"Install Terraform from the repository:
sudo apt install terraformInstall Terraform on CentOS|Rocky Linux|AlmaLinux
Install yum-utils package:
sudo yum install -y yum-utilsNext we add CentOS|Rocky Linux|AlmaLinux YUM repository:
sudo yum-config-manager --add-repo https://rpm.releases.hashicorp.com/RHEL/hashicorp.repoInstall Terraform by using the commands below:
sudo yum -y install terraformInstall Terraform on Amazon Linux 2
Follow the guide below to install Terraform on Amazon Linux 2.
Confirm the terraform version installed:
$ terraform  --version
Terraform v1.9.8
on linux_amd64
Sample Terraform Configuration used with Google Cloud
The following is the Terraform configuration file used with Google Cloud. The file has .tf extension i.e. main.tf .
terraform {
  required_providers {
    google = {
      source = "hashicorp/google"
      version = "3.5.0"
    }
  }
}

provider "google" {
  credentials = file("<NAME>.json")

  project = "<PROJECT_ID>"
  region  = "us-central1"
  zone    = "us-central1-c"
}

resource "google_compute_network" "vpc_network" {
  name = "terraform-network"
}<NAME> should be replaced with the path to the service account key file you obtained, and <PROJECT_ID> should be replaced with the ID of your project.
Terraform parameters, including the essential providers Terraform will use to provision your infrastructure, are contained in the terraform {} block.
Creating VM instance in Cloud Cloud using Terraform
The following are prerequisites in order to create an instance using Terraform.
- You’ll need a Google Cloud Platform account to get started. Create a Google Cloud Platform account if you don’t already have one. This tutorial can be performed entirely with the GCP free tier’s services.
- Locally installed Terraform version 0.15.3+.
GCP Setup
To enable Terraform to provision your infrastructure, build or edit the following resources after creating your GCP account.
a) GCP Project
Resources are organized into projects by GCP. Create one in the GCP console right now and save the project ID. In the cloud resource manager, you may see a list of your projects.
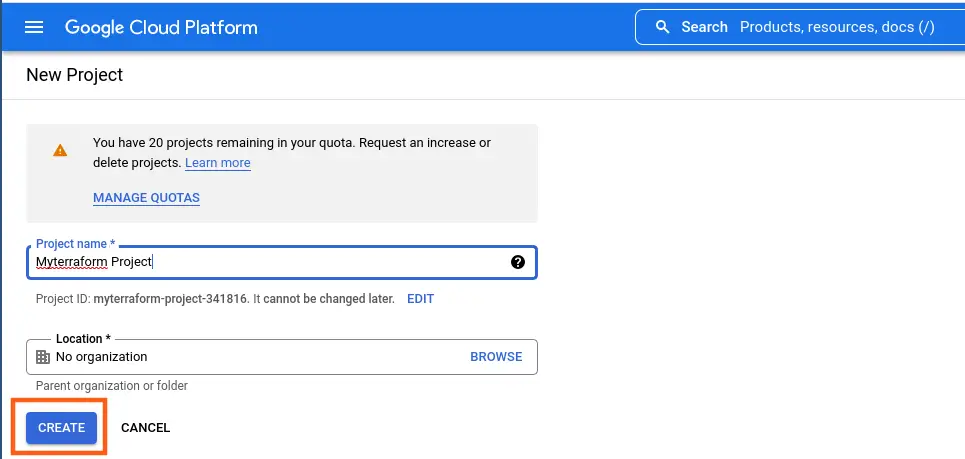
b) Google Compute Engine
In the GCP console, enable Google Compute Engine for your project. To follow this lesson, make sure you select the project you’ll be using and click the “Enable” option.

c) GCP service account key
To allow Terraform to access your GCP account, create a service account key. Use the following procedures when creating the key:
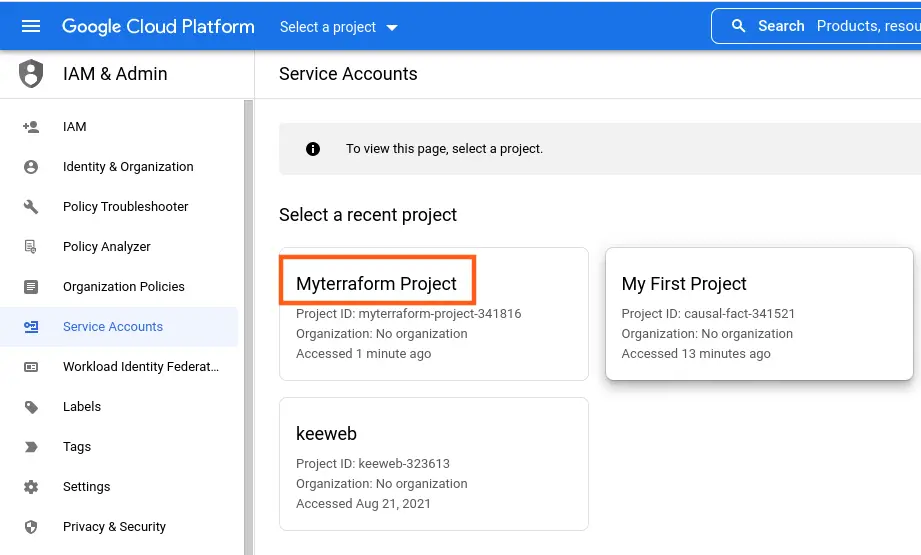
Choose the project you made in the preceding stage.
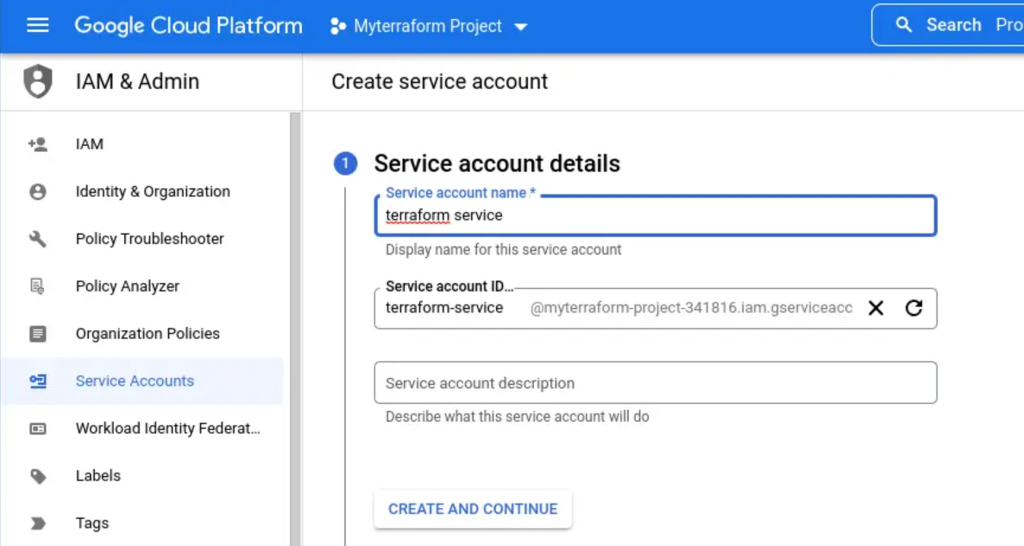
Select “Create Service Account“.

Click “Create” and give it whatever name you like.
Choose “Project -> Editor” for the Role, then “Continue.”
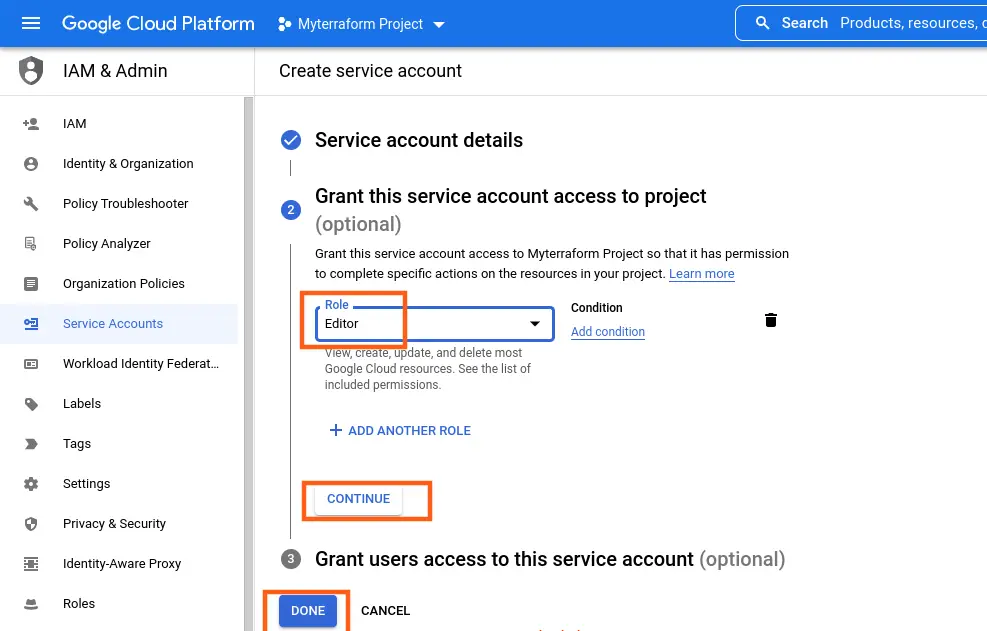
Click “Done” instead of providing more users access. Download your service account key after you’ve created your service account:
Choose your service account from the list.
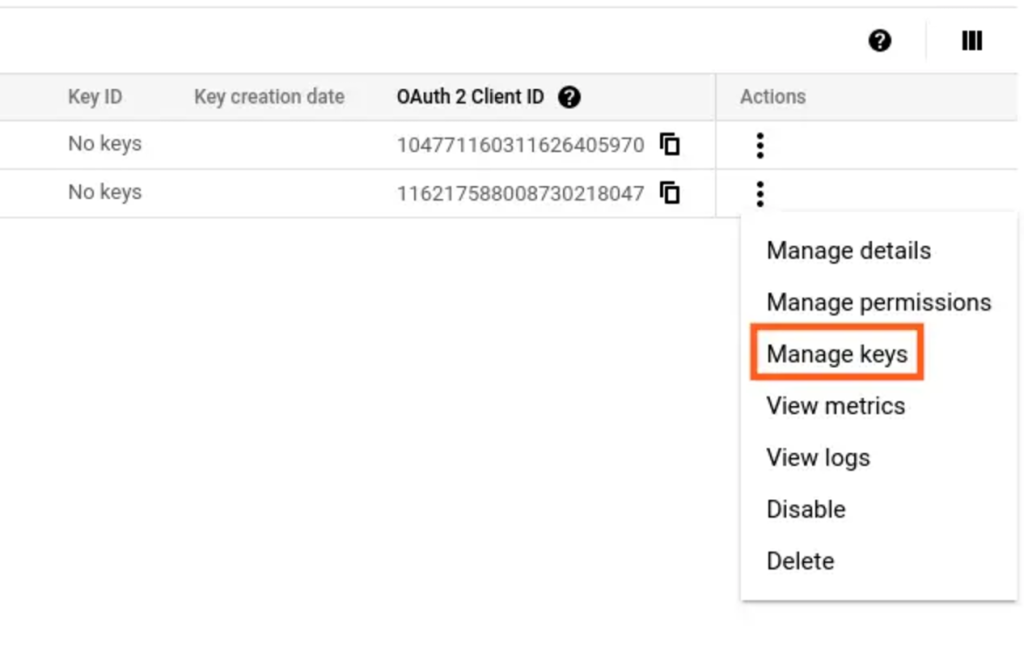
The “Keys” tab should be selected.
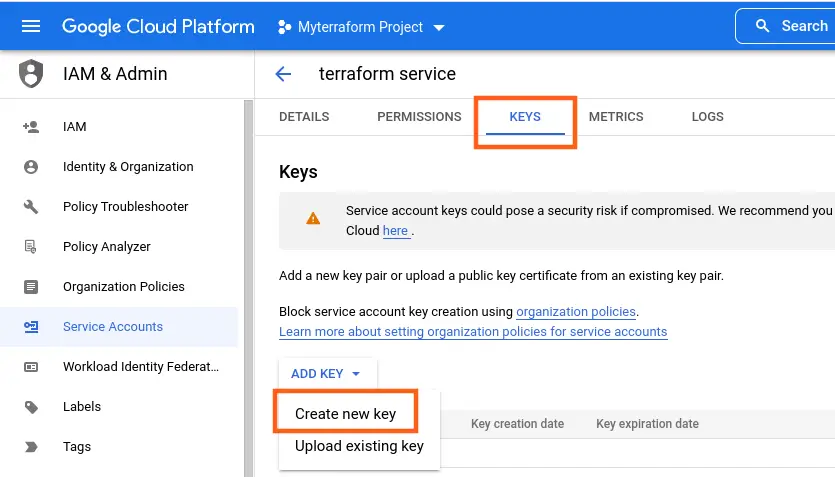
Select “Create new key” from the drop-down menu. Leave Key Type set to JSON.
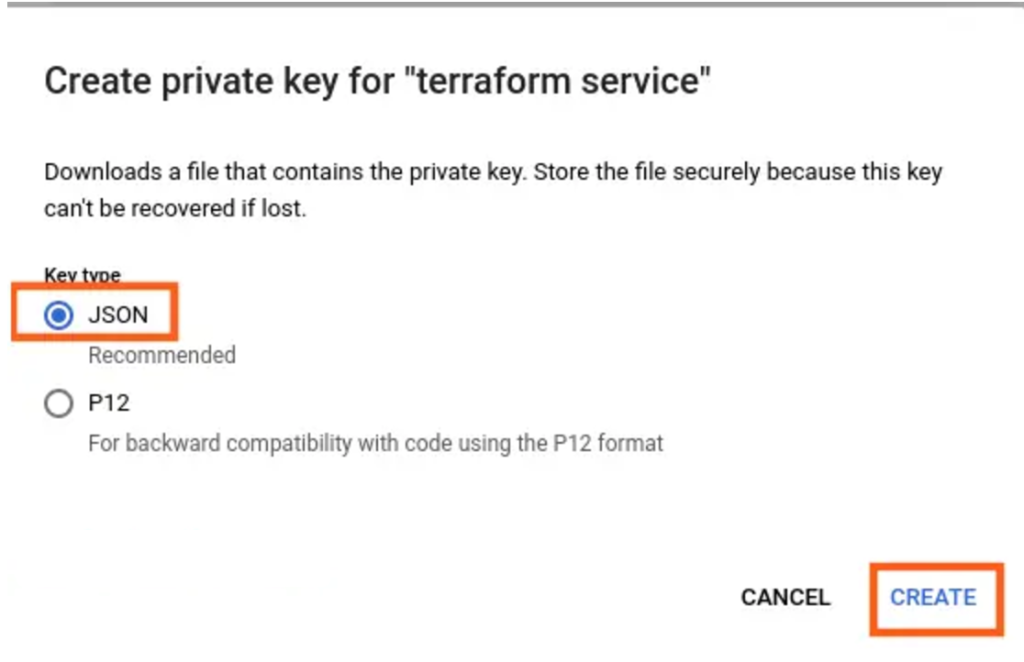
To create the key and store the key file to your PC, click “Create.”
Deploy VM Instance on Google Cloud
Create Terraform working directory and change to it:
$ mkdir terraform-project
$ cd terraform-project
Create a main.tf file for the instance.
vim main.tfAdd the content below to the file above:
provider "google" {
  credentials  = file("~/Documents/myterraform-project-341816-b1959e7e2de3.json")
  project = "myterraform-project-341816"
  region  = "us-central1"
  zone    = "us-central1-c"
}

resource "google_compute_instance" "vm_instance" {
  name         = "terraform-instance"
  machine_type = "f1-micro"

  boot_disk {
    initialize_params {
      image = "debian-cloud/debian-11"
    }
  }

  network_interface {
    # A default network is created for all GCP projects
    network = google_compute_network.vpc_network.self_link
    access_config {
    }
  }
}

resource "google_compute_network" "vpc_network" {
  name                    = "terraform-network"
  auto_create_subnetworks = "true"
}
You must use terraform init to initialize the directory when creating a new configuration. The providers defined in the configuration are downloaded in this stage.
$ terraform init

Initializing the backend...

Initializing provider plugins...
- Reusing previous version of hashicorp/google from the dependency lock file
- Using previously-installed hashicorp/google v4.11.0

Terraform has been successfully initialized!

You may now begin working with Terraform. Try running "terraform plan" to see
any changes that are required for your infrastructure. All Terraform commands
should now work.

If you ever set or change modules or backend configuration for Terraform,
rerun this command to reinitialize your working directory. If you forget, other
commands will detect it and remind you to do so if necessary.
Now that you have a Terraform configuration and your credentials set up, you can use terraform apply to supply your resources. If you wish to skip this step and have the changes applied automatically, use terraform apply -auto-approve.
$ terraform apply -auto-approve

Terraform used the selected providers to generate the following execution plan. Resource actions are indicated with the following symbols:
  + create

Terraform will perform the following actions:

  # google_compute_instance.vm_instance will be created
  + resource "google_compute_instance" "vm_instance" {
      + can_ip_forward       = false
      + cpu_platform         = (known after apply)
      + current_status       = (known after apply)
      + deletion_protection  = false
      + guest_accelerator    = (known after apply)
      + id                   = (known after apply)
      + instance_id          = (known after apply)
......
 # google_compute_network.vpc_network will be created
  + resource "google_compute_network" "vpc_network" {
      + auto_create_subnetworks         = true
      + delete_default_routes_on_create = false
      + gateway_ipv4                    = (known after apply)
      + id                              = (known after apply)
      + mtu                             = (known after apply)
      + name                            = "terraform-network"
      + project                         = (known after apply)
      + routing_mode                    = (known after apply)
      + self_link                       = (known after apply)
    }

Plan: 2 to add, 0 to change, 0 to destroy.
google_compute_network.vpc_network: Creating...
google_compute_network.vpc_network: Still creating... [10s elapsed]
google_compute_network.vpc_network: Still creating... [20s elapsed]
google_compute_network.vpc_network: Still creating... [30s elapsed]
google_compute_network.vpc_network: Creation complete after 33s [id=projects/myterraform-project-341816/global/networks/terraform-network]
google_compute_instance.vm_instance: Creating...
google_compute_instance.vm_instance: Still creating... [10s elapsed]
google_compute_instance.vm_instance: Creation complete after 16s [id=projects/myterraform-project-341816/zones/us-central1-c/instances/terraform-instance]

Apply complete! Resources: 2 added, 0 changed, 0 destroyed.
Now the instance is deployed on GCP with Terraform:

The terraform destroy command can be used to terminate the instance. The terraform destroy -auto-approve flag can be used in the same way as the apply command to skip the confirmation.
$ terraform destroy -auto-approve
.....
Terraform will perform the following actions:

  # google_compute_instance.vm_instance will be destroyed
  - resource "google_compute_instance" "vm_instance" {
      - can_ip_forward       = false -> null
      - cpu_platform         = "Intel Haswell" -> null
      - current_status       = "RUNNING" -> null
      - deletion_protection  = false -> null
      - enable_display       = false -> null
      - guest_accelerator    = [] -> null
      - id                   = "projects/myterraform-project-341816/zones/us-central1-c/instances/terraform-instance" -> null
      - instance_id          = "2657643470062770536" -> null
      - label_fingerprint    = "42WmSpB8rSM=" -> null
      - labels               = {} -> null
      - machine_type         = "f1-micro" -> null
      - metadata             = {} -> null
      - metadata_fingerprint = "jHui8PFiD9s=" -> null
      - name                 = "terraform-instance" -> null
      - project              = "myterraform-project-341816" -> null
      - resource_policies    = [] -> null
      - self_link            = "https://www.googleapis.com/compute/v1/projects/myterraform-project-341816/zones/us-central1-c/instances/terraform-instance" -> null
      - tags                 = [] -> null
      - tags_fingerprint     = "42WmSpB8rSM=" -> null
      - zone                 = "us-central1-c" -> null
.....
Destroy complete! Resources: 2 destroyed.
Conclusion
Our article on How to Deploy and Instance on Google Cloud Using Terraform must come to an end. Terraform allows you to quickly deploy, release, scale, and manage the infrastructure of multi-tier application.
Check out our other articles on Terraform:

