Uptime Kuma is a free and open-source self-hosted monitoring program written in Nodejs that functions similarly to an uptime robot. It has a nice dashboard and is used to monitor the uptime of hosts or servers using the HTTP(s), TCP, and Ping protocols. If the hosts are inaccessible via HTTP and TCP, the uptime host delivers messages by Email, SMTP, Telegram, Slack, and other means.
Uptime Kuma has several features, including the ability to monitor HTTP services, script websites by searching for specified keywords, check if SSH connections are active using TCP services, ping your systems to confirm they are up, check DNS records, and enable beautiful notifications. One can view the behavior of the active services on Uptime Kuma’s elegant status page.
It serves as an alternative to Nagios Core and other monitoring tools. A few examples include Spiceworks, Nagios, Cacti, and Wireshark.
Features of Uptime Kuma:
- It has a nice simple status page.
- It tracks the availability of HTTP(s), TCP, Ping, DNS records, and other services.
- It has a nice user interface.
- Notifications are sent in various ways, including email via SMTP, Telegram, Slack, etc.
- It includes a Ping chart.
- It provides the system’s certificate information, such as when licenses expire.
- It is written in Nodejs, which is simple to use and comprehend.
How To Install Uptime Kuma on Debian 12
In this guide, we will learn how to Install and Configure Uptime Kuma on Debian 12. Let’s get started!
1. Update the system
Begin by updating your system package’s cache index.
sudo apt update && sudo apt dist-upgrade -yBefore you proceed with the installations once the packages are up-to-date, confirm if a system reboot is required.
[ -e /var/run/reboot-required ] && sudo reboot2. Install Node.js and npm
In this step, we shall install Node.js and npm. Kindly utilize our link below to accomplish this.
After finishing the installation, go to the next step.
3. Install Git Version Control
Git is a free and open-source version control system. Run the command below to install.
sudo apt update && sudo apt install git4. Clone Uptime Kuma
Execute the following line to clone the uptime kuma.
$ git clone https://github.com/louislam/uptime-kuma.git
Cloning into 'uptime-kuma'...
remote: Enumerating objects: 28976, done.
remote: Counting objects: 100% (28976/28976), done.
remote: Compressing objects: 100% (6722/6722), done.
remote: Total 28976 (delta 22108), reused 28649 (delta 21984), pack-reused 0
Receiving objects: 100% (28976/28976), 22.23 MiB | 29.00 MiB/s, done.
Resolving deltas: 100% (22108/22108), done.
After cloning uptime-Kuma, enter that directory by using cd command.
cd uptime-kuma5. Run Uptime Kuma setup
Using npm, run the uptime-Kuma setup.
npm run setupOutput:
> [email protected] setup
> git checkout 1.23.3 && npm ci --production && npm run download-dist

Note: switching to '1.23.3'.

You are in 'detached HEAD' state. You can look around, make experimental
changes and commit them, and you can discard any commits you make in this
state without impacting any branches by switching back to a branch.

If you want to create a new branch to retain commits you create, you may
do so (now or later) by using -c with the switch command. Example:

  git switch -c <new-branch-name>

Or undo this operation with:

  git switch -

Turn off this advice by setting config variable advice.detachedHead to false

HEAD is now at c3e3f274 Update to 1.23.3
npm WARN config production Use `--omit=dev` instead.
npm WARN EBADENGINE Unsupported engine {
npm WARN EBADENGINE   package: '@azure/[email protected]',
npm WARN EBADENGINE   required: { node: '10 || 12 || 14 || 16 || 18' },
npm WARN EBADENGINE   current: { node: 'v20.5.1', npm: '9.8.0' }
npm WARN EBADENGINE }
npm WARN deprecated [email protected]: This module has moved and is now available at @hapi/topo. Please update your dependencies as this version is no longer maintained an may contain bugs and security issues.
npm WARN deprecated [email protected]: This module has moved and is now available at @hapi/hoek. Please update your dependencies as this version is no longer maintained an may contain bugs and security issues.
npm WARN deprecated [email protected]: Use promise-toolbox/fromEvent instead
npm WARN deprecated @npmcli/[email protected]: This functionality has been moved to @npmcli/fs
npm WARN deprecated [email protected]: This module has moved and is now available at @hapi/joi. Please update your dependencies as this version is no longer maintained an may contain bugs and security issues.

added 682 packages, and audited 683 packages in 11s

113 packages are looking for funding
  run `npm fund` for details

found 0 vulnerabilities

> [email protected] download-dist
> node extra/download-dist.js

Downloading dist
https://github.com/louislam/uptime-kuma/releases/download/1.23.3/dist.tar.gz
https://objects.githubusercontent.com/github-production-release-asset-2e65be/382496361/225854c9-f907-4097-b589-d51dec762f4b?X-Amz-Algorithm=AWS4-HMAC-SHA256&X-Amz-Credential=AKIAIWNJYAX4CSVEH53A%2F20231026%2Fus-east-1%2Fs3%2Faws4_request&X-Amz-Date=20231026T054646Z&X-Amz-Expires=300&X-Amz-Signature=6fbbc25be8b8c85c7279986fd333f4d0b336649ee62bda41ad581e3f9b2a01c6&X-Amz-SignedHeaders=host&actor_id=0&key_id=0&repo_id=382496361&response-content-disposition=attachment%3B%20filename%3Ddist.tar.gz&response-content-type=application%2Foctet-stream
Extracting dist...
Done
npm notice
npm notice New major version of npm available! 9.8.0 -> 10.2.1
npm notice Changelog: https://github.com/npm/cli/releases/tag/v10.2.1
npm notice Run npm install -g [email protected] to update!
npm notice
6. Test the success of the installation
Enter the following command to see if your uptime installation was successful:
$ node server/server.js
Welcome to Uptime Kuma
Your Node.js version: 20.5.1
2023-10-26T09:25:57+03:00 [SERVER] INFO: Welcome to Uptime Kuma
2023-10-26T09:25:57+03:00 [SERVER] INFO: Node Env: production
2023-10-26T09:25:57+03:00 [SERVER] INFO: Inside Container: false
2023-10-26T09:25:57+03:00 [SERVER] INFO: Importing Node libraries
2023-10-26T09:25:57+03:00 [SERVER] INFO: Importing 3rd-party libraries
2023-10-26T09:25:58+03:00 [SERVER] INFO: Creating express and socket.io instance
2023-10-26T09:25:58+03:00 [SERVER] INFO: Server Type: HTTP
2023-10-26T09:25:58+03:00 [SERVER] INFO: Importing this project modules
2023-10-26T09:25:59+03:00 [NOTIFICATION] INFO: Prepare Notification Providers
2023-10-26T09:25:59+03:00 [SERVER] INFO: Version: 1.23.3
2023-10-26T09:25:59+03:00 [DB] INFO: Data Dir: ./data/
2023-10-26T09:25:59+03:00 [SERVER] INFO: Copying Database
2023-10-26T09:25:59+03:00 [SERVER] INFO: Connecting to the Database
2023-10-26T09:25:59+03:00 [DB] INFO: SQLite config:
[ { journal_mode: 'wal' } ]
[ { cache_size: -12000 } ]
.
.
.
7. Using PM2 to manage Kuma service
To maintain the online status of your application, use PM2, a daemon process manager.
Install PM2
The following instructions must be executed while inside your directory: such as Uptime-Kuma
npm install pm2@latest -g
## OR ##
yarn global add pm2
Start Uptime Kuma Server
Execute the below command inside Uptime-Kuma dir.
pm2 start server/server.js --name uptime-kumaNow, to start, stop, and restart Uptime Kuma, use the following instructions.
### Starting  Uptime Kuma Server ###
pm2 start uptime-kuma

### Starting  Uptime Kuma Server ###
pm2 stop uptime-kuma

### Restarting  Uptime Kuma Server ###
pm2 restart uptime-kuma
Let’s Start Uptime Kuma :
pm2 start uptime-kumaIf you want to update environment variables, run:
pm2 restart uptime-kuma --update-env8. Setup Uptime Kuma on browser
Open your best browser and type http://server-ip:3001 to configure Uptime Kuma from a web browser. This will bring you to this page.
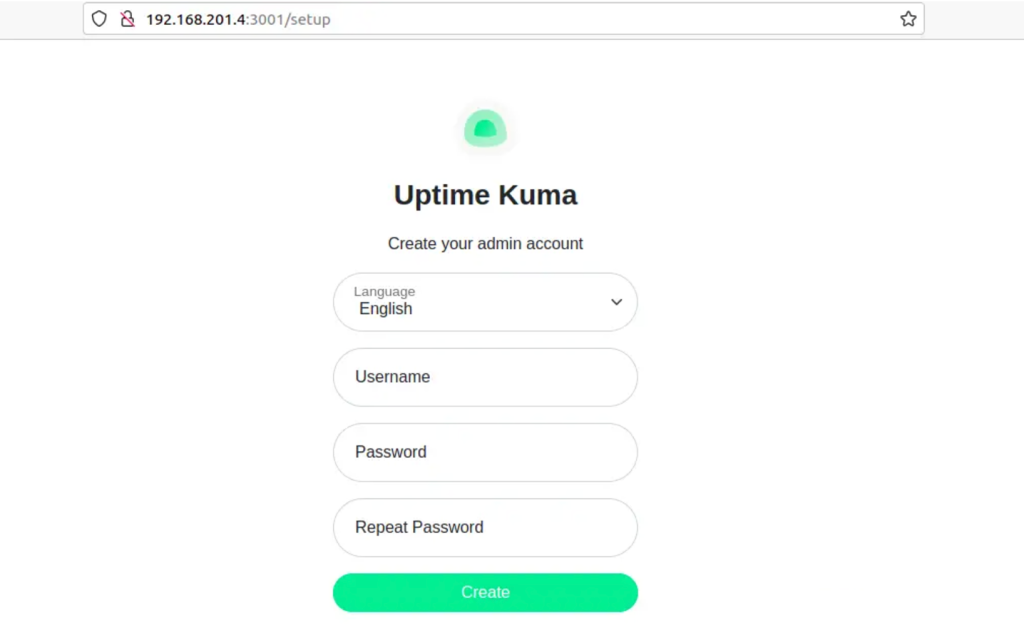
Then, enter your admin username and password and click Create. This will bring you to the Dashboard.
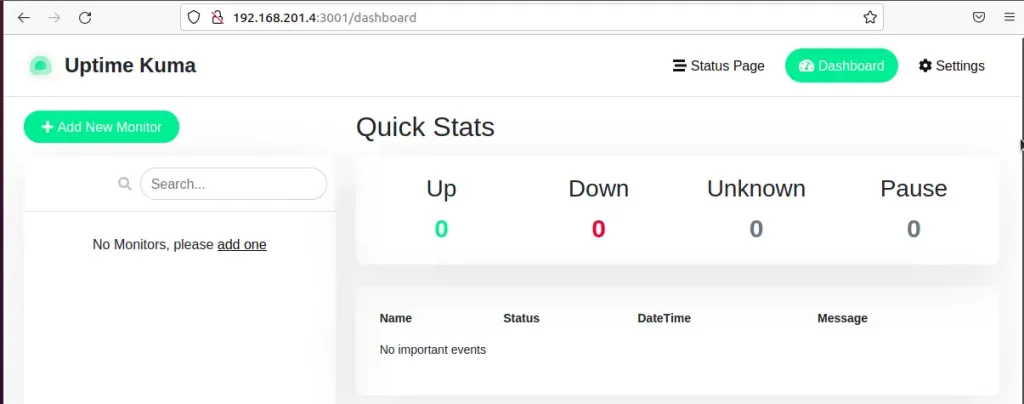
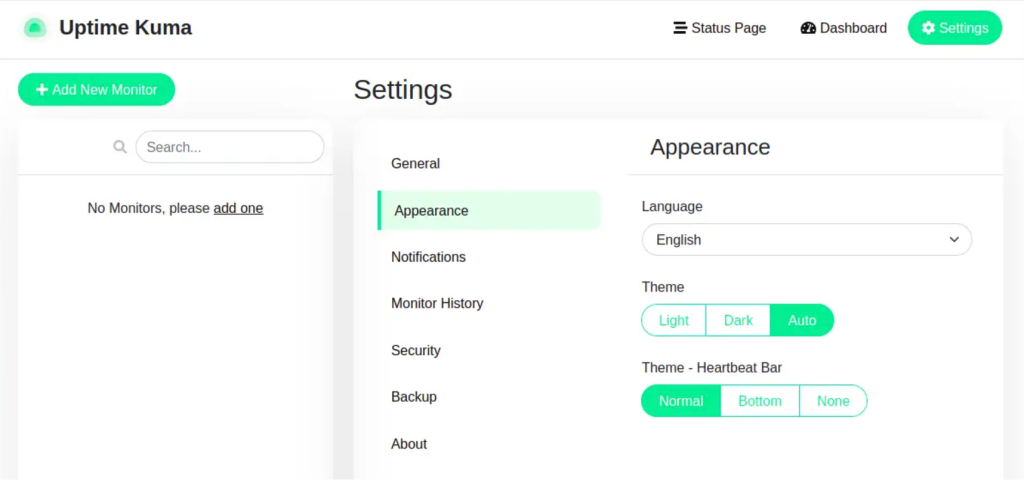
Once on your Dashboard, navigate to settings in the top right corner to discover a slew of sophisticated options.
You may adjust a number of items under the settings tab, such as notifications, history monitoring, user management under the security tab, backup import and export, dashboard customization, and more.
9. Usage Example
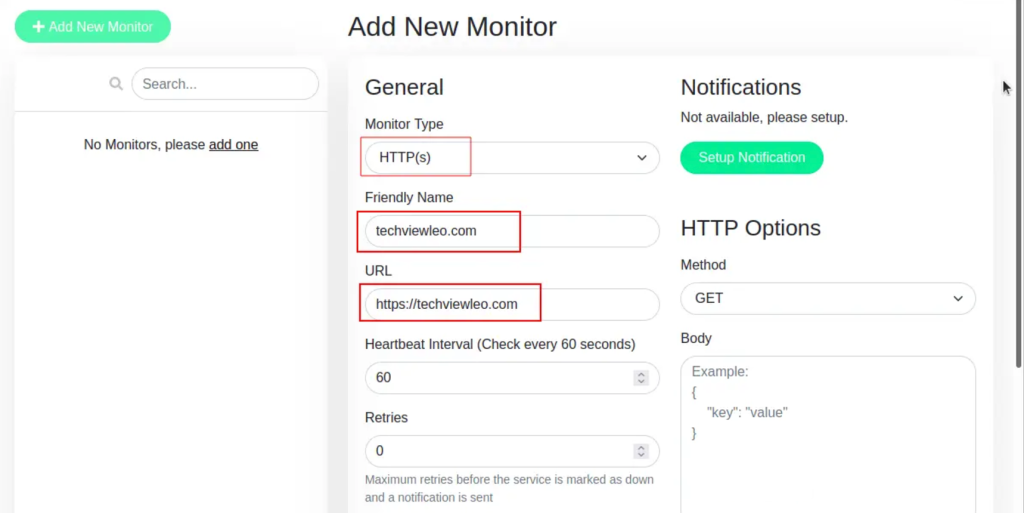
For instance, to use Uptime Kuma to monitor our website check below:
Click Add New Monitor in the dashboard’s upper left corner. I will set the website details as shown.
Then add tag.
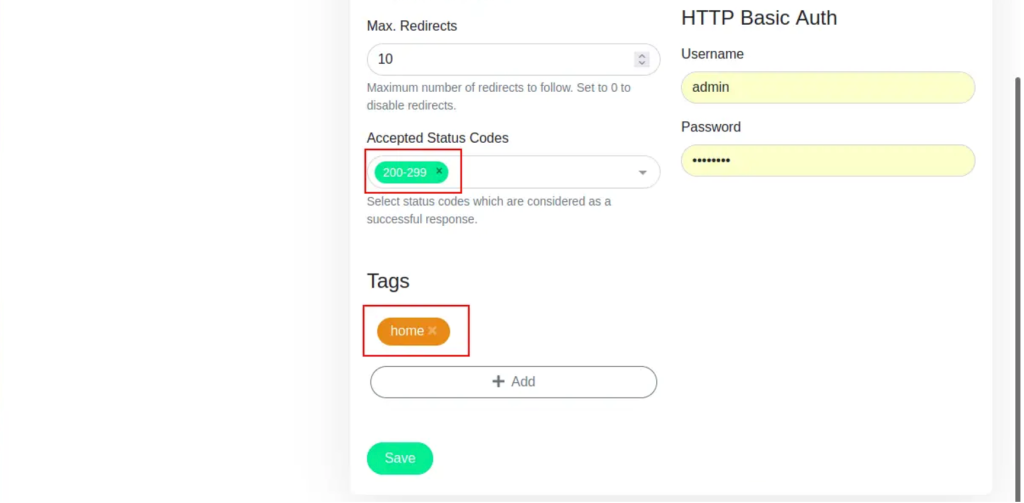
To save the modifications, click Save button. As seen in the sample screenshot, your Dashboard should have a wealth of information about your website.
Verdict
Congratulations! Using PM2, a non-docker, you have successfully configured Uptime Kuma on Debian 12 (Bookworm). We hope the article was enjoyable for you. Enjoy monitoring!
Other cool guides:

