
Minecraft is a 3D sandbox video game that has a simple appearance but has a lot of things going on on the backend. It is an open-world game with fewer limits as it was not intended to be played linearly. Minecraft is a multiplayer video game with few exceptions as you are allowed to roam around anywhere the developer of the game intends you to allow countless possibilities.
There are four editions of Minecraft:
- Java Edition is played on any Windows, Mac, or Linux machine with Java installed and the minimum PC requirements. It was formerly known as the PC edition to contrast it with others that run on mobile and console platforms.
- Bedrock Edition refers to multi-platform versions of Minecraft. It comes from the Bedrock codebase written in the C++ programming language to run on platforms that cannot support Java. This accommodates differences in the target platforms for networking and storage access, as around 90% of the code is used on every platform.
- Education Edition has features that are used in a classroom setting. It is based on the bedrock edition with the ability to allow students to collaborate to build projects and solve problems easily. With it, you can easily track the progress of a student with the documented development of their projects.
- China Edition is a localized edition of Java and Bedrock editions for mainland China that is free to download and play. It allows Multiple in-game player names with support for live text chat. It has server management in the launcher that can be backed up and shut down when the storage space is full.
Minecraft Servers allow players to play Minecraft online or via a local network with others. It is distributed free of charge and can be installed on multiple platforms including macOS, Windows, BSD, and Linux. There are various types of archetypes of servers with outstanding features, rules, and infrastructure. The servers include; Survival, Creative, Minigame, Anarchy, Faction, Personal, Hardcore, Roleplay, and Play-to-win.
You can set up the server and manage it locally. You can also set up locally and play the game online. You can also host it online but will be required to pay monthly for this type of server which saves you the trouble of always maintaining the software and ensuring the server is always online. A high-end machine is not necessarily required to set up the server but notebooks and netbooks are not recommended for good server machines.
Requirements for Minecraft server are;
- A Java runtime (JRE), version 8 or higher. JDK contains JRE so you can install JDK alone.
- At least 1 GB of RAM is allocated for the server to run.
- A CPU with good single-core performance.
We are going to set up the Java Edition Minecraft Server in this guide.
Step 1: Install Java Runtime Environment (JRE)
Minecraft servers require the Java Runtime Environment (JRE) to run. We’ll need to install Java on Ubuntu system.
Update the package index and installed packages by running the following command:
sudo apt update && sudo apt update -yInstall the required packages before setting up Minecraft.
sudo apt install software-properties-common screenNow install Oracle Java 21 and make it default with the following command. Accept the Oracle Java 17 License agreement and continue with the installation.
sudo apt install openjdk-21-jdk -yVerify if Java is installed by checking the version.
$ java -version
openjdk version "21.0.5" 2024-10-15
OpenJDK Runtime Environment (build 21.0.5+11-Ubuntu-1ubuntu124.04)
OpenJDK 64-Bit Server VM (build 21.0.5+11-Ubuntu-1ubuntu124.04, mixed mode, sharing)
Step 2: Download Minecraft Server Jar
To set up the Minecraft server, first, create a directory.
sudo mkdir /opt/minecraftThen download the Jar file from the Downloads page. Alternatively, run the following command to download the server jar file
sudo wget https://piston-data.mojang.com/v1/objects/4707d00eb834b446575d89a61a11b5d548d8c001/server.jarMove the Jar file to the Minecraft directory the change it to that directory.
sudo mv server.jar /opt/minecraft
cd /opt/minecraft
List the items in the folder to ensure the file was successfully moved
lsRun the server with the following command
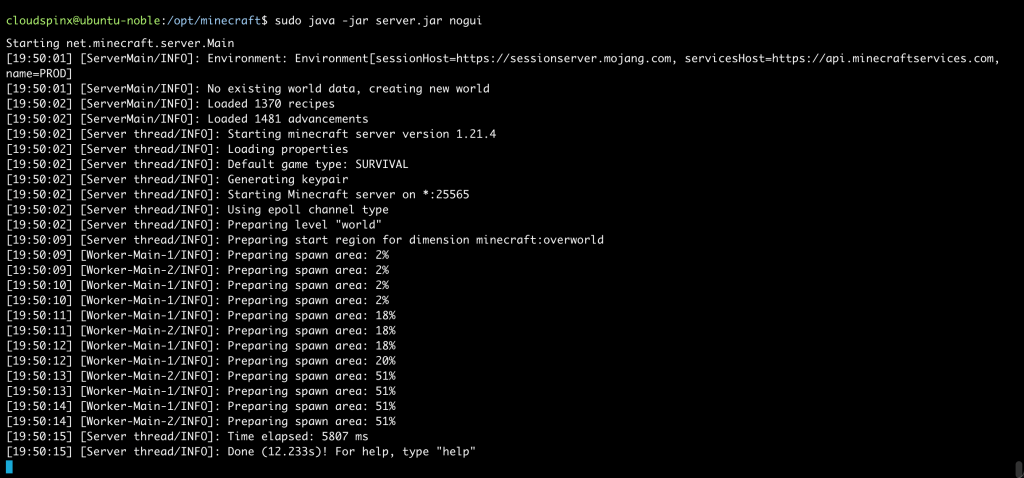
sudo java -jar server.jar --noguiOnce the server runs, A file named eula.txt will be generated. This is for the end-user license agreement. You will have to edit it to signify that you have read and understood the end-user license agreement that you’ll follow when using the software. Run the command below to agree to the terms:
sudo vim eula.txt
##Edit false to true
eula=true
The server is now set up and you can run it with the following command.
sudo java -jar server.jar noguiTo start the server with the graphical user interface, leave out the ‘nogui’ part.
Step 3: Configure Minecraft environment
You can run the following command to start up the server
sudo java -Xmx1024M -Xms1024M -jar server.jar noguiXmx 1024 is the maximum RAM allocated to the server while Xms is the minimum RAM.
But using this script is boring as you have to remember the command-line options for your server. To simplify this, create a start.sh file on the folder with the jar file.
sudo vim start.shAdd the following contents to the file
#!/bin/sh
cd "$(dirname "$0")"
exec java -Xmx1024M -Xms1024M -jar /opt/minecraft/server.jar nogui
Save and exit the file.
Make the file executable with the following command
sudo chmod a+x start.shNow start up the server with the following command
./start.shSetup Startup Script with Systemd
Alternatively, You can set up the start and stop of the Minecraft server service with scripts.
Create a user and group for Minecraft then add the user to the group.
sudo adduser --system --home /opt/minecraft minecraft
sudo groupadd minecraft
sudo adduser minecraft minecraft
Assign ownership of your installations directory to the user
sudo chown -R minecraft:minecraft /opt/minecraftCreate a new system file
sudo vim /etc/systemd/system/minecraft.serviceAdd the
[Unit]

Description=start and stop the minecraft-server

[Service]

WorkingDirectory=/opt/minecraft
User=minecraft
Group=minecraft
Restart=on-failure
RestartSec=20 5
ExecStart=/usr/bin/screen -DmS minecraft /usr/bin/java -Xmx1024M -Xms1024M -jar /opt/minecraft/server.jar nogui


[Install]

WantedBy=multi-user.target
Save and exit the file then reload the system daemon to update the system.
sudo systemctl daemon-reloadStart and Enable the service with the following command.
sudo systemctl enable minecraft.service
sudo systemctl start minecraft.service
Check for the status of the service.
$ systemctl status minecraft.service
● minecraft.service - start and stop the minecraft-server
     Loaded: loaded (/etc/systemd/system/minecraft.service; enabled; preset: enabled)
     Active: active (running) since Fri 2025-01-24 20:07:38 UTC; 2s ago
   Main PID: 13125 (java)
      Tasks: 23 (limit: 7025)
     Memory: 205.2M (peak: 205.8M)
        CPU: 4.207s
     CGroup: /system.slice/minecraft.service
             └─13125 /usr/bin/java -Xmx1024M -Xms1024M -jar server.jar nogui

Jan 24 20:07:38 ubuntu-noble systemd[1]: Started minecraft.service - start and stop the minecraft-server.
Jan 24 20:07:38 ubuntu-noble java[13125]: Starting net.minecraft.server.Main
Step 4: Configure Firewall Service
If not already done Enable and configure the firewall with the following command to allow the Minecraft Server port.
sudo ufw enable
sudo ufw allow 25565/tcp
To disable anyone from accessing your server, you should enable the Whitelist mode first.
sudo vim /opt/minecraft/server.propertiesChange the following line to true.
white-list=trueSave and close the file then restart your server.
sudo systemctl restart minecraftAccess the Minecraft console with the following command.
sudo -u minecraft screen -r minecraftTo enable a user to access your server add them to your whitelist with the following command.
whitelist add PlayerUsernameTo remove a player, use the following command.
whitelist remove PlayerUsernameExit the screen session (server console) with CTRL + A-D.
Conclusion
Minecraft video game allows players to have countless possibilities while playing the game as players can choose how they want to play the game. It has features that focus on allowing the player to explore with maps made of one-cubic-meter-sized blocks and environment features plants, mobs, and items. If you want just to access the game from the local network only, then you can go ahead and set up the localized one for the local network only.
More articles to check out:


