

In this article we will perform an installation of Proxmox VE 8.x on Hetzner Root Server. Hetzner is a cloud hosting company providing auctions for physical server hardware at competitive rates with a per/month billing model. With the dedicated servers provided by Hetzner, you have the flexibility of custom hardware configurations to meet your application demands. There are also variety of choices around CPU, Memory and Storage for standard configurations.
Proxmox Virtual Environment (VE) is an enterprise-grade open-source server virtualization solution based on Debian Linux distribution with a modified Ubuntu LTS kernel. It allows you to deploy and manage both virtual machines and containers. We will install Debian 12 Linux operating system on a Hetzner root server then proceed to deploy Proxmox VE virtualization solution on it.
I’ll be performing an installation of Proxmox VE 8.x on a Hetzner root server with the following hardware specifications.
CPU: Intel(R) Xeon(R) Gold 5412U (Cores 48)
Memory: 256GB RAM
Disk: 2 x 1920GB SSD
Network: 1Gbit
IPV4 Addresses: 1 x IPV4 public address
Note that with Hetzner Root servers, you get a single IPv4 public IP address but you can request for additional IP or subnet for use.
1 – Boot to Rescue Mode
Login to your Hetzner console for Root servers and navigate to Servers section under Main functions.
Main functions > Servers > Server Label > Rescue
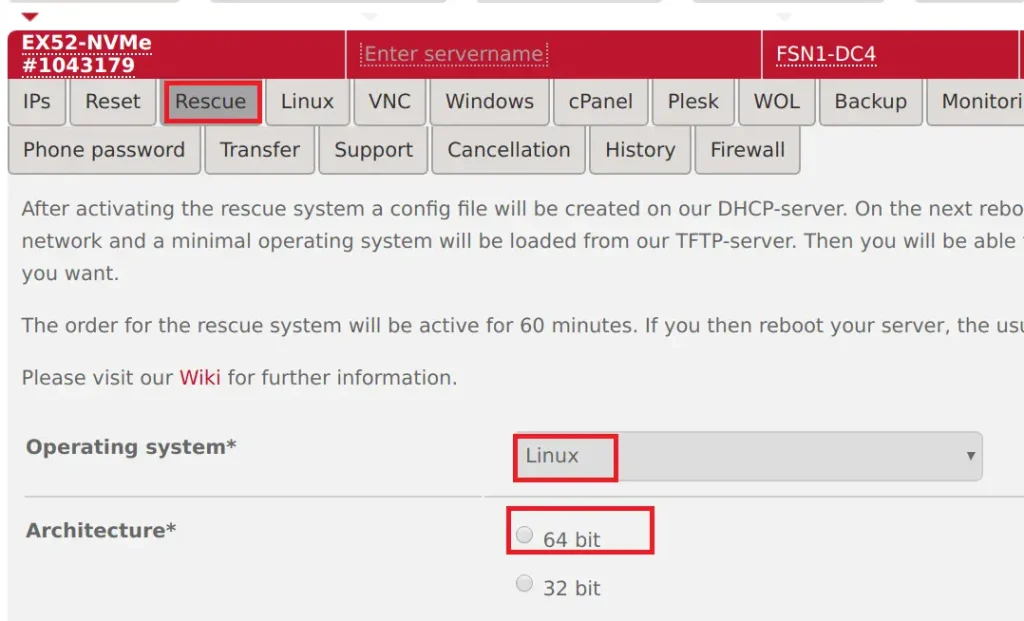
Select the Operating system to use in rescue mode, CPU Architecture, and public key and click on “Activate rescue system“.

Reboot the server under “Reset” server section.
2 – Create Root Server Configuration
SSH to the server in rescue mode using root user and password shown during Rescue activation.
$ ssh root@hetznerserverip
 Welcome to the Hetzner Rescue System.
 This Rescue System is based on Debian GNU/Linux 12 (bookworm) with a custom kernel.
   kernel. You can install software as in a normal system.
 To install a new operating system from one of our prebuilt
   images, run 'installimage' and follow the instructions.
 More information at http://wiki.hetzner.de

Rescue System (via EFI) up since 2025-03-01 11:45 +01:00

Hardware data:

   CPU1: Intel(R) Xeon(R) Gold 5412U (Cores 48)
   Memory:  257423 MB
   Disk /dev/nvme0n1: 1920 GB (=> 1788 GiB) doesn't contain a valid partition table
   Disk /dev/nvme1n1: 1920 GB (=> 1788 GiB) doesn't contain a valid partition table
   Total capacity 3576 GiB with 2 Disks

Network data:
   eth0  LINK: yes
         MAC:  b4:2e:99:47:fa:5c
         IP:   xxxxxxxxxxxxxxxxxx
         IPv6: xxxxxxxxxxxxxxxxxx
         Intel(R) Gigabit Ethernet Network Driver
 root@rescue ~ #
The root server used in this example has two disks each 1920GB. We’ll configure them in redundant RAID 1 configuration.
Let’s create a Hetzner server installer configuration file called install-config.txt
vim debian-install-config.txtThis is the data populated that will be used by the installimage to install Debian operating system from pre-built image.
#CRYPTPASSWORD Password01
DRIVE1 /dev/nvme0n1
DRIVE2 /dev/nvme1n1
SWRAID 1
SWRAIDLEVEL 1 # 1 for raid 1, 0 for raid 0
HOSTNAME pve.cloudspinx.com

PART /boot ext4 512M
#PART  /boot/efi  esp    256M       #Only needed in UEFI mode, if you get failed install, try enable it
PART lvm vg0 all

LV vg0 root / ext4 50G
LV vg0 swap swap swap 32G
LV vg0 var /var  ext4  all # You can specific size e.g 300G

IMAGE /root/images/Debian-bookworm-latest-amd64-base.tar.gz
If not using LVM configs will be like below:
PART /boot ext3 1024
#PART /boot/efi esp 256M
PART swap swap 8G
PART / ext4 all
Review and update disk configurations shown in this article to suit your use case.
3 – Install Debian on Hetzner root server
Once you’re confident with the configurations, start the installation process of Debian Hetzner root server.
installimage -a -c debian-install-config.txtInstallation process will start immediately after command execution:
Found AUTOSETUP file '/autosetup'
Running unattended installimage installation ...

DRIVE1 /dev/nvme0n1
DRIVE2 /dev/nvme1n1
SWRAID 1
SWRAIDLEVEL 1 # Use 1 for Raid 1
BOOTLOADER grub
HOSTNAME pve.cloudspinx.com
PART /boot ext3 512M
PART lvm vg0 all
LV vg0 root / ext4 50G
LV vg0 swap swap swap 8G
LV vg0 var /var  ext4  300G
IMAGE /root/images/Debian-bookworm-latest-amd64-base.tar.gz

WARNING:
  Starting installation in 20 seconds ...
  Press X to continue immediately ...
  Installation will DELETE ALL DATA ON DISK(s)!
  Press CTRL-C to abort now!
Wait for the installation to finish.
                Hetzner Online GmbH - installimage

  Your server will be installed now, this will take some minutes
             You can abort at any time with CTRL+C ...

         :  Reading configuration                           done
         :  Loading image file variables                    done
         :  Loading debian specific functions               done
   1/17  :  Deleting partitions                             done
   2/17  :  Test partition size                             done
   3/17  :  Creating partitions and /etc/fstab              done
   4/17  :  Creating software RAID level 1                  done
   5/17  :  Creating LVM volumes                            done
   6/17  :  Formatting partitions
         :    formatting /dev/md/0 with ext4                done
         :    formatting /dev/md/1 with vfat                done
         :    formatting /dev/vg0/root with ext4            done
         :    formatting /dev/vg0/swap with swap            done
         :    formatting /dev/vg0/var with ext4             done
   7/17  :  Mounting partitions                             done
   8/17  :  Sync time via ntp                               done
         :  Importing public key for image validation       done
   9/17  :  Validating image before starting extraction     done
  10/17  :  Extracting image (local)                        done
  11/17  :  Setting up network config                       done
  12/17  :  Executing additional commands
         :    Setting hostname                              done
         :    Generating new SSH keys                       done
         :    Generating mdadm config                       done
         :    Generating ramdisk                            done
         :    Generating ntp config                         done
  13/17  :  Setting up miscellaneous files                  done
  14/17  :  Configuring authentication
         :    Fetching SSH keys                             done
         :    Disabling root password                       done
         :    Disabling SSH root login with password        done
         :    Copying SSH keys                              done
  15/17  :  Installing bootloader grub                      done
  16/17  :  Running some debian specific functions          done
  17/17  :  Clearing log files                              done

                  INSTALLATION COMPLETE
   You can now reboot and log in to your new system with the
 same credentials that you used to log into the rescue system.
Then reboot the server once the installation is done.
shutdown -r nowLogin to your server with root user credentials.
ssh root@serveripCheck partition scheme on the server. It should reflect initial settings:
# lsblk
NAME           MAJ:MIN RM   SIZE RO TYPE  MOUNTPOINTS
nvme0n1        259:0    0   1.7T  0 disk
├─nvme0n1p1    259:1    0   512M  0 part
│ └─md0          9:0    0   511M  0 raid1 /boot
├─nvme0n1p2    259:2    0   256M  0 part
│ └─md1          9:1    0 255.9M  0 raid1 /boot/efi
└─nvme0n1p3    259:3    0   1.7T  0 part
  └─md2          9:2    0   1.7T  0 raid1
    ├─vg0-root 253:0    0    50G  0 lvm   /
    ├─vg0-swap 253:1    0    32G  0 lvm   [SWAP]
    └─vg0-var  253:2    0   1.7T  0 lvm   /var
nvme1n1        259:4    0   1.7T  0 disk
├─nvme1n1p1    259:5    0   512M  0 part
│ └─md0          9:0    0   511M  0 raid1 /boot
├─nvme1n1p2    259:6    0   256M  0 part
│ └─md1          9:1    0 255.9M  0 raid1 /boot/efi
└─nvme1n1p3    259:7    0   1.7T  0 part
  └─md2          9:2    0   1.7T  0 raid1
    ├─vg0-root 253:0    0    50G  0 lvm   /
    ├─vg0-swap 253:1    0    32G  0 lvm   [SWAP]
    └─vg0-var  253:2    0   1.7T  0 lvm   /var

root@pve01 ~ # pvs
  PV         VG  Fmt  Attr PSize  PFree
  /dev/md2   vg0 lvm2 a--  <1.75t    0

root@pve01 ~ # vgs
  VG  #PV #LV #SN Attr   VSize  VFree
  vg0   1   3   0 wz--n- <1.75t    0

root@pve01 ~ # lvs
  LV   VG  Attr       LSize  Pool Origin Data%  Meta%  Move Log Cpy%Sync Convert
  root vg0 -wi-ao---- 50.00g
  swap vg0 -wi-ao---- 32.00g
  var  vg0 -wi-ao---- <1.67t
You can add more space to a logical volume if you didn’t allocate all to /var
lvextend -r -L +20G /dev/vg0/<lvname>
lvextend -r -l +100%FREE /dev/vg0/<lvname> #add all free to this lv
Confirm Debian successful installation by querying OS release info:
root@proxmox ~ # cat /etc/os-release
PRETTY_NAME="Debian GNU/Linux 12 (bookworm)"
NAME="Debian GNU/Linux"
VERSION_ID="12"
VERSION="12 (bookworm)"
VERSION_CODENAME=bookworm
ID=debian
HOME_URL="https://www.debian.org/"
SUPPORT_URL="https://www.debian.org/support"
BUG_REPORT_URL="https://bugs.debian.org/"
Ensure the system is updated:
apt update
apt -y full-upgrade
apt install sudo bash-completion wget vim
[ -f /var/run/reboot-required ] && reboot -f
4 – Install Proxmox VE 8.x on Debian 12
Once the OS is installed you can then progress to the installation of Proxmox VE 8.x on Debian 12. I recently did an article on deployment of Proxmox Virtualization solution on Debian. Reference article is shared in the link below.
Stay tuned for more guides on Virtualization:


