This article is created to help you install Rocky Linux on Hetzner Dedicated Server, whether you’re setting up a personal lab environment, production, or a high-performance hosting solution for your business. Hetzner is a strong German-based hosting provider offering affordable and powerful dedicated servers with a wide range of configurations to suit various needs. At the time of ordering, you can choose custom hardware specs for the server.
Follow the steps below to provision a Hetzner dedicated server and install Rocky Linux on the hardware.
1 – Order dedicated server
Visit Hetzner website and choose the dedicated server that suits your needs. You can filter by Price, DataCenter Location, CPU, Memory, Disk Drives count and size, e.t.c.
2 – Boot Server to Rescue Mode
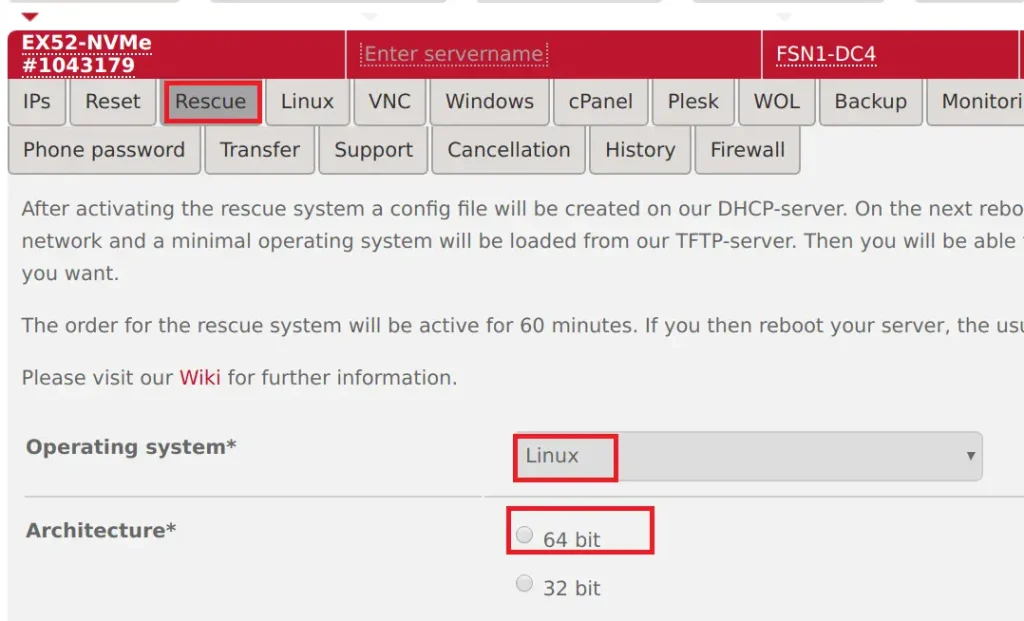
After the order is complete, login to the Hetzner root server console, and go to Main functions > Servers > Server Label > Rescue

Select a Linux operating system that matches your CPU architecture. Next, choose your preferred authentication method – either SSH public key or password, and then activate the Rescue System.

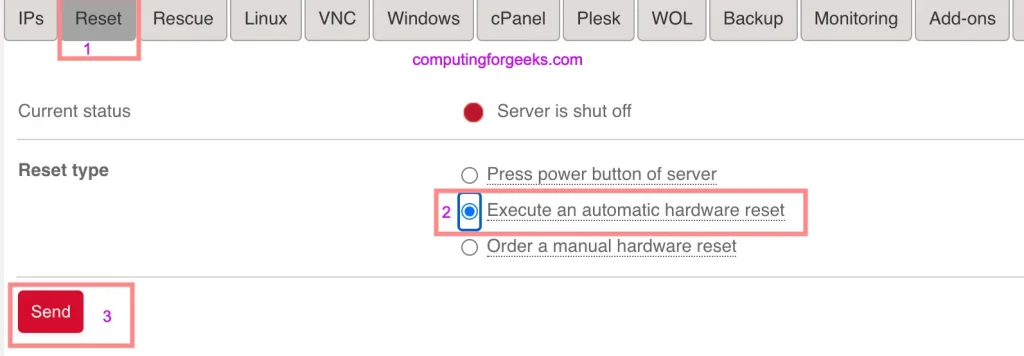
Reboot the server from the Reset section to launch into the Rescue System.

3 – Create an installation configuration
After the server has rebooted into the Rescue System, connect via SSH using the root user and your chosen authentication method (password or SSH key).
$ ssh root@ServerIPAddress
Linux rescue 6.12.19 #1 SMP Fri Mar 14 05:34:52 UTC 2025 x86_64

-------------------------------------------------------------------------------------------------------------------------

  Welcome to the Hetzner Rescue System.

  This Rescue System is based on Debian GNU/Linux 12 (bookworm) with a custom kernel.
  You can install software like you would in a normal system.

  To install a new operating system from one of our prebuilt images, run 'installimage' and follow the instructions.

  Important note: Any data that was not written to the disks will be lost during a reboot.

  For additional information, check the following resources:
    Rescue System:           https://docs.hetzner.com/robot/dedicated-server/troubleshooting/hetzner-rescue-system
    Installimage:            https://docs.hetzner.com/robot/dedicated-server/operating-systems/installimage
    Install custom software: https://docs.hetzner.com/robot/dedicated-server/operating-systems/installing-custom-images
    other articles:          https://docs.hetzner.com/robot

-------------------------------------------------------------------------------------------------------------------------

Rescue System (via Legacy/CSM) up since 2025-04-20 23:25 +02:00

Last login: Sun Apr 20 23:44:56 2025 from 41.90.9.177
Hardware data:

   CPU1: Intel(R) Core(TM) i7-8700 CPU @ 3.20GHz (Cores 12)
   Memory:  128729 MB (Non-ECC)
   Disk /dev/nvme0n1: 1024 GB (=> 953 GiB) doesn't contain a valid partition table
   Disk /dev/nvme1n1: 1024 GB (=> 953 GiB) doesn't contain a valid partition table
   Total capacity 1907 GiB with 2 Disks

Network data:
   eth0  LINK: yes
         MAC:  xxxxxx
         IP:   yyyyyy
         IPv6: zzzzzz
         Intel(R) PRO/1000 Network Driver
To view the available disk paths and partitions, use the lsblk command.
# lsblk
NAME    MAJ:MIN RM   SIZE RO TYPE MOUNTPOINTS
loop0     7:0    0   3.4G  1 loop
nvme0n1 259:0    0 953.9G  0 disk
nvme1n1 259:1    0 953.9G  0 disk
We’ll set up the disks in a non-redundant RAID 0 configuration to maximize performance. Begin by creating the installer configuration file that defines the installation parameters.
vim rocky-config.txtModify sample configuration parameters provided below match your installation requirements. See installimage documentation for more details.
# Define disks to be used
DRIVE1 /dev/nvme0n1
DRIVE2 /dev/nvme1n1

# Enable Raid 0
SWRAID 1
# Set RAID Level
SWRAIDLEVEL 0 # Use 1 for Raid 1, 0 for no raid
BOOTLOADER grub
HOSTNAME rockyserver.cloudspinx.com # Set correct hostname
PART /boot ext4 512M
#PART  /boot/efi  esp    256M       #Only needed in UEFI mode

# Allocate the entire disk to a volume group named 'vg0' using LVM
PART lvm vg0 all
# Create a logical volume named 'root' in 'vg0' mounted at '/' with the XFS filesystem. Set your desired size.
LV vg0 root / xfs all
# Or specific size,
#LV vg0 root / xfs 200G
# Additional paritions example:
#LV vg0 swap swap swap 8G
#LV vg0 var /var  ext4  500G

# List images with ls /root/images
IMAGE /root/images/Rocky-9-latest-amd64-base.tar.gz
If you’re not using LVM, the configuration will look like the following:
PART /boot ext3 1024
PART swap swap 8G
PART / xfs all
Customize the partitioning scheme based on your storage hardware and the available disk space.
4) Install Rocky Linux on Hetzner root server
Once you’ve created your custom configurations, begin to install Rocky Linux on hetzner dedicated server by running the command:
installimage -a -c rocky-config.txtInstallation should begin immediately.
Found AUTOSETUP file '/autosetup'
...
WARNING:
  Starting installation in 20 seconds ...
  Press X to continue immediately ...
  Installation will DELETE ALL DATA ON DISK(s)!
  Press CTRL-C to abort now!
The installation process is fully automated, requiring no further user input after the configuration file is generated.
                Hetzner Online GmbH - installimage

  Your server will be installed now, this will take some minutes
             You can abort at any time with CTRL+C ...

         :  Reading configuration                           done
         :  Loading image file variables                    done
         :  Loading rockylinux specific functions           done
   1/17  :  Deleting partitions                             done
   2/17  :  Test partition size                             done
   3/17  :  Creating partitions and /etc/fstab              done
   4/17  :  Creating software RAID level 0                  done
   5/17  :  Creating LVM volumes                            done
   6/17  :  Formatting partitions
         :    formatting /dev/md/0 with ext4                done
         :    formatting /dev/vg0/swap with swap            done
         :    formatting /dev/vg0/root with xfs             done
   7/17  :  Mounting partitions                             done
   8/17  :  Sync time via ntp                               done
         :  Importing public key for image validation       done
   9/17  :  Validating image before starting extraction     done
  10/17  :  Extracting image (local)                        done
  11/17  :  Setting up network config                       done
  12/17  :  Executing additional commands
         :    Setting hostname                              done
         :    Generating new SSH keys                       done
         :    Generating mdadm config                       done
         :    Generating ramdisk                            done
         :    Generating ntp config                         done
  13/17  :  Setting up miscellaneous files                  done
  14/17  :  Configuring authentication
         :    Fetching SSH keys                             done
         :    Disabling root password                       done
         :    Disabling SSH root login with password        done
         :    Copying SSH keys                              done
  15/17  :  Installing bootloader grub                      done
  16/17  :  Running some rockylinux specific functions      done
  17/17  :  Clearing log files                              done

                  INSTALLATION COMPLETE
   You can now reboot and log in to your new system with the
 same credentials that you used to log into the rescue system.
After the OS installation, perform a reset by rebooting the server.
rebootRemote access via SSH is possible with the Public IP address provisioned for the server.
$ ssh root@serverip
Enter passphrase for key '/Users/jmutai/.ssh/id_rsa':
Linux pve01 6.2.16-15-pve #1 SMP PREEMPT_DYNAMIC PMX 6.2.16-15 (2023-09-28T13:53Z) x86_64

The programs included with the Debian GNU/Linux system are free software;
the exact distribution terms for each program are described in the
individual files in /usr/share/doc/*/copyright.

Debian GNU/Linux comes with ABSOLUTELY NO WARRANTY, to the extent
permitted by applicable law.
You can check the disk partitioning scheme and LVM partitions using the commands provided below.
# lsblk
NAME           MAJ:MIN RM   SIZE RO TYPE  MOUNTPOINTS
nvme0n1        259:0    0 953.9G  0 disk
├─nvme0n1p1    259:2    0   512M  0 part
│ └─md0          9:0    0   511M  0 raid1 /boot
└─nvme0n1p2    259:3    0 953.4G  0 part
  └─md1          9:1    0   1.9T  0 raid0
    ├─vg0-swap 253:0    0    32G  0 lvm   [SWAP]
    └─vg0-root 253:1    0   1.8T  0 lvm   /
nvme1n1        259:1    0 953.9G  0 disk
├─nvme1n1p1    259:4    0   512M  0 part
│ └─md0          9:0    0   511M  0 raid1 /boot
└─nvme1n1p2    259:5    0 953.4G  0 part
  └─md1          9:1    0   1.9T  0 raid0
    ├─vg0-swap 253:0    0    32G  0 lvm   [SWAP]
    └─vg0-root 253:1    0   1.8T  0 lvm   /

# pvs
  PV         VG  Fmt  Attr PSize PFree
  /dev/md1   vg0 lvm2 a--  1.86t    0

# vgs
  VG  #PV #LV #SN Attr   VSize VFree
  vg0   1   2   0 wz--n- 1.86t    0

# lvs
  LV   VG  Attr       LSize  Pool Origin Data%  Meta%  Move Log Cpy%Sync Convert
  root vg0 -wi-ao----  1.83t
  swap vg0 -wi-ao---- 32.00g
Extending an LVM is straightforward when there is available space in the Volume Group. In this example, we are adding an extra 100GB to the /dev/vg0/var Logical Volume.
# lvextend -r -L +100G /dev/vg0/vg0Verify the successful installation of Rocky Linux by checking the OS release information:
root@proxmox ~ # cat /etc/os-release
NAME="Rocky Linux"
VERSION="9.5 (Blue Onyx)"
ID="rocky"
ID_LIKE="rhel centos fedora"
VERSION_ID="9.5"
PLATFORM_ID="platform:el9"
PRETTY_NAME="Rocky Linux 9.5 (Blue Onyx)"
ANSI_COLOR="0;32"
LOGO="fedora-logo-icon"
CPE_NAME="cpe:/o:rocky:rocky:9::baseos"
HOME_URL="https://rockylinux.org/"
VENDOR_NAME="RESF"
VENDOR_URL="https://resf.org/"
BUG_REPORT_URL="https://bugs.rockylinux.org/"
SUPPORT_END="2032-05-31"
ROCKY_SUPPORT_PRODUCT="Rocky-Linux-9"
ROCKY_SUPPORT_PRODUCT_VERSION="9.5"
REDHAT_SUPPORT_PRODUCT="Rocky Linux"
REDHAT_SUPPORT_PRODUCT_VERSION="9.5"
Check if any OS updates are available.
sudo dnf -y updateOnce the OS is installed, you can proceed with setting up your environment, such as installing server packages, configuring services, and deploying applications. In future we will write an deep dive eBook on Rocky Linux server administration.
Similar articles:


