

Squid is free open-source software and a Web caching proxy that supports HTTP, HTTPS, FTP, and other protocols. By caching and reusing frequently-requested web pages, squid saves bandwidth and improves response time making accessing web pages very fast. Squid has extensive access control capabilities which makes it a great server accelerator. Squid runs on the majority of Operating Systems including Windows and is licensed under the GNU GPL.
Squid makes most of the internet connections by optimizing data flow between clients and servers to improve performance and caching frequently used content to save bandwidth. Squid also routes content requests to web servers in many ways to build a hierarchy to optimize network throughput.
Squid increases content delivery for websites by reducing the server load while improving delivery speeds to clients. It also has an advanced content routing configuration that helps in building content clusters that route and load balance requests through a variety of web servers.
Features of Squid Proxy Server
- Supports majorly of Operating systems.
- Supports many internet protocols.
- Cache server hierarchy capability optimizes on network throughput.
- Load distribution across intercommunicating proxy server hierarchies.
- Defines strict access control lists for all clients accessing the proxy server
- The Content routing configuration capability to build content clusters.
- Allows or denies access control to specific web pages
- Generates statistics on frequently accessed web pages.
We now turn our focus on installing Squid Proxy Server on Rocky Linux 8.
System Requirements.
- Sufficient RAM.
- CPU with a lower processor core count of 4 – 8 physical cores.
- Minimum disk cache size of 4GB.
- Hard Disk / SSD Architecture- Most preferred are the SSD. Avoid hard disks with a RAID 5 architecture.
As of this article, version 5 is the stable version that can be used in a production environment.
Step 1: Update your System
This is the best practice to do before any package installation.
sudo dnf update -yAfter the system is upgraded proceed to the second step.
Step 2: Enable EPEL repository
EPEL has a set of high-quality Extra Packages for Enterprise Linux. The Squid package is not available for Rocky Linux on the system default repositories, hence the need to install EPEL.
To install the epel-release run the command below:
sudo yum install https://dl.fedoraproject.org/pub/epel/epel-release-latest-9.noarch.rpmStep 3: Install Squid Proxy Server
Run the command shown below to install Squid Proxy Server.
sudo dnf install squid -yStep 4: Verify Squid version
Run the squid --version command to check the version of Squid software after installation:
squid --versionCommand output :
[Jil@rocky-linux-01 ~]$ squid --version
Squid Cache: Version 5.5
Service Name: squid
Step 5: Start and enable squid service
To start and enable squid and make it available on the next system boot:
sudo systemctl start squid
sudo systemctl enable squid
Step 6: Check squid service status
To check the status of squid to ensure it is running:
sudo systemctl status squid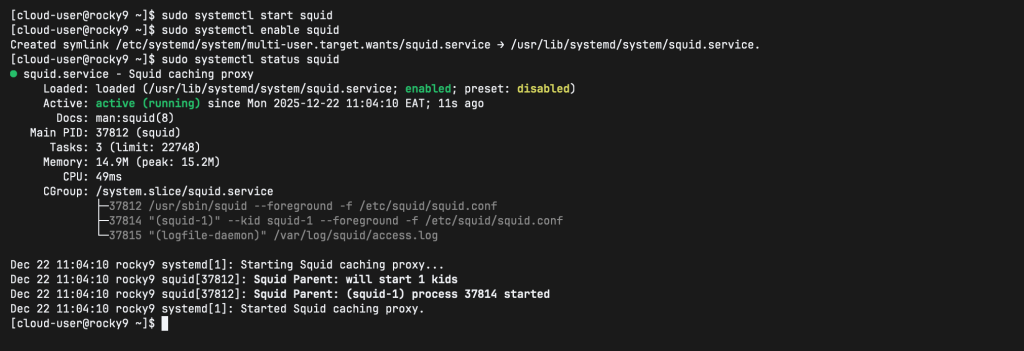
From the output, Squid is loaded, active, and running. This confirms that the squid proxy server is running.
Step 7: Allow Squid Ports on Firewalld
If your server has Firewalld running and enabled, enable it to allow the client machines to reach it. Run the commands below to enable squid on your firewall.
sudo firewall-cmd --add-service=squid --permanent
sudo firewall-cmd --reload
IIf Squid is configured to listen from a different port other than the default port number 3128 , then configure your firewall as follows:
sudo firewall-cmd --permanent --add-port=[port_number]/tcp
sudo firewall-cmd --reload
Then run your SELinux in enforcing mode by assigning the port to the squid_port_t port type definition:
sudo semanage port -a -t squid_port_t -p tcp [port_number]Squid normally listens to port 3128 by default. If you would wish to change the service port, edit the squid configuration file.
sudo vim /etc/squid/squid.confLocate this section:
# Squid normally listens to port 3128
 http_port 3128
# http_port 3128 transparent
To change the service port on which the Squid service listens, edit the http_port parameter to say port 8080.
http_port 8080If you wish to configure a specific IP address through which Squid service listens, you can do so by:
http_port [YOUR IP ADDRESS]:3128To add multiple http_port parameters for Squid to listen on both port numbers and IP addresses:
http_port 192.168.102.20:3128
http_port 192.168.102.21:8080
Then Restart Squid service:
sudo systemctl restart squidThat is how you install squid proxy server in Rocky Linux 9. We now briefly check on the testing functionality of squid.
Step 8: Testing Squid functionality
There are two methods of testing squid functionality on your local system.
Method 1 : Using squidclient command
squidclient command outputs the response to a web request similar to wget or curl. unlike wget and curl, squidclient automatically connect to the default proxy setup of Squid, localhost:3128.
In this article, I will test this with my domain address www.cloudspinx.com
On your command prompt and as a normal user or sudo user, issue this command:
squidclient http://www.example.orgOutput :
HTTP/1.1 301 Moved Permanently
Date: Mon, 22 Dec 2025 08:14:46 GMT
Content-Length: 0
Location: https://www.cloudspinx.com/
Report-To: {"group":"cf-nel","max_age":604800,"endpoints":[{"url":"https://a.nel.cloudflare.com/report/v4?s=150KnDIqiL%2B9UKi%2B05RrF63ac2p8y55RZZ09jfPMUix5chYs1WaAhBzKJMbgu6qgOlcsiOg4PzMQ1%2FCl2%2BgmeuHDnJuIXw9sQzaFi5GUt5t5ew%3D%3D"}]}
Nel: {"report_to":"cf-nel","success_fraction":0.0,"max_age":604800}
Server: cloudflare
CF-RAY: 9b1e2ae1bcbb8a46-NBO
alt-svc: h3=":443"; ma=86400
X-Cache: MISS from rocky9
X-Cache-Lookup: MISS from rocky9:3128
Via: 1.1 rocky9 (squid/5.5)
Connection: close
From the output, we can deduce the following:
The line X-Cache: indicates that the requested document was not in the squid cache.
The value of the header Via: gives the HTTP version, name of the local machine, and squid version.
Method 2 : Using a Web browser – E.g Firefox
You can accomplish the above by setting up your localhost as the proxy and 3128 as the port number. Then load your page and check the response headers in the Network panel of the browser’s Inspector or Developer Tools.
Stopping , Reloading and Restarting Squid.
Issue the commands below:
sudo systemctl reload squid
sudo systemctl restart squid
sudo systemctl stop squid
To remove squid
To completely remove squid from your system, delete the /etc/cache/squid directory manually.
Step 9: Additional Squid Configurations
The default squid configuration file is located at /etc/squid/squid.conf .This file has minimum recommended configurations for the squid proxy server. The proxy is available for localhost on default port number 3128.
To set your own configurations, make a copy of this file.
sudo cp /etc/squid/squid.conf /etc/squid/squid.conf.bakSample output
#
# Recommended minimum configuration:
#

# Example rule allowing access from your local networks.
# Adapt to list your (internal) IP networks from where browsing
# should be allowed
acl localnet src 0.0.0.1-0.255.255.255  # RFC 1122 "this" network (LAN)
acl localnet src 10.0.0.0/8             # RFC 1918 local private network (LAN)
acl localnet src 100.64.0.0/10          # RFC 6598 shared address space (CGN)
acl localnet src 169.254.0.0/16         # RFC 3927 link-local (directly plugged) machines
acl localnet src 172.16.0.0/12          # RFC 1918 local private network (LAN)
acl localnet src 192.168.0.0/16         # RFC 1918 local private network (LAN)
acl localnet src fc00::/7               # RFC 4193 local private network range
acl localnet src fe80::/10              # RFC 4291 link-local (directly plugged) machines

acl SSL_ports port 443
acl Safe_ports port 80          # http
acl Safe_ports port 21          # ftp
acl Safe_ports port 443         # https
acl Safe_ports port 70          # gopher
acl Safe_ports port 210         # wais
acl Safe_ports port 1025-65535  # unregistered ports
acl Safe_ports port 280         # http-mgmt
acl Safe_ports port 488         # gss-http
acl Safe_ports port 591         # filemaker
acl Safe_ports port 777         # multiling http
acl CONNECT method CONNECT

#
# Recommended minimum Access Permission configuration:
#
# Deny requests to certain unsafe ports
http_access deny !Safe_ports

# Deny CONNECT to other than secure SSL ports
http_access deny CONNECT !SSL_ports

# Only allow cachemgr access from localhost
http_access allow localhost manager
http_access deny manager

# We strongly recommend the following be uncommented to protect innocent
# web applications running on the proxy server who think the only
# one who can access services on "localhost" is a local user
#http_access deny to_localhost

#
# INSERT YOUR OWN RULE(S) HERE TO ALLOW ACCESS FROM YOUR CLIENTS
#

# Example rule allowing access from your local networks.
# Adapt localnet in the ACL section to list your (internal) IP networks
# from where browsing should be allowed
http_access allow localnet
http_access allow localhost
# And finally deny all other access to this proxy
http_access allow all
# Squid normally listens to port 3128
 http_port 3128
# Uncomment and adjust the following to add a disk cache directory.
#cache_dir ufs /var/spool/squid 100 16 256
# Leave coredumps in the first cache dir
coredump_dir /var/spool/squid
#
# Add any of your own refresh_pattern entries above these.
#
refresh_pattern ^ftp:           1440    20%     10080
refresh_pattern ^gopher:        1440    0%      1440
refresh_pattern -i (/cgi-bin/|\?) 0     0%      0
refresh_pattern .               0       20%     4320
Configure Squid Access Control List
Squid has a detailed system for controlling the access to the proxy server. These Access Control Lists (ACL) are rules-based lists that are processed in sequential order. ACL’s must be defined before they are used. Default ACL’s such as all and localhost, already exist.
ACL syntax is as shown.
acl ACL_NAME TYPE DATA- ACL_NAME – can be chosen arbitrarily
- TYPE – You can select the type from different options found in the ACCESS CONTROLS section in /etc/squid/squid.conf file.
- DATA – depends on the individual ACL type e.g hostnames, IP addresses, etc
Example: To allow hosts in 192.168.58.0/24 network to access the internet through the proxy server, edit /etc/squid/squid.conf and add a UCL entry as shown below.
...
# INSERT YOUR OWN RULE(S) HERE TO ALLOW ACCESS FROM YOUR CLIENTS
#
acl internal src 192.168.58.0/24 # Allow Internal hosts
...
Next, allow access from the network based on your defined ACL above.
...
# INSERT YOUR OWN RULE(S) HERE TO ALLOW ACCESS FROM YOUR CLIENTS
#
acl internal src 192.168.58.0/24 # Allow Internal hosts
http_access allow internal
...
Block unwanted websites
To block a certain website e.g facebook create a file that defines the domain of this website. as shown below.
vim /etc/squid/restricted-sites.squidThen add a list all the websites you want to block. Each should start with a dot. The dot specifies that you are blocking the subsites of the main site
.facebook.comThen, create an ACL for the blocked/restricted sites in the /etc/squid/squid.conf and set the deny rule for the defined rule.
...
# INSERT YOUR OWN RULE(S) HERE TO ALLOW ACCESS FROM YOUR CLIENTS
#
acl internal src 192.168.58.0/24 # Allow Internal hosts
acl blockedsites dstdomain "/etc/squid/restricted-sites.squid" # For blocked/restricted sites
http_access deny blockedsites
http_access allow internal
...
Block websites with certain words keywords
Just like blocking websites on a domain, you can block websites with certain keywords.
Create a file with your keywords
sudo vi /etc/squid/block_keywords.squidDefine a list of all your keywords to restrict
betting
porn
Make changes to your squid configuration file
...
# INSERT YOUR OWN RULE(S) HERE TO ALLOW ACCESS FROM YOUR CLIENTS
#
acl internal src 192.168.58.0/24 # Allow Internal hosts
acl blockedsites dstdomain "/etc/squid/restricted-sites.squid" # For blocked/restricted sites
acl keyword-ban url_regex "/etc/squid/block_keywords.squid"
http_access deny blockedsites
http_access deny block_keywords
http_access allow internal
...
Step 10: Configure clients to use Squid Proxy
This can be achieved by setting system-wide proxy configurations, configuring clients to use squid proxy as the gateway or by setting the proxy settings on your browser.
System wide proxy configurations
To set system-wide proxy configuration, create a file in the /etc/profile.d with environment variables defining squid proxy server details.
sudo vi /etc/profile.d/squid.shDefine your squid proxy server details:
PROXY_URL="192.168.201.2:3128"
HTTP_PROXY=$PROXY_URL
HTTPS_PROXY=$PROXY_URL
FTP_PROXY=$PROXY_URL
http_proxy=$PROXY_URL
https_proxy=$PROXY_URL
ftp_proxy=$PROXY_URL
export HTTP_PROXY HTTPS_PROXY FTP_PROXY http_proxy https_proxy ftp_proxy
Then source your configuration file.
source /etc/profile.d/squid.shTry and download anything from the terminal.
Execute this command on the client’s terminal.
[Jil@rocky-linux-01 ~]$ wget google.com
--2021-10-04 16:23:18--  http://google.com/
Connecting to 192.168.201.2:3128... connected.
Proxy request sent, awaiting response... 301 Moved Permanently
Location: http://www.google.com/ [following]
--2021-10-04 16:23:18--  http://www.google.com/
Reusing existing connection to 192.168.201.2:3128.
Proxy request sent, awaiting response... 200 OK
Length: unspecified [text/html]
Saving to: ‘index.html’

index.html              [ <=>                ]  13.61K  --.-KB/s    in 0.001s

2021-10-04 16:23:18 (9.06 MB/s) - ‘index.html’ saved [13939]
On the server, tail the access log file.
sudo tail -f /var/log/squid/access.log Access log output:
1633357398.806     47 192.168.201.2 TCP_MISS/301 708 GET http://google.com/ - HIER_DIRECT/142.250.186.174 text/html
1633357398.883     76 192.168.201.2 TCP_MISS/200 14785 GET http://www.google.com/ - HIER_DIRECT/142.250.186.100 text/html
Configure Proxy Setting on the browser
To set squid server proxy settings on your firefox browser, navigate to Preferences > General > Network Settings > Manual Proxy Configuration
Once you have saved your settings, and on trying to access your Facebook account, it will be blocked.
Analyze the server logs:
sudo tail -f /var/log/squid/access.log That sums up our article on how to Install and Configure Squid Proxy Server on Rocky Linux 9. Be sure to check on squid proxy server official site for more information. We hope you have followed along. Thank you and keep it CloudSpinx for more. Thank you.


