
There are several initial configurations that you should consider when setting up KVM environment and network configurations is one of the key ones.
For the virtual machines (VMs) created to connect over a network to your host (hypervisor), to other VMs on the host, and the outside world, you must configure the VM networking accordingly.
A default network is configured during installation to provide VMs networking, which can be modified further.
🔥 Looking for the complete guide to KVM? This excerpt is from Mastering KVM Virtualization – The Ultimate eBook. Download now.
Understanding virtual networking
All VMs connection to other devices and locations on a network depend on the host hardware. In this section we explain the mechanisms of VM network connections available in KVM hypervisor.
Here is a figure that shows a virtual network switch connecting two VMs to the network:

To the guest operating system, a virtual network connection functions just like a physical network connection. The host hypervisor treat virtual network switchs as network interfaces.
Default libvirt network
When virtnetworkd service which is a daemon responsible for the management of virtual machine (VM) networks on the host system is first started, it creates virbr0, the default network interface for VMs.
Use the ip utility to view information about the default virbr0 interface:
$ ip addr show virbr0
6: virbr0: <NO-CARRIER,BROADCAST,MULTICAST,UP> mtu 1500 qdisc noqueue state DOWN group default qlen 1000
    link/ether 52:54:00:ff:ea:b6 brd ff:ff:ff:ff:ff:ff
    inet 192.168.122.1/24 brd 192.168.122.255 scope global virbr0
       valid_lft forever preferred_lft forever
By default, all the virtual machines (VMs) on a single host are connected to the same NAT-type virtual network named default, which utilizes the virbr0 interface.
$ virsh net-list
 Name         State    Autostart   Persistent
-----------------------------------------------
 default      active   yes         yes
This default network works for basic outbound-only network access from VM. The VMs on the network are visible to the host and other VMs on the host linked to the same network. They can also connect to the external networks but are not visible to the devices outside the network.
The following diagram is an illustration to the default VM network configuration:
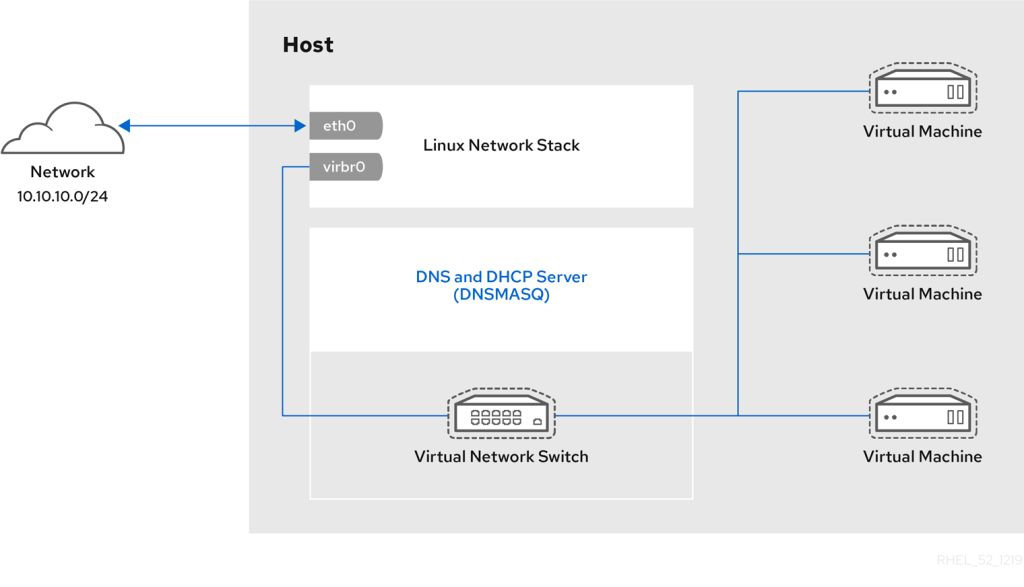
The default virtual network switch operate in network address translation (NAT) mode
To adjust the default nework configurations such as IP address, netmask and DHCP range, use the virsh net-edit command:
$ virsh net-edit default
<network>
  <name>default</name>
  <uuid>92d537a2-d1dd-48c6-bd3f-c96de487e01b</uuid>
  <forward mode='nat'/>
  <bridge name='virbr0' stp='on' delay='0'/>
  <mac address='52:54:00:ff:ea:b6'/>
  <ip address='192.168.122.1' netmask='255.255.255.0'>
    <dhcp>
      <range start='192.168.122.2' end='192.168.122.254'/>
    </dhcp>
  </ip>
</network>
In addition to the default NAT network, other networks and interfaces can be configured to use one of the following modes:
- Bridged mode
- Routed mode
- Isolated mode
- Open mode
- Create NAT (Network Address Translation) Network
In a Network Address Translation (NAT) network:
- The VMs use the host’s IP for outbound traffic and are on a private network behind the host. It uses IP masquerading, which hides the VMs’ individual addresses.
- VMs have access to external networks, but external systems cannot initiate connections to the VMs.
Benefits:
- Simple Setup: Easy to configure for basic VM internet access.
- Consolidated Management: VMs share a single external IP, simplifying external network management.
Limitations:
- Limited Inbound Communication: External devices cannot directly access VMs on the NAT network.
- Security Considerations: VMs inherit the host’s security posture, which might not be ideal for all situations.
This approach is suitable for scenarios where you only need basic internet access for your VMs and outbound communication is the primary concern.
1. Create Network Definition File
The easiest way to create a network of type NAT is by dumping the default network configuration into a file.
virsh net-dumpxml default >net-config.xmlOpen the file using your favorite file editor – can be vim or nano
vim net-config.xmlWe will modify the configuration to have:
- Network name: private
- Bridge name: virbr1
- IP address: 192.168.99.1
- Network mask: 255.255.255.0
- DHCP Start IP Address: 192.168.99.50
- DHCP End IP Address: 192.168.99.200
Below is our complete configurations after making the changes.
<network>
  <name>private</name>
  <forward mode='nat'>
    <nat>
      <port start='1024' end='65535'/>
    </nat>
  </forward>
  <bridge name='virbr1' stp='on' delay='0'/>
  <ip address='192.168.99.1' netmask='255.255.255.0'>
    <dhcp>
      <range start='192.168.99.50' end='192.168.99.200'/>
    </dhcp>
  </ip>
</network>
Where:
<name>: Specifies the name of the network to be created.<forward mode="nat"/>: Sets the mode of the network to NAT.<bridge name="virbr1"/>: Defines the bridge interface name (virbr1in this example).<ip>: Specifies the IP address and DHCP configuration for the NAT network.address: Sets the IP address for the NAT network (IP assigned on host)netmask: Defines the subnet mask.<dhcp>: Configures DHCP settings.<range>: Specifies the range of IP addresses available for DHCP lease.
Remember to adjust IP address range (192.168.99.0/24), bridge name (virbr1), and DHCP settings as needed for your environment.
2. Define the Network
Use the virsh net-define command to define the network from your XML file:
sudo virsh net-define net-config.xml3. Start the Network
Start the network newly defined:
sudo virsh net-start private4. Enable network autostart (Optional)
For the network to be started automatically when the host boots up, you need to enable autostart.
sudo virsh net-autostart private5. Verify the Network
Check the status of your NAT network:
sudo virsh net-list --allTo view all the details dump network XML configurations.
sudo virsh net-dumpxml privateCheck bridge on the host
# Example of virbr1
$ ip ad show dev virbr1
13: virbr1: <NO-CARRIER,BROADCAST,MULTICAST,UP> mtu 1500 qdisc noqueue state DOWN group default qlen 1000
    link/ether 52:54:00:47:18:1d brd ff:ff:ff:ff:ff:ff
    inet 192.168.99.1/24 brd 192.168.99.255 scope global virbr1
       valid_lft forever preferred_lft forever
2) Understanding Bridged Network
In a bridged network:
- The virtual machines (VMs) connect directly to the physical network interface of the host machine ( using an existing Linux bridge on the host).
- This allows the VMs to share the same IP subnet as the host.
- VMs appear as separate devices on the same network as the host machine. Each VM has its own IP address on the local network.
Bridged mode uses connection switching based on the MAC address:

Bridged network bonding
This is a combination of multiple physical network interfaces on the host machine into a single logical interface for your VMs.
Some benefits are:
- Increased Bandwidth: Network traffic is distributed across multiple physical interfaces, potentially leading to higher overall bandwidth for your VMs.
- Fault Tolerance: In a scenaio where one of the physical interface fails, the VMs can still communicate through the remaining active interface(s), minimizing overall downtime.
- Load Balancing: Bonding helps to distribute network traffic more evenly across available interfaces, hence improving the network performance.
Key points to consider when implementing the bridged network bonding:
- Switch configuration: The switch used in the physical network should be configured with the appropriate bonding mode (e.g., 802.3ad)to work with the host’s bonded interface.
- Hardware compatibility: Both the switch and host server network interfaces need to support link aggregation.
Creating Bridged Network in Libvirt
Setting up a bridge network in a virtualization environment is crucial for allowing virtual machines (VMs) to communicate with each other and the external network. In a Linux environment managed by Libvirt, this can be achieved using XML configuration files. This method provides a flexible and powerful way to define network settings, ensuring persistence and easy management.
Step 1: Create XML Configuration File
Start be creating a new XML file for your bridge network, e.g., bridge-network.xml.
vim bridge-network.xmlBelow is an example XML configuration:
- Bridge without DHCP service. You will set IP address information manually on the instance.
<network>
  <name>br0</name>
  <forward mode='bridge'/>
  <bridge name='br0'/>
  <mtu size='1500'/>
</network>- Bridge with DHCP service – VMs will get IP allocations from defined IP block.
<network>
  <name>br0</name>
  <forward mode='bridge'/>
  <bridge name='br0'/>
  <ip address='192.168.10.1' netmask='255.255.255.0'>
    <dhcp>
      <range start='192.168.10.20' end='192.168.10.200'/>
    </dhcp>
  </ip>
</network>- With DNS Forwarding. The DNS forwarders configured are google public ones.
<network>
  <name>br0</name>
  <forward mode='bridge'/>
  <bridge name='br0'/>
  <ip address='192.168.10.1' netmask='255.255.255.0'>
    <dhcp>
      <range start='192.168.10.20' end='192.168.10.200'/>
    </dhcp>
  </ip>
  <dns>
    <forwarder addr='8.8.8.8'/>
    <forwarder addr='8.8.4.4'/>
  </dns>
</network>
Exaplanations:
- In this example:
<name>: Specifies the name of the network.<forward mode='bridge'/>: Indicates that the network operates in bridge mode.<bridge name='br0'/>: Specifies the name of the bridge interface to use.- The other settings are for IP address, DHCP and DNS forwarders accordingly
Step 2: Define the Network in Libvirt
Use the virsh command to define the network with the XML configuration file.
virsh net-define bridge-network.xmlStep 3: Start and Autostart the Network
Use the commands below to start the network and set it to start automatically
virsh net-start br0
virsh net-autostart br0
Step 4: Verify the Network
List available networks in your KVM host by running the following commands
virsh net-list --allTo output the network information as an XML dump to stdout, use:
 virsh net-dumpxml <network>
 # Example  virsh net-dumpxml br0
You can also get basic information about the network object.
virsh net-info <network>🌍 Whether at work or on the go, access Mastering KVM Virtualization anytime, in the book you will learn:
- Host Network Management using Netplan: bridges, VLANs, Bonded interfaces
- Host Network Management using Network Manager (NMCLI) – bridged, VLANs, Bonds/Teamed
- Host Network Management using Networking Scripts
- Host Network Management using Open vSwitch


