

In this blog post we will be discussing how to add remote hosts to Nagios server for monitoring. Once you have nagios server installed, you should be able to start adding hosts for monitoring. Check out the guide:
With Nagios server installed and running login to the server through ssh and follow the below steps.
ssh root@serverip
ssh username@serverip
Create Host Object Definition
Nagios server uses files that define the servers to be monitored with all their particulars. These are called object definitions and are found in /usr/local/nagios/etc/objects directory. To create new object definitions, you can create a sub-directory to place your files as below:
sudo mkdir /usr/local/nagios/etc/objects/testNagios server needs to know that we have a new directory where it needs to read definitions from. Open Nagios main configuration file and update it.
sudo vim /usr/local/nagios/etc/nagios.cfgUnder OBJECT CONFIGURATION FILE(S) section, add the following line:
cfg_dir=/usr/local/nagios/etc/objects/testNow create a definition file for your server to be monitored. The file defines the host specifics and the host group to be placed in.
sudo vim /usr/local/nagios/etc/objects/test/host1.cfgAdd the following content, replacing the ones specific to your server
# REMOTE HOST
define host {
   use                     example-test-hosts
   host_name               example.com
   alias                   example
   address                 192.168.1.210
}

###############################################################################
#
# REMOTE HOST GROUP DEFINITION
#
###############################################################################
define hostgroup {
   hostgroup_name         example-test-env01
   alias                  Linux Servers
   members                example.com
}
Create Custom Template
‘Use‘ in the above configuration defines the template that will be used for monitoring your server. There is a default template that you can also use instead, /usr/local/nagios/etc/objects/templates.cfg. Let us create our custom template above:
sudo vim /usr/local/nagios/etc/objects/test/hosts-service-template.cfgPaste the below content but edit it to suit your server and needs:
# Host Template Definition
define host{
name                        example-test-hosts
notifications_enabled        1
event_handler_enabled        1
flap_detection_enabled       1
process_perf_data            1
retain_status_information    1
retain_nonstatus_information 1
       check_command                check-host-alive
       check_interval               5
       max_check_attempts           2
       notification_interval        0
       notification_period          24x7
       notification_options         d,u,r
       contact_groups               example-test-admins
register                     0
}
# Service Template definition
define service{
name                         example-test-service
active_checks_enabled        1
passive_checks_enabled       1
parallelize_check            1
obsess_over_service          1
check_freshness              0
notifications_enabled        1
event_handler_enabled        1
flap_detection_enabled       1
process_perf_data            1
retain_status_information    1
retain_nonstatus_information 1
       notification_interval        0
       is_volatile                  0
       check_period                 24x7
       check_interval               5
       retry_interval               1
       max_check_attempts           2
       notification_period          24x7
       notification_options         w,u,c,r
       contact_groups               example-test-admins
register                     0
}
Create Contact Definition
As you can see above, we have also defined contact group but we have not yet created. This will be used for sending alert messages. Let us go ahead to include contact file.
sudo vim /usr/local/nagios/etc/objects/test/example-test-contacts.cfgAdd the content below but edit appropriately:
# Define Your Contacts Here
define contact {
   contact_name        cloudspinx ; Short name of user
   use        generic-contact ; Inherit default values from generic-contact template (defined above)
   alias        cloudspinx ; Full name of user
   email        [email protected] ; <<***** CHANGE THIS TO YOUR EMAIL ADDRESS ******
}
# Create Contact Group
define contactgroup {
   contactgroup_name       example-test-admins
   alias       example-test Administrators
   members       cloudspinx
}
Verify Nagios Configuration
Run the following command to check if the configuration file is okay. You should actually run after you make any changes to ensure that you are not making mistakes.
sudo /usr/local/nagios/bin/nagios -v /usr/local/nagios/etc/nagios.cfgIf you run into any problems regarding invalid whitespaces due to copy pasting the configurations, you can strip all the non-ASCII characters using the `sed` command as shown below. For instance, to remove all the non-ASCII characters in all your nagios config files, run:
LC_ALL=C sed -i 's/[^ -~]//g' /usr/local/nagios/etc/objects/test/*.cfgYou should get the output as below:
Nagios Core 4.5.9
Copyright (c) 2009-present Nagios Core Development Team and Community Contributors
Copyright (c) 1999-2009 Ethan Galstad
Last Modified: 2024-12-19
License: GPL

Website: https://www.nagios.org
Reading configuration data...
   Read main config file okay...
   Read object config files okay...

Running pre-flight check on configuration data...

Checking objects...
	Checked 8 services.
	Checked 2 hosts.
	Checked 2 host groups.
	Checked 0 service groups.
	Checked 2 contacts.
	Checked 2 contact groups.
	Checked 24 commands.
	Checked 5 time periods.
	Checked 0 host escalations.
	Checked 0 service escalations.
Checking for circular paths...
	Checked 2 hosts
	Checked 0 service dependencies
	Checked 0 host dependencies
	Checked 5 timeperiods
Checking global event handlers...
Checking obsessive compulsive processor commands...
Checking misc settings...

Total Warnings: 0
Total Errors:   0

Things look okay - No serious problems were detected during the pre-flight check
Then restart Nagios server:
sudo systemctl restart nagiosNow visit Nagios web interface and verify that your new server has been added for monitoring: http://<server-ip>/nagios. From Nagios web interface, navigate to the hosts panel to view the added hosts:
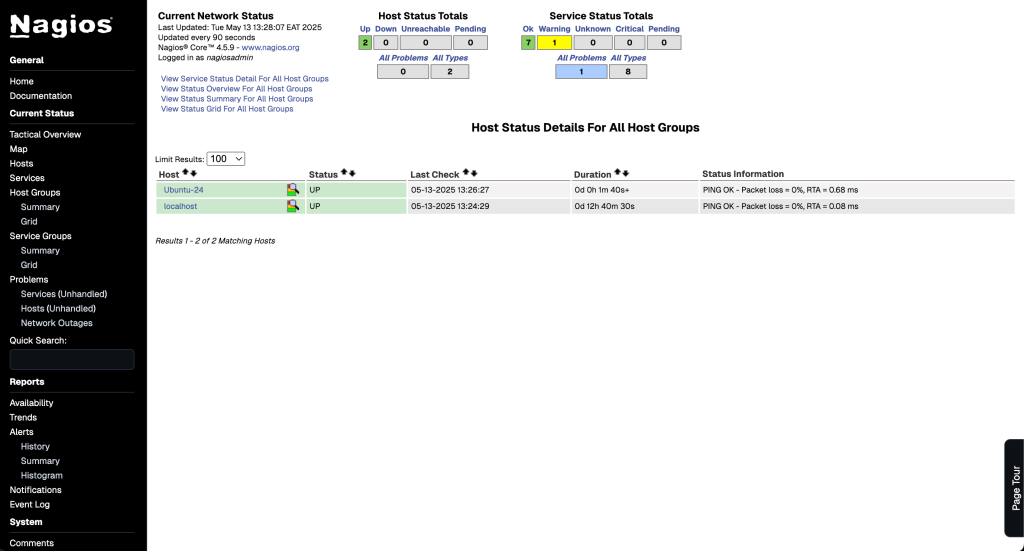
This concludes our guide on how to add a remote host to Nagios monitoring server. I hope the guide has been helpful. Check more interesting guides below:


