MariaDB is a community version of MySQL database server. The latest stable version of MariaDB is 10.6. In a database environment, there is always need for disaster recovery (DR). This is usually put in place because database systems require 99.99% uptime. In this guide we will perform the setup MariaDB Master-Slave Replication on Rocky Linux 8.
This article will cover how to setup database replication between two or more MariaDB instances where one acts as the primary host and the other nodes secondary nodes.
As you already know, MariaDB is a structured database server that uses standard SQL syntax to use and manage the environment. Let’s quickly dive into the installation steps.
Step 1: Install MariaDB Server (Master)
In my setup, I have two nodes with the following details:
- Primary server – 192.168.100.42
- Secondary server – 192.168.100.44
To install MariaDB, we need to configure MariaDB YUM repository.
Download and install MariaDB repo:
sudo yum install curl
curl -LsS -O https://downloads.mariadb.com/MariaDB/mariadb_repo_setup
sudo bash mariadb_repo_setup
The above command install the MariaDB repository and updates your system cache.
Install MariaDB server and client packages.
sudo dnf module reset -qy mariadb
sudo yum install MariaDB-server MariaDB-client python3-policycoreutils
Review dependencies and proceed with the installation of MariaDB server:
....
Transaction Summary
======================================================================================================================================================================================================
Install  13 Packages

Total download size: 54 M
Installed size: 258 M
Is this ok [y/N]: y
When the installation is done, enable and start mariadb-service.
sudo systemctl enable --now mariadb.serviceConfirm that the service is up and running
sudo systemctl status mariadbHarden your database server before you can start using it.
$ sudo mariadb-secure-installation

NOTE: RUNNING ALL PARTS OF THIS SCRIPT IS RECOMMENDED FOR ALL MariaDB
      SERVERS IN PRODUCTION USE!  PLEASE READ EACH STEP CAREFULLY!

In order to log into MariaDB to secure it, we'll need the current
password for the root user.  If you've just installed MariaDB, and
you haven't set the root password yet, the password will be blank,
so you should just press enter here.

Enter current password for root (enter for none):
OK, successfully used password, moving on...

Setting the root password ensures that nobody can log into the MariaDB
root user without the proper authorisation.

Set root password? [Y/n] y
New password:
Re-enter new password:
Password updated successfully!
Reloading privilege tables..
 ... Success!


By default, a MariaDB installation has an anonymous user, allowing anyone
to log into MariaDB without having to have a user account created for
them.  This is intended only for testing, and to make the installation
go a bit smoother.  You should remove them before moving into a
production environment.

Remove anonymous users? [Y/n] y
 ... Success!

Normally, root should only be allowed to connect from 'localhost'.  This
ensures that someone cannot guess at the root password from the network.

Disallow root login remotely? [Y/n] y
 ... Success!

By default, MariaDB comes with a database named 'test' that anyone can
access.  This is also intended only for testing, and should be removed
before moving into a production environment.

Remove test database and access to it? [Y/n] y
 - Dropping test database...
 ... Success!
 - Removing privileges on test database...
 ... Success!

Reloading the privilege tables will ensure that all changes made so far
will take effect immediately.

Reload privilege tables now? [Y/n] y
 ... Success!

Cleaning up...

All done!  If you've completed all of the above steps, your MariaDB
installation should now be secure.

Thanks for using MariaDB!
You will need to configure the root password in the above step. This is important as you will need it to login to your database server using the command below.
$ mysql -u root -p
Enter password:
Welcome to the MariaDB monitor.  Commands end with ; or \g.
Your MariaDB connection id is 8
Server version: 11.2.6-MariaDB MariaDB Server

Copyright (c) 2000, 2018, Oracle, MariaDB Corporation Ab and others.

Type 'help;' or '\h' for help. Type '\c' to clear the current input statement.

MariaDB [(none)]> SELECT VERSION();
+----------------+
| VERSION()      |
+----------------+
| 11.2.6-MariaDB |
+----------------+
1 row in set (0.000 sec)

MariaDB [(none)]> quit
Bye
Configure MariaDB settings on Primary Node
Below are some of the MariaDB configuration files:
- /etc/my.cnf
- /etc/my.cnf.d/client.cnf
- /etc/my.cnf.d/mysql-clients.cnf
- /etc/my.cnf.d/server.cnf
Custom configuration files can be added in the /etc/my.cnf.d/ directory.
We need to configure the Primary node to make it aware of its role in the cluster. To do this, we shall edit the /etc/my.cnf.d/server.conf file and add the following lines under the [mysqld] section.
$ sudo vi /etc/my.cnfAdd the details below;
[mysqld]
bind-address=192.168.100.39
server-id=1
log_bin=mysql-bin
binlog-format=ROW
Save the changes, exit and restart mariadb service.
sudo systemctl restart mariadbCreate a database user that will be used to bind the servers for replication
MariaDB [(none)]> create user dbreplica@'%' identified by 'StrongP@ssw0rd';
MariaDB [(none)]> GRANT REPLICATION SLAVE ON *.* TO dreplica@'%';
MariaDB [(none)]> flush privileges;
Allow MySQL port through the firewall.
$ sudo firewall-cmd --add-port=3306/tcp --zone=public --permanent
$ sudo firewall-cmd --reload
Step 2: Install MariaDB Slave
We now need to install MariaDB on our secondary node. The installation process is similar the one above.
Confgure MariaDB YUM repo:
sudo yum install curl
curl -LsS -O https://downloads.mariadb.com/MariaDB/mariadb_repo_setup
sudo bash mariadb_repo_setup
Install MariaDB server:
sudo dnf module reset -qy mariadb
sudo yum install MariaDB-server MariaDB-client python3-policycoreutils
Step 3: Configure MariaDB Slave settings
We need to configure MariaDB on the secondary node to act as the slave.
Enable and start MariaDB on slave node:
sudo systemctl enable --now mariadbHarden MariaDB installation:
sudo mariadb-secure-installationConfigure Slave settings for MariaDB. Edit the /etc/my.cnf/d/server.conf file and add the following.
[mysqld]
bind-address=0.0.0.0
server-id=2
binlog-format=ROW
Take note of the server-id above. It should always be a number bigger than the master node ID.
Save the config, then restart Mariadb service
sudo systemctl restart mariadbStep 4: Configure MariaDB Replication
The steps involved in configuration of MariaDB replication are:
- Get the current status of the primary server
- Configure database replication on the secondary server
1) Get the current status of the Primary server
Stop the slave user on the Master server:
MariaDB [(NONE)]> STOP SLAVE;Get the status of the master by running:
SHOW MASTER STATUS;Obtain the position of the master database, e.g in my case the position is 1218 and the filename, e.g mysql-bin.000001
MariaDB [(none)]> SHOW MASTER STATUS;
+------------------+----------+--------------+------------------+
| File             | Position | Binlog_Do_DB | Binlog_Ignore_DB |
+------------------+----------+--------------+------------------+
| mysql-bin.000001 |     1218 |              |                  |
+------------------+----------+--------------+------------------+
Unlock tables on the master database:
MariaDB [(NONE)]> UNLOCK TABLES;Note that if you have an existing database you will need to create a backup of the same, restore the database on the secondary server before you enable slave replication.
For instance, if I have a database called students:
mysqldump -u root -p student >> students.sqlSend a copy of the database to the secondary server
scp students.sql root@secondary-server:~/Login to the secondary server, restore the database:
mysql -u root -p students<students.sql2) Configure database replication on the secondary server
Login to the secondary database
mysql -u root -pStop the slave threads for the secondary server
stop slave;Configure the secondary node to replicate the master node with the command below:
CHANGE MASTER TO MASTER_HOST = 'your-master-host-ip', MASTER_USER = 'replication', MASTER_PASSWORD = 'your-password', MASTER_LOG_FILE = 'mysql-bin.000001', MASTER_LOG_POS = podition-id;Example:
CHANGE MASTER TO MASTER_HOST='192.168.100.42', MASTER_USER='dbreplica',
MASTER_PASSWORD='Str0ngP@ssw0rd', MASTER_LOG_FILE='mysql-bin.000001' ,
MASTER_LOG_POS=1218;
Replace the variables in the above command with the correct details in your environment.
Next, start the slave threads on the secondary node.
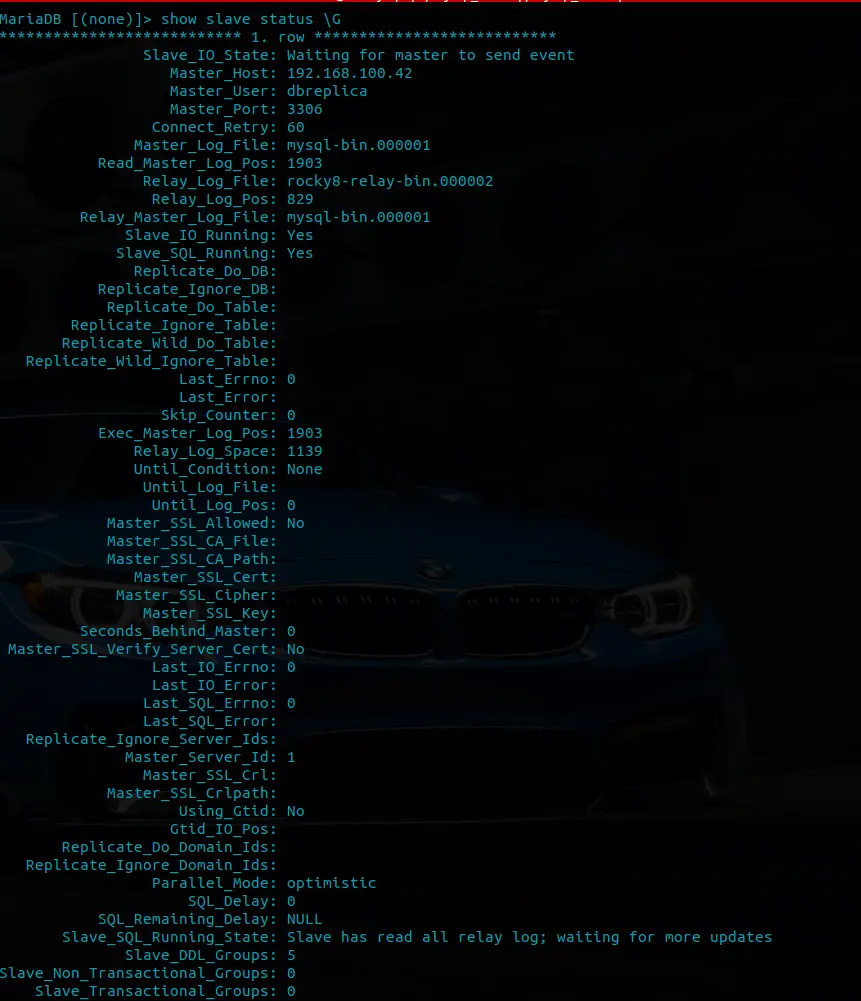
start slave;Verify that the slave replication is has started
MariaDB [(none)]> show slave status \GYou should see an output similar to this below:

Step 5: Test Database Replication
The last step will be to test and see if the replication is really working.
On the Master node, create a sample database and insert some data into it.
MariaDB [(none)]> CREATE DATABASE students;

MariaDB [(none)]> create table students.student_details (std_no VARCHAR(20), birth_date VARCHAR(20), first_name VARCHAR(20), last_name VARCHAR(20), gender VARCHAR(20));

MariaDB [(none)]> INSERT INTO student.student_details (std_no, birth_date, first_name, last_name, gender, ) VALUES (500000, '1922-07-12', 'vic', 'eng', 'M');
Confirm that you can see the database from the secondary node:
MariaDB [(none)]> show databases;
+--------------------+
| Database           |
+--------------------+
| information_schema |
| mysql              |
| performance_schema |
| students           |
+--------------------+
4 rows in set (0.002 sec)
Confirm if the table created on the master server exists on the secondary node:
MariaDB [(none)]> select * from students.student_details;
+--------+------------+------------+-----------+--------+
| std_no | birth_date | first_name | last_name | gender |
+--------+------------+------------+-----------+--------+
| 500000 | 1922-07-12 | vic        | Null      | M      |
+--------+------------+------------+-----------+--------+
1 row in set (0.001 sec)
This confirms that the replication is working as expected. You can always use the secondary database in case there is a problem with your primary server. This is definitely a life-saver when it comes to disaster recovery.
Explore More with CloudSpinx
Looking to streamline your tech stack? At CloudSpinx, we deliver robust solutions tailored to your needs.
Learn more about how we can support your journey with CloudSpinx.


