Authentication provides information that verifies that the person performing an operation has the rights. Authentication factor provides the means in which rights verification is performed. Most systems use password as the authentication factor. Other means include fingerprints, electrical access cards, ssh keys among others. Linux systems mostly use passwords and ssh keys to authorize system login.
🔑 Unlock the complete Ubuntu Desktop learning journey by purchasing our best selling ebook: The Ultimate Ubuntu Desktop Handbook.
Using only one mode of authentication is referred to as one-factor authentication. You can opt to require both the password and ssh key for access, in which case you have to configure 2-factor authentication (2FA), also called multi-factor authentication.
2FA/ MFA is important in ensuring system security. It will be a bit hard for a hacker to break through more than authentication methods for the sane system. Verification codes are generated after every few seconds to ensure that the same code is used for a long time. You can combine login password and verification code or more secure ssh keys and verification code.
Google Authenticator
Google Authenticator will generate a 2-step authentication for your device. It generates a code that will enable you to add a second layer of authentication on top of your password or ssh keys on your Linux system.
Install Google Authenticator PAM Module
On your Linux system terminal, run the following command to install Google Authenticator PAM module. I am using Ubuntu 24.04
sudo apt update
sudo apt install libpam-google-authenticator vim
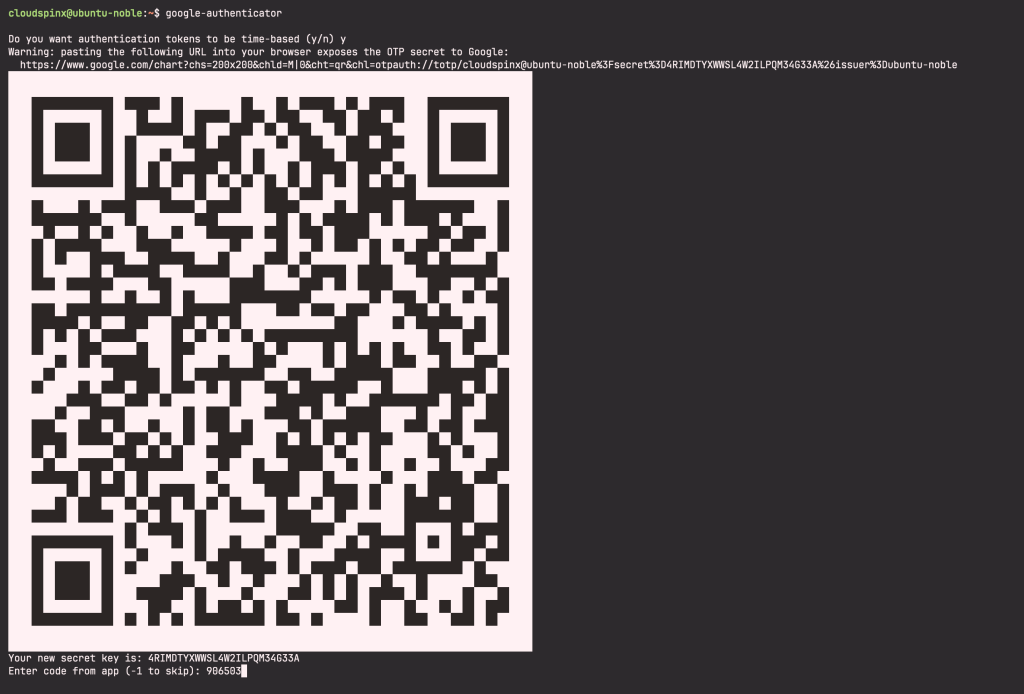
Once installed, run google-authenticator command to create a new secret key in your home directory
google-authenticatorWhen you press ‘Enter’ you will be prompted with a couple of questions. The first question is whether you want time-based authentication tokens.
Do you want authentication tokens to be time-based (y/n) y
This will output several lines of information as explained below:
- QR code – you will need to scan this code using google authenticator app. When scanned, it will turn into some numbers which are your authentication code. The app will generate a new code after every 30 seconds.
- Secret key – Used to configure authenticator app in case your device does not support QR scanning.
- Verification code – the first verification code that this QR generates
- Emergency scratch codes (back up codes) –In case you lose your authenticator device, the codes will enable you to go through the 2FA authentication. You need to keep the codes safely to avoid being locked out.
Google Authenticator App
On your mobile device, go to google play store, search for ‘google authenticator’ and download. When downloaded, open it and it should be ready to scan the QR code on your Linux terminal. Once you scan, it automatically brings up the name of your Linux system in which it will be generating verification codes for.
In the intervals of 30 seconds, the app generates different verification codes (TOTP secrets) that will be used to login to a system on top of the already configured authentication method such as a password. TOTP stands for Time-based One Time Password. If you want to add more devices that you have enable 2FA authentication, click on the + sign and the bottom left of the app to either scan another QR code or to enter a set up key.
The next prompts are as follows:
...
Code confirmed
Your emergency scratch codes are:
  49314635
  75107425
  81640413
  39825740
  79866846

Do you want me to update your "/home/cloudspinx/.google_authenticator" file? (y/n) y

Do you want to disallow multiple uses of the same authentication
token? This restricts you to one login about every 30s, but it increases
your chances to notice or even prevent man-in-the-middle attacks (y/n) y

By default, a new token is generated every 30 seconds by the mobile app.
In order to compensate for possible time-skew between the client and the server,
we allow an extra token before and after the current time. This allows for a
time skew of up to 30 seconds between authentication server and client. If you
experience problems with poor time synchronization, you can increase the window
from its default size of 3 permitted codes (one previous code, the current
code, the next code) to 17 permitted codes (the 8 previous codes, the current
code, and the 8 next codes). This will permit for a time skew of up to 4 minutes
between client and server.
Do you want to do so? (y/n) y

If the computer that you are logging into isn't hardened against brute-force
login attempts, you can enable rate-limiting for the authentication module.
By default, this limits attackers to no more than 3 login attempts every 30s.
Do you want to enable rate-limiting? (y/n) y
Activating 2FA on Ubuntu
We need to ensure that SSH is aware of Google authentication by editing ssh file as below:
sudo vim /etc/pam.d/sshdAdd the following line at the end
auth required pam_google_authenticator.soAlso open /etc/ssh/sshd_config and change ‘ChallengeResponseAuthentication’ from no to yes.
$ sudo vim /etc/ssh/sshd_config
# some PAM modules and threads)
KbdInteractiveAuthentication yes
Restart sshd service:
sudo systemctl restart sshdTest 2FA Authentication
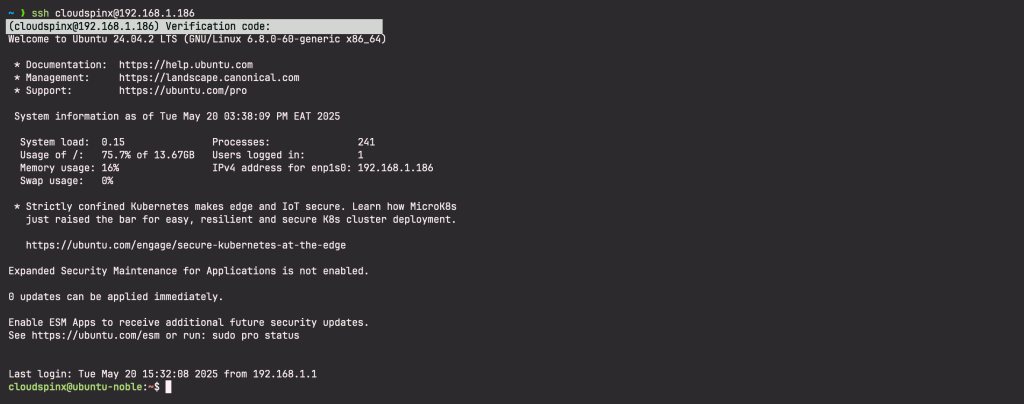
Now that you have properly configured Google Authentication for your server, we need to test if it working. Log out of the system and login back. For my case, I am using password for login. I expect to be prompted for password, which after I enter, I get prompted for verification code.
$ ssh [email protected]
Password:
Verification code:
After I entered the verification code, I was able to login.
If you are using ssh key for login and not a password, we need to tell the system which authentication methods it should expect. Open ssh configuration file again
sudo vim /etc/ssh/sshd_configAdd the below line at the end of the file:
AuthenticationMethods publickey,password publickey,keyboard-interactiveThis tells ssh that we require ssh key login and either a password or verification key.
To disable password prompt, we edit /etc/pam.d/sshd as below:
sudo vim /etc/pam.d/sshdComment out the line @include common-auth by adding # at the beginning.
. . .
# Standard Un*x authentication.
#@include common-auth
. . .
Save the file and restart sshd.
sudo systemctl restart sshdNow log out of the system and login back to test authentication. You will notice the ssh key is used for login and you are only prompted for verification code.

Systems protection is quite critical. It is important to ensure that all ways in which a hacker can get into a system are blocked. Multi-factor authentication makes it harder for them to access the systems. Ensure that the google authenticator app is well protected to avoid unauthorized individuals getting hold of your verification codes.
More guides:


