
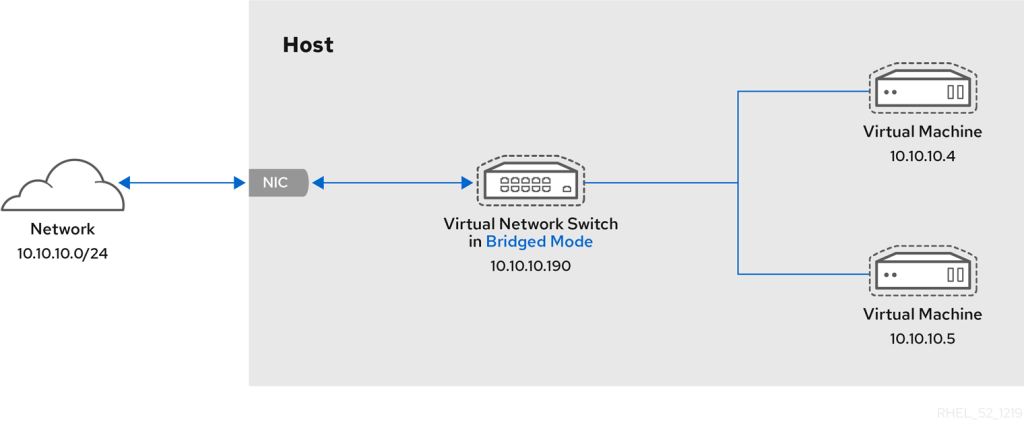
In a bridged network:
- The virtual machines (VMs) connect directly to the physical network interface of the host machine ( using an existing Linux bridge on the host).
- This allows the VMs to share the same IP subnet as the host.
- VMs appear as separate devices on the same network as the host machine. Each VM has its own IP address on the local network.
Bridged mode uses connection switching based on the MAC address:
Netplan is a network configuration tool from Canonical, used on modern Ubuntu (and other Debian-based) systems. It is designed to provided a simple and declarative way to configure networking.
Mastering KVM Virtualization - The Ultimate eBook
From home labs to production clouds - master KVM Host management, automating KVM administration using Terraform, Vagrant, and cloud automation. This eBook will enable you to build scalable virtual infrastructure that works whether you're learning at home or deploying enterprise solutions. Get your full copy today
Bridged network bonding
This is a combination of multiple physical network interfaces on the host machine into a single logical interface for your VMs.
Some benefits are:
- Increased Bandwidth: Network traffic is distributed across multiple physical interfaces, potentially leading to higher overall bandwidth for your VMs.
- Fault Tolerance: In a scenaio where one of the physical interface fails, the VMs can still communicate through the remaining active interface(s), minimizing overall downtime.
- Load Balancing: Bonding helps to distribute network traffic more evenly across available interfaces, hence improving the network performance.
Key points to consider when implementing the bridged network bonding:
- Switch configuration: The switch used in the physical network should be configured with the appropriate bonding mode (e.g., 802.3ad)to work with the host’s bonded interface.
- Hardware compatibility: Both the switch and host server network interfaces need to support link aggregation.
Ensure Netplan is installed on your system.
sudo apt update
sudo apt install netplan.io ifenslave bridge-utils
Network configurations are defined in YAML files located in /etc/netplan directory. It used various backends like systemd-networkd and NetworkManager.
Check all the files inside /etc/netplan/ directory.
ls /etc/netplan/You can edit the existing file inside the directory if active. If you are not using a backup, rename the file with .bak extension at the end.
Create Linux bridge using Netplan
For custom creation of a Linux bridge using Netplan, define a new configuration file:
sudo nano /etc/netplan/10-netcfg.yaml- Create Linux Bridge using DHCP
Add and modify the following configuration with your environment values.
network:
  version: 2
  renderer: networkd
  ethernets:
    eth0:
      dhcp4: no
  bridges:
    br0:
      interfaces: [eth0]
      dhcp4: yes
      parameters:
        stp: false
forward-delay: 0- Create Linux Bridge using Static IP Address
If you need an IP address mapped to br0 manually update the yaml file as follows:
network:
  version: 2
  renderer: networkd
  ethernets:
    eth0:                              # Network interface
      dhcp4: no                        # Disables DHCP for eth0 interface
  bridges:
    br0:                               # Name of the bridge interface
      interfaces: [eth0]               # Specified eth0 as part of the bridge
      addresses: [192.168.1.10/24]     # Your IP address and subnet mask
      gateway4: 192.168.1.1            # Your gateway IP address for bridge
      nameservers:
        addresses: [8.8.8.8, 8.8.4.4]  # Your DNS servers for bridge
      parameters:
        stp: false                     # Disables STP on the bridge
        forward-delay: 0               # Sets the forwarding delay to 0 seconds
To apply the configuration run:
sudo netplan applyCreate Linux bridge on VLAN interface
Let’s assume the physcial interface is eno1 and VLAN ID is 100. Here’s how you will create a sub-vlan interface.
sudo apt update
sudo apt install bridge-utils vlan
Ensure that the 8021q module required for VLAN is loaded.
sudo modprobe 8021qTo ensure it loads on boot, add it to /etc/modules.
echo 8021q | sudo tee -a /etc/modulesAdd VLAN interface to the /etc/network/interfaces file.
sudo nano /etc/network/interfacesAdd and modify the following network configurations for your environment.
auto eno1.100
iface eno1.100 inet manual
  vlan-raw-device eno1

auto br0
iface br0 inet static
  address 192.168.1.10
  netmask 255.255.255.0
  gateway 192.168.1.1
  dns-nameservers 8.8.8.8 8.8.4.4
  bridge_ports eno1.100
  bridge_stp off
  bridge_fd 0
  bridge_maxwait 0
When done with the configurations restart networking service.
sudo systemctl restart networkingUsing Netplan, this is an equivalent yaml definition:
network:
  version: 2
  renderer: networkd
  ethernets:
    eno1:
      dhcp4: no
  vlans:
    vlan100:
      id: 100
      link: eno1
      dhcp4: no
  bridges:
    br0:
      dhcp4: no
      interfaces:
        - vlan100
      addresses:
        - 192.168.1.2/24
      gateway4: 192.168.1.1
      nameservers:
        addresses:
          - 8.8.8.8
          - 8.8.4.4
To apply the netplan configuration:
sudo netplan applyCreate a Bond Interface and Bridge
Load bonding kernel module which is required to create bond interfaces.
sudo modprobe bonding
echo bonding | sudo tee -a /etc/modules
You can get details about the module once it’s loaded.
modinfo bondingCreate netplan configurations for the bond interface
- Using mode
(active-backup)example:
network:
  version: 2
  renderer: networkd
  ethernets:
    eth0:
      dhcp4: yes
    eth1:
      dhcp4: no
    eth1:
      dhcp4: no
  bonds:
    bond0:
      interfaces:
        - eth1
        - eth2
      parameters:
        mode: active-backup
primary: eth1- Using mode
0 (balance-rr)example:
 bonds:
    bond0:
      interfaces:
        - eth1
        - eth2
      parameters:
        mode: balance-rr
mii-monitor-interval: 100- Using mode
4 (802.3ad)example:
bonds:
    bond0:
      interfaces:
        - eth1
        - eth2
      parameters:
        mode: 802.3ad
        lacp-rate: fast
        mii-monitor-interval: 100
Here are the complete file contents that includes bridge configurations.
network:
  version: 2
  renderer: networkd
  ethernets:
    eth0:
      dhcp4: yes
    eth1:
      dhcp4: no
    eth2:
      dhcp4: no
  bonds:
    bond0:
      interfaces:
        - eth1
        - eth2
      parameters:
        mode: active-backup
        primary: eth1
        mii-monitor-interval: 100
  bridges:
    br0:
      dhcp4: no
      interfaces:
        - bond0
      addresses:
        - 192.168.1.10/24
      gateway4: 192.168.1.1
      nameservers:
        addresses:
          - 8.8.8.8
          - 8.8.4.4
      parameters:
        stp: false
        forward-delay: 0
Apply the Netplan configuration with the following command:
sudo netplan apply🌍 Whether at work or on the go, access Mastering KVM Virtualization anytime, in the book you will learn:
- Host Network Management using Netplan: bridges, VLANs, Bonded interfaces
- Host Network Management using Network Manager (NMCLI) – bridged, VLANs, Bonds/Teamed
- Host Network Management using Networking Scripts
- Host Network Management using Open vSwitch
Watch out for other KVM guides from our team:


