In this guide, I will demonstrate how to Create Google SQL Database Instance on GCP using Terraform. Cloud SQL instances are relational MySQL, PostgreSQL, and SQL Server databases that are completely managed. To assure availability and performance, Google manages replication, patch management, and database management.
Features of Google SQL
Google SQL have the following amazing features:
- Integrated: Almost any application can connect to Cloud SQL instances. From App Engine, Compute Engine, Google Kubernetes Engine, and your workstation, you can easily connect.
- Easy migrations to Cloud SQL: Database Migration Service (DMS) makes migrating your production databases to Cloud SQL simple and painless. The manual effort of provisioning, administering, and monitoring migration-specific resources is eliminated with our serverless option.
- Reliable: Protect your data by easily configuring replication and backups. Make your database even more available by enabling automatic failover.
- Fully managed: Cloud SQL automatically guarantees that your databases are dependable, safe, and scalable, ensuring that your business runs smoothly.
Benefits of Google SQL
The benefits of Google SQL are as follows:
- At rest and in transit, data is encrypted. User-controlled network access with firewall security and private connectivity with Virtual Private Cloud.
- You can easily scale your instances with a single API call, whether you’re just getting started or require a highly available database in production.
- In only a few minutes, you may establish and connect to your first database using standard connection drivers and built-in migrational tools.
After setting up your GCP project, Create Google SQL Database Instance on GCP using Terraform as follows:
Step 1: Create Variable Definition File
It’s easier to specify the values of several variables in a variable definitions file (with a filename ending in . tfvars.
Create terraform.tfvars file:
vim terraform.tfvarsAdd the following content to the file created:
project = "myterraform-project-341816"
region = "us-central1"
Step 2: Deploy Google SQL Instance
To deploy Google SQL Instance, create main.tf file as follows:
vim main.tfAdd:
variable "project" {}
variable "region" {}
provider "google" {
project = "${var.project}"
region = "${var.region}"
}
resource "google_sql_database_instance" "instance" {
name = "my-database-instance"
database_version = "MYSQL_8_0"
region = "${var.region}"
settings {
tier = "db-f1-micro"
}
}
resource "google_sql_database" "database" {
name = "mydatabase"
instance = "${google_sql_database_instance.instance.name}"
charset = "utf8"
collation = "utf8_general_ci"
}
resource "google_sql_user" "users" {
name = "root"
instance = "${google_sql_database_instance.instance.name}"
host = "%"
password = "mypassw0rd"
}
The above main.tf terraform code will create three resources:
- Google SQL instance.
- Google SQL Database.
- Google SQL user.
When building a new configuration, you must first run terraform init to initialize the directory. In this stage, the providers defined in the configuration are downloaded.
$ terraform init -var-file="terraform.tfvars"

Initializing the backend...

Initializing provider plugins...
- Reusing previous version of hashicorp/google from the dependency lock file
- Using previously-installed hashicorp/google v4.11.0

Terraform has been successfully initialized!

You may now begin working with Terraform. Try running "terraform plan" to see
any changes that are required for your infrastructure. All Terraform commands
should now work.

If you ever set or change modules or backend configuration for Terraform,
rerun this command to reinitialize your working directory. If you forget, other
commands will detect it and remind you to do so if necessary.
You can use terraform apply to supply your resources now that you have a Terraform configuration and credentials set up. Use terraform apply -autoapprove to bypass this step and have the changes made automatically.
$ terraform apply -var-file="terraform.tfvars" -auto-approve

Terraform used the selected providers to generate the following execution plan. Resource actions are indicated with the following symbols:
  + create

Terraform will perform the following actions:

  # google_sql_database.database will be created
  + resource "google_sql_database" "database" {
      + charset   = "utf8"
      + collation = "utf8_general_ci"
      + id        = (known after apply)
      + instance  = "my-database-instance"
      + name      = "mydatabase"
      + project   = (known after apply)
      + self_link = (known after apply)
    }

  # google_sql_database_instance.instance will be created
  + resource "google_sql_database_instance" "instance" {
      + connection_name               = (known after apply)
      + database_version              = "MYSQL_5_7"
      + deletion_protection           = true
      + first_ip_address              = (known after apply)
      + id                            = (known after apply)
      + ip_address                    = (known after apply)
      + master_instance_name          = (known after apply)
      + name                          = "my-database-instance"
      + private_ip_address            = (known after apply)
      + project                       = (known after apply)
      + public_ip_address             = (known after apply)
      + region                        = "us-central1"
      + self_link                     = (known after apply)
      + server_ca_cert                = (known after apply)
      + service_account_email_address = (known after apply)
........
google_sql_database_instance.instance: Still creating... [9m0s elapsed]
google_sql_database_instance.instance: Still creating... [9m10s elapsed]
google_sql_database_instance.instance: Still creating... [9m20s elapsed]
google_sql_database_instance.instance: Still creating... [9m30s elapsed]
google_sql_database_instance.instance: Still creating... [9m40s elapsed]
google_sql_database_instance.instance: Still creating... [9m50s elapsed]
google_sql_database_instance.instance: Still creating... [10m0s elapsed]
google_sql_database_instance.instance: Still creating... [10m10s elapsed]
google_sql_database_instance.instance: Still creating... [10m20s elapsed]
google_sql_database_instance.instance: Still creating... [10m30s elapsed]
google_sql_database_instance.instance: Still creating... [10m40s elapsed]
google_sql_database_instance.instance: Still creating... [10m50s elapsed]
google_sql_database_instance.instance: Creation complete after 10m53s [id=my-database-instance]
google_sql_database.database: Creating...
google_sql_user.users: Creating...
google_sql_user.users: Creation complete after 5s [id=root/%/my-database-instance]
google_sql_database.database: Creation complete after 9s [id=projects/myterraform-project-341816/instances/my-database-instance/databases/mydatabase]

Apply complete! Resources: 3 added, 0 changed, 0 destroyed.
Now, SQL Instance has been deployed on GCP with Terraform:

Step 3: Connect to GCP SQL Database instance
To connect to our instance, we’ll utilize Cloud Shell’s mysql client.
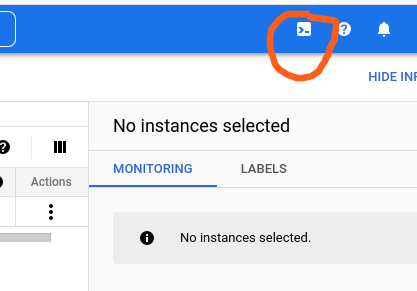
Click the Cloud Shell symbol (Cloud Shell icon) in the upper right corner of the Google Cloud Console.

When Cloud Shell is finished initializing, it displays a message like this: Following that, there’s:
Welcome to Cloud Shell! Type "help" to get started.
Your Cloud Platform project in this session is set to myterraform-project-341816.
Use “gcloud config set project [PROJECT_ID]” to change to a different project.
bettkipkorirf@cloudshell:~ (myterraform-project-341816)$
Connect to your Cloud SQL instance from the Cloud Shell prompt. Use the gcloud sql connect command to connect to the database. If your instance name is different, simply replace it.
$ gcloud sql connect my-database-instance --user=rootTo authorize Cloud Shell to make API requests, click Authorize in the dialog box.
Allowlisting your IP for incoming connection for 5 minutes...done.Now, Enter your root password.
Connecting to database with SQL user [root]. Enter password:
Welcome to the MySQL monitor.  Commands end with ; or \g.
Your MySQL connection id is 164
Server version: 8.0.27-google (Google)

Copyright (c) 2000, 2022, Oracle and/or its affiliates.

Oracle is a registered trademark of Oracle Corporation and/or its
affiliates. Other names may be trademarks of their respective
owners.

Type 'help;' or '\h' for help. Type '\c' to clear the current input statement.

mysql>
Check available databases:
mysql> show databases;
+--------------------+
| Database           |
+--------------------+
| information_schema |
| mydatabase         |
| mysql              |
| performance_schema |
| sys                |
+--------------------+
5 rows in set (0.10 sec)
mydatabase is the database created when deploying SQL instance.
On your Cloud SQL instance, you can also create a SQL database:
CREATE DATABASE testdb;Now create table and insert data in my testdb database:
USE testdb;
CREATE TABLE cars (CarName VARCHAR(255), Color VARCHAR(255),
    CarID INT NOT NULL AUTO_INCREMENT, PRIMARY KEY(CarID));
    INSERT INTO cars (CarName, Color) values ("BMW X3", "Black");
    INSERT INTO cars (CarName, Color) values ("Audi Q5", "Gray");
Now retrieve the data from cars table:
SELECT * FROM cars;Output:
+---------+-------+-------+
| CarName | Color | CarID |
+---------+-------+-------+
| BMW X3  | Black |     1 |
| Audi Q5 | Gray  |     2 |
+---------+-------+-------+
2 rows in set (0.10 sec)
Conclusion
This concludes our tutorial on how to use Terraform to create a Google SQL Database Instance on GCP. Terraform is simple to use and makes work easier. Take use of terraform in your development.
Check out our other articles about Terraform:
- How To Install Terraform on Amazon Linux 2
- How To Deploy VM Instance on Google Cloud using Terraform
- How To Provision Virtual Machines on AWS using Terraform


