Mkcert is a simple tool used to make locally trusted development certificates. It requires no configurations to use making it a very efficient tool for developers to test their applications before deploying them for production purposes. Mkcert automatically creates and installs the local CA in the system root store and then generates a locally generated certificate for you. You then configure your server with the generated certificate.
Mkcert is fit for developers because it enables them to locally test their applications before they are deployed for production purposes. For production purposes, a license must be purchased from Certificate Authorities, commonly known as SSL Certificate. In this post you will learn to configure locally trusted SSL certificates on your Linux machine.
Step 1: Install Mkcert Tool on Linux
It’s a simple process to install mkcert in any Linux system. Follow the steps below.
1) Update system and install wget,curl
As best practice, always update your system before performing any installations.
# RHEL based system
sudo yum update -y
sudo yum -y install wget curl

# Debian based systems
sudo apt update
sudo apt install wget curl
2) Install certutil utility
The certutil is a certificate database tool with a command-line utility to create and modify certificates and key databases. certutil Manage keys and certificates in both NSS databases and other NSS tokens
To install mkcert dependencies run the following command:
### RHEL Based Linux ###
sudo yum install nss-tools

### Debian based system ###
sudo apt update
sudo apt install libnss3-tools
Step 2: Download and install mkcert
To download mkcert, you can visit the GitHub releases page. An alternative option is checking and downloading the latest available release for Linux using the following commands:
curl -s https://api.github.com/repos/FiloSottile/mkcert/releases/latest | grep browser_download_url | grep '\linux-amd64' | cut -d '"' -f 4 | wget -i -The next step is to move and rename your file to /usr/bin/ folder.
sudo mv mkcert-v*-linux-amd64 /usr/bin/mkcertUsing Chmod command :
sudo chmod +x /usr/bin/mkcertYou can verify the version of mkcert installed by running the command:
$ mkcert --version
v1.4.4
Congratulations, mkcert is now installed in your system. Let’s now proceed to generate a Local CA.
Step 3: Generate Locally Trusted SSL using mkcert
To generate a Local CA issue the command mkcert -install on your terminal.
$ mkcert -install
Created a new local CA 💥
The local CA is now installed in the system trust store! ⚡️
The local CA is now installed in the Firefox and/or Chrome/Chromium trust store (requires browser restart)! 🦊
A local CA has been installed. To locate the certificate, check the CA root directory.
mkcert -CAROOTCommand output is as shown below.
$ mkcert -CAROOT
/home/Jil/.local/share/mkcert
To generate a Local Certificate for a test website (test.example.com) in the localhost 127.0.0.1, execute the following command:
mkcert test.example.com localhost 127.0.0.1 ::1Samle command output :
$ mkcert test.example.com localhost 127.0.0.1 ::1
Created a new certificate valid for the following names 📜
 - "test.example.com"
 - "localhost"
 - "127.0.0.1"
 - "::1"

The certificate is at "./test.example.com+3.pem" and the key at "./test.example.com+3-key.pem" ✅

It will expire on 23 January 2024 🗓
To see the contents of the certificate :
cat ./test.example.com+3.pemTo see the contents of the key generated.
cat ./test.example.com+3-key.pemTo use the local certificate on a web server, copy your certificate and the key to /etc/ssl/ directory. Then configure your webserver to use the certificate and the generated key. For the purpose of this article, I will use the Nginx web server.
To copy the generated certificate and the key
sudo cp ./test.example.com+3* /etc/sslStep 4: Testing mkcert using Nginx
To test out the certificate, we will use a simple Nginx configuration file.
1) Install Nginx web server
To install Nginx web server:
### RHEL Based Linux ###
sudo yum install nginx
sudo systemctl enable --now nginx

### Debian Based Linux ###
sudo apt update && sudo apt install nginx
sudo systemctl enable --now nginx
Check status of Nginx service:
systemctl status nginxIf you have active firewall, allow http and https ports:
### RHEL Based Linux ###
sudo firewall-cmd --zone=public --add-port={80,443}/tcp --permanent
sudo firewall-cmd --reload

### Debian Based Linux ###
ufw allow proto tcp from any to any port 80,443
2) Create a simple web page
Configure the /etc/nginx/conf.d/ directory by editing the file with a text editor.
sudo nano /etc/nginx/conf.d/mkcert.confPaster and modify the following sample code:
server {
   listen 80;
   server_name test.example.com;
   root /var/www/html;
}

server {
   listen *:443 ssl;
   root /var/www/html;
   server_name test.example.com;
   ssl_certificate /etc/ssl/test.example.com+3.pem;
   ssl_certificate_key /etc/ssl/test.example.com+3-key.pem;
}
After adding the contents verify configurations syntax:
sudo nginx -tRestart the Nginx service for the changes to take effect:
sudo systemctl restart nginxThen, ensure /etc/hosts file has the records for the used domain.
$ sudo nano /etc/hosts
127.0.0.1 test.example.com
Step 5: Verify SSL for your domain
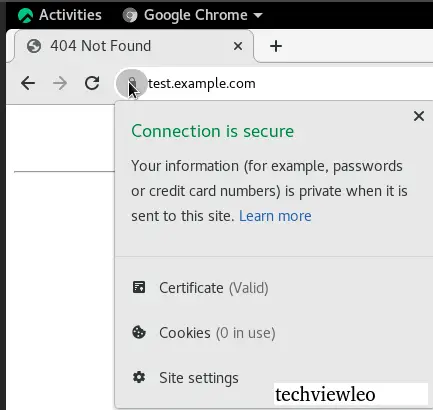
To carry out this test, you must ensure that your browser has NO proxy enabled, otherwise your test will not be successful. On your browser’s URL type https://test.example.com
Your domain should be secured with mkcert certificate as shown in the screenshots below.

Conclusion.
Congratulations! you have successfully installed Mkcert and created a trusted CA certificate for your test.example.com website. Mkcert should be used for testing purposes and not for development purposes. This article has covered how to Create a Locally Trusted SSL Certificate with mkcert on Linux. I hope you have gained new insights. For any Linux related support contact us now and we will be happy to help.


