To expose ArgoCD on a self-managed Kubernetes cluster, there needs to be a way to provide the application with an IP address from the outside world, along with the necessary networking for the application to have an easily accessible, production-quality way of navigating from the outside world into the application itself, utilizing HTTPS routing. In the context of bare-metal installations, without the cloud load balancer, solutions involving MetalLB for IP address needs, along with the NGINX Ingress Controller for routing over HTTP/HTTPS, are usually employed.
Expose Argo CD on Kubernetes Using MetalLB and NGINX Ingress
In this walkthrough, you will see how you can provide access to ArgoCD on Kubernetes by configuring MetalLB with the NGINX Ingress Controller. You will see how you can configure the load balancer service, implement the DNS solution for the ArgoCD domain, implement the TLS solution, and then verify the access on the ArgoCD application.
1. Install MetalLB
MetalLB provides LoadBalancer support for bare-metal Kubernetes clusters. If you’re trying to run MetalLB on a cloud platform, you should also look at the cloud compatibility page and make sure your cloud platform can work with MetalLB (most cannot). Also, if you’re using kube-proxy in IPVS mode, since Kubernetes v1.14.2 you have to enable strict ARP mode. Do so using the command below:
kubectl edit configmap -n kube-system kube-proxyThen set strictArp to true:

Now, to install MetalLB, apply the manifest as follows:
kubectl apply -f https://raw.githubusercontent.com/metallb/metallb/v0.15.2/config/manifests/metallb-native.yamlThis will deploy MetalLB to your cluster and into the metalla-system namespace with the following components:
- The
metallb-system/controllerdeployment – IP address assignments. - The
metallb-system/speakerdaemonset – speaks the protocol(s) of your choice to make the services reachable.
MetalLB remains idle until configured by deploying resources into the metallb-system namespace. To be able to assign an IP to the services, MetalLB needs to be instructed to do so using the definition of the IPAddressPool CR. Once the IPs are assigned to a service, they must be announced.
MetalLB has a couple of protocols that are applicable to announce the assigned IP addresses, but we’ll go for the simplest one, which is Layer 2 mode. For instance, the following configuration avails the IPs from 192.168.1.205 to 192.168.1.215 to MetalLB, and also configures Layer 2 mode:
apiVersion: metallb.io/v1beta1
kind: IPAddressPool
metadata:
  name: default-address-pool
  namespace: metallb-system
spec:
  addresses:
  - 192.168.1.205-192.168.1.215

---
apiVersion: metallb.io/v1beta1
kind: L2Advertisement
metadata:
  name: default
  namespace: metallb-system
spec:
  ipAddressPools:
  - default-address-pool
Save the configs in a manifest, e.g metallb-pool.yaml, then run the following command:
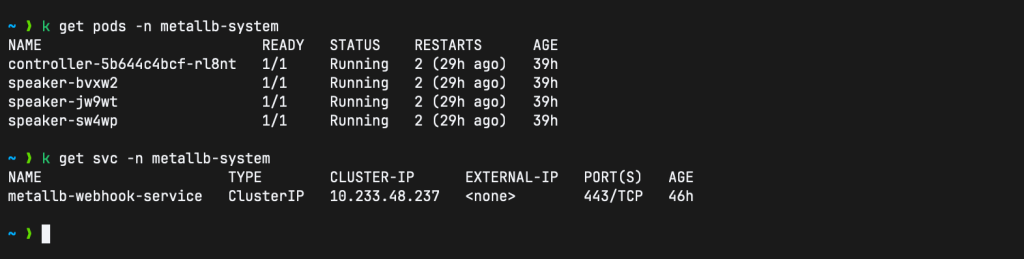
kubectl apply -f metallb-pool.yamlThen check the pods and services in the metallb-system namespace:
If all your cluster nodes are both control plane and worker nodes, then Kubespray often labels them with
node.kubernetes.io/exclude-from-external-load-balancers=true, preventing MetalLB from advertising LoadBalancer IPs hence ingress will not be reachable.If this is the case, remove the label on all your nodes with the command below:
kubectl label node <node-name> node.kubernetes.io/exclude-from-external-load-balancers-Another option is to provide the speakers with the
--ignore-exclude-lbflag. For this, you’d have to install MetalLB either using Helm or via Kustomize.
2. Install NGINX Ingress Controller
If you have Helm installed, you can deploy the ingress controller as follows:
helm upgrade --install ingress-nginx ingress-nginx \
  --repo https://kubernetes.github.io/ingress-nginx \
  --namespace ingress-nginx --create-namespace
Then check the services in the ingress-nginx namespace:
kubectl get svc -n ingress-nginx
3. Install Cert-Manager
cert-manager provides Helm charts as a first-class method of installation on Kubernetes. With Helm installed, you can install cert-manager directly with the helm install command and no extra setup:
helm install \
cert-manager oci://quay.io/jetstack/charts/cert-manager \
--version v1.19.1 \
--namespace cert-manager \
--create-namespace \
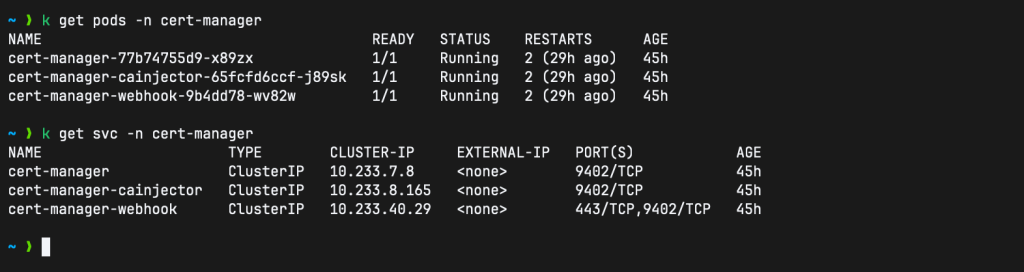
--set crds.enabled=trueThis command creates the cert-manager namespace and deploys cert-manager components in that namespace:
4. Configure Let’s Encrypt with Cloudflare DNS
Since we’ll be using a CloudFlare acme issuer, we are going to create a CloudFlare apiToken secret as follows. First, generate an API token secret or use your Global API key, then run the command below:
# API TOKEN
kubectl create secret generic cloudflare-apitoken-secret \
  -n cert-manager \
  --from-literal=apitoken='<CF_API_TOKEN>'

# GLOBAL API KEY
kubectl create secret generic cloudflare-apikey-secret \
  -n cert-manager \
  --from-literal=apikey='<CF_API_KEY>'
Then create a ClusterIssuer as follows:
apiTokenSecret
If you are using the CloudFlare API Token secret, configure your ClusterIssuer as follows:
apiVersion: cert-manager.io/v1
kind: ClusterIssuer
metadata:
  name: letsencrypt-staging
spec:
  acme:
    email: [email protected]
    server: https://acme-staging-v02.api.letsencrypt.org/directory
    privateKeySecretRef:
      name: letsencrypt-staging
    solvers:
    - dns01:
        cloudflare:
          apiTokenSecretRef:
            name: cloudflare-apitoken-secret
            key: apitoken
      selector:
        dnsZones:
        - 'domain.example.com'
apiKeySecret
If you are using your CloudFlare Global API Key, configure your ClusterIssuer as follows:
apiVersion: cert-manager.io/v1
kind: ClusterIssuer
metadata:
  name: letsencrypt-staging
spec:
  acme:
    email: [email protected]
    server: https://acme-staging-v02.api.letsencrypt.org/directory
    privateKeySecretRef:
      name: letsencrypt-staging
    solvers:
    - dns01:
        cloudflare:
          email: [email protected]
          apiKeySecretRef:
            name: cloudflare-apikey-secret
            key: apikey
      selector:
        dnsZones:
        - 'domain.example.com'
Save the manifest as clusterissuer-staging.yaml then apply it:
kubectl apply -f clusterissuer-staging.yaml5. Install ArgoCD and Deploy ArgoCD Ingress
To install ArgoCD, run the commands below:
kubectl create namespace argocd
kubectl apply -n argocd \
  -f https://raw.githubusercontent.com/argoproj/argo-cd/stable/manifests/install.yaml
This will create a new namespace, argocd, where Argo CD services and application resources will live. Now let’s create an Ingress for ArgoCD as follows:
apiVersion: networking.k8s.io/v1
kind: Ingress
metadata:
  name: argocd-server-ingress
  namespace: argocd
  annotations:
    cert-manager.io/cluster-issuer: letsencrypt-staging
    nginx.ingress.kubernetes.io/ssl-passthrough: "true"
    # If you encounter a redirect loop or are getting a 307 response code
    # then you need to force the nginx ingress to connect to the backend using HTTPS.
    nginx.ingress.kubernetes.io/force-ssl-redirect: "true"
    nginx.ingress.kubernetes.io/backend-protocol: "HTTPS"
spec:
  ingressClassName: nginx
  rules:
  - host: argocd.kloudke.dpdns.org
    http:
      paths:
      - path: /
        pathType: Prefix
        backend:
          service:
            name: argocd-server
            port:
              name: https
  tls:
  - hosts:
    - argocd.kloudke.dpdns.org
    secretName: argocd-server-tls # as expected by argocd-server
Save the config as argocd-server-ingress.yaml then apply it:
kubectl apply -f argocd-server-ingress.yamlSince the ingressClassName is nginx, it will take the External IP assigned to the ingress-nginx-controller:

As soon as you apply the argocd ingress, a cert will be requested. Give it a few minutes then check the certificate resource:
kubectl get certificate -n argocd
kubectl describe certificate argocd-server-tls -n argocd
By the time of writing this article, I had already performed most of these steps, hence the age of most of the resources in this guide. You can validate the cert issuance further as follows:
# Check the ACME odrer
kubectl get order -n argocd
kubectl describe order <NAME> -n argocd

# Check the ACME Challenge
kubectl get challenge -n argocd
kubectl describe challenge <NAME> -n argocd
Also, you can verify that the TLS Secret exists.
kubectl get secret argocd-server-tls -n argocd
6. Switch to Production ClusterIssuer
After confirming that the cert is requested and obtained successfully, you need to switch to the production ClusterIssuer. Create the production ClusterIssuer as follows:
apiTokenSecret
If using the CloudFlare API Token:
apiVersion: cert-manager.io/v1
kind: ClusterIssuer
metadata:
  name: letsencrypt-prod
spec:
  acme:
    email: [email protected]
    server: https://acme-v02.api.letsencrypt.org/directory
    privateKeySecretRef:
      name: letsencrypt-prod
    solvers:
    - dns01:
        cloudflare:
          apiTokenSecretRef:
            name: cloudflare-apitoken-secret
            key: apitoken
      selector:
        dnsZones:
        - 'domain.exmaple.com'
apiKeySecret
If using thelare Global API Key:
apiVersion: cert-manager.io/v1
kind: ClusterIssuer
metadata:
  name: letsencrypt-prod
spec:
  acme:
    email: [email protected]
    server: https://acme-v02.api.letsencrypt.org/directory
    privateKeySecretRef:
      name: letsencrypt-prod
    solvers:
    - dns01:
        cloudflare:
          email: [email protected]
          apiKeySecretRef:
            name: cloudflare-apikey-secret
            key: apikey
      selector:
        dnsZones:
        - 'domain.example.com'
Save the manifest as clusterissuer-prod.yaml and apply it:
kubectl apply -f clusterissuer-prod.yamlThe update the argocd ingress to use letsencrypt-pro cluster-issuer:
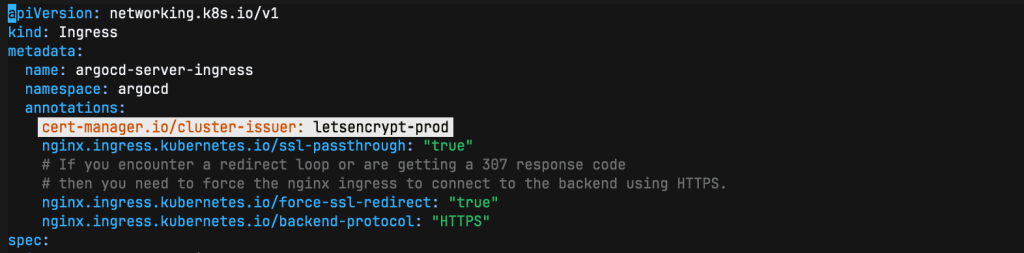
Then apply the argocd ingress again:
kubectl apply -f argocd-server-ingress.yaml7. Access ArgoCD UI
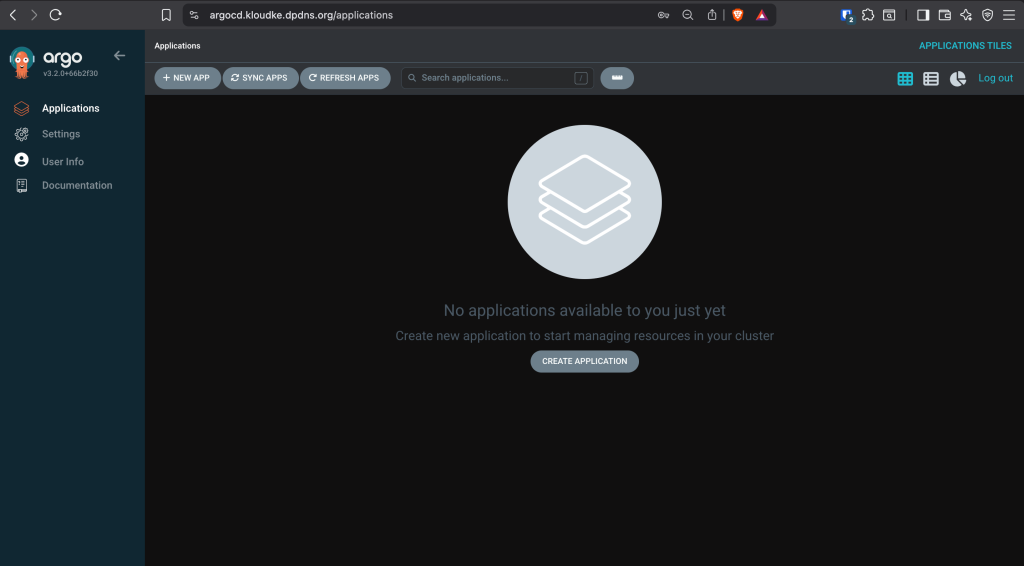
Head over to your browser and try url the ArgoCD endpoint, i.e https://argocd.domain.example.com:
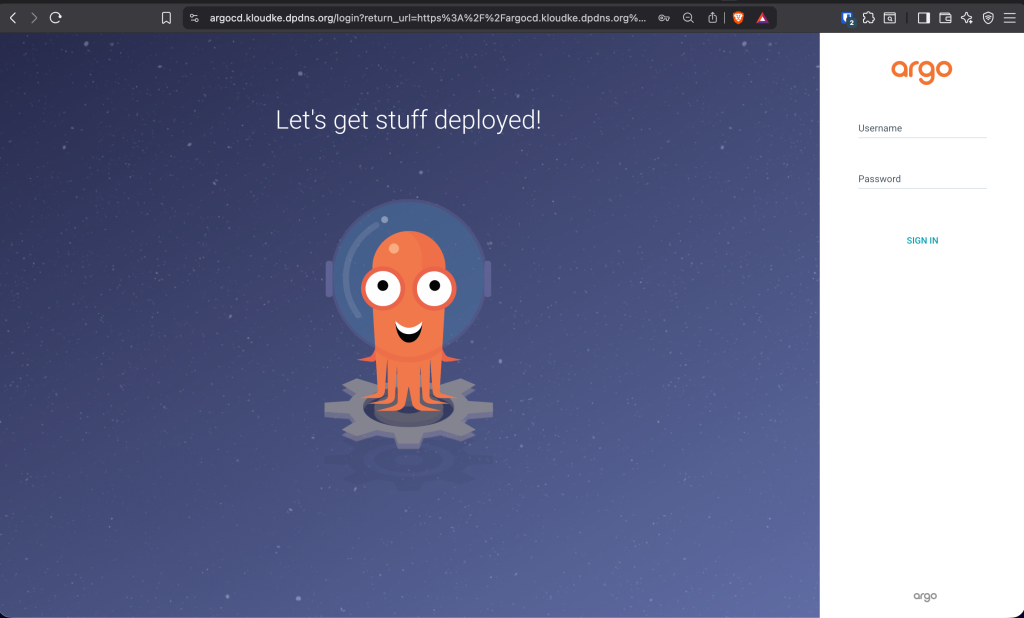
The username is admin and the password can be fetched using the command below:
kubectl -n argocd get secret argocd-initial-admin-secret -o jsonpath="{.data.password}" | base64 -d && echo
Enjoy using ArgoCD: