
iSCSI (Internet Small Computer System Interface) is a protocol used to send SCSI commands between clients (initiators) and targets (storage devices) via an IP network. iSCSI supports the creation of block-level storage area networking (SAN) over existing Ethernet networks, and it provides remote access to targets as local disk storage.
An iSCSI Storage Pool consists of block storage units (hard disks or SSDs) organized as an iSCSI protocol entity. They present as a single storage resource to clients using a network. The storage pool can be configured, managed, and presented by a storage server (iSCSI target) and accessed by clients (iSCSI initiators) to be used as storage.
In an iSCSI storage pool, individual physical storage devices (local disks) are grouped into logical pools or volumes and then presented to network-based devices as iSCSI targets.
Volumes have to be pre-allocated to the iSCSI server and can’t be provisioned using the libvirt APIs. As /dev/XXX can change with every logon to iSCSI target by libvirt, it’s recommended to be configured to use /dev/disk/by-path or /dev/disk/by-id as the path to be used as the target. These provide long-term stable naming of LUNs.
The given host name or IP address is not resolved by the libvirt iSCSI storage backend when performing discovery of available targets’ IQNs in the host; hence, defining two pools to use the same IQN in one host will result in duplicate source pool checks to be failed.
Use Cases
- High-Performance Virtualization: iSCSI storage pools are usually utilized in virtualization environments in which high-performing virtual machines must have access to remote block-based storage. They work best when you wish to have virtual machines on storage that isn’t physically hosted on the hypervisor.
- Remote Disk Expansion for Servers: Under iSCSI, the disk space of physical or virtual servers can be increased by utilizing the capability to access the remote storage at a block level. It is useful when a server lacks physical room for additional disks but requires additional storage.
- Backup and disaster recovery: iSCSI storage pools are oftentimes a part of a disaster recovery scheme in which data from production systems are copied on a regular basis to remote iSCSI targets. Backed-up data are readily accessible as a local disk.
Mastering KVM Virtualization - The Ultimate eBook
From home labs to production clouds - master KVM Host management, automating KVM administration using Terraform, Vagrant, and cloud automation. This eBook will enable you to build scalable virtual infrastructure that works whether you're learning at home or deploying enterprise solutions. Get your full copy today
Configuring an iSCSI Storage Pool
This section covers how to configure an iSCSI storage pool using three different management tools: virsh (command-line interface), Cockpit (web-based UI), and Virt-Manager (Qemu/KVM GUI).
Using Virsh CLI
Before you can start configuring the storage pool with virsh, ensure that your hypervisor supports iSCSI storage pools using the command below:
virsh pool-capabilities | grep "'iscsi' supported='yes'"If the above command displays any output, then your hypervisor supports iSCSI storage pools.
Create the storage pool
Virsh utility provides the virsh pool-define-as command to create any type of storage pool. For instance, you can define a iSCSI storage pool named vms_iscsi and use the IQN (iSCSI Qualified Name) iqn.2025-05.truenas.local:iscsi.share.1 on the server, server1.example.com.
The storage pool is mounted on the target path /dev/disk/by-path.
virsh pool-define-as --name vms_iSCSI --type iscsi --source-host server1.example.com --source-dev iqn.2025-05.truenas.local:iscsi.share.1 --target /dev/disk/by-pathDefine Storage Pool using XML
The virsh pool-define command allows you to define and create a storage pool from an xml definition.
To create an iSCSI-based storage pool using an xml file, you must include the following parameters:
| Description | XML |
|---|---|
| Storage pool type. | <pool type='iscsi'> |
| Name of the storage pool | <name>name</name> |
| The name of the host | <source><host name=hostname/> |
| The iSCSI IQN | <source><host name=hostname /> |
| The path specifying the target. This will be the path used for the storage pool. | <target><path>/dev/disk/by-path</path></target> |
Example
An example of an xml file that defines an iSCSI based storage pool is as follows:
<pool type='iscsi'>
  <name>vms_iSCSI</name>
  <source>
    <host name='server1.example.com'/>
    <device path='iqn.2025-05.truenas.local:iscsi.share.1'/>
  </source>
  <target>
    <path>/dev/disk/by-path</path>
  </target>
</pool>
Save the file as vms.xml (change it to yours) and exit, then run the command below to create the storage pool:
virsh pool-define /path/to/xmlfile.xmlThen use virsh pool-list command to verify that the storage pool has been created:
virsh pool-list --allStart the Storage Pool
Start the created storage pool using the virsh pool-start command:
virsh pool-start vms_iSCSIAlternatively, you can configure the pool to autostart using the virsh pool-autostart command:
virsh pool-autostart vms_iSCSIVerify the Storage Pool
Use the virsh pool-info command to verify that the storage pool is in the running state and that the sizes and allocation match what you set.
$ virsh pool-info vms_iSCSI
Name:           vms_iSCSI
UUID:           35cf18e6-1420-4d65-99bc-c9f3dcb1bd57
State:          running
Persistent:     yes
Autostart:      yes
Capacity:       170.00 GiB
Allocation:     164.00 GiB
Available:      170.00 GiB
Using Cockpit Web Console
Navigate to the cockpit web interface on your browser and login to the console using your admin credentials. In the web console, click on the Virtual Machines tab then click on Storage Pools.
In the storage pools window, click Create storage pool and a new wizard appears.
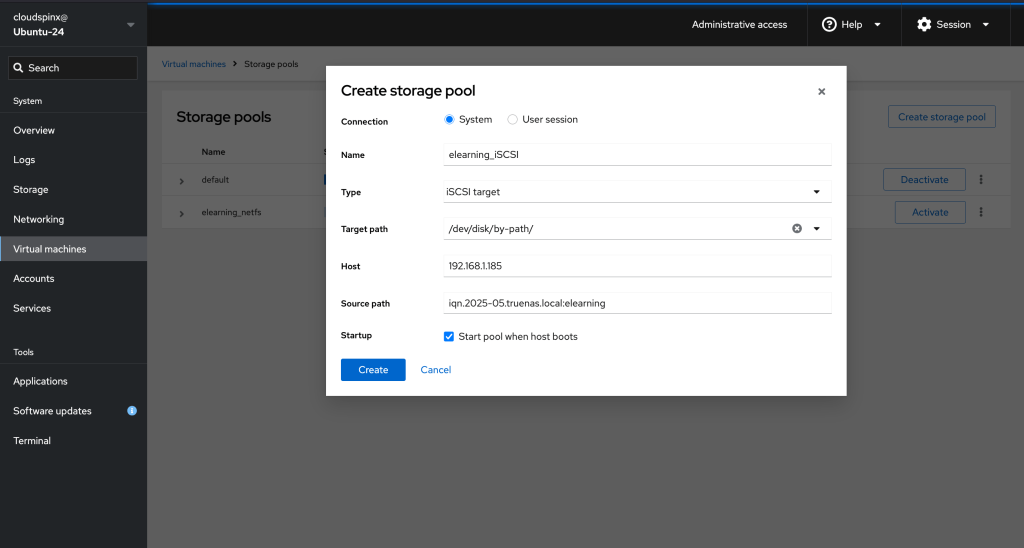
Enter a name for the storage pool and select iSCSI target in the pool type field. You also need to input the following information:
- Target Path – Path to the location where the pool will be based
- Host – The hostname or IP address of the ISCSI server.
- Source path – The unique iSCSI Qualified Name (IQN) of the iSCSI target.
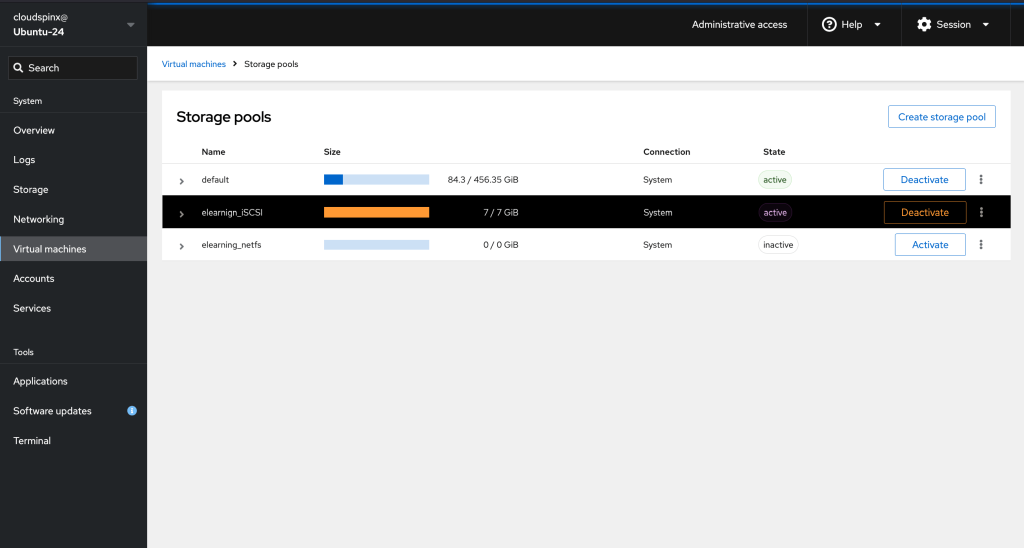
Click the Startup checkbox to configure the pool to autostart. Then click create and your iSCSI storage pool should be created successfully and should appear in the list of storage pools. Click on the Activate button to activate the storage pool.
Using Virt-Manager
Launch Virt-Manager from your desktop and connect it to the host where you want to create the iSCSI storage pool.
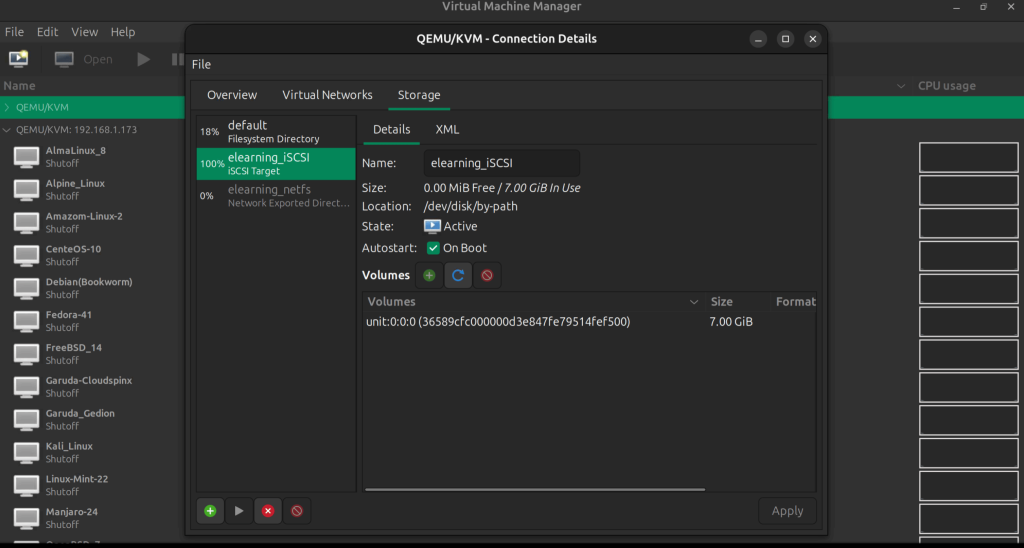
From the Virt-Manager window, navigate to the storage tab. (Edit→Connection Details→Storage)
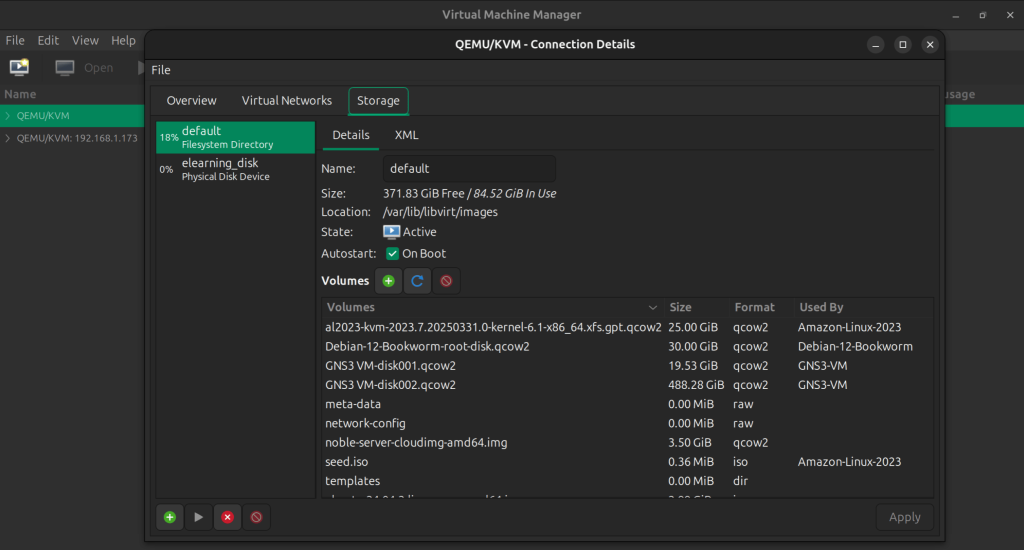
Click the Add Pool button to launch a new storage pool creation wizard. Input the name of your new iSCSI storage pool, and then select iSCSI Target as pool type in the type field. Also fill in the following details:
- Target Path – Path to the location where the pool will be based
- Host – The hostname or IP address of the ISCSI server.
- Source path – The unique iSCSI Qualified Name (IQN) of the iSCSI target.
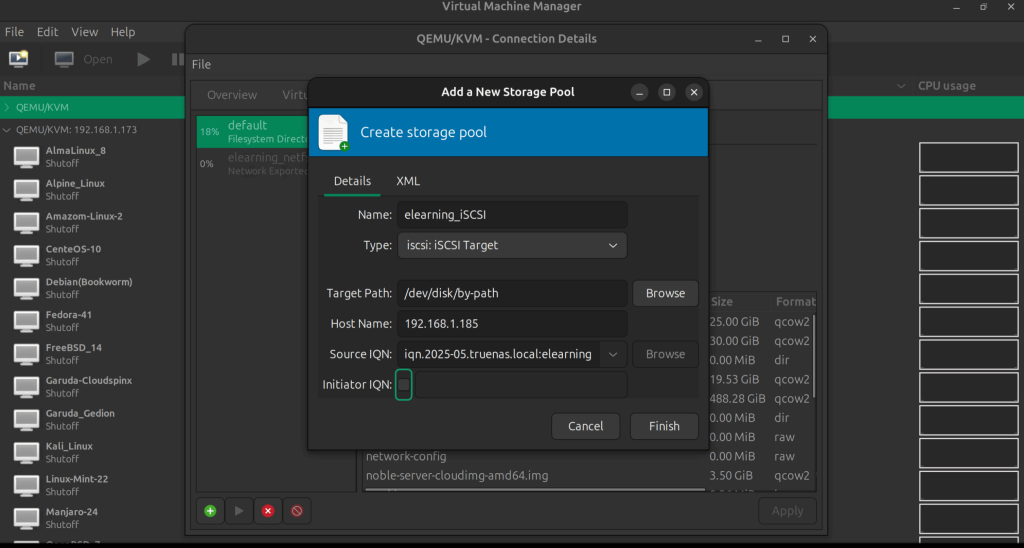
Then click Finish when done, to create your storage pool. The new storage pool should be listed in the storage pool list.
🌍 Our KVM eBook covers all this in details and more. In the book you will learn:
- Supported Storage Pool Types
- Storage Management Using Virsh CLI
- Storage Management using Cockpit UI
- Storage Management using Virt-Manager
Watch out for more guides from our team:


