From a simple business to an enterprise infrastructure setup, securing and managing the network is really important at today’s digital pace, and this asks for a good DNS setup to prove just that game-changer. That’s where BIND, better known as Berkeley Internet Name Domain, comes in. Behind the versatile firewall capabilities courtesy of pfSense, BIND will grant you unprecedented control over domain name resolution and manage DNS queries with both precision and flexibility.
In this tutorial, we are detailing step-by-step how to install BIND DNS on pfSense. This will allow one to have a seamless, secure, and feature-packed network environment.
Step 1 : Install pfSense prerequisites
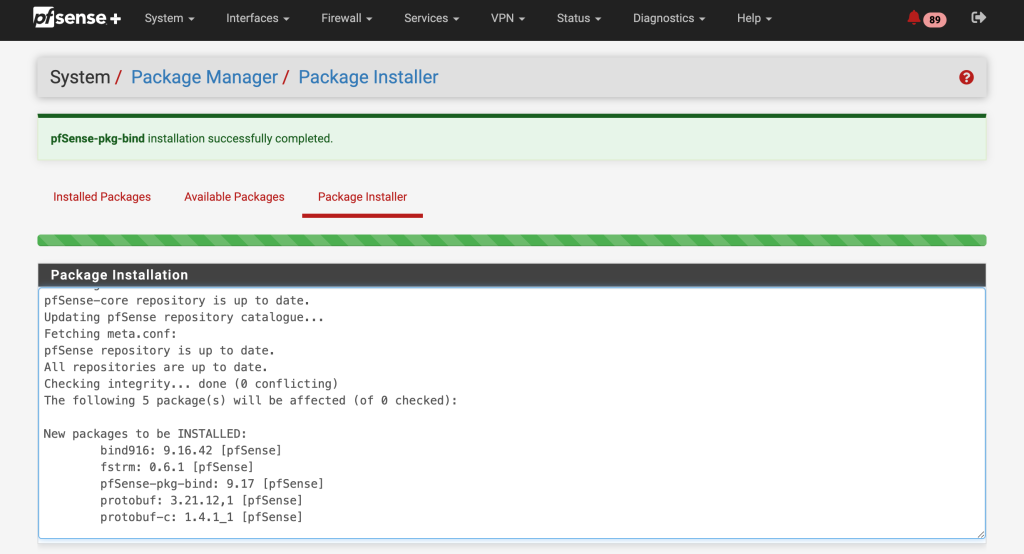
Here we will log into your pfSense device and install the ‘bind’ DNS server package via pfSense package manager which will also install a Web GUI component for the pfSense platform.
Go to System > Package Manager > Available Packages > search for ‘bind’. (9.17) and click install.
Step 3 : Configure DNS
In order to set BIND DNS as your DNS server, you need to disable DNS Forwarder and DNS Resolver.
- Go to Services > DNS Forwarder > ensure Enable DNS forwarder is unchecked.
- Go to Services > DNS Resolver > Disable DNS Resolver and then Save. You might also need to apply the changes if prompted.
Now, we’ll proceed to configure BIND DNS. Go to Services > BIND DNS Server.
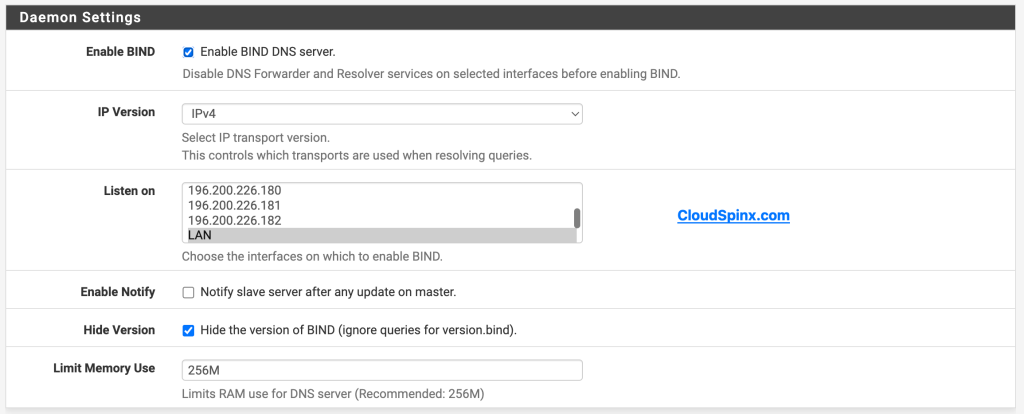
First, we need to configure the Daemon Settings, set the interfaces you wish the pfSense DNS FW to protect clients on. Make sure to include (lo / loopback) if you want your pfsense device to be able to resolve via the DNS server as well.
- Daemon settings:
- Enable BIND: Checked
- IP Version: IPv4
- Listen On: LAN or whatever other interface you want to serve as DNS server
- Enable Notify: Unchecked
- Hide Version: Checked
- Limit Memory Use: 256MB
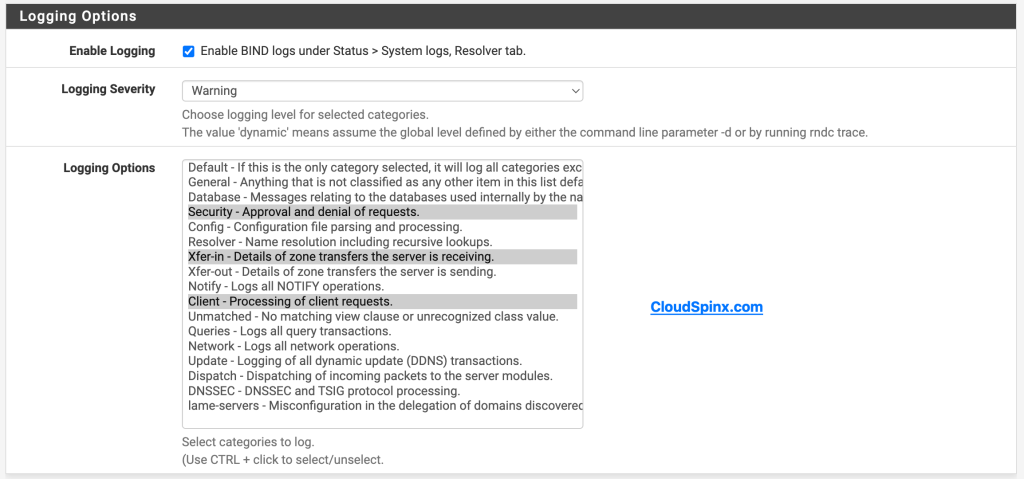
The Logging options should be configured as follows: This section is only required if you intend to upload logs for upstream analysis.
- Logging options:
- Enable logging: Checked
- Logging Severity: Warning
- Logging Options: Default
For the Response Rate, this section can be setup to your personal preferences. We do recommend Rate Limiting if you don’t have full control over your environment.
- Response Rate Limit:
- Rate Limit: Checked
- Limit action: Deny query
- limit: 15

You can also customize this section to your liking. For this demo,we’ll configure this to forward all queries that aren’t hosted locally to other, bigger DNS servers such as CloudFlare and Google DNS.

Step 5 : Setup a BIND ACLs
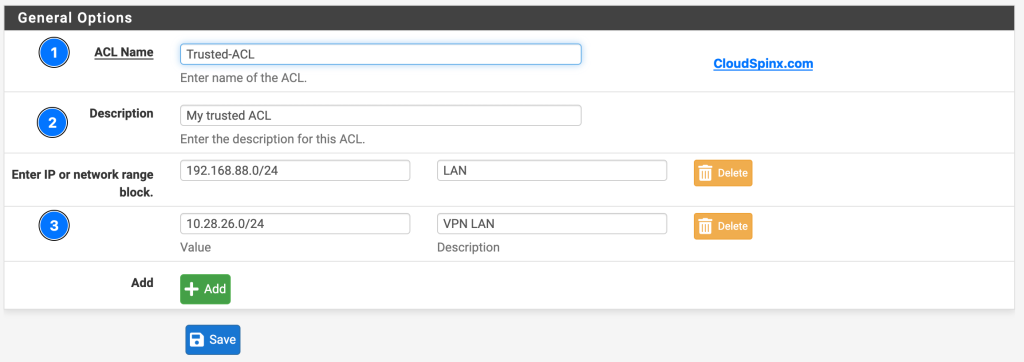
BIND sets up it’s own built-in ACLs but the one we need is the Trusted-ACL. To configure your Trusted-ACL:
- Click on Add
- General Options:
- ACL Name: Trusted-ACL
- Description: My Trusted ACL, or whatever you want to name it.
- Enter IP or network range block: 192.168.88.0/24 (Use your Network range)
- Click on Save
- General Options:
Step 5 : Setup a BIND View
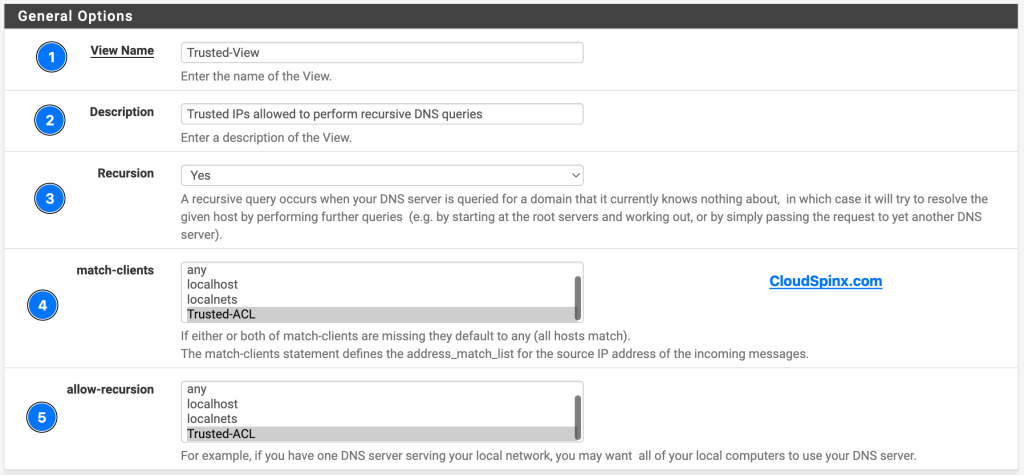
To put it simple terms, BIND view is like an interface which determines which instance handles each DNS query. Configure BIND view as follows:
- Views
- Click on Add
- General Options:
- View name: Trusted-View
- Description: Whatever description you want to use (e.g Trusted Ips for recursive DNS querying)
- Recursion: Yes
- match-clients: Select Trusted-ACL
- allow-recursion: Select Trusted-ACL
- Custom Views:
- Custom Options: leave this one blank
- General Options:
- Click on Save
- Click on Add
Step 5 – Setting up Policy Zones
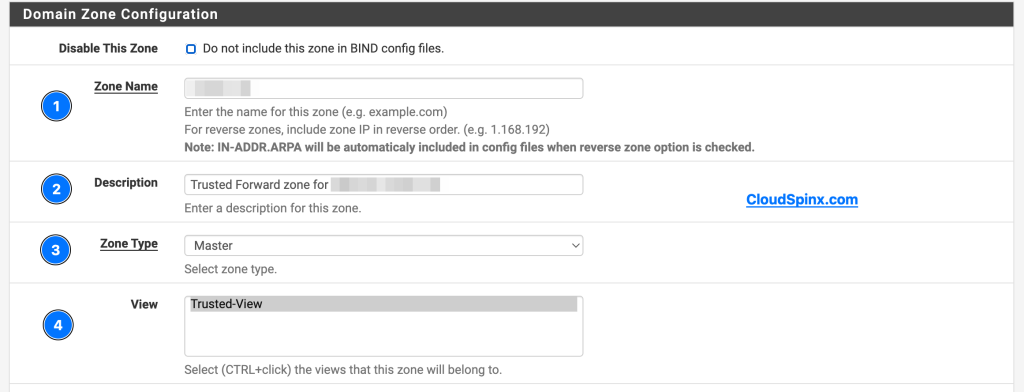
For this section, we’ll need to setup a forward zone. Let’s dive in. We’ll configure the forward zone as follows:
- Domain Zone Configuration
- Disable this zone: Leave this unchecked
- Zone name: example.com (your network FQDN)
- Description: example.com trusted forward zone or any description you want
- Zone Type: Select Master
- View: Select Trusted-View
- Reverse zone: Leave this unchecked
- IPv6 Reverse Zone: Also leave this unchecked
- Response Policy Zone: And this unchecked
- Custom option: Leave this one blank
- DNSSEC
- Inline signing: Unchecked
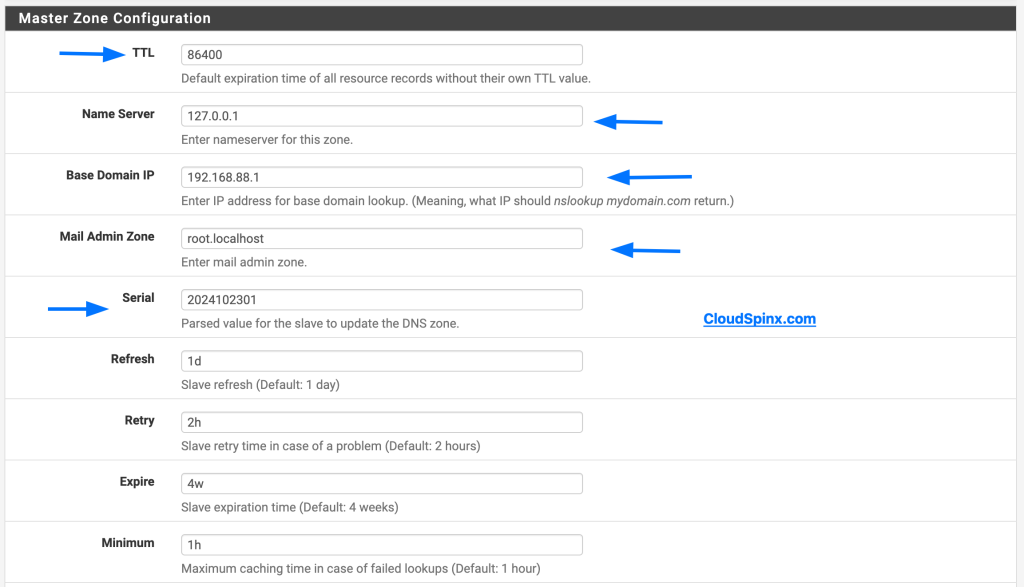
- Master Zone Configuration
- TTL: 86400
- Nameserver: 127.0.0.1 or localhost
- Base domain IP: 192.168.88.1 (your DNS domain)
- Mail Admin Zone: any email you want, even a fake
- Serial: YYYYMMDDxx (e.g. 2024102401)
- Refresh: leave as it is
- Retry: leave as it is
- Expire: leave as it is
- Minimum: leave as it is
- allow-update: None
- Enable update-policy: Leave box unchecked
- allow-query: Select Trusted-ACL
- allow-transfer: Select None
- Zone Domain Records:
- Transfer any records you had specified in DNS Resolver(Unbound).
- Record: k8sapi
- Type: A
- Priority: blank
- Alias or IP address: 192.168.88.2
- Register DHCP Static Mappings: Check the box for BIND to register static DHCP mappings
- Transfer any records you had specified in DNS Resolver(Unbound).
- Custom Zone Domain Records:
- Leave this blank
The Domain Zone Configuration.
Master Zone Configuration.
Transfered Domain Records.

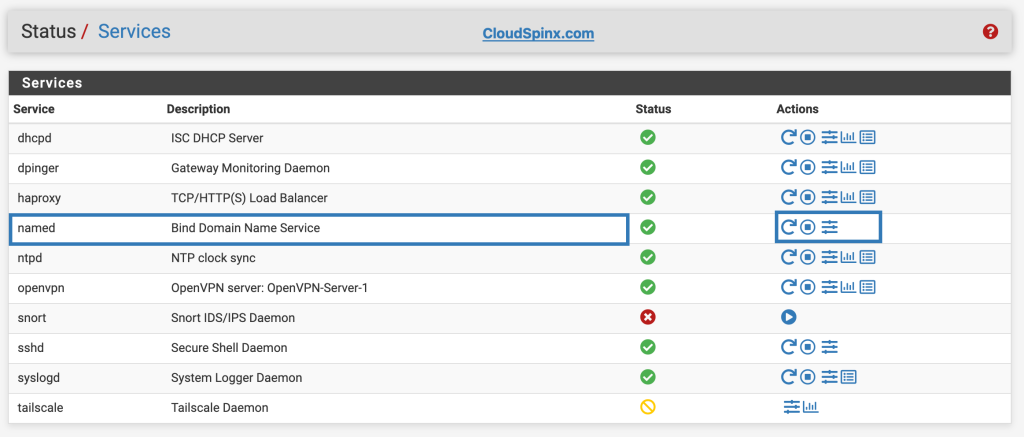
After hitting the save button, BIND will start automatically, navigate to Status>Services and restart the named service.
Step 6 – Testing your configuration
To test that the configuration was a succes, let’s login to a client using this device as their primary DNS server and run the DNS utility dig.
[root@k8sworkstation ~]# dig disney.com

; <<>> DiG 9.16.23-RH <<>> disney.com
;; global options: +cmd
;; Got answer:
;; ->>HEADER<<- opcode: QUERY, status: NOERROR, id: 24587
;; flags: qr rd ra; QUERY: 1, ANSWER: 1, AUTHORITY: 0, ADDITIONAL: 1

;; OPT PSEUDOSECTION:
; EDNS: version: 0, flags:; udp: 1232
; COOKIE: b95167c895890cf801000000671a97cb96cdac58c6fc199b (good)
;; QUESTION SECTION:
;disney.com.			IN	A

;; ANSWER SECTION:
disney.com.		1533	IN	A	130.211.198.204

;; Query time: 142 msec
;; SERVER: 192.168.88.1#53(192.168.88.1)
;; WHEN: Thu Oct 24 21:54:03 EAT 2024
;; MSG SIZE  rcvd: 83

[root@k8sworkstation ~]# dig google.com

; <<>> DiG 9.16.23-RH <<>> google.com
;; global options: +cmd
;; Got answer:
;; ->>HEADER<<- opcode: QUERY, status: NOERROR, id: 6092
;; flags: qr rd ra; QUERY: 1, ANSWER: 1, AUTHORITY: 0, ADDITIONAL: 1

;; OPT PSEUDOSECTION:
; EDNS: version: 0, flags:; udp: 1232
; COOKIE: 63ccba7aac23596e01000000671a97d590f055ed82b04c62 (good)
;; QUESTION SECTION:
;google.com.			IN	A

;; ANSWER SECTION:
google.com.		300	IN	A	172.217.19.142

;; Query time: 153 msec
;; SERVER: 192.168.88.1#53(192.168.88.1)
;; WHEN: Thu Oct 24 21:54:13 EAT 2024
;; MSG SIZE  rcvd: 83
And there you have it, BIND DNS server is up and running in your pfSense, congrats.
Conclusion
While efficiency and security will take center stage, BIND will give so much more personalization in DNS management than ever before. The combination of BIND and pfSense can scale from a home lab to perfecting a business network; it’s ready for anything that the digital world will throw at it.

