

Let’s talk about Network File Sharing, or famously referred to as (NFS). So, basically, NFS is a networking protocol for sharing files over distributed systems. The need for a shared network file system comes in when there is limited disk space and at the same time, you need to share data between client computers. In your computers, a file system is is responsible for the way data is stored and retrieved from storage spaces.
This NFS concept involves shared directories that are created on a server, most preferably, a file server. This server must be running the NFS server component in order to serve these directories remotely over a network. An NFS file share is mounted on a client machine, making it available just like folders the user created locally. Now, multiple users running NFS client can access and manage these directories from their various clients.
NFS is one of the most widely used protocols for file servers. NFS implementations are available for most modern operating systems. Let’s look at some benefits of using NFS:
- Data that would otherwise be duplicated on each client can be kept in a single location and accessed by clients on the network.
- Several clients may need access to the
/usr/ports/distfilesdirectory. Sharing that directory allows for quick access to the source files without having to download them to each client. - On large networks, it is often more convenient to configure a central NFS server on which all user home directories are stored. Users can log into a client anywhere on the network and have access to their home directories.
- Administration of NFS exports is simplified. For example, there is only one file system where security or backup policies must be set.
In this article, we will learn how to Install and Configure NFS Server and client on FreeBSD 14. Let’s get started:
How to configure NFS server on FreeBSD 14
We have configure NFS server on FreeBSD 14, but in order to do this properly and effectively, we’ll need to have the following daemons installed and running on our server machine; nsfd, mountd and rpcbind. nfsd services requests from NFS clients, mountd carries out requests received from nfsd and rpcbind allows NFS clients to discover which port the NFS server is using.
Step 1. Set up NFS Server on FreeBSD 14
The file systems which the NFS server will share are specified in /etc/exports. Each line in this file specifies a file system to be exported, which clients have access to that file system, and any access options. When adding entries to this file, each exported file system, its properties, and allowed hosts must occur on a single line. If no clients are listed in the entry, then any client on the network can mount that file system.
Open the /etc/rc.conf file and add the following lines:
# sudo nano /etc/rc.conf
## add to last line
rpcbind_enable="YES"
nfs_server_enable="YES"
mountd_enable="YES"
## specify your domain name
nfsuserd_flags="-domain example.com"
Step 2. Create a File System
We will now Create an NFS Export Directory. This is the filesystem that will be shared with the client system. The files in this directory will be shared with the client system. The /etc/exports entries will demonstrate how to export file systems.
Let’s begin by creating a directory in our home mount point, then change into the directory and create some sample files
mkdir -p /nfs/projects
cd /nfs/projects
touch sample.txt test.txt site.txt
Now, we need to configure a list of file systems that will be made available for the clients on the same LAN. Open the /etc/exports file and add the following parameters:
# nano /etc/exports
## See the following parameters##
/nfs/projects -maproot=root 192.168.1.178 (rw, sync)
/nfs/projects                               192.168.1.159 (rw, sync)
/nfs/projects                               192.168.1.179 (rw, sync)
This command above /nfs/projects so that three clients from different domains may access that file system. The -maproot=root allows root on the remote system to write data on the exported file system as root. If -maproot=root is not specified, the client’s root user will be mapped to the server’s nobody account and will be subject to the access limitations defined for nobody. Save and close the file.
You can now start the server by running the following command:
service nfsd startTo check if the exports are good on the server, run the command showmount -e with your server’s IP:
# showmount -e <server_hostname_or_ip>
e.g
# showmount -e 192.168.1.182
Whenever the NFS server is started, mountd also starts automatically. However, mountd only reads /etc/exports when it is started. To make subsequent /etc/exports edits take effect immediately, force mountd to reread it:
service mountd reloadHow to configure NFS Client
For the client configuration part, we’ll be configuring it on FreeBSD 14, Ubuntu, and Rocky Linux 9. So, let’s get on with it
Configuring NFS Client on FreeBSD 14
In our previous step, we configured NFS server on our FreeBSD 14, and now, we will configure NFS client on a FreeBSD 14. This client will have access to the directory we created in our server.
Open the /etc/rc.conf file and add the following parameters to enable NFS client:
# sudo nano /etc/rc.conf
##add the following parameters
nfs_client_enable="YES"
mountd_enable="YES"
rpcbind_enable="YES"
mountd_flags="-r"
Now start the nfsclient service:
service nfsclient startCreate an NFS Mount Point on the Client:
mkdir /nfs_clientshareThe client now has everything it needs to mount a remote file system. To mount /nfs/projects on server to the /nfs_clientshare mount point on client:
mount -t nfs server_ip:/nfs/projects /nfs_clientshare/The files and directories in /nfs/projects will now be available on client, in the /nfs_clientshare directory. Change to /nfs_clientshare directory and list the contents.
cd /nfs_clientshare/
ls -l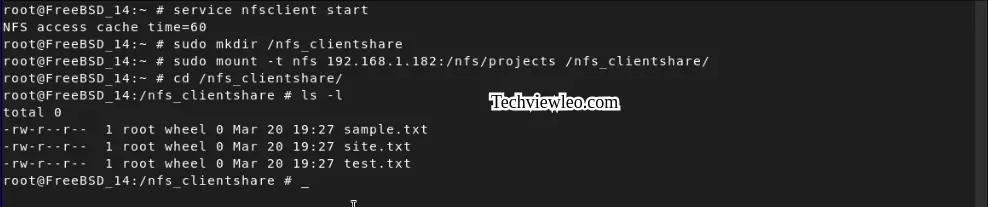
The files on FreeBSD 14 server-side are now available in the FreeBSD client machine. To mount a remote file system each time the client boots, add it to the /etc/fstab file:
# sudo nano /etc/fstab
## Make the mount persistent as shown ##
nfs_server_ip:/nfs/projects	/nfs_clientshare	nfs	rw	0	0
Configuring NFS Client (Ubuntu 22.04 Example)
On the client server, we need to install a package called nfs-common, which provides NFS functionality without including any server components. Again, update the local package index before the installation to ensure that you have up-to-date information:
sudo apt update
sudo apt install nfs-common
Now that the host server is configured and serving its shares, we’ll prepare our client. In order to make the remote shares available on the client, we need to mount the directories on the host that we want to share to empty directories on the client.
sudo mkdir /nfs_clientshareNow that we have a location to put the remote shares, we can mount the shares using the IP address of our host server:
sudo mount nfs_server_ip:/nfs/projects /nfs_clientshareThe files on the NFS server on FreeSD 14 should now be available on our Ubuntu client. Change into the /nfs_client directory and list its contents:
cd /nfs_clientshare
ls -l
We can mount the remote NFS shares automatically at boot by adding them to /etc/fstab file on the client.
$ sudo nano /etc/fstab
##add the following line##
host_ip:/var/nfs/general    /nfs/general   nfs auto,nofail,noatime,nolock,intr,tcp,actimeo=1800 0 0
Configuring NFS Client on Rocky Linux 9
Now that the host server is configured and serving its shares, we need to prepare the client. On the client server, you need to install the nfs-utils package:
sudo dnf install nfs-utilsLet’s create a directory to mount the shared directory:
sudo mkdir /nfs_clientshareNow that we have a location to put the remote shares, we can mount the shares using the IP address of your host server:
sudo mount nfs_server_ip:/nfs/projects /nfs_clientshareThe files on the NFS server on FreeSD 14 should now be available on our Rocky Linux client. Change into the /nfs_client directory and list its contents:
cd /nfs_clientshare
ls -l
We can mount the remote NFS shares automatically at boot by adding them to /etc/fstab file on the client. Open /etc/fstab with root privileges and edit as follows:
$ sudo vim /etc/fstab
##add the following line##
nfs_server_ip:/nfs/projects    /nfs_clientshare   nfs auto,nofail,noatime,nolock,intr,tcp,actimeo=1800 0 0
Conclusion
This marks the end this guide. In this tutorial, we set up an NFS host and demonstrated how you can create an NFS mounts that you can serve to an NFS client. This protocol itself is not secure, and if you intend to use NFS in production, you should be aware of the security riska. Unless you are sharing over a public network, this will not be a concern. In other circumstances, you’ll need a VPN or another form of encrypted tunnel to protect your data.


