
Amazon Linux 2023 (AL2023) is the newest version of Amazon Linux distribution designed to provide a secure and stable high-performance environment to run cloud and on-premises workloads. While AL2023 is intended to be used with Amazon EC2, Amazon provides release-ready KVM-compatible QCOW2 images so that you can download and install AL2023 on local virtualization environments like KVM. In this tutorial, we will walk through an install of Amazon Linux 2023 on the KVM hypervisor from downloading the image to installing and booting your virtual machine.
Mastering KVM Virtualization - The Ultimate eBook
From home labs to production clouds - master KVM Host management, automating KVM administration using Terraform, Vagrant, and cloud automation. This eBook will enable you to build scalable virtual infrastructure that works whether you're learning at home or deploying enterprise solutions. Get your full copy today
Requirements
Ensure your KVM host meets the following requirements:
- Operating System: A compatible version.AWS Documentation
- QEMU Version: 6.2 or newer.
- Machine Type:
q35for x86-64 architectures.
For this demo, I’ll be using an EndeavourOS KVM host.
Step 1: Download Amazon’s AL2023 QCOW2 image
For KVM virtualization, Amazon provides a QCOW2 image. Download the latest AL2023 QCOW2 image from Amazon’s download page:
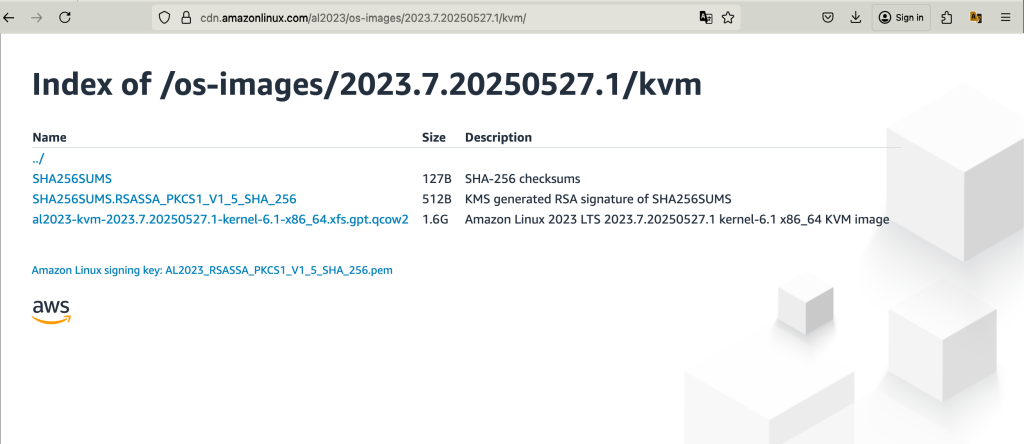
Alternatively, you can pull the QCOW2 image by running the command below in your KVM host terminal:
wget https://cdn.amazonlinux.com/al2023/os-images/2023.8.20250715.0/kvm/al2023-kvm-2023.8.20250715.0-kernel-6.1-x86_64.xfs.gpt.qcow2Step 2: Resize the Image
If you need to resize the image, then you can do so using the qemu-image command. Check the size of the image using the command below:
$ qemu-img info al2023-kvm-2023.7.20250527.1-kernel-6.1-x86_64.xfs.gpt.qcow2
image: al2023-kvm-2023.7.20250527.1-kernel-6.1-x86_64.xfs.gpt.qcow2
file format: qcow2
virtual size: 25 GiB (26843545600 bytes)
disk size: 1.59 GiB
cluster_size: 65536
Format specific information:
    compat: 1.1
    compression type: zlib
    lazy refcounts: false
    refcount bits: 16
    corrupt: false
    extended l2: false
Child node '/file':
    filename: al2023-kvm-2023.7.20250527.1-kernel-6.1-x86_64.xfs.gpt.qcow2
    protocol type: file
    file length: 1.59 GiB (1710817280 bytes)
    disk size: 1.59 GiB
Then resize the image to your desired size using the command below:
sudo qemu-img resize \
  /var/lib/libvirt/virtual-machines/al2023-kvm-2023.7.20250527.1-kernel-6.1-x86_64.xfs.gpt.qcow2 \
  40G
Step 3: Prepare cloud-init Configuration
Because KVM and VMware environments do not have Amazon EC2 Instance Meta Data Service (IMDS), we need to configure Amazon Linux 2023 using a seed.iso image. This seed.iso image contains the initial configuration information needed to boot your AL2023 virtual machine. i.e network configs, hostname, and user data.
To generate the seed.iso image, you need at least two configuration files, but if you include the network configurations(optional), then it’s three files:
- meta-data: configures the hostname of the virtual machine.
- user-data: configures user accounts, their passwords, ssh key pairs, and/or access mechanisms.
- network-config: provides a network configuration for the virtual machine which will override the default one.
- The default configuration is to use DHCP on the first available network interface.
Create the seed.iso image
Create a new folder named seedconfig then navigate to it:
sudo mkdir seedconfig
cd seedconfig
meta-data config file:
Then create a new file named meta-data:
sudo vim meta-dataAdd the following content, replacing Amazon-Linux-2023 with the host name for the VM:
#cloud-config
local-hostname: Amazon-Linux-2023.local
Save the file and exit.
user-data config file:
Next, create the user-data config file:
sudo vim user-dataAdd the following to the file, and make changes where necessary:
#cloud-config
#vim:syntax=yaml
users:
  - name: cloudspinx
    gecos: Cloudspinx Support
    sudo: ALL=(ALL) NOPASSWD:ALL
    plain_text_passwd: $Xcqt0689
    groups: sudo, admin
    shell: /bin/bash
    ssh_authorized_keys:
      - ssh-rsa PUBLIC-KEY
For a hashed password, you need to generate one and then use passwd: instead of plain_text_passwd in your user-data config file.
To generate the hashed password, use the following and enter your password when prompted:
mkpasswd --method=SHA-512 --rounds=4096
For the SSH-KEY, copy the full content after rsa. For example:
ssh-rsa AAAAB3NzaC1yc2EAAAADAQABAAACAQDanumqcAvVq9Ind+MgVsU23cbfD0MGldN2h61YZzHJpj+oLXgoI90PnuV14eL1/EKl4CYoPDdXaJxvjbfzlrehHYqG9nEZywL0KoeFtyCfft2pn3WIJMB1nsBYi2njjwS/fr9oSBVetrj10bp5Q6VHZaOoFWfOr4JT0iB/R6IFUx5FM6k+g+Ow05qrh5WBoZ/FFY5e0a1p5PaEBj/1EzigeGroQ10rznM0QBUIYgUVterL5TdDweCYjwfMnkXi2ZMjVU9+Dy2Q9BRDpcnybjnk7FkmZ4sWkBnD7U7KBNeKhM4tH0QB2joRGbSwSDiOYSYY0Jkui5YNfrC/5pwZY6e4UVbgeZXvKBSezjByk0/pPSLiimnLcDMt2vYzyr1cmvmY/lsUGRuwG9O3wOlAgh48hA/YDoIOiQPEQcnW6ascrZB39KutvX5H2fR5tpI3IjR1Eryhpn7t5Q0KQO9d1B1W8XpLTnR45uUMSxqKl/RrHgDBqWfiGNFUbyCu3+6jGCQZH5U8RMlCIpeJ5wKBNGwjmWy6q0inx+jrR9pVnQRsZFqqCpq+U9w592nMK6yKFq45Pf9gjvF9s3AJRGfkLwY+/A1W3AQrUZ9rxqbRJ7Fb/Sn+Eu+qbR2if5nX6dPZ1sxUvLW0hAL26NTuHml5R0ayUdPAPCRerhGS87vd6hanDQ== generated-on-2025-03-11For a better understanding of how to set up cloud-init, see this page.
network-config file(optional):
Do this step only if you want to override the default network. Create a new file named network-config:
sudo vim network-configAnd add the following:
#cloud-config
version: 2
ethernets:
  enp1s0:
    dhcp4: false
    addresses:
      - 192.168.1.182/24
    gateway4: 192.168.1.1
    nameservers:
      addresses: [8.8.8.8, 8.8.4.4]
Save the file and exit.
Now that we have all the required config files, we can proceed to create the seed.iso image using the mkisofs or genisoimage tools. While still in the seed folder, run either one of the following commands:
Using mkisofs tool:
# Without the network-config file
mkisofs -output seed.iso -volid cidata -joliet -rock user-data meta-data
# With the network-config file
mkisofs -output seed.iso -volid cidata -joliet -rock user-data meta-data network-config
Using genisoimage tool:
# Without the network-config file
genisoimage -output seed.iso -volid cidata -joliet -rock user-data meta-data
# With the network-config file
genisoimage -output seed.iso -volid cidata -joliet -rock user-data meta-data network-config
Either one of the above commands should be able to generate a seed.iso image.
$ mkisofs -output seed.iso -volid cidata -joliet -rock user-data meta-data network-config
Setting input-charset to 'UTF-8' from locale.
Total translation table size: 0
Total rockridge attributes bytes: 363
Total directory bytes: 0
Path table size(bytes): 10
Max brk space used 0
183 extents written (0 MB)
The resulting seed.iso file can now be attached to your new Amazon Linux 2023 Virtual Machine using a virtual CD-ROM drive for cloud-init to find on first boot and apply the configuration to the system.
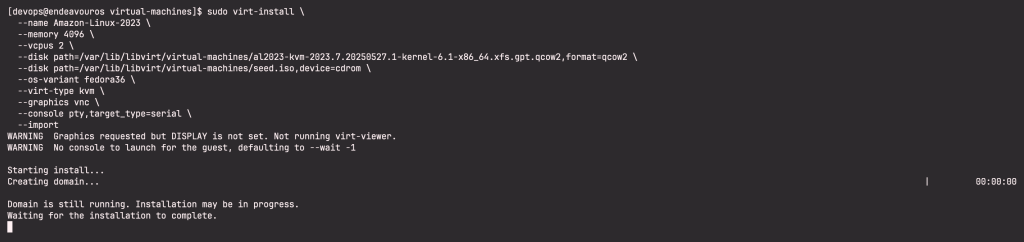
Step 4: Create and Configure AL2023 Virtual Machine
To create your VM, use virt-install command. If you have cockpit or virt-manager installed, you can provision your VM using the GUI. Run the following command to create Amazon Linux 2023 using virt-install:
sudo virt-install \
  --name Amazon-Linux-2023 \
  --memory 4096 \
  --vcpus 2 \
  --disk path=/var/lib/libvirt/virtual-machines/al2023-kvm-2023.7.20250527.1-kernel-6.1-x86_64.xfs.gpt.qcow2,format=qcow2 \
  --disk path=/var/lib/libvirt/virtual-machines/seed.iso,device=cdrom \
  --os-variant fedora36 \
  --virt-type kvm \
  --graphics vnc \
  --console pty,target_type=serial \
  --import
Sample Output:
Access the VM console via virt-manager or cockpit we UI. Login with the password you set, this is only possible since we specifically set lock_passwd to false in the user-data cloud config file.
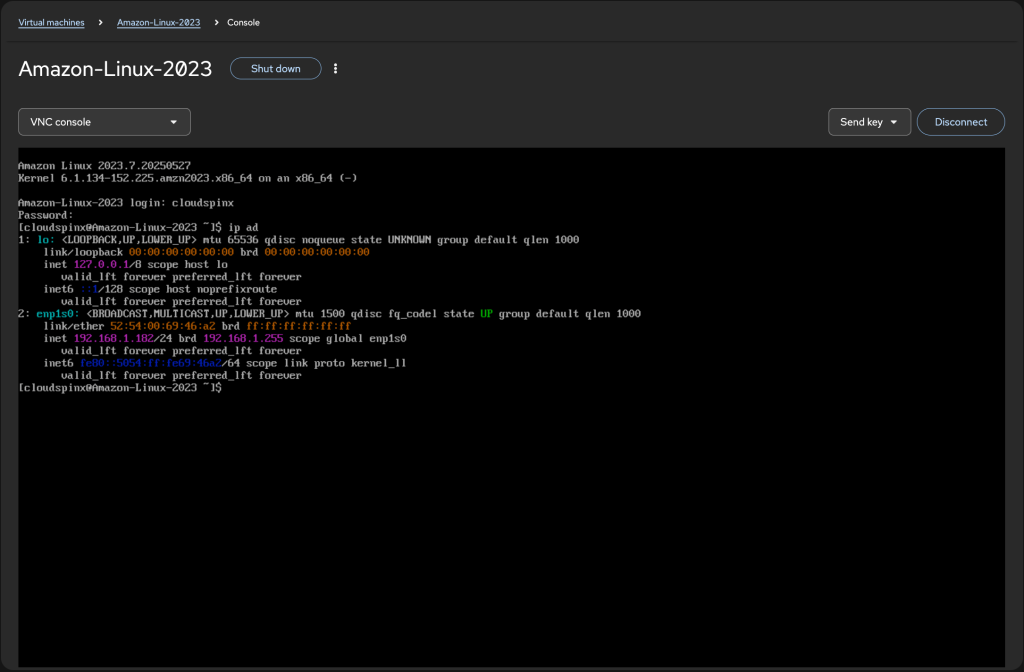
Now, try accessing the VM using ssh:
ssh [email protected]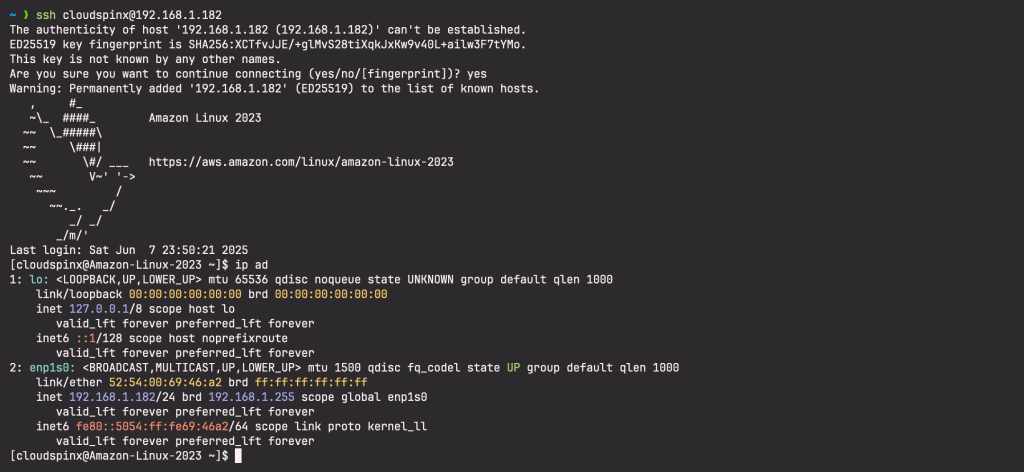
Detach the seed.iso image after a successfull installation. We really hope this guide was very helpful and that you enjoyed reading it as much as we did writing it. Feel free to engage with us through the comment section.
More articles that might interest you:


