
In this tutorial, we will focus on how to install OpenNMS on RHEL 9/ CentOS Stream 9. Monitoring in IT relates to having a system that keeps track of the IT infrastructure and its underlying components. From the Processors, Memory Usage, Programs running, Requests received, Responses sent, and generally the whole performance of the environment. This would require System administrators to go through a bunch of hardware and software to ensure things are in check. But imagine this, What if an issue occurs and you can’t get to the bottom of it in time because you do not know where it began? This would mean slowing up business, losing customers, and counting losses. I mean who wants that?
But in this modern era, Monitoring solutions have been introduced. You do not need to juggle around different systems to get to solve an issue. These tools provide a comprehensive process of monitoring a whole IT infrastructure from the central repository. From this central console, system admins can check the performance of the system, gauge the functionalities of different programs, run diagnostics, troubleshoot and solve network issues with ease, and do more tasks. There are many monitoring tools available for Linux Platforms, including; Prometheus, Nagios, Cacti, Observium, InfluxDB, OpenNMS, Zabbix, DataDog, and many more.
OpenNMS
OpenNMS is an open-source network management application platform that is designed to monitor a large number of devices while you visualize and monitor everything on your local and remote networks It is highly configurable with a variety of ways to integrate with other systems. OpenNMS offers comprehensive monitoring tools in one platform supported by a large community of users offering dynamic scalability for data processing. The platform offers robust configuration through the web UI or XML scripting, including thresholding, provisioning, event and flow management, service monitoring, and performance measurement.
There are four main components of OpenNMS;
- Helm for customized dashboards for the OpenNMS web UI that can be exported as PDF.
- Provisioning Integration Server (PRIS) for extracted data integration for automated and directed discovery. It automatically scans your network for devices with a multithreaded discovery process to handle large devices.
- Architecture for Learning Enabled Correlation (ALEC) for event and notification management. It is a framework for logically grouping related faults (alarms) into higher-level objects (situations) with OpenNMS
- OpenNMS Horizon is a free distribution with the newest features that include; the core which is the server that drives Horizon, Minion which is used for distributed network monitoring, and Sentinel which is great for scalability.
OpenNMS monitors some of the largest networks that cover healthcare, technology, energy, finance, government, education, retail, and industrial sectors. OpenNMS comes in two open-source distributions: Horizon which is a community release and Meridian which is an enterprise release that has a subscription service that provides access to an optimized and stable version of OpenNMS.
Some of the unique features of OpenNMS include;
- Providing a Fault-tolerant and Performance management networking Monitoring solution with an extensive network, application, service, and topology discovery for Route monitoring, distributed monitoring, and network traffic analysis.
- Easy configuration through web UI and REST API. The Web UI is customizable to include dashboards, node status, resource graph viewer, geographical and logical topology maps, heat maps, trends/trend analysis, and more.
- Support for email and SMS notifications for Notifications and alerts.
- IPv4 and IPv6 compliant.
- Event/Alarm Management and Correlation with support for JBoss Drools, Event translation, and enrichment.
- Support Layer 2 and Layer 3 network topologies.
- Integration with Jira, TSRM, RT, and Drools for a ticketing system.
- Highly Scalable, Event-Driven Architecture developed in Java using Spring, Hibernate, Drools, OSGi, and Vaadin.
This guide will show you how to Install and Configure OpenNMS on RHEL 9 / CentOS Stream 9.
Install OpenNMS on RHEL 9/ CentOS Stream 9
A basic Horizon deployment installs and configures the core software, which includes PostgreSQL, REST endpoints, monitoring functions, provisioning, and web interface:
Step 1. Install Java
Install Java and its environment on your system.
sudo dnf install java-11-openjdkVerify the Java version to confirm successful installation.
$ java --version
openjdk 11.0.25 2024-10-15 LTS
OpenJDK Runtime Environment (Red_Hat-11.0.25.0.9-1) (build 11.0.25+9-LTS)
OpenJDK 64-Bit Server VM (Red_Hat-11.0.25.0.9-1) (build 11.0.25+9-LTS, mixed mode, sharing)
Set Java Environment to all users at boot time.
cat << 'EOF' >> ~/.bashrc
export JAVA_HOME=$(readlink -f $(which java) | sed 's:/bin/java::')
export PATH=$JAVA_HOME/bin:$PATH
EOF
Then reload the shell:
source ~/.bashrcStep 2. Set up PostgreSQL
Install PostgreSQL with the following command.
sudo dnf -y install postgresql-server postgresqlInitialize the PostgreSQL database.
$ sudo postgresql-setup --initdb --unit postgresql
 * Initializing database in '/var/lib/pgsql/data'
 * Initialized, logs are in /var/lib/pgsql/initdb_postgresql.log
Enable the PostgreSQL to start on boot time.
sudo systemctl enable --now postgresqlCreate an OpenNMS user.
$ sudo -i -u postgres createuser -P opennms
Enter password for new role:
Enter it again:
Create a database and set the owner to the OpenNMS user.
sudo -i -u postgres createdb -O opennms opennmsSet a password for the PostgreSQL superuser. Replace the Password with your preferred actual one.
sudo -i -u postgres psql -c "ALTER USER postgres WITH PASSWORD 'StrongPassword'";Change the access policy for PostgreSQL by editing the configuration file.
sudo vim /var/lib/pgsql/data/pg_hba.confAllow Horizon to access the database over the local network with an MD5 hashed password for IPv4 and IPv6 on localhost.
host    all             all             127.0.0.1/32            md5
host    all             all             ::1/128                 md5
Save and exit the file then restart the PostgreSQL to apply changes.
sudo systemctl reload postgresqlStep 3. Install the Horizon core instance
Add the official repository and import the GPG key.
sudo dnf -y install https://yum.opennms.org/repofiles/opennms-repo-stable-rhel9.noarch.rpm
sudo rpm --import https://yum.opennms.org/OPENNMS-GPG-KEY
Then install OpenNMS Horizon with its in-built dependencies.
sudo dnf -y install opennmsDisable auto-updates for OpenNMS Horizon to prevent unwanted upgrades when upgrading other packages on the server.
sudo dnf config-manager --disable opennms-repo-stable-*Verify directory structure with the tree command.
$ tree /opt/opennms -L 1
/opt/opennms
├── bin
├── contrib
├── data
├── deploy
├── etc
├── jetty-webapps
├── lib
├── logs -> /var/log/opennms
├── share -> /var/opennms
└── system

10 directories, 0 files
Step 4. Setup Core Instance
Configure PostgreSQL database access using the command shown below:
sudo -u opennms vim /opt/opennms/etc/opennms-datasources.xmlSet credentials to access the PostgreSQL database. Replace the database name, username, and password to fit the ones you created above.
<jdbc-data-source name="opennms"
                    database-name="opennms"
                    class-name="org.postgresql.Driver"
                    url="jdbc:postgresql://localhost:5432/opennms"
                    user-name="** YOUR-OPENNMS-USERNAME **"
                    password="** YOUR-OPENNMS-PASSWORD **" />

<jdbc-data-source name="opennms-admin"
                    database-name="template1"
                    class-name="org.postgresql.Driver"
                    url="jdbc:postgresql://localhost:5432/template1"
                    user-name="postgres"
                    password="** YOUR-POSTGRES-PASSWORD **" />
Detect and assign Java environment and persist in /opt/opennms/etc/java.conf.
$ sudo /opt/opennms/bin/runjava -s
runjava: Looking for an appropriate JVM...
runjava: Checking for an appropriate JVM in JAVA_HOME...
runjava: Skipping... JAVA_HOME not set.
runjava: Checking JVM in the PATH: "/usr/lib/jvm/java-11-openjdk-11.0.25.0.9-7.el9.x86_64/bin/java"...
runjava: Found an appropriate JVM in the PATH: "/usr/lib/jvm/java-11-openjdk-11.0.25.0.9-7.el9.x86_64/bin/java"
runjava: Value of "/usr/lib/jvm/java-11-openjdk-11.0.25.0.9-7.el9.x86_64/bin/java" stored in configuration file.
Initialize the database and detect system libraries persisted in /opt/opennms/etc/libraries.properties:
$ sudo /opt/opennms/bin/install -dis

##Sample Output##
...
Finished in 0 seconds

Processing RemotePollerServiceConfigMigratorOffline: Remove deprecated RemotePoller service entry from service-configuration.xml, see NMS-12684
- Running pre-execution phase
  Creating backup of /opt/opennms/etc/service-configuration.xml
    Zipping /opt/opennms/etc/service-configuration.xml
- Running execution phase
  Current configuration: 32 services.
  A service entry named 'OpenNMS:Name=PerspectivePoller' already exists.
  Final configuration: 32 services.
- Saving the execution state
- Running post-execution phase
  Removing backup /opt/opennms/etc/service-configuration.xml.zip

Finished in 0 seconds

Processing SystemIDMigratorOffline: Updates OpenNMS system ID to a random UUID.
- Running pre-execution phase
- Running execution phase
- Saving the execution state
- Running post-execution phase

Finished in 0 seconds

Processing ClearKarafCacheMigratorOffline: Clears the Karaf cache in '/opt/opennms/data', see NMS-16226
- Running pre-execution phase
- Running execution phase
- Ignore the execution status, as this task is executed with every call
- Running post-execution phase

Finished in 0 seconds


*** Thanks for using OpenNMS!
***
*** Consider joining our active and supportive online community through
***
*** https://www.opennms.com/participate/
***
*** To connect with users, testers, experts, and contributors.
***
*** Or email us directly at [email protected] to learn more.

Upgrade completed successfully!
Enable Horizon core instance on system boot and start immediately.
sudo systemctl enable opennms
sudo systemctl start opennms
Check the status of the service:
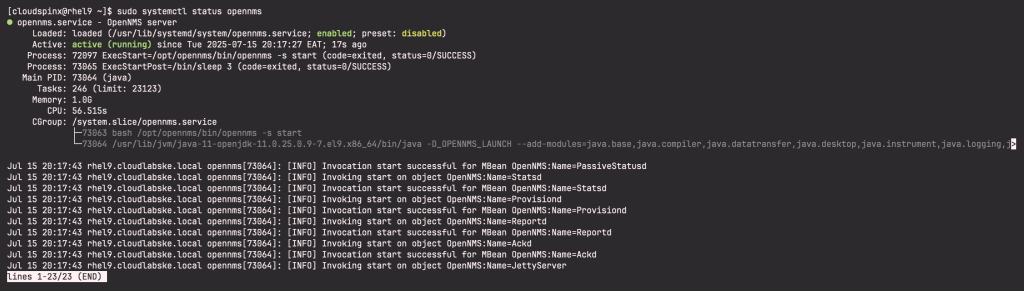
Disable SELinux permanently with the following command.
sudo setenforce 0
sudo sed -i 's/SELINUX=enforcing/SELINUX=disabled/g' /etc/selinux/config
Configure Firewalld to allow connection to the web UI from your network.
sudo firewall-cmd --permanent --add-port=8980/tcp
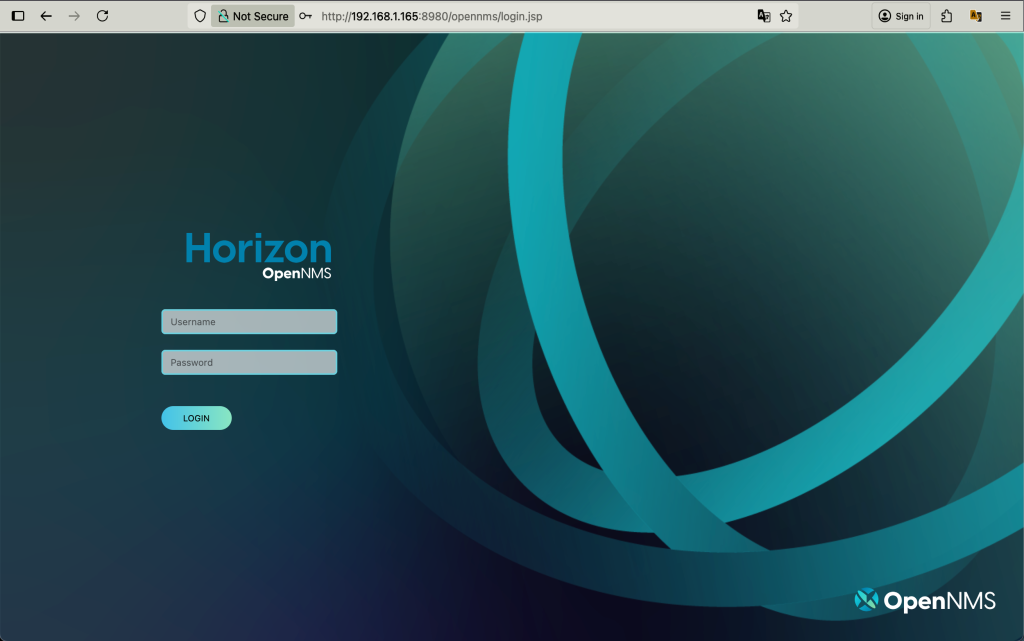
sudo systemctl reload firewalldStep 5. Access OpenNMS on RHEL 9 / CentOS Stream 9
After you start the Horizon core services, access the web application at http://core-instance-ip:8980/opennms. The default login and password are admin.
Please take a moment to change your admin user password from its default value. This step helps protect your installation against default credential attacks.
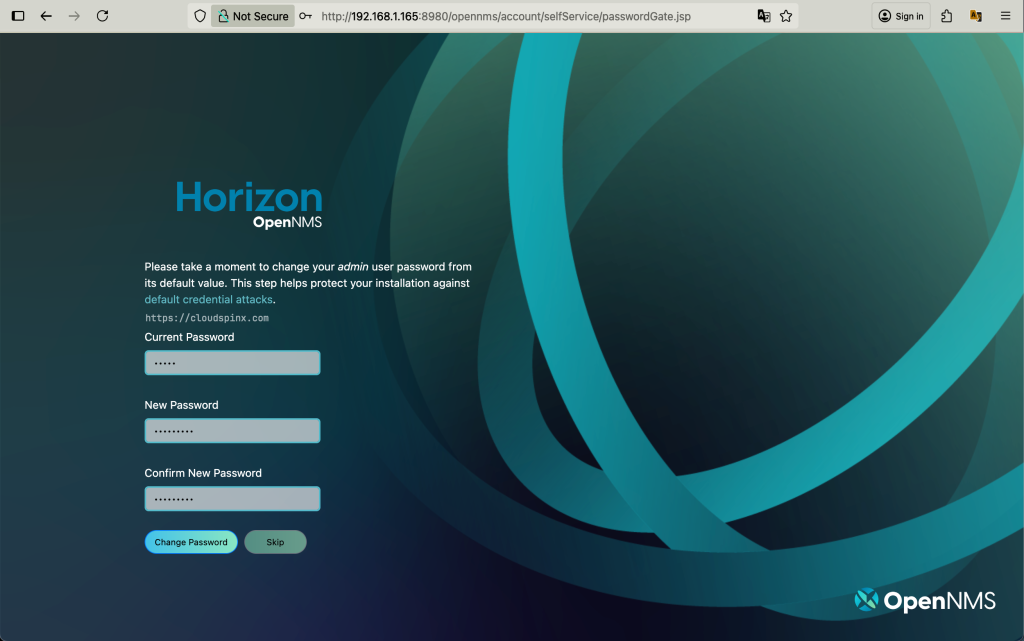
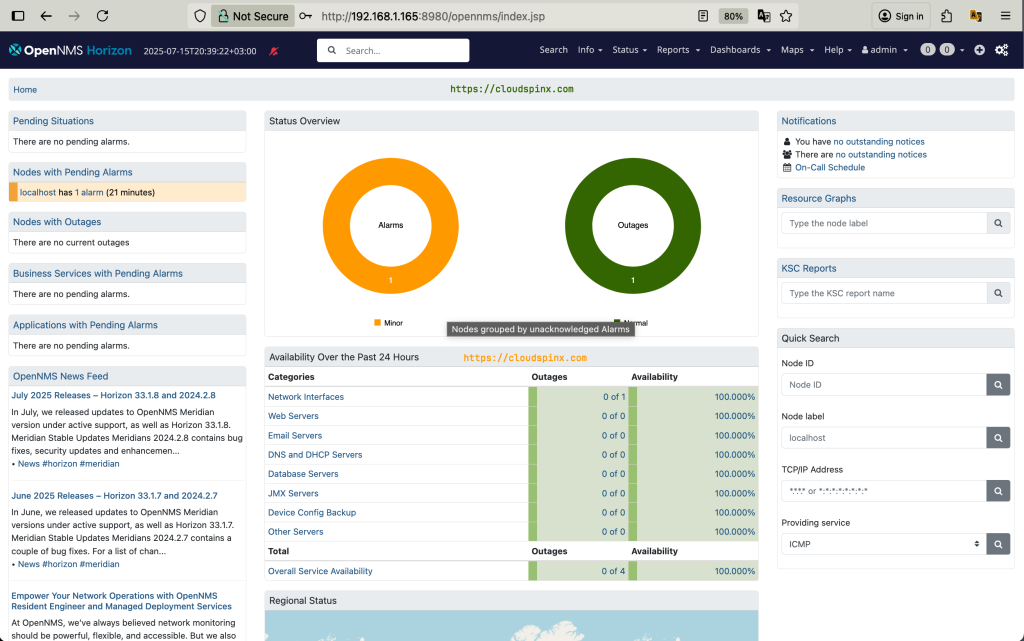
Click Change Password and the Horizon Dashboard opens as shown below.
Step 6. Add Remote Client on Horizon
To add a remote device click on the + icon to add a node. The requisition selfmonitor is already available, select it. Then enter the IP address of the remote device you want to add and give it a label (name).
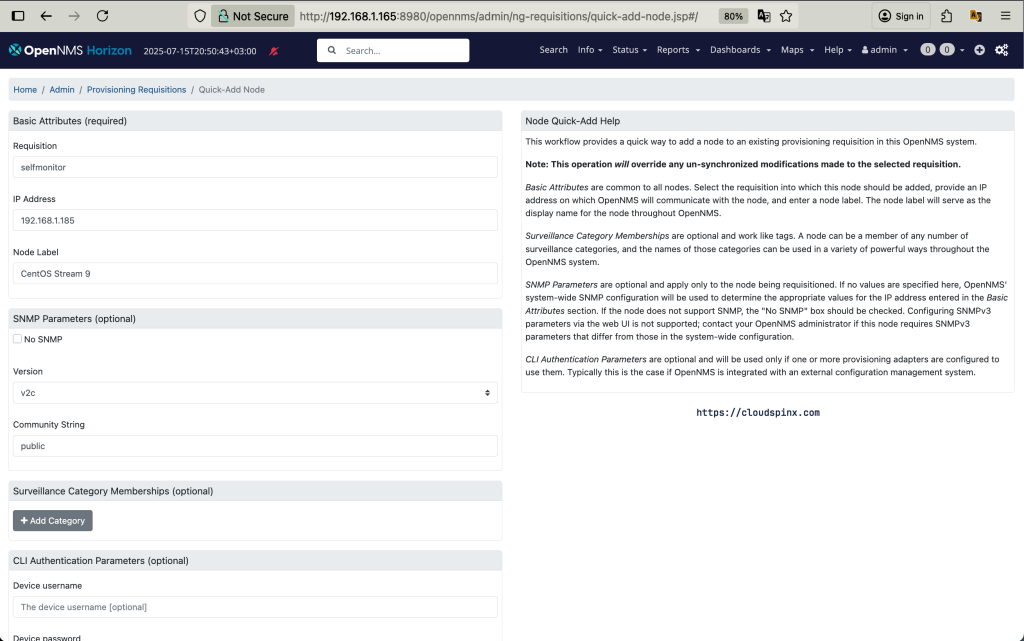
The other fields can be left as default. Click on Provision to add the node and the Node will be added successfully.
Wrapping Up
OpenNMS is a highly extensible, highly scalable, and highly configurable network management application platform with support for integration with third-party tools like Grafana and Graphite to help you visualize and monitor everything on your local and remote networks. It has detailed technical features that include LDAP/AD authentication, REST API for information, performance data, alarms, and events availability, Elastic search integration, R integration, and more. This makes OpenNMS the best solution to integrate with your core business applications and workflows. heck below for more articles from us;


