Greetings and salutations. Today we seek the answer to the question “How can I install phpMyAdmin on Oracle Linux 9?” phpMyAdmin is a free and open-source PHP-based software used for the administration of MySQL and MariaDB databases over the web. It is used to create, alter, drop, delete, import, and export MySQL database tables. Additionally, you can use phpMyAdmin to create databases, run SQL queries and create user accounts.
PHP is an open-source general-purpose cross-platform scripting language used for building dynamic websites. Developers appreciate PHP because of its versatility and its open source nature being able to run across many platforms. PHP supports most web servers and easily integrates with HTML language as well as being extendable with other programming languages. Furthermore, PHP integrates with a number of databases while supporting protocols such as POP3 and LMAP maintaining its security and flexibility.
phpMyAdmin supported features include the following:
- phpMyAdmin is multilingual and supported in over 70 languages.
- phpMyAdmin is very easy to use and learn.
- It is easy to create, browse, edit, and drop databases, tables, views, columns, and indexes.
- phpMyAdmin has a stable and flexible code base.
- phpMyAdmin offers an intuitive web interface.
- it is easier to import data from CSV and SQL files.
- It is easy to support and administer multiple servers with phpMyAdmin
- You can also create complex queries using Query-by-example (QBE).
- adding, editing, and removing MySQL user accounts and privileges is very easy.
- phpMyAdmin supports creating graphics of your database layout in various formats.
Read more features on the phpMyAdmin official documentation. The current stable release is phpMyAdmin 5.2.1.
How To Install and use phpMyAdmin on Oracle Linux 9
To install phpMyAdmin on Oracle Linux 9, we must have the LAMP stack fully installed in your system. LAMP stack comprises several open source software that helps the developers to build their applications with ease. LAMP stands for ( Linux, Apache, MySQL, and PHP ).
Begin the process by updating your system to have updated system packages.
sudo dnf update -yOnce the system repository is refreshed, proceed with the installation.
Step 1: Install LAMP Stack on Oracle Linux 9
Begin by inspecting your system.
$ cat /etc/os-release
NAME="Oracle Linux Server"
VERSION="9.5"
ID="ol"
ID_LIKE="fedora"
VARIANT="Server"
VARIANT_ID="server"
VERSION_ID="9.5"
PLATFORM_ID="platform:el9"
PRETTY_NAME="Oracle Linux Server 9.5"
ANSI_COLOR="0;31"
CPE_NAME="cpe:/o:oracle:linux:9:5:server"
HOME_URL="https://linux.oracle.com/"
BUG_REPORT_URL="https://github.com/oracle/oracle-linux"

ORACLE_BUGZILLA_PRODUCT="Oracle Linux 9"
ORACLE_BUGZILLA_PRODUCT_VERSION=9.5
ORACLE_SUPPORT_PRODUCT="Oracle Linux"
ORACLE_SUPPORT_PRODUCT_VERSION=9.5
Our system is Oracle Linux 9.5.
Install LAMP Stack with the command below.
sudo dnf install mariadb mariadb-server httpd httpd-tools php php-fpm php-cli php-json php-gd php-mbstring php-pdo php-xml php-mysqlnd -ySample output:
Last metadata expiration check: 0:39:37 ago on Sun 05 Jan 2025 11:36:32 PM EAT.
Dependencies resolved.
==========================================================================================================================================================================================================
Package Architecture Version Repository Size
==========================================================================================================================================================================================================
Installing:
httpd x86_64 2.4.62-1.0.1.el9 ol9_appstream 65 k
httpd-tools x86_64 2.4.62-1.0.1.el9 ol9_appstream 94 k
mariadb x86_64 3:10.5.22-1.el9_2 ol9_appstream 1.6 M
mariadb-server x86_64 3:10.5.22-1.el9_2 ol9_appstream 9.7 M
php x86_64 8.0.30-1.el9_2 ol9_appstream 7.6 k
php-cli x86_64 8.0.30-1.el9_2 ol9_appstream 3.1 M
php-common x86_64 8.0.30-1.el9_2 ol9_appstream 714 k
php-fpm x86_64 8.0.30-1.el9_2 ol9_appstream 1.6 M
php-gd x86_64 8.0.30-1.el9_2 ol9_appstream 39 k
php-mbstring x86_64 8.0.30-1.el9_2 ol9_appstream 467 k
php-mysqlnd x86_64 8.0.30-1.el9_2 ol9_appstream 155 k
php-pdo x86_64 8.0.30-1.el9_2 ol9_appstream 87 k
php-xml x86_64 8.0.30-1.el9_2 ol9_appstream 144 k
Installing dependencies:
apr x86_64 1.7.0-12.el9_3 ol9_appstream 131 k
apr-util x86_64 1.6.1-23.el9 ol9_appstream 99 k
apr-util-bdb x86_64 1.6.1-23.el9 ol9_appstream 12 k
httpd-core x86_64 2.4.62-1.0.1.el9 ol9_appstream 1.8 M
httpd-filesystem noarch 2.4.62-1.0.1.el9 ol9_appstream 12 k
mariadb-common x86_64 3:10.5.22-1.el9_2 ol9_appstream 54 k
mariadb-connector-c x86_64 3.2.6-1.el9_0 ol9_appstream 205 k
mariadb-connector-c-config noarch 3.2.6-1.el9_0 ol9_appstream 9.7 k
mariadb-errmsg x86_64 3:10.5.22-1.el9_2 ol9_appstream 239 k
mysql-selinux noarch 1.0.10-1.el9 ol9_appstream 35 k
nginx-filesystem noarch 2:1.20.1-20.0.1.el9 ol9_appstream 8.5 k
oracle-logos-httpd noarch 90.2-1.0.4.el9 ol9_baseos_latest 37 k
perl-DBD-MariaDB x86_64 1.21-16.el9_0 ol9_appstream 160 k
perl-File-Copy noarch 2.34-481.el9 ol9_appstream 19 k
perl-Sys-Hostname x86_64 1.23-481.el9 ol9_appstream 16 k
Installing weak dependencies:
apr-util-openssl x86_64 1.6.1-23.el9 ol9_appstream 14 k
mariadb-backup x86_64 3:10.5.22-1.el9_2 ol9_appstream 6.5 M
mariadb-gssapi-server x86_64 3:10.5.22-1.el9_2 ol9_appstream 15 k
mariadb-server-utils x86_64 3:10.5.22-1.el9_2 ol9_appstream 234 k
mod_http2 x86_64 2.0.26-2.el9_4.1 ol9_appstream 171 k
mod_lua x86_64 2.4.62-1.0.1.el9 ol9_appstream 58 k
php-opcache x86_64 8.0.30-1.el9_2 ol9_appstream 509 k
Transaction Summary
==========================================================================================================================================================================================================
Install 35 Packages
Total download size: 28 M
Installed size: 151 M
Is this ok [y/N]: yPress Enter to continue.
Step 2: Start and enable the Apache Server
To ensure the HTTPD service starts on boot time, it must be enabled.
sudo systemctl start httpd
sudo systemctl enable httpd
Now confirm the httpd status:
$ systemctl status httpd
● httpd.service - The Apache HTTP Server
     Loaded: loaded (/usr/lib/systemd/system/httpd.service; enabled; vendor pre>
    Drop-In: /usr/lib/systemd/system/httpd.service.d
             └─php-fpm.conf
     Active: active (running) since Mon 2025-01-06 00:16:56 EAT; 9s ago
       Docs: man:httpd.service(8)
  Main PID: 69914 (httpd)
     Status: "Total requests: 0; Idle/Busy workers 100/0;Requests/sec: 0; Bytes served/sec:   0 B/sec"
      Tasks: 177 (limit: 34592)
     Memory: 21.6M
        CPU: 79ms
     CGroup: /system.slice/httpd.service
             ├─69914 /usr/sbin/httpd -DFOREGROUND
             ├─69921 /usr/sbin/httpd -DFOREGROUND
             ├─69923 /usr/sbin/httpd -DFOREGROUND
             ├─69924 /usr/sbin/httpd -DFOREGROUND
             └─69925 /usr/sbin/httpd -DFOREGROUND

Jan 06 00:16:55 oracle-linux.cloudspinx.com systemd[1]: Starting The Apache HTTP Server...
Jan 06 00:16:56 oracle-linux.cloudspinx.com httpd[69914]: AH00558: httpd: Could not reliably determine the server's fully qualified domain name, using oracle-linux.cloudspinx.com. Set the 'ServerName' >
Jan 06 00:16:56 oracle-linux.cloudspinx.com systemd[1]: Started The Apache HTTP Server.
Jan 06 00:16:56 oracle-linux.cloudspinx.com httpd[69914]: Server configured, listening on: port 80
The Apache server services is loaded and running.
Step 3: Start and Enable MariaDB Database
Execute the commands below.
sudo systemctl start mariadb
sudo systemctl enable mariadb
Check the status of MariaDB.
$ systemctl status mariadb
● mariadb.service - MariaDB 10.5 database server
     Loaded: loaded (/usr/lib/systemd/system/mariadb.service; enabled; vendor p>
     Active: active (running) since Mon 2025-01-06 00:18:20 EAT; 10s ago
       Docs: man:mariadbd(8)
             https://mariadb.com/kb/en/library/systemd/
   Main PID: 70238 (mariadbd)
     Status: "Taking your SQL requests now..."
      Tasks: 12 (limit: 34592)
     Memory: 77.5M
        CPU: 406ms
     CGroup: /system.slice/mariadb.service
             └─70238 /usr/libexec/mariadbd --basedir=/usr

Jan 06 00:18:20 oracle-linux.cloudspinx.com mariadb-prepare-db-dir[70196]: The second is mysql@localhost, it has no password either, but
Jan 06 00:18:20 oracle-linux.cloudspinx.com mariadb-prepare-db-dir[70196]: you need to be the system 'mysql' user to connect.
Jan 06 00:18:20 oracle-linux.cloudspinx.com mariadb-prepare-db-dir[70196]: After connecting you can set the password, if you would need to be
Jan 06 00:18:20 oracle-linux.cloudspinx.com mariadb-prepare-db-dir[70196]: able to connect as any of these users with a password and without sudo
Jan 06 00:18:20 oracle-linux.cloudspinx.com mariadb-prepare-db-dir[70196]: See the MariaDB Knowledgebase at https://mariadb.com/kb
Jan 06 00:18:20 oracle-linux.cloudspinx.com mariadb-prepare-db-dir[70196]: Please report any problems at https://mariadb.org/jira
Jan 06 00:18:20 oracle-linux.cloudspinx.com mariadb-prepare-db-dir[70196]: The latest information about MariaDB is available at https://mariadb.org/.
Jan 06 00:18:20 oracle-linux.cloudspinx.com mariadb-prepare-db-dir[70196]: Consider joining MariaDB's strong and vibrant community:
Jan 06 00:18:20 oracle-linux.cloudspinx.com mariadb-prepare-db-dir[70196]: https://mariadb.org/get-involved/
Jan 06 00:18:20 oracle-linux.cloudspinx.com systemd[1]: Started MariaDB 10.5 database server.
Our MariaDB database is loaded, active, and running.
To see the version of PHP installed:
$ php -v
PHP 8.0.30 (cli) (built: Aug  3 2023 17:13:08) ( NTS gcc x86_64 )
Copyright (c) The PHP Group
Zend Engine v4.0.30, Copyright (c) Zend Technologies
    with Zend OPcache v8.0.30, Copyright (c), by Zend Technologies
The latest version of PHP is installed in the system.
Step 4: Start and enable php-fpm service
To be able to serve the web pages, php-fpm must be enabled. This can be achieved by executing the command:
sudo systemctl enable --now php-fpmAlso, ensure you install the php-mysqlnd extension.
sudo yum -y install php-mysqlndCheck the status of php-fpm.
$ systemctl status php-fpm
● php-fpm.service - The PHP FastCGI Process Manager
     Loaded: loaded (/usr/lib/systemd/system/php-fpm.service; enabled; preset: disabled)
     Active: active (running) since Mon 2025-01-06 00:16:55 EAT; 3min 10s ago
   Main PID: 69915 (php-fpm)
     Status: "Processes active: 0, idle: 5, Requests: 0, slow: 0, Traffic: 0req/sec"
      Tasks: 6 (limit: 34592)
     Memory: 13.0M
        CPU: 83ms
     CGroup: /system.slice/php-fpm.service
             ├─69915 "php-fpm: master process (/etc/php-fpm.conf)"
             ├─69916 "php-fpm: pool www"
             ├─69917 "php-fpm: pool www"
             ├─69918 "php-fpm: pool www"
             ├─69919 "php-fpm: pool www"
             └─69920 "php-fpm: pool www"

Jan 06 00:16:55 oracle-linux.cloudspinx.com systemd[1]: Starting The PHP FastCGI Process Manager...
Jan 06 00:16:55 oracle-linux.cloudspinx.com systemd[1]: Started The PHP FastCGI Process Manager.
Step 5: Secure MariaDB with a password
Our database as it is is not secure. We need to set up a password to make it more secure and avoid access by unintended users.
To do this issue the command:
sudo mysql_secure_installationThen follow the prompts.
NOTE: RUNNING ALL PARTS OF THIS SCRIPT IS RECOMMENDED FOR ALL MariaDB
      SERVERS IN PRODUCTION USE!  PLEASE READ EACH STEP CAREFULLY!

In order to log into MariaDB to secure it, we'll need the current
password for the root user. If you've just installed MariaDB, and
haven't set the root password yet, you should just press enter here.

Enter current password for root (enter for none):
OK, successfully used password, moving on...

Setting the root password or using the unix_socket ensures that nobody
can log into the MariaDB root user without the proper authorisation.

You already have your root account protected, so you can safely answer 'n'.

Switch to unix_socket authentication [Y/n] n
 ... skipping.

You already have your root account protected, so you can safely answer 'n'.

Change the root password? [Y/n] Y
New password:
Re-enter new password:
Password updated successfully!
Reloading privilege tables..
 ... Success!


By default, a MariaDB installation has an anonymous user, allowing anyone
to log into MariaDB without having to have a user account created for
them.  This is intended only for testing, and to make the installation
go a bit smoother.  You should remove them before moving into a
production environment.

Remove anonymous users? [Y/n] Y
 ... Success!

Normally, root should only be allowed to connect from 'localhost'.  This
ensures that someone cannot guess at the root password from the network.

Disallow root login remotely? [Y/n] Y
 ... Success!

By default, MariaDB comes with a database named 'test' that anyone can
access.  This is also intended only for testing, and should be removed
before moving into a production environment.

Remove test database and access to it? [Y/n] Y
 - Dropping test database...
 ... Success!
 - Removing privileges on test database...
 ... Success!

Reloading the privilege tables will ensure that all changes made so far
will take effect immediately.

Reload privilege tables now? [Y/n] Y
 ... Success!

Cleaning up...

All done!  If you've completed all of the above steps, your MariaDB
installation should now be secure.

Thanks for using MariaDB!
Log in to the database and create a sample database and sample user. This is the phpMyAdmin admin user to manage the database.
To log in to the database, run the command.
$ mysql -u root -p
Enter password: <StrongPassword>
Welcome to the MariaDB monitor.  Commands end with ; or \g.
Your MariaDB connection id is 13
Server version: 10.5.13-MariaDB MariaDB Server

Copyright (c) 2000, 2018, Oracle, MariaDB Corporation Ab and others.

Type 'help;' or '\h' for help. Type '\c' to clear the current input statement.

MariaDB [(none)]>
Create a database:
CREATE DATABASE phpmyadmin;
USE phpmyadmin;
Create user:
CREATE USER 'phpmyadminuser'@'localhost' IDENTIFIED BY 'Passw0rd';Grant all access to the database user:
GRANT ALL ON phpmyadmin.* TO 'phpmyadminuser'@'localhost' IDENTIFIED BY 'Passw0rd';Flush Privileges.
FLUSH PRIVILEGES;
EXIT
So far so good.
Step 6: Install PhpMyAdmin on Oracle Linux 9
Navigate to the phpMyAdmin official download page and grab the latest release of phpMyAdmin download link and download it as shown below.
sudo dnf install wget tar
wget https://www.phpmyadmin.net/downloads/phpMyAdmin-latest-all-languages.tar.gz
Extract the tarball:
tar xvf phpMyAdmin-latest-all-languages.tar.gz Move the folder to /usr/share/phpmyadmin:
rm phpMyAdmin-latest-all-languages.tar.gz
sudo mv phpMyAdmin*/ /usr/share/phpmyadmin/
Create a directory for phpMyAdmin temp files.
sudo mkdir -p /var/lib/phpmyadmin/tmp
sudo chown -R apache:apache /var/lib/phpmyadmin
Create a directory for phpMyAdmin configuration files such as htpass file.
sudo mkdir /etc/phpmyadmin/Create a phpMyAdmin configuration file.
sudo cp /usr/share/phpmyadmin/config.sample.inc.php /usr/share/phpmyadmin/config.inc.phpEdit the configuration file.
sudo vim /usr/share/phpmyadmin/config.inc.phpSet a secret passphrase – This must be a random 32-bit long secret passphrase. Navigate to $cfg[‘blowfish_secret’] to set this secret passphrase.
$cfg['blowfish_secret'] = 'Rta67jRT90YheyvR63Ghtm74ohTHDer4'; /* YOU MUST FILL IN THIS FOR COOKIE AUTH! */Then configure the Temp Directory.
$cfg['TempDir'] = '/var/lib/phpmyadmin/tmp';Step 7: Configure Apache web Server for phpMyAdmin
Next, we will configure the Apache web server.
Begin by making a phpMyAdmin Apache configuration file.
sudo vim /etc/httpd/conf.d/phpmyadmin.confInsert the configurations below.
# Apache configuration for phpMyAdmin
Alias /phpMyAdmin /usr/share/phpmyadmin/
Alias /phpmyadmin /usr/share/phpmyadmin/

<Directory /usr/share/phpmyadmin/>
   AddDefaultCharset UTF-8

   <IfModule mod_authz_core.c>
     # Apache 2.4
     Require all granted
   </IfModule>
   <IfModule !mod_authz_core.c>
     # Apache 2.2
     Order Deny,Allow
     Deny from All
     Allow from 127.0.0.1
     Allow from ::1
   </IfModule>
</Directory>
To restrict access to a given IP address for security, you can add the code below to the configuration file.
Require ip 127.0.0.1 192.168.201.19/24Validate Apache configuration.
sudo apachectl configtest
Syntax OK
Restart the apache server service so that changes are effected.
sudo systemctl restart httpdStep 8: Configure SElinux and Firewall
If SElinux is set to enforcing, you need to allow httpd to serve content in the directory. If you do not allow the httpd to serve content, you will be denied.
Run the command below.
sudo semanage fcontext -a -t httpd_sys_content_t "/usr/share/phpmyadmin(/.*)?"Allow the policy by the command below:
sudo restorecon -Rv /usr/share/phpmyadminNow allow the http port through the firewall.
sudo firewall-cmd --add-service=http --permanent
sudo firewall-cmd --reload
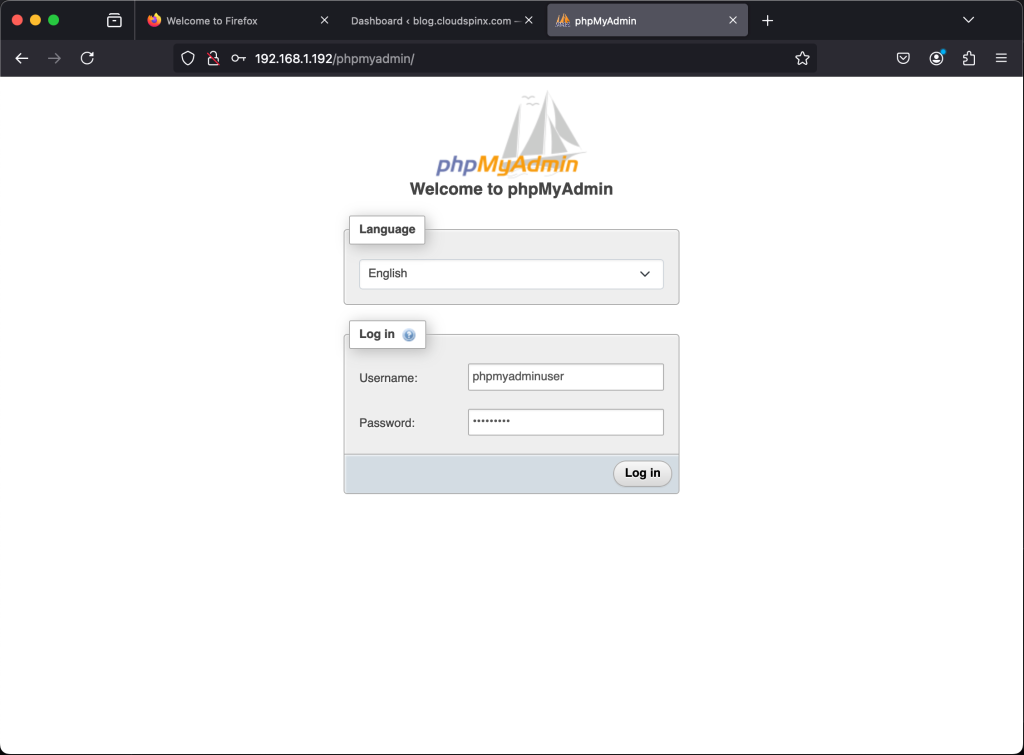
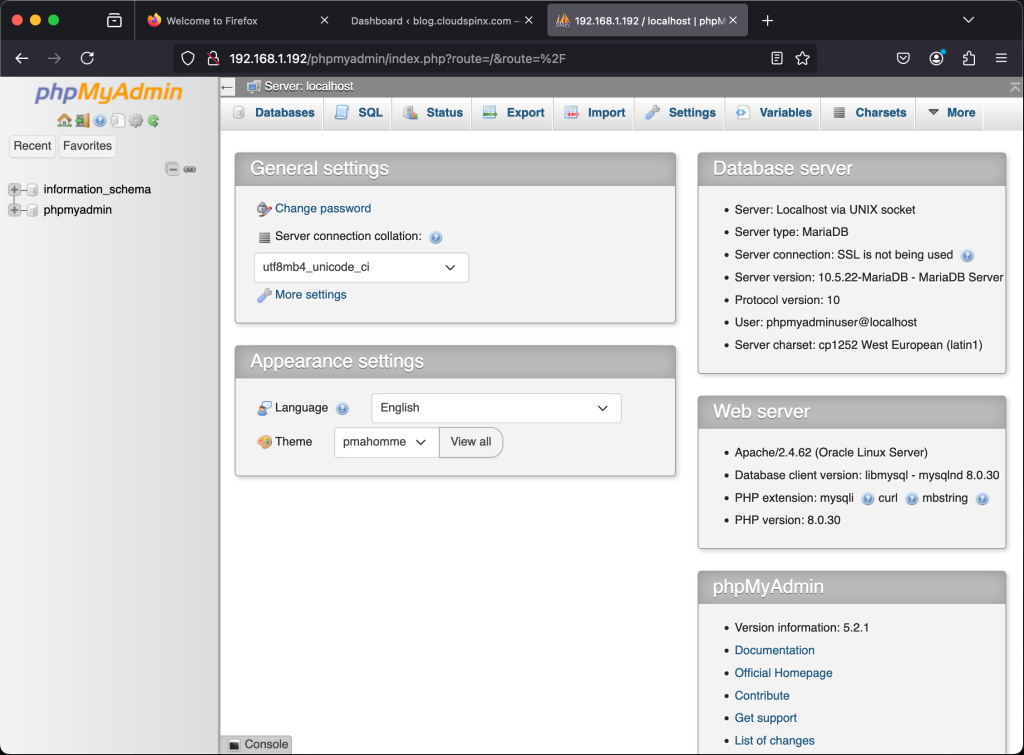
Step 9: Access phpMyAdmin Web interface
On the web browser URL enter the address http://serveraddress/phpmyadmin

Log in to the phpMyAdmin dashboard by the credentials created in the steps above. i.e
- Username: phpmyadminuser
- Password: Passw0rd

Conclusion
That marks the end of our guide today. I hope you learned a thing or two. In the guide, we have shown you the steps that entail installing phpMyAdmin on Oracle Linux 9. We would like to hear from you. The small tip from you keeps us motivated to continue doing what we are so passionately doing. Thank you.
For more:


1 thought on “How To Install and use phpMyAdmin on Oracle Linux 9”
GRANT ALL ON phpmyadmin.* TO ‘phpmyadminuser’@’localhost’ IDENTIFIED BY ‘Passw0rd’; -> Incorrect, should be:
GRANT ALL ON phpmyadmin.* TO ‘phpmyadminuser’@’localhost’ ;
You don’t use IDENTIFIED BY in GRANT queries, it’s used in CREATE USER.