Atlassian created Jira, a bug tracking and agile project management application. Jira has a number of solutions and deployment choices designed specifically for software, IT, business, operations, and other teams.
Today we are going to look at how to deploy Jira on Rocky Linux 9 and secure it with Let’s Encrypt SSL.
Features of Jira
Here are the cool features of Jira:
- Management of bugs and defects
- Streamlined integration of sources and issues
- Filtering and searching
- Reporting on a higher level
- Dashboards and wallboards that can be customized
- Advanced administration and security
- Flexible REST APIs are used for integration.
- Data from other systems may be easily imported.
- User interface for mobile devices
- Deployment options include OnDemand and OnPremise.
Benefits of using Jira Project Management Solution
Here are the advantages of using Jira:
- Jira centralizes all of your company’s historical data in one place.
- Jira also gives you a 360-degree perspective of your processes, which is quite useful.
- While Jira is well-known for its issue and bug tracking capabilities, these are far from the system’s primary capabilities.
- Linux and Windows installers are available for the OnPremise option, depending on their present software infrastructure, but they may also choose Jira OnDemand, which is hassle-free and requires minimal maintenance.
- Through bank-grade security and centralized management for Jira Software and other Atlassian cloud products, the solution assures the protection of your data and files.
- If you choose the premium plan, you can rest confident that Jira Software will grow with your company.
- The platform focuses largely on agile project management, with Scrum and Kanban techniques available.
- If you choose the premium plan, you can rest confident that Jira Software will grow with your company.
Jira Installation System Requirements
For successful installation of Jira, here are the minimum system requirements:
- Fresh Rocky Linux 9 server install.
- Minimum storage of 40 GB.
- At least 4 GB of memory.
- FQDN -> jira.example.com.
- 3.4 GHz CPU.
How To Install Jira on Rocky Linux 9
The steps below will show you how to Deploy Jira with Let’s Encrypt SSL.
Step 1: Install Java
For Jira to operate on your computer, you’ll need to have Java installed. To install Java, use the following command:
sudo dnf update -y
sudo dnf -y install java-17-openjdk java-17-openjdk-devel
Check the installed Java Version:
$ java -version
openjdk 21.0.6 2025-01-21 LTS
OpenJDK Runtime Environment (Red_Hat-21.0.6.0.7-1) (build 21.0.6+7-LTS)
OpenJDK 64-Bit Server VM (Red_Hat-21.0.6.0.7-1) (build 21.0.6+7-LTS, mixed mode, sharing)
Java environment variables should be set:
sudo tee /etc/profile.d/java.sh <<EOF
export JAVA_HOME=\$(dirname \$(dirname \$(readlink \$(readlink \$(which javac)))))
export PATH=\$PATH:\$JAVA_HOME/bin
export CLASSPATH=.:\$JAVA_HOME/jre/lib:\$JAVA_HOME/lib:\$JAVA_HOME/lib/tools.jar
EOF
To use the file without logging out, source it as shown below:
source /etc/profile.d/java.shStep 2: Install MySQL Database Server
Install MySQL from AppStream repository:
sudo dnf install mysql-server -yStart and enable mysqld service:
sudo systemctl enable --now mysqldSecure database server:
$ sudo mysql_secure_installation

Securing the MySQL server deployment.

Connecting to MySQL using a blank password.

VALIDATE PASSWORD COMPONENT can be used to test passwords
and improve security. It checks the strength of password
and allows the users to set only those passwords which are
secure enough. Would you like to setup VALIDATE PASSWORD component?

Press y|Y for Yes, any other key for No: N
Please set the password for root here.

New password:

Re-enter new password:
By default, a MySQL installation has an anonymous user,
allowing anyone to log into MySQL without having to have
a user account created for them. This is intended only for
testing, and to make the installation go a bit smoother.
You should remove them before moving into a production
environment.

Remove anonymous users? (Press y|Y for Yes, any other key for No) : Y
Success.


Normally, root should only be allowed to connect from
'localhost'. This ensures that someone cannot guess at
the root password from the network.

Disallow root login remotely? (Press y|Y for Yes, any other key for No) : Y
Success.

By default, MySQL comes with a database named 'test' that
anyone can access. This is also intended only for testing,
and should be removed before moving into a production
environment.


Remove test database and access to it? (Press y|Y for Yes, any other key for No) : Y
 - Dropping test database...
Success.

 - Removing privileges on test database...
Success.

Reloading the privilege tables will ensure that all changes
made so far will take effect immediately.

Reload privilege tables now? (Press y|Y for Yes, any other key for No) : Y
Success.

All done!
Configure MySQL database server:
$ sudo vim /etc/my.cnf.d/mariadb-server.cnf
[mysqld]
datadir=/var/lib/mysql
socket=/var/lib/mysql/mysql.sock
log-error=/var/log/mysql/mysql.log
pid-file=/run/mysqld/mysql.pid
default-storage-engine=INNODB
character_set_server=utf8mb4
innodb_default_row_format=DYNAMIC
innodb_log_file_size=2G
sql_mode = NO_AUTO_VALUE_ON_ZERO
Restart mysqld service:
sudo systemctl restart mysqldLogin to shell and created database and user:
$ mysql -u root -p
CREATE DATABASE jiradb CHARACTER SET utf8mb4 COLLATE utf8mb4_bin;
CREATE USER 'jirauser'@'localhost' IDENTIFIED BY 'Str0ngDBP@ssw%rd';
GRANT SELECT,INSERT,UPDATE,DELETE,CREATE,DROP,REFERENCES,ALTER,INDEX on jiradb.* TO 'jirauser'@'localhost';
FLUSH PRIVILEGES;
QUIT;
Step 3: Download and Install JIRA
After we’ve installed Java and a database server, we’ll download JIRA’s binary fil. Navigate to Jira Downloads page, to get the most recent version using wget command.
sudo dnf -y install wget
sudo wget https://www.atlassian.com/software/jira/downloads/binary/atlassian-jira-software-10.5.0.tar.gz
Create the installation directory
Create your installation directory – this is where Jira will be installed. Avoid using spaces or special characters in the path. We’ll refer to this directory as your <installation-directory>.
sudo mkdir jirasoftwareExtract the downloaded archive to your installation directory:
#Install tar utility
sudo dnf install -y tar
#Extract jira.tar.gz archive
sudo tar -xzf atlassian-jira-software-*.tar.gz -C ./jirasoftware
#Switch to installation directoty
cd ./jirasoftware
Give your dedicated Jira user read, write and execute permission to your <installation-directory>.
sudo chown -R cloudspinx /home/cloudspinx/jirasoftware
sudo chmod -R u=rwx,go-rwx /home/cloudspinx/jirasoftware
Create Jira home directory
Create Jira home directory. This is a separate directory to your installation directory, where Jira application data like logs, search indexes and files will be stored.
sudo mkdir /var/jirasoftware-homeGive your dedicated Jira user (cloudspinx) read, write and execute permissions to the <home-directory>.
sudo chown -R cloudspinx /var/jirasoftware-home
sudo chmod -R u=rwx,go-rwx /var/jirasoftware-home
Tell Jira where to find your <home-directory> when it starts up. You can do this by setting an variable named JIRA_HOME in your OS with the absolute path to jira home-directory.
export JIRA_HOME=/path/to/home-directory

#Example
export JIRA_HOME=/var/jirasoftware-home
Start Jira
Run <installation-directory>/atlassian-jira-software-X.X.X-standalone/bin/start-jira.sh to start the setup process:
We recommend running Jira as your dedicated user.
su -u cloudspinx
cd ./jirasoftware/atlassian-jira-software-*-standalone/bin/
./start-jira.sh
Sample Output:
To run Jira in the foreground, start the server with start-jira.sh -fg
executing as current user

                  `sMMMMMMMMMMMMMM+
                     MMMMMMMMMMMMMM
                     :sdMMMMMMMMMMM
                             MMMMMM
          `sMMMMMMMMMMMMMM+  MMMMMM
             MMMMMMMMMMMMMM  +MMMMM
              :sMMMMMMMMMMM   MMMMM
                     MMMMMM    `UOJ
   `sMMMMMMMMMMMMM+  MMMMMM
     MMMMMMMMMMMMMM  +MMMMM
      :sdMMMMMMMMMM   MMMMM
             MMMMMM    `UOJ
             MMMMMM
             +MMMMM
              MMMMM
               `UOJ

      Atlassian Jira
      Version : 10.5.0


If you encounter issues starting or stopping Jira, please see the Troubleshooting guide at https://docs.atlassian.com/jira/jadm-docs-105/Troubleshooting+installation

Using JIRA_HOME:       /var/jirasoftware-home

Server startup logs are located in /home/cloudspinx/jirasoftware/atlassian-jira-software-10.5.0-standalone/logs/catalina.out
Using CATALINA_BASE:   /home/cloudspinx/jirasoftware/atlassian-jira-software-10.5.0-standalone
Using CATALINA_HOME:   /home/cloudspinx/jirasoftware/atlassian-jira-software-10.5.0-standalone
Using CATALINA_TMPDIR: /home/cloudspinx/jirasoftware/atlassian-jira-software-10.5.0-standalone/temp
Using JRE_HOME:        /usr/lib/jvm/java-17-openjdk-17.0.14.0.7-2.el9.x86_64
Using CLASSPATH:       /home/cloudspinx/jirasoftware/atlassian-jira-software-10.5.0-standalone/bin/bootstrap.jar:/home/cloudspinx/jirasoftware/atlassian-jira-software-10.5.0-standalone/bin/tomcat-juli.jar
Using CATALINA_OPTS:   -Xms384m -Xmx2048m
Using CATALINA_PID:    /home/cloudspinx/jirasoftware/atlassian-jira-software-10.5.0-standalone/work/catalina.pid
Tomcat started.
Configure MySQL Connector Java
You need to copy the MySQLJDBC driver to the jira installation directory. Download the recommended MySQL driver JDBC Connector/J 8.0.
sudo wget https://downloads.mysql.com/archives/get/p/3/file/mysql-connector-j-9.1.0.tar.gz
sudo tar xvf mysql-connector-j-*.tar.gz
Then copy the driver to the following directory:
<Jira-installation-directory>/atlassian-jira-software-10.5.0-standalone/lib
#Example
sudo cp mysql-connector-j-9.1.0/mysql-connector-j-9.1.0.jar /home/cloudspinx/jirasoftware/atlassian-jira-software-*-standalone/lib
Configure Firewalld
Jira primarily uses the following ports:
- 8080 (Default HTTP port)
- 8443 (HTTPS if SSL is configured)
- 8005 (Shutdown port, optional)
Allow these ports through the firewall:
sudo firewall-cmd --permanent --add-port=8080/tcp
sudo firewall-cmd --permanent --add-port=8443/tcp
sudo firewall-cmd --permanent --add-port=8005/tcp
Step 5: Setting up Jira
After you’ve completed the installation and configuration, go to http://jira.example.com to begin the setup process. Select “My Own Database” as the database type:
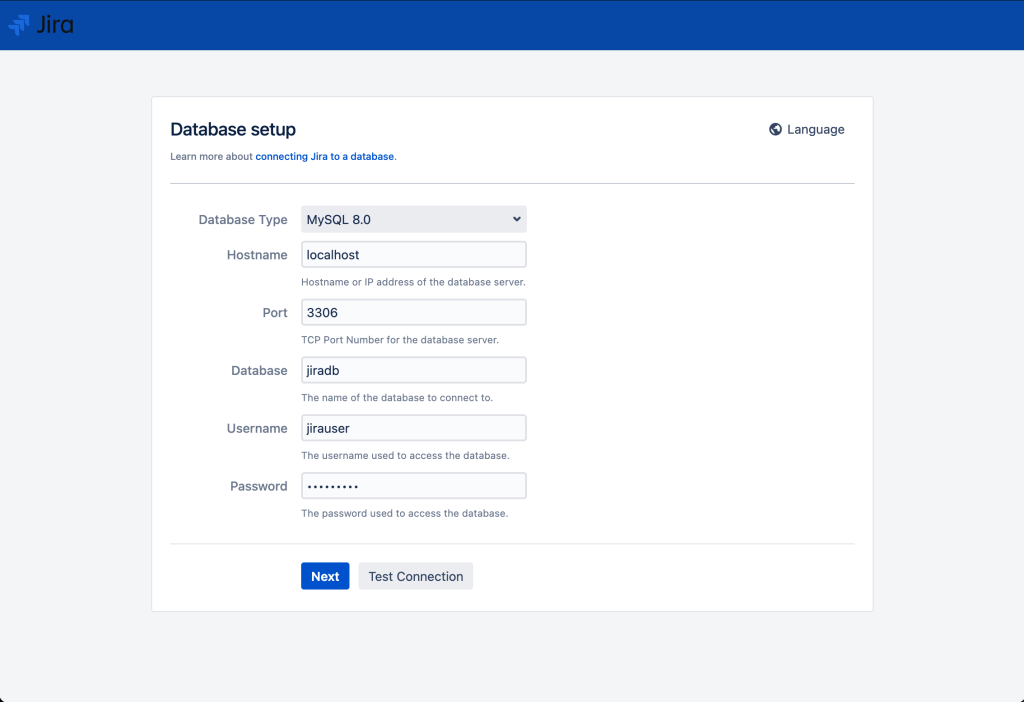
Wait for the Database to be set up, it may take a couple of minutes.

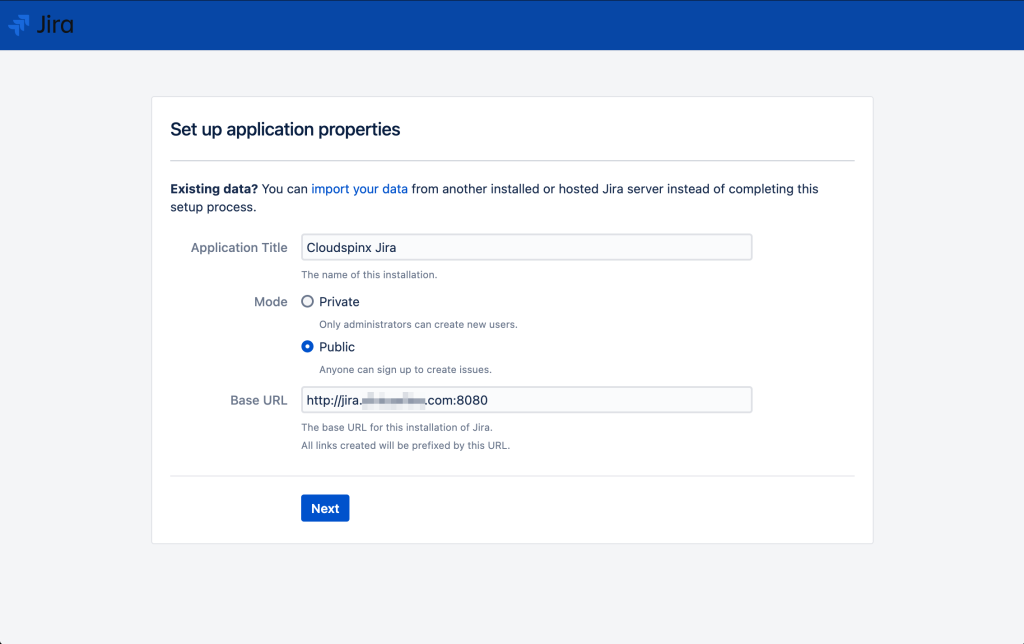
Set application properties. Give your Jira site a name, choose whether your site should be private or anyone can sign up. You can change this later. Enter your base URL – this is the address people will use to access your Jira site.
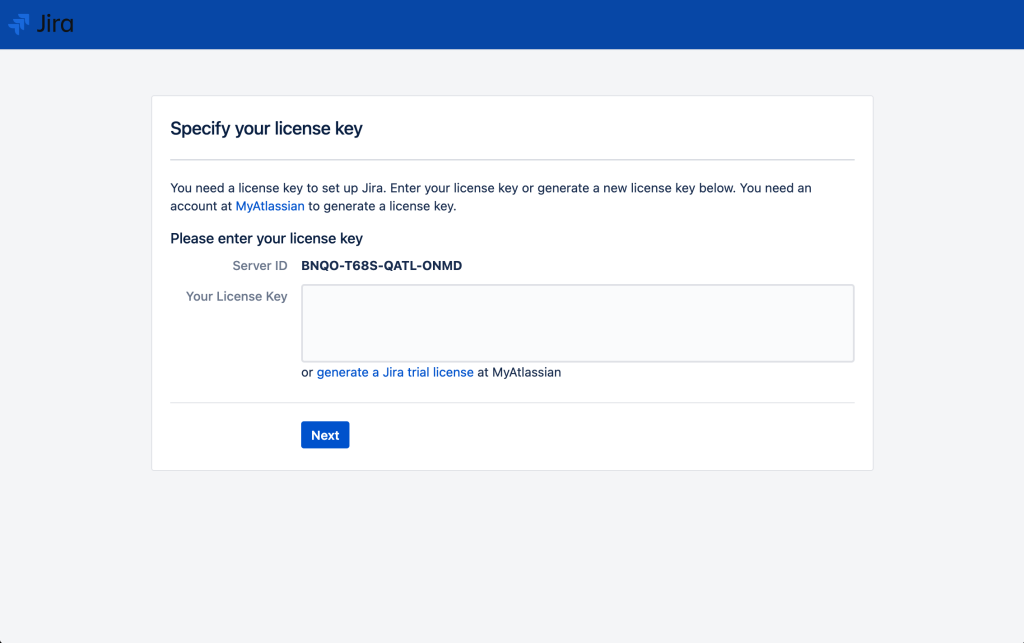
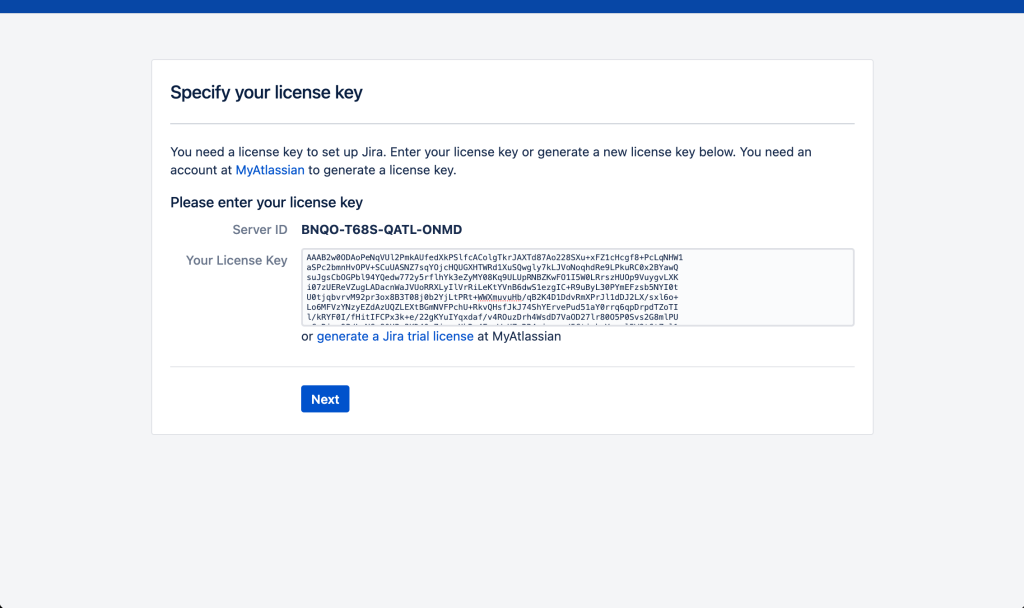
Enter your License:
Get a Jira Data Center trial license
A trial license gives you access to a full instance of Jira Software (or Jira Service Management) Data Center for 30 days. At the end of the trial period, your Jira Software Data Center site will become read-only, and you’ll have the option to buy a full license to continue using it so that you won’t lose any of your projects or data.
To create a Jira Software Data Center trial license:
- Go to my.atlassian.com and log in with your Atlassian ID.
- In the Licenses section, select New trial license.
- From the list of Atlassian products, select Jira then Jira Software Data Center.
For Jira Service Management, select Jira Service Management from the list of products then Jira Service Management (formerly Service Desk) (Data Center). - Fill out the form with your organization’s information.
- Select Generate license.
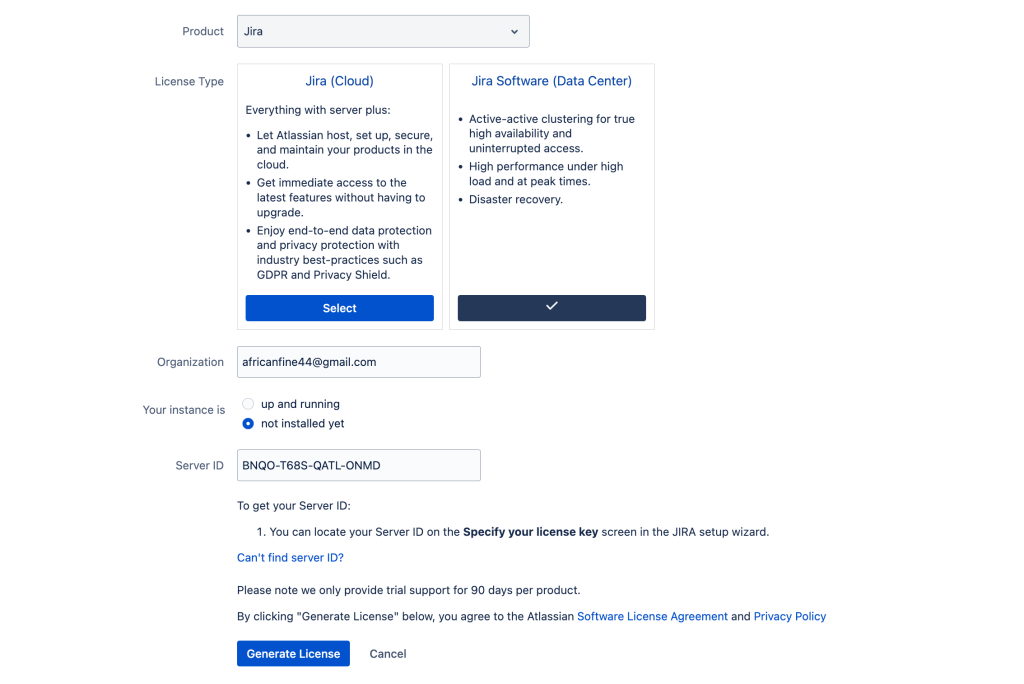
Click on Generate License:
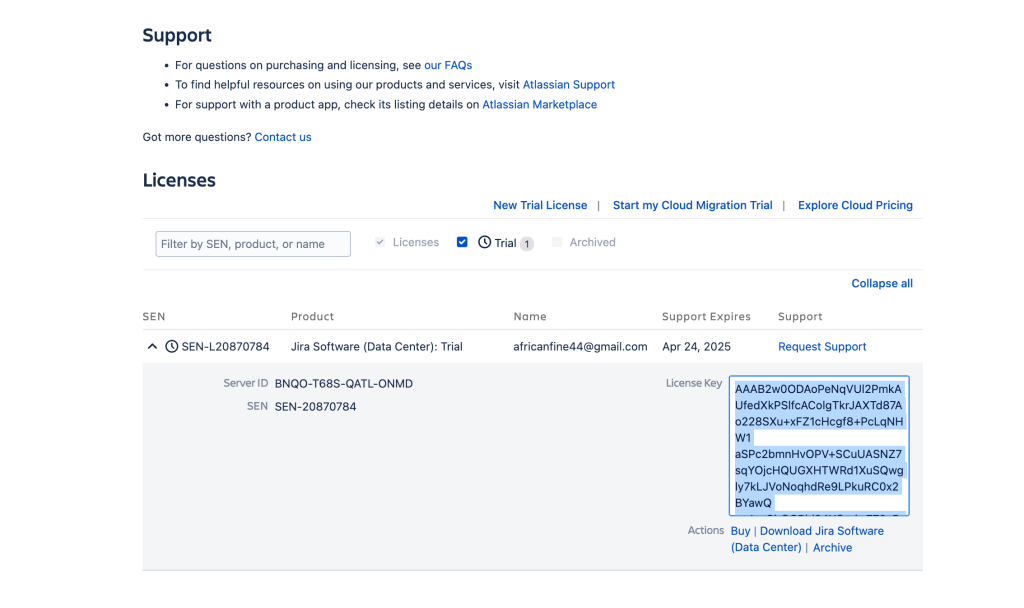
Paste the License key on the license key page and click Next.
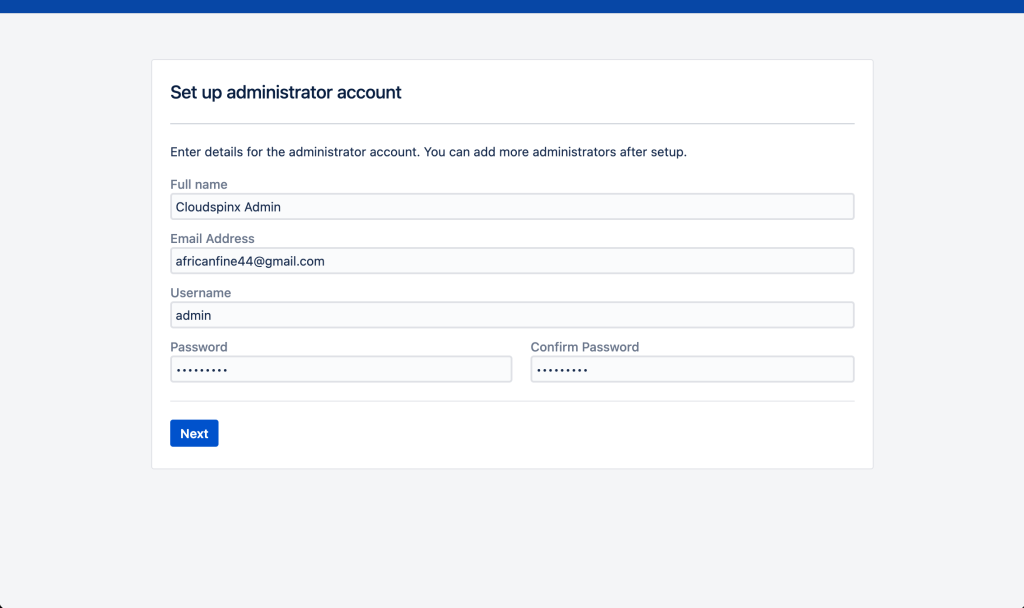
Enter details for the administrator account. You can add more administrators after set up is complete.
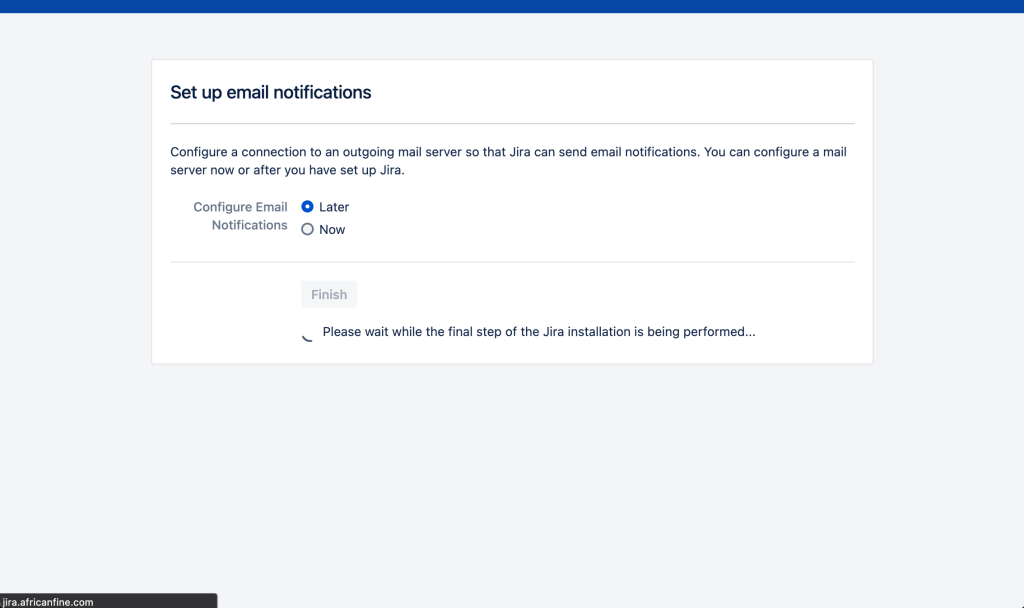
Also set up email-notification you can select “later” to configure email notification after installation:

Then click Finish. Wait for the final installation step to finish.
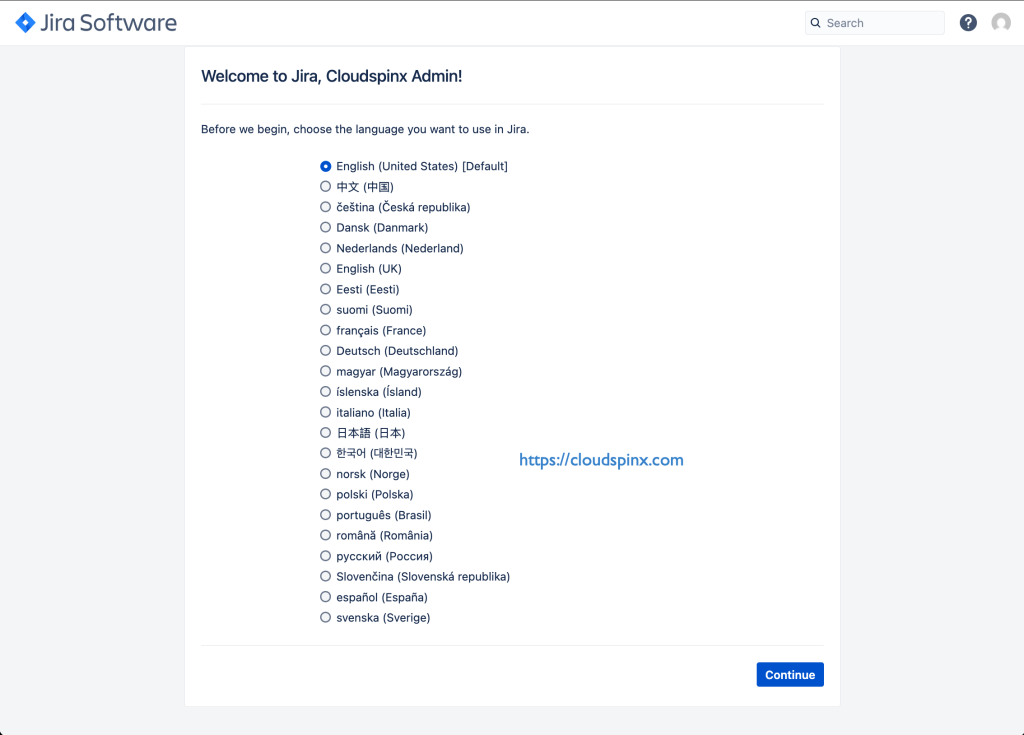
Select Jira default language and click Continue:
Select an avatar to use then click Next.

Now you will be able to access Jira Admin dashboard as shown below:
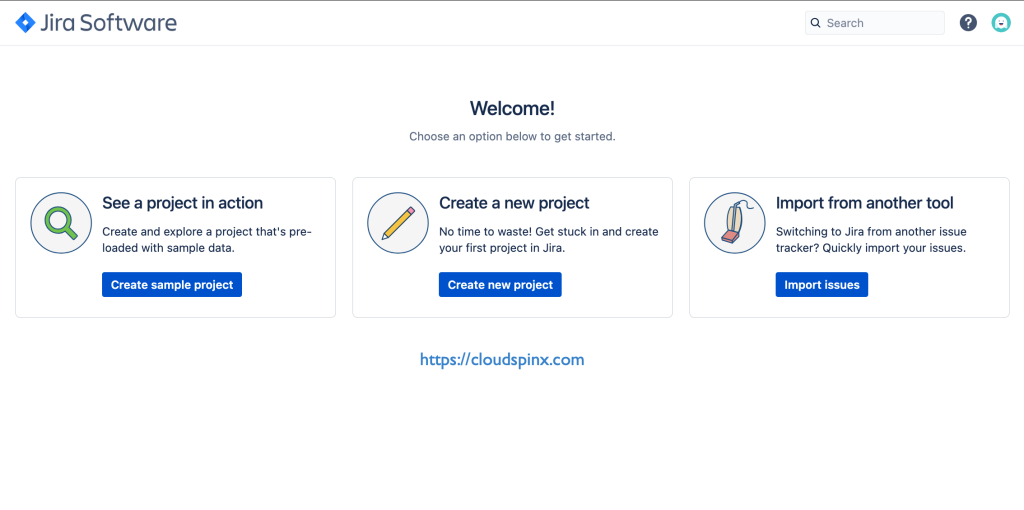
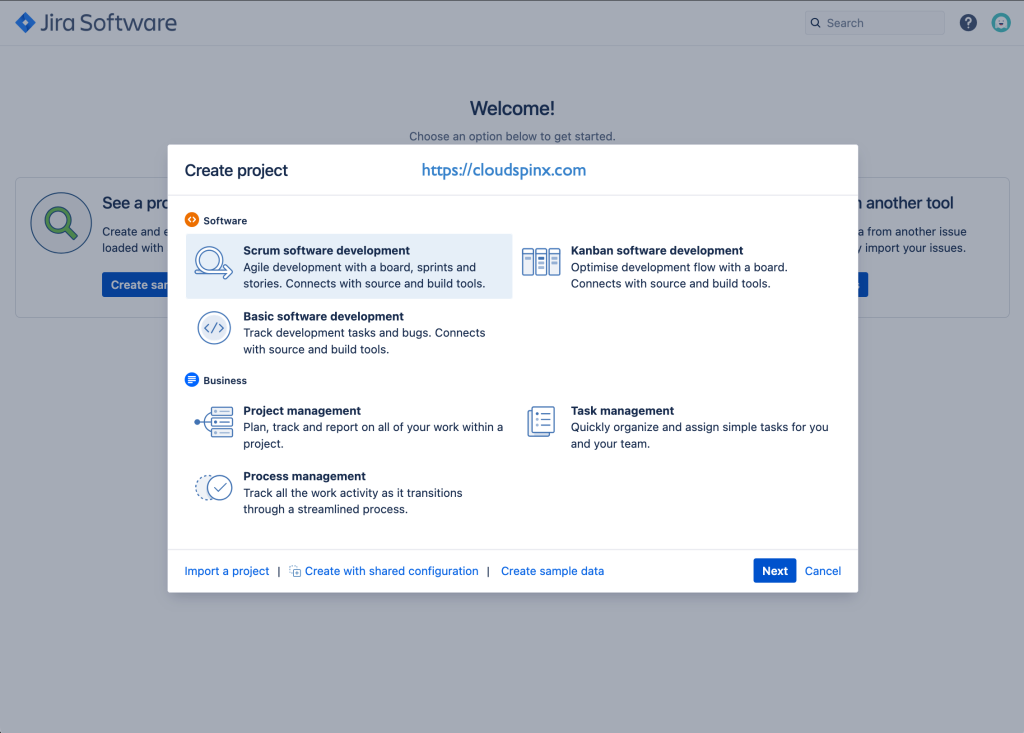
Click create project as shown above to create the project of your choice:
Step 6: Secure Jira with Let’s Encrypt SSL
Next we secure our Jira installation with Let’s Encrypt SSL by following below guide:
Conclusion
We have successfully deploy Jira on Rocky Linux 9 and secure access using Let’s Encrypt SSL certificate. Enjoy using Jira in your daily creation of projects.
Cools articles you should check: