Greetings to all geeks out there. In this guide, we will learn how to install the K8s cluster on the Proxmox VE virtualization platform. But before then, we will have a brief introduction to both Kubernetes and Proxmox VE
What is Kubernetes?
Kubernetes is an open-source container orchestration engine for automating application deployment, scaling, and managing containerized applications. Developed by Google in 2014, Kubernetes is portable and extensible and the most preferred container orchestrator platform. Kubernetes is ideal for large and rapidly growing ecosystems targeting workloads that facilitate both declarative and automation configurations.
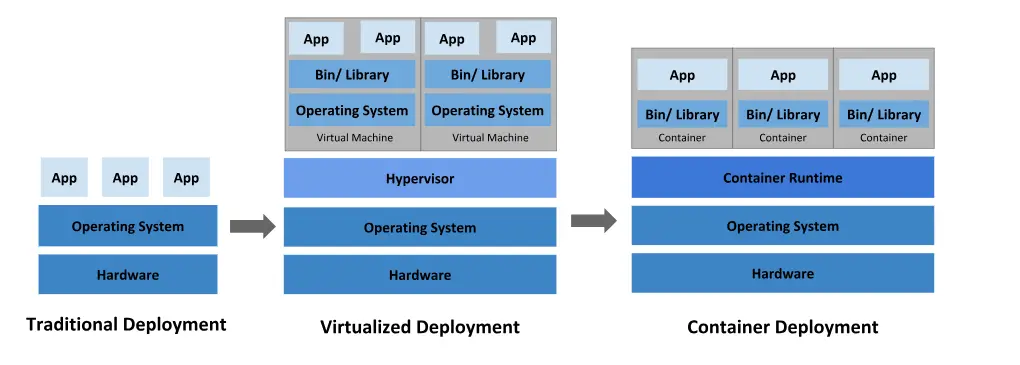
In the modern technological world, containers have replaced both traditional and virtualization deployments. Containers are similar to virtualization except that in containers, applications can share the same operating system. This makes containers lightweight. Containers are bundled with their own filesystem, Share of CPU, memory, etc. Containers are decoupled from the underlying infrastructure but are portable across cloud and OS distributions.
The diagram below from Kubernetes’ official website demonstrates the chronology of deployments from traditional deployments to virtualized deployments and to container deployments.

What is Proxmox VE?
Proxmox Virtual Enviroment is an open-source server virtualization platform that is based on QEMU/KVM and LXC. With Proxmox VE a system administrator can easily manage virtual machines, containers, HA clusters, storage, and networks on a web interface or on a command line interface. Proxmox integrates the KVM hypervisor and Linux Containers (LXC), storage, disaster recovery, and network functionality in a single platform. Proxmox VE is based on Debian GNU/Linux and uses a custom Linux Kernel
Key features
Some key features associated with Proxmox VE include the following.
- Server virtualization – Proxmox is based on Kernel-based Virtual Machine (KVM), Container-based virtualization, and Linux Containers (LXC).
- Central management – Has a central, web-based management interface and Command line interface (CLI) to manage virtual machines, containers, etc. Proxmox also has a RESTful API for easy integration with third parties. Proxmox is also available via mobile devices.
- Clustering – Proxmox Virtual Environment can scale out to a large set of clustered nodes.
- Authentication – This can be Role-based administration or Authentication realms. In role-based Auth, you define privileges, that help you to control access to objects. In Authentication realms, multiple authentication sources can be deployed e.g. Linux PAM an integrated Proxmox VE authentication server, LDAP, Microsoft Active Directory, and OpenID Connect.
- Proxmox VE High Availability (HA) Cluster – The Proxmox VE HA Manager monitors all VMs and containers in the cluster and automatically comes into action if one fails. Proxmox VE HA Simulator allows you to test the behavior of a real-world 3-node cluster with 6 VMs.
- Bridged Networking – Proxmox uses a bridged networking model and each host can have up to 4094 bridges.
- Flexible Storage Options – Network storage types { supports multiple storage types e.g NFS share, iSCSI target, SMB/CIFS, CephFS, LVM Group, etc} and Local storage types { ZFS, Directory (storage on an existing filesystem) and, LVM Group.
- Software-Defined Storage with Ceph – Proxmox fully integrates with Ceph to help in running and managing Ceph storage directly from any of your cluster nodes. Ceph is easy to set up, it is self-healing, scalable, and runs on economical commodity hardware.
- Proxmox VE Firewall – Proxmox has a built-in, customizable firewall to provide an easy way to protect your IT infrastructure.
- Backup/Restore – Full Backups and restores can easily be set up on a GUI interface on the web interface or via a command line tool.
Read more features on the official documentation.
How To Install Kubernetes Cluster on Proxmox VE
With that background, we now proceed with the day’s business on how to install Kubernetes Cluster on Proxmox VE. I will begin by building an Ubuntu template in the first section of this guide, then in the next section, we will clone the template to create Kubernetes master and worker nodes. If you are familiar with creating a template, you can skip this step and proceed to the next section. I am running on Proxmox Virtual Environment 7.2-7.
Create Ubuntu 24.04 template
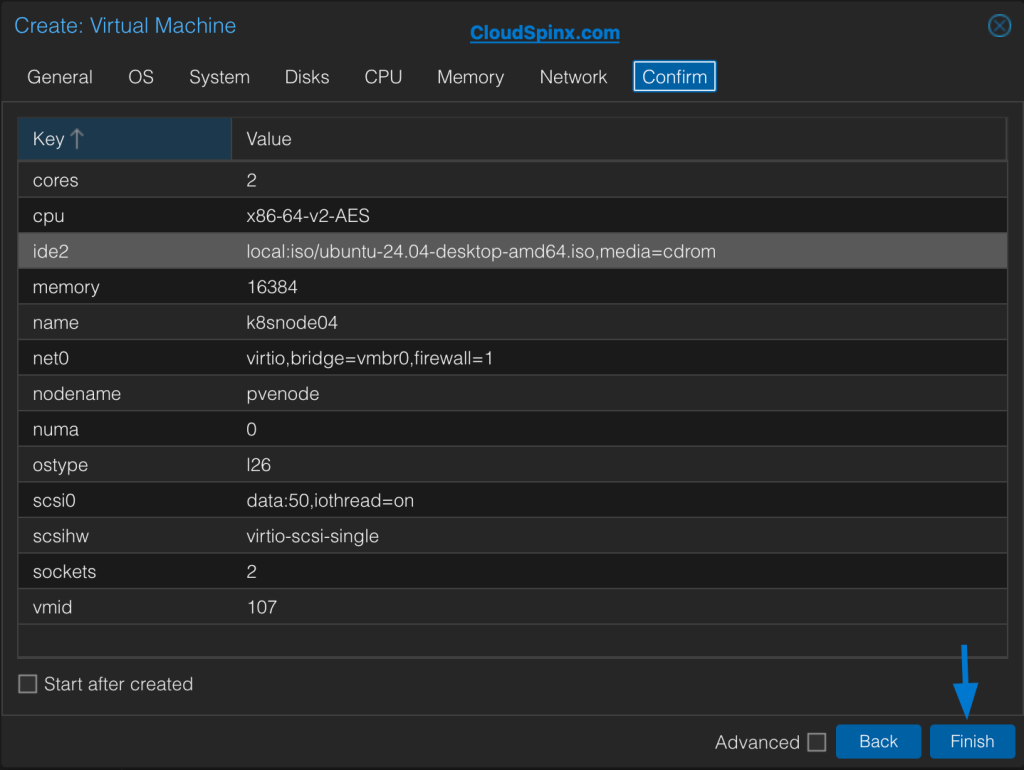
This article assumes you are using Proxmox VE as your home lab virtualization platform. To begin the Ubuntu template creation, log in to Proxmox VE and head over to Create VM. Then proceed to create your template.

Once you are satisfied with your template properties, click Finish then proceed with the installation steps. Once you have set up an Ubuntu template, you are ready to proceed.
Once you have your template ready, we will begin building the Kubernetes Cluster using Proxmox VE.
Requirements
To build a tremendous K8s Cluster, you will need the following:
- At least two instances of Ubuntu 24.04 server, 3 is an ideal number. One acts as the controller and the other as the worker node.
- Controller minimum requirements ( atleast 2 cores, 2 GiB RAM, )
- Worker node minimum requirements ( atleast 1 core, 1 GiB RAM)
I will begin by cloning the template we created in the previous step. Their details are as below.
| k8s-controller | 192.168.200.41 | |
| k8s-worker-node-1 | 192.168.200.42 | |
| k8s-worker-node-2 | 192.168.200.43 |
The details above show the hostname and the IP address assigned to the k8s-controller and the two worker nodes. Make sure you set your hostname appropriately by editing the /etc/hostname with your favorite text editor.
Next, set the correct host names by editing the /etc/hosts file.
$ sudo nano /etc/hosts
192.168.200.41       k8s-controller  k8s-controller   ## controller plane
192.168.200.42       k8s-worker-node-1 k8s-worker-node-1 ## worker-node-1
192.168.200.43       k8s-worker-node-2 k8s-worker-node-2 ## worker-node-2
Step 1: Qemu Guest Agent & SSH
Before we begin the building process, do a bit of housekeeping to prepare your Ubuntu virtual machines.
Begin by updating your system packages.
sudo apt -y update && sudo apt -y dist-upgradeThen install the QEMU guest agents. This package gives you more control of the virtual machines from the Proxmox VE dashboard.
Execute the command :
sudo apt install qemu-guest-agent To ssh to the server, ensure you have installed openssh-server. Run the command
sudo apt install openssh-serverStep 2: Install container runtime on all nodes
In a containerized environment, container runtimes are responsible for loading container images from a repository, monitoring local system resources, isolating system resources for use of a container, and managing the container lifecycle.
sudo apt update
sudo apt install ca-certificates curl gnupg lsb-release

sudo mkdir -p /etc/apt/keyrings
curl -fsSL https://download.docker.com/linux/ubuntu/gpg | sudo gpg --dearmor -o /etc/apt/keyrings/docker.gpg

echo \
  "deb [arch=$(dpkg --print-architecture) signed-by=/etc/apt/keyrings/docker.gpg] https://download.docker.com/linux/ubuntu \
  $(lsb_release -cs) stable" | sudo tee /etc/apt/sources.list.d/docker.list > /dev/null

sudo apt update
Install the container runtime by this command. Ensure you run the command on all instances i.e. the controller and the worker nodes.
$ sudo apt install containerd.io
Reading package lists... Done
Building dependency tree
Reading state information... Done
The following packages were automatically installed and are no longer required:
  gir1.2-goa-1.0 libfwupdplugin1 libxmlb1
Use 'sudo apt autoremove' to remove them.
The following additional packages will be installed:
  runc
The following NEW packages will be installed:
  containerd runc
0 upgraded, 2 newly installed, 0 to remove and 0 not upgraded.
Need to get 35.3 MB of archives.
After this operation, 151 MB of additional disk space will be used.
Do you want to continue? [Y/n] y
Once the container runtime is installed, check its status to ensure it’s up and running.
$ systemctl status containerd
● containerd.service - containerd container runtime
     Loaded: loaded (/lib/systemd/system/containerd.service; enabled; vendor pr>
     Active: active (running) since Mon 2024-07-31 00:22:00 CAT; 4min 24s ago
       Docs: https://containerd.io
    Process: 4448 ExecStartPre=/sbin/modprobe overlay (code=exited, status=0/SU>
   Main PID: 4449 (containerd)
      Tasks: 11
     Memory: 14.4M
     CGroup: /system.slice/containerd.service
             └─4449 /usr/bin/containerd

Jul 31 00:22:00 k8s-controller containerd[4449]: time="2023-07-31T00:22:00.9024>
Jul 31 00:22:00 k8s-controller containerd[4449]: time="2023-07-31T00:22:00.9026>
Jul 31 00:22:00 k8s-controller containerd[4449]: time="2023-07-31T00:22:00.9028>
Jul 31 00:22:00 k8s-controller containerd[4449]: time="2023-07-31T00:22:00.9029>
Jul 31 00:22:00 k8s-controller containerd[4449]: time="2023-07-31T00:22:00.9031>
Jul 31 00:22:00 k8s-controller containerd[4449]: time="2023-07-31T00:22:00.9032>
Jul 31 00:22:00 k8s-controller containerd[4449]: time="2023-07-31T00:22:00.9037>
Jul 31 00:22:00 k8s-controller containerd[4449]: time="2023-07-31T00:22:00.9040>
Jul 31 00:22:00 k8s-controller systemd[1]: Started containerd container runtime.
Jul 31 00:22:00 k8s-controller containerd[4449]: time="2023-07-31T00:22:00.9059>
Ensure the container runtime is running in both the controller and the worker nodes.
We will now create a directory that will hold our files in both controller and the worker nodes.
sudo mkdir /etc/containerdStep 3: Configure containerd runtime
The next step is to make some necessary configurations to the containerd configuration file. We will place the default containerd configuration files inside the created directory. This is for both controller and the worker nodes. The following command achieves this:
sudo containerd config default | sudo tee /etc/containerd/config.tomlThe tee command prints the config files to your screen. I will not paste the command output, as a long file is printed. This command can view the file:
$ ls -l /etc/containerd/
total 8
-rw-r--r-- 1 root root 6994 Jul 31 17:03 config.toml
The file has default configurations, we will edit the file to make the necessary changes. Set Systemd Cgroup from false to true.
sudo sed -i 's/SystemdCgroup = false/SystemdCgroup = true/g' /etc/containerd/config.tomlRestart containerd.
sudo systemctl restart containerdStep 4: Disable the swap
Disabling swap is only for testing purposes. This should however not be encouraged. If swap is enabled, Kubernetes complains, hence why we need to disable swap.
To disable swap on both controller and worker nodes, run the command below.
Check if your system has swap enabled by this command.
$  free -m
                      total        used        free      shared  buff/cache   available
Mem:           1963         716         198           7        1048        1081
Swap:          2047           1           2046
To disable swap, execute the command.
sudo swapoff -a
sudo sed -i.bak -r 's/(.+ swap .+)/#\1/' /etc/fstab
Confirm if the swap is disabled.
$ free -m
              total        used        free      shared  buff/cache   available
Mem:           1963         716         198           7        1048        1081
Swap:             0           0           0
You could also edit the /etc/fstab file and comment out the swap line.
Step 5: Enable packet forwarding
Packet forwarding is done by sysctl. To enable packet forwarding we need to edit the sysctl.conf. sysctl.conf is a simple file containing sysctl values to be read in and set by sysctl.
Edit this file with your preferred text editor and uncomment the line below.
sudo tee /etc/sysctl.d/kubernetes.conf<<EOF
net.bridge.bridge-nf-call-ip6tables = 1
net.bridge.bridge-nf-call-iptables = 1
net.ipv4.ip_forward = 1
EOF
Make the change above to both the controller and the worker nodes. When done reload the settings:
sudo sysctl --systemStep 6: Configure kernel modules to load at boot time
Next, we need to ensure that kernel modules load at boot time. This is achieved by creating the file /etc/modules-load.d with a text editor. The essence of this is to ensure that bridging is enabled within the cluster. Bridging facilitates communication within the cluster between the controller and the nodes.
sudo tee /etc/modules-load.d/k8s.conf <<EOF
overlay
br_netfilter
EOF
Enable modules.
sudo modprobe overlay
sudo modprobe br_netfilter
Step 7: Installing Kubernetes packages
In the previous steps, we prepared our controller and worker nodes. It’s time we jumped into the deep waters. To install Kubernetes in the Ubuntu instances we have, we begin by installing the required dependencies.
Debian based systems
Update the APT package index and install packages needed to use the Kubernetes apt repository:
sudo apt update && sudo apt dist-upgrade -y
sudo apt-get install -y ca-certificates curl
For Debian 9 Stretch, run the command below.
sudo apt install -y apt-transport-httpsDownload the Google Cloud public signing key:
curl -fsSL https://packages.cloud.google.com/apt/doc/apt-key.gpg | sudo gpg --dearmor -o /etc/apt/keyrings/kubernetes-archive-keyring.gpgAdd the Kubernetes apt repository
echo "deb [signed-by=/etc/apt/keyrings/kubernetes-archive-keyring.gpg] https://apt.kubernetes.io/ kubernetes-xenial main" | sudo tee /etc/apt/sources.list.d/kubernetes.listFinally, Update your system.
sudo apt update
sudo apt install kubeadm kubectl kubelet -y
RHEL based systems
For RPM-based distributions, execute the following commands.
cat <<EOF | sudo tee /etc/yum.repos.d/kubernetes.repo
[kubernetes]
name=Kubernetes
baseurl=https://packages.cloud.google.com/yum/repos/kubernetes-el7-\$basearch
enabled=1
gpgcheck=1
gpgkey=https://packages.cloud.google.com/yum/doc/yum-key.gpg https://packages.cloud.google.com/yum/doc/rpm-package-key.gpg
EOF
Next, install the packages required by Kubernetes in both controller and worker nodes.
sudo yum install -y kubectl kubeadm kubelet -yKubeadm contains tools used to bootstrap the cluster eg initializing a new cluster, join a node to an existing cluster as well as upgrade a cluster to a new version. Kubectl provides the command line utility for cluster management and for easily interacting with the cluster. Kubelet is an agent that facilitates communication between the nodes. Kubelet also provides an API that we can use to provide additional functionality.
Once the required packages are installed, we are ready to proceed to the next steps.
Step 8: Initializing the Kubernetes cluster
We have prepared and made all the necessary installations. we will now initialize our Kubernetes cluster. Run the command below on the controller plane.
Get interface name.
$ ip ad
1: lo: <LOOPBACK,UP,LOWER_UP> mtu 65536 qdisc noqueue state UNKNOWN group default qlen 1000
    link/loopback 00:00:00:00:00:00 brd 00:00:00:00:00:00
    inet 127.0.0.1/8 scope host lo
       valid_lft forever preferred_lft forever
    inet6 ::1/128 scope host
       valid_lft forever preferred_lft forever
2: eth0: <BROADCAST,MULTICAST,UP,LOWER_UP> mtu 1500 qdisc fq_codel state UP group default qlen 1000
    link/ether 96:00:02:6f:b2:d6 brd ff:ff:ff:ff:ff:ff
    altname enp0s3
    inet 192.168.200.41/32 scope global dynamic noprefixroute eth0
       valid_lft 86205sec preferred_lft 86205sec
    inet6 2a01:4f9:c010:ba51::1/64 scope global noprefixroute
       valid_lft forever preferred_lft forever
    inet6 fe80::9400:2ff:fe6f:b2d6/64 scope link noprefixroute
       valid_lft forever preferred_lft forever
Get master Node primary interface IP address.
INT_NAME=eth0
HOST_IP=$(ip addr show $INT_NAME | grep "inet\b" | awk '{print $2}' | cut -d/ -f1)
echo $HOST_IP
On Master Node.
sudo kubeadm init --control-plane-endpoint=$HOST_IP --pod-network-cidr=10.244.0.0/16 --cri-socket /run/containerd/containerd.sockA section of the command output looks like this:
Your Kubernetes control-plane has initialized successfully!

To start using your cluster, you need to run the following as a regular user:

  mkdir -p $HOME/.kube
  sudo cp -i /etc/kubernetes/admin.conf $HOME/.kube/config
  sudo chown $(id -u):$(id -g) $HOME/.kube/config

Alternatively, if you are the root user, you can run:

  export KUBECONFIG=/etc/kubernetes/admin.conf

You should now deploy a pod network to the cluster.
Run "kubectl apply -f [podnetwork].yaml" with one of the options listed at:
  https://kubernetes.io/docs/concepts/cluster-administration/addons/

You can now join any number of control-plane nodes by copying certificate authorities
and service account keys on each node and then running the following as root:

  kubeadm join 192.168.200.41:6443 --token awpcpv.7vzrj2nhxy8ad14k \
	--discovery-token-ca-cert-hash sha256:c722cbf90bdb83dd51d49ed6b2acbea3750d248e88bc42a1bdc8540be2f333fb \
	--control-plane

Then you can join any number of worker nodes by running the following on each as root:

kubeadm join 192.168.200.41:6443 --token awpcpv.7vzrj2nhxy8ad14k \
	--discovery-token-ca-cert-hash sha256:c722cbf90bdb83dd51d49ed6b2acbea3750d248e88bc42a1bdc8540be2f333fb
I have highlighted the Kubeadmin join token. This will be used to join the nodes to the cluster. Copy this to a notepad and keep it private. Do not disclose this token to anyone. Mine is for test purposes and the test VM will be destroyed by the time you are reading this article. 🙂
To start using your cluster, you need to run the following as a regular user: These commands are run on the controller node.
mkdir -p $HOME/.kube
sudo cp -i /etc/kubernetes/admin.conf $HOME/.kube/config
sudo chown $(id -u):$(id -g) $HOME/.kube/config
The commands will create a normal user to control and manage the cluster without being a root user.
Let’s run some basic commands on our cluster to check its functionality.
To get the running pods and all namespaces, issue the command:
$ kubectl get pods --all-namespaces
NAMESPACE     NAME                                                                      READY   STATUS    RESTARTS                AGE
kube-system   coredns-5d78c9869d-6w7wf                            0/1     Pending                 0                         11m
kube-system   coredns-5d78c9869d-tvhzf                               0/1     Pending                 0                         11m
kube-system   etcd-k8s-controller                                              1/1     Running                 1 (21m ago)    22m
kube-system   kube-apiserver-k8s-controller                          1/1     Running                 1 (21m ago)    22m
kube-system   kube-controller-manager-k8s-controller      1/1     Running                 1 (21m ago)    22m
kube-system   kube-proxy-jwsbp                                                 1/1     Running                 0                         11m
kube-system   kube-scheduler-k8s-controller                         1/1     Running                 1 (21m ago)    22m
Step 9: Adding an overlay network to our cluster
The output of the command above shows that some pods are pending while others are running. We will set up an overall network for our cluster. An overlay network refers to the virtual network layer (SDN). An overlay network is designed to be more highly scalable than the underlying network.
Run the command :
kubectl apply -f https://raw.githubusercontent.com/flannel-io/flannel/master/Documentation/kube-flannel.ymlRun the commands to confirm it’s running.
$ kubectl get pods -n kube-flannel
NAME                    READY   STATUS    RESTARTS   AGE
kube-flannel-ds-7l8lp   1/1     Running   0          26s
Step 10: Joining nodes to the cluster
We will now join our worker nodes to the Kubernetes cluster. Currently, we only have the controller node. Check this by running the command below.
$ kubectl get nodes
NAME             STATUS   ROLES           AGE   VERSION
k8s-controller   Ready    control-plane   48m   v1.27.4
To join nodes to the cluster, we will use the kubeadm join token generated in the step above. Copy the token and paste it on your worker node as shown below.
sudo   kubeadm join 192.168.200.41:6443 --token awpcpv.7vzrj2nhxy8ad14k \
	--discovery-token-ca-cert-hash sha256:c722cbf90bdb83dd51d49ed6b2acbea3750d248e88bc42a1bdc8540be2f333fb \
	--control-plane

## The output

[preflight] Running pre-flight checks
[preflight] Reading configuration from the cluster...
[preflight] FYI: You can look at this config file with 'kubectl -n kube-system get cm kubeadm-config -o yaml'
[kubelet-start] Writing kubelet configuration to file "/var/lib/kubelet/config.yaml"
[kubelet-start] Writing kubelet environment file with flags to file "/var/lib/kubelet/kubeadm-flags.env"
[kubelet-start] Starting the kubelet
[kubelet-start] Waiting for the kubelet to perform the TLS Bootstrap...

This node has joined the cluster:
* Certificate signing request was sent to apiserver and a response was received.
* The Kubelet was informed of the new secure connection details.

Run 'kubectl get nodes' on the control-plane to see this node join the cluster.
If the token expires after some time, you can regenerate the token by the command:
kubeadm token create --print-join-commandOnce you have run the commands on your worker nodes, head over to your controller node and run the commands below.
To see the running nodes:
$ kubectl get nodes
NAME                STATUS   ROLES           AGE     VERSION
k8s-controller      Ready    control-plane   19h     v1.27.4
k8s-worker-node-1   Ready    <none>          5m41s   v1.27.4
k8s-worker-node-2   Ready    <none>          95s     v1.27.4
To see the config view.
$ kubectl config view
apiVersion: v1
clusters:
- cluster:
    certificate-authority-data: DATA+OMITTED
    server: https://192.168.200.41:6443
  name: kubernetes
- cluster:
    proxy-url: my-proxy-url
    server: ""
  name: my-cluster-name
contexts:
- context:
    cluster: kubernetes
    user: kubernetes-admin
  name: kubernetes-admin@kubernetes
current-context: kubernetes-admin@kubernetes
kind: Config
preferences: {}
users:
- name: kubernetes-admin
  user:
    client-certificate-data: DATA+OMITTED
    client-key-data: DATA+OMITTED
To set a cluster entry in the kubeconfig:
$ kubectl config set-cluster Production_cluster
Cluster "Production_cluster" set.
To get the documentation for pod manifests:
$ kubectl explain pods
KIND:       Pod
VERSION:    v1

DESCRIPTION:
    Pod is a collection of containers that can run on a host. This resource is
    created by clients and scheduled onto hosts.
.
.
.
For a full Kubectl Cheatsheet, visit the official link.
Step 11: Launching an Nginx container
We now have a running cluster. I will demonstrate how to launch an Nginx container within the K8s cluster. To do this I will create a yaml file with the following details.
$ nano pod.yaml
## Add the following params

apiVersion: apps/v1
kind: Deployment
metadata:
  name: nginx-deployment
spec:
  selector:
    matchLabels:
      app: nginx
  replicas: 1 # tells deployment to run 1 pod matching the template
  template:
    metadata:
      labels:
        app: nginx
    spec:
      containers:
      - name: nginx
        image: nginx:1.25
        ports:
        - containerPort: 80
Save your file and exit from the text editor.
The next step is to apply your yaml file created above. To do this, run the command below.
$ kubectl apply -f pod.yml
deployment.apps/nginx-deployment created
To see the running pods, run the command:
$ kubectl get pods
NAME                                READY   STATUS    RESTARTS   AGE
nginx-deployment-79b55879bb-j9nbj   1/1     Running   0          90s
To get the node that a particular pod is running at:
$ kubectl get pods -o wide
NAME                                READY   STATUS    RESTARTS   AGE     IP           NODE                NOMINATED NODE   READINESS GATES
nginx-deployment-79b55879bb-j9nbj   1/1     Running   0          3m20s   10.244.2.2   k8s-worker-node-2   <none>           <none>
To display information about the Deployment:
$ kubectl describe deployment nginx-deployment
Name:                   nginx-deployment
Namespace:              default
CreationTimestamp:      Tue, 01 Aug 2023 18:03:58 +0200
Labels:                 <none>
Annotations:            deployment.kubernetes.io/revision: 1
Selector:               app=nginx
Replicas:               1 desired | 1 updated | 1 total | 1 available | 0 unavailable
StrategyType:           RollingUpdate
MinReadySeconds:        0
RollingUpdateStrategy:  25% max unavailable, 25% max surge
Pod Template:
  Labels:  app=nginx
  Containers:
   nginx:
    Image:        nginx:1.25
    Port:         80/TCP
    Host Port:    0/TCP
    Environment:  <none>
    Mounts:       <none>
  Volumes:        <none>
Conditions:
  Type           Status  Reason
  ----           ------  ------
  Available      True    MinimumReplicasAvailable
  Progressing    True    NewReplicaSetAvailable
OldReplicaSets:  <none>
NewReplicaSet:   nginx-deployment-79b55879bb (1/1 replicas created)
Events:
  Type    Reason             Age    From                   Message
  ----    ------             ----   ----                   -------
  Normal  ScalingReplicaSet  6m48s  deployment-controller  Scaled up replica set nginx-deployment-79b55879bb to 1
Step 12: Exposing service outside network via a nodeport
We are almost done, we just need to expose our services to the outside network. We’ll briefly go over how we can expose the container to the outside network.
It can be done in a number of ways. First, let’s get the pods details:
$  kubectl get pods -o wide
NAME                                READY   STATUS    RESTARTS   AGE   IP           NODE                NOMINATED NODE   READINESS GATES
nginx-deployment-79b55879bb-j9nbj   1/1     Running   0          15m   10.244.2.2   k8s-worker-node-2   <none>           <none>
Method 1: Using the curl command.
$ curl 10.244.2.2
<!DOCTYPE html>
<html>
<head>
<title>Welcome to nginx!</title>
<style>
html { color-scheme: light dark; }
body { width: 35em; margin: 0 auto;
font-family: Tahoma, Verdana, Arial, sans-serif; }
</style>
</head>
<body>
<h1>Welcome to nginx!</h1>
<p>If you see this page, the nginx web server is successfully installed and
working. Further configuration is required.</p>

<p>For online documentation and support please refer to
<a href="http://nginx.org/">nginx.org</a>.<br/>
Commercial support is available at
<a href="http://nginx.com/">nginx.com</a>.</p>

<p><em>Thank you for using nginx.</em></p>
</body>
</html>
The HTML output shows that the Nginx welcome page is successfully installed and working.
Method 2: Using the nodeport service.
To use the nodeport service, we will create a yml file with the following parameters.
$ nano service-nodeport.yml

###Add the following parameters
apiVersion: v1
kind: Service
metadata:
  name: nginx
spec:
  type: NodePort
  ports:
  - port: 80
    nodePort: 30080
    protocol: TCP
    name: http
  selector:
    app: nginx
Apply the yaml file:
$ kubectl apply -f service-nodeport.yml
service/nginx configured
Now to see the service :
$ kubectl get service
NAME           TYPE           CLUSTER-IP       EXTERNAL-IP   PORT(S)        AGE
kubernetes     ClusterIP      10.96.0.1        <none>        443/TCP        20h
my-nginx-svc   LoadBalancer   10.111.25.201    <pending>     80:32148/TCP   43m
nginx          NodePort       10.111.106.106   <none>        80:30080/TCP   2m42s
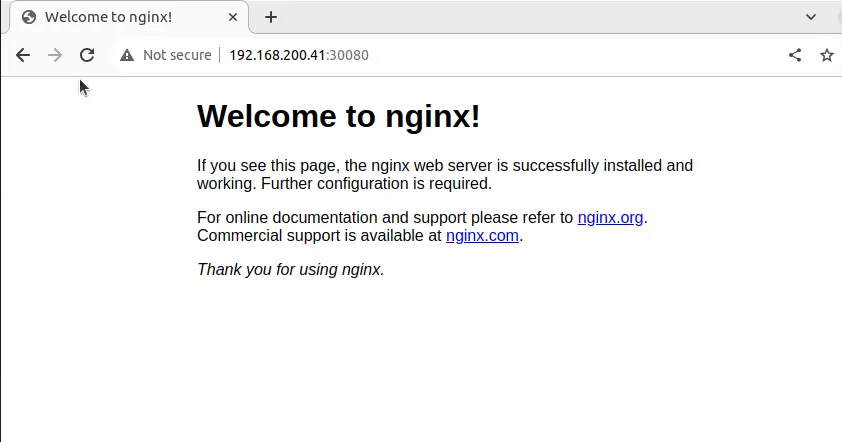
To check this on the web browser, enter the address http://<server_ip_address>:30080

If you get this page, your configuration is successful.
Wrap-up
That marks the end of our guide on how to How To Install Kubernetes Cluster on Proxmox VE. I hope you have followed along. Services can be exposed in different ways by specifying a type in the spec of the service in the yaml file. Other methods for exposing the services include using ClusterIP


