
Kubernetes Dashboard is an application deployed on Kubernetes to provide a web-based UI for daily management, troubleshooting, and monitoring Kubernetes clusters. For Kubernetes beginners, it can serve as a valuable component in visualizing cluster state and to better understand what’s happening in your clusters. The dashboard provide a more real-time insights into the cluster resources, workloads, and events thus facilitate efficient debugging of issues.
Here is a table showing the key features of Kubernetes Dashboard:
| Feature | Description |
|---|---|
| Cluster Overview | View node statuses, resource usage, and workloads at a glance. |
| Workload Management | Deployments, StatefulSets, Pods, ReplicaSets – create, edit, or delete them easily. |
| Real-Time Logs | View pod logs without needing kubectl logs. |
| Pod Monitoring | See pod status, restarts, container health, and events. |
| Namespace Switching | Quickly navigate between namespaces. |
| Secrets & ConfigMaps | View and edit them securely (if RBAC allows). |
| RBAC-Aware | Permissions are based on the service account or user accessing the dashboard. |
| Terminal Access | Open an interactive shell into a container (like kubectl exec -it in the browser). |
In this short tutorial, we cover the necessary steps to install, configure, and access kubernetes dashboard via a web browser. The assumption is that you have a working Kubernetes cluster. You can refer to articles available in our website for the kubernetes installation guides.
Confirm your cluster is functional by listing nodes:
$ kubectl get nodes
NAME                       STATUS   ROLES           AGE   VERSION
k0snode01.cloudspinx.com   Ready    control-plane   26d   v1.32.2+k0s
k0snode02.cloudspinx.com   Ready    <none>          26d   v1.32.2+k0s
Install Helm
You should have helm installed in your workstation. If not run the following commands to have it installed.
curl -fsSL -o get_helm.sh https://raw.githubusercontent.com/helm/helm/main/scripts/get-helm-3
chmod 700 get_helm.sh
./get_helm.sh
Check the version to confirm it works:
helm versionInstall Kubernetes Dashboard using helm
After helm is installed, add Kubernetes dashboard helm repository
helm repo add kubernetes-dashboard https://kubernetes.github.io/dashboard/Generate default values.yaml for the chart
helm show values kubernetes-dashboard/kubernetes-dashboard > kubernetes-dashboard-values.yamlAdjust the values as needed to suit your requirements.
Example : Enable Ingress
If you have an ingress configured in your cluster such as Nginx Ingress. Enable ingress configurations in the values file.
app:
  ingress:
    enabled: true
    hosts:
      - localhost
    ingressClassName: nginx
    tls:
      enabled: true
secretName: ""- You should have the appropriate domain or subdomain to replace
localhostfor the NGINX Ingress – for example,dashboard.k8s.cloudspinx.com, assumingk8s.cloudspinx.comis configured as a wildcard DNS for the NGINX Ingress. - Replace
internal-nginxwith correct IngressClass name for Nginx - For SSL, the secret with key and cert should exist and configured in secretName.
Use helm to install Kubernetes Dashboard
After making the necessary adjustment to the default values, install kubernetes dashboard in the cluster.
helm upgrade --install kubernetes-dashboard \
kubernetes-dashboard/kubernetes-dashboard \
--create-namespace \
--namespace kubernetes-dashboard \
-f kubernetes-dashboard-values.yaml
Expected output from command execution:
Release "kubernetes-dashboard" does not exist. Installing it now.
NAME: kubernetes-dashboard
LAST DEPLOYED: Sun Apr  6 22:35:37 2025
NAMESPACE: kubernetes-dashboard
STATUS: deployed
REVISION: 1
TEST SUITE: None
NOTES:
*************************************************************************************************
*** PLEASE BE PATIENT: Kubernetes Dashboard may need a few minutes to get up and become ready ***
*************************************************************************************************

Congratulations! You have just installed Kubernetes Dashboard in your cluster.

To access Dashboard run:
  kubectl -n kubernetes-dashboard port-forward svc/kubernetes-dashboard-kong-proxy 8443:443

NOTE: In case port-forward command does not work, make sure that kong service name is correct.
      Check the services in Kubernetes Dashboard namespace using:
        kubectl -n kubernetes-dashboard get svc

Dashboard will be available at:
  https://localhost:8443
List all resources in the namespace to confirm successful installation:
# kubectl get all -n kubernetes-dashboard
NAME                                                        READY   STATUS    RESTARTS   AGE
pod/kubernetes-dashboard-api-868c9bc5f4-6gmtx               1/1     Running   0          3m20s
pod/kubernetes-dashboard-auth-7df6cd66db-svxw7              1/1     Running   0          3m20s
pod/kubernetes-dashboard-kong-678c76c548-m8b98              1/1     Running   0          3m20s
pod/kubernetes-dashboard-metrics-scraper-7d9658df44-w4xwq   1/1     Running   0          3m20s
pod/kubernetes-dashboard-web-66b75c6c7f-hbncj               1/1     Running   0          3m20s

NAME                                           TYPE           CLUSTER-IP       EXTERNAL-IP     PORT(S)          AGE
service/kubernetes-dashboard-api               ClusterIP      10.152.183.245   <none>          8000/TCP         3m20s
service/kubernetes-dashboard-auth              ClusterIP      10.152.183.250   <none>          8000/TCP         3m20s
service/kubernetes-dashboard-kong-proxy        ClusterIP      10.152.183.78    <none>          443/TCP          3m20s
service/kubernetes-dashboard-metrics-scraper   ClusterIP      10.152.183.236   <none>          8000/TCP         3m20s
service/kubernetes-dashboard-web               ClusterIP      10.152.183.93    <none>          8000/TCP         3m20s

NAME                                                   READY   UP-TO-DATE   AVAILABLE   AGE
deployment.apps/kubernetes-dashboard-api               1/1     1            1           3m20s
deployment.apps/kubernetes-dashboard-auth              1/1     1            1           3m20s
deployment.apps/kubernetes-dashboard-kong              1/1     1            1           3m20s
deployment.apps/kubernetes-dashboard-metrics-scraper   1/1     1            1           3m20s
deployment.apps/kubernetes-dashboard-web               1/1     1            1           3m20s

NAME                                                              DESIRED   CURRENT   READY   AGE
replicaset.apps/kubernetes-dashboard-api-868c9bc5f4               1         1         1       3m20s
replicaset.apps/kubernetes-dashboard-auth-7df6cd66db              1         1         1       3m20s
replicaset.apps/kubernetes-dashboard-kong-678c76c548              1         1         1       3m20s
replicaset.apps/kubernetes-dashboard-metrics-scraper-7d9658df44   1         1         1       3m20s
replicaset.apps/kubernetes-dashboard-web-66b75c6c7f               1         1         1       3m20s
Access Kubernetes Dashboard
Before we can access the dashboard, let’s first configure correct authentication using service account and bearer token.
Create kubernetes resources
Let’s start by creating:
- A service account with the name
dashboard-adminin namespace kubernetes-dashboard - Create a ClusterRoleBinding
- Create a secret with the bearer token
1) Admin User creation
Run the following commands to create service account and assign cluster role binding with admin privileges.
kubectl apply -f - <<EOF
apiVersion: v1
kind: ServiceAccount
metadata:
  name: dashboard-admin
  namespace: kubernetes-dashboard
---
apiVersion: rbac.authorization.k8s.io/v1
kind: ClusterRoleBinding
metadata:
  name: dashboard-admin
roleRef:
  apiGroup: rbac.authorization.k8s.io
  kind: ClusterRole
  name: cluster-admin
subjects:
- kind: ServiceAccount
  name: dashboard-admin
  namespace: kubernetes-dashboard
---
apiVersion: v1
kind: Secret
metadata:
  name: dashboard-admin
  namespace: kubernetes-dashboard
  annotations:
    kubernetes.io/service-account.name: "dashboard-admin"
type: kubernetes.io/service-account-token
EOF
Once the secret is created, execute the following commands to get the token:
kubectl get secret dashboard-admin -n kubernetes-dashboard -o jsonpath="{.data.token}" | base64 -d;echo2) read only user
If you want to create a read-only user, refer to the following service account and
kubectl apply -f - <<EOF
apiVersion: v1
kind: ServiceAccount
metadata:
  name: dashboard-read-only-user
  namespace: kubernetes-dashboard
---
apiVersion: rbac.authorization.k8s.io/v1
kind: ClusterRole
metadata:
  annotations:
    rbac.authorization.kubernetes.io/autoupdate: "true"
  labels:
  name: dashboard-read-only-clusterrole
  namespace: kubernetes-dashboard
rules:
- apiGroups:
  - ""
  resources: ["*"]
  verbs:
  - get
  - list
  - watch
- apiGroups:
  - extensions
  resources: ["*"]
  verbs:
  - get
  - list
  - watch
- apiGroups:
  - apps
  resources: ["*"]
  verbs:
  - get
  - list
  - watch
---
apiVersion: rbac.authorization.k8s.io/v1
kind: ClusterRoleBinding
metadata:
  name: dashboard-read-only-binding
roleRef:
  kind: ClusterRole
  name: dashboard-read-only-clusterrole
  apiGroup: rbac.authorization.k8s.io
subjects:
- kind: ServiceAccount
  name: dashboard-read-only-user
  namespace: kubernetes-dashboard
EOF
Then obtain token from secret created:
kubectl get secret dashboard-read-only-user -n kubernetes-dashboard -o jsonpath="{.data.token}" | base64 -d;echoAccess Kubernetes dashboard using kubectl port forwarding
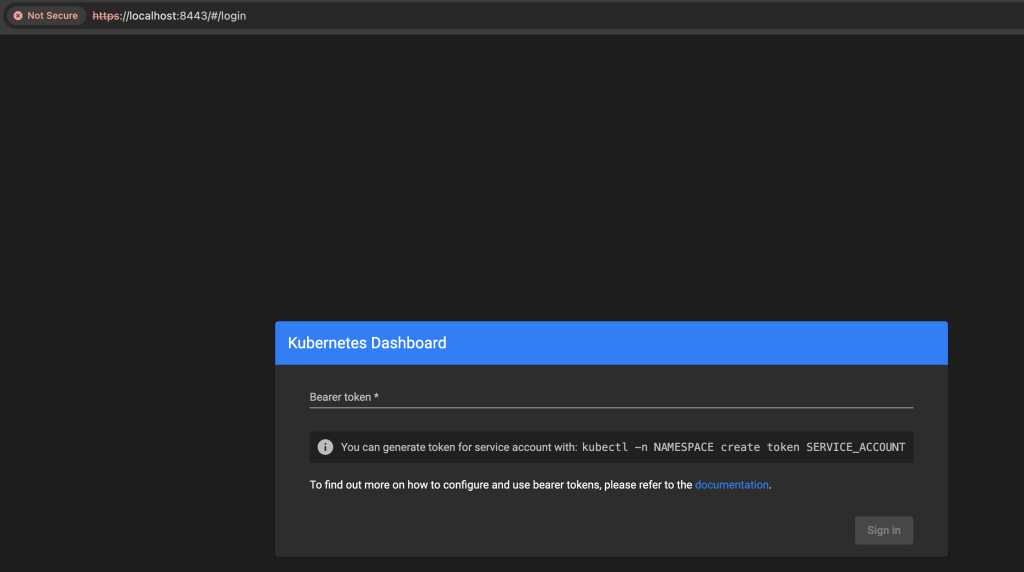
The most secure method for accessing Kubernetes dashboard is using kubectl proxy for port forwarding.
kubectl -n kubernetes-dashboard port-forward svc/kubernetes-dashboard-kong-proxy 8443:443Command execution output:
Forwarding from 127.0.0.1:8443 -> 8443
Forwarding from [::1]:8443 -> 8443
Then access the URL at https://localhost:8443. Paste the generated token to authenticate:
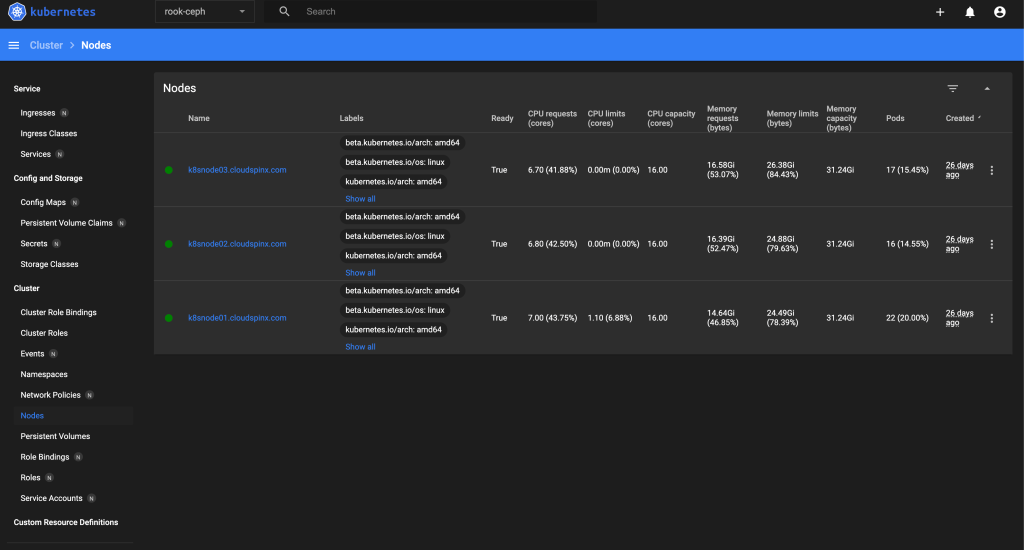
After logging into kubernetes dashboard, you can browse and manage various Kubernetes resource types.
Useful Kubernetes Dashboard Links:


