
LAMP is an acronym for Linux, Apache, MySQL and PHP, which are open-source software that work together to build powerful web applications. In this case, Linux is the operating system being used. Apache (httpd in Redhat operating systems) is the web server while MySQL is a database management application. PHP (Hypertext Pre-processor) is the backend programming language. In this guide, we are going to look at how to install Apache, MySQL and PHP (LAMP stack) on Oracle Linux 9.
Step 1: Install Apache Web server
Httpd is already available in the official repository of Oracle Linux 9. We are going to install it with dnf command as shown.
sudo dnf -y install httpdNow start httpd service and enable it to start on system boot.
sudo systemctl start httpd
sudo systemctl enable httpd
sudo systemctl status httpd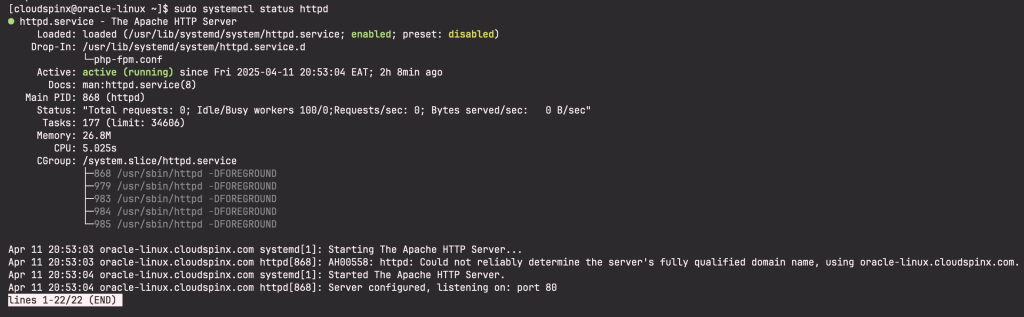
We need to open port 80 on the firewall since we will configure our web application to run on that port.
sudo firewall-cmd --permanent --add-service={http,https}
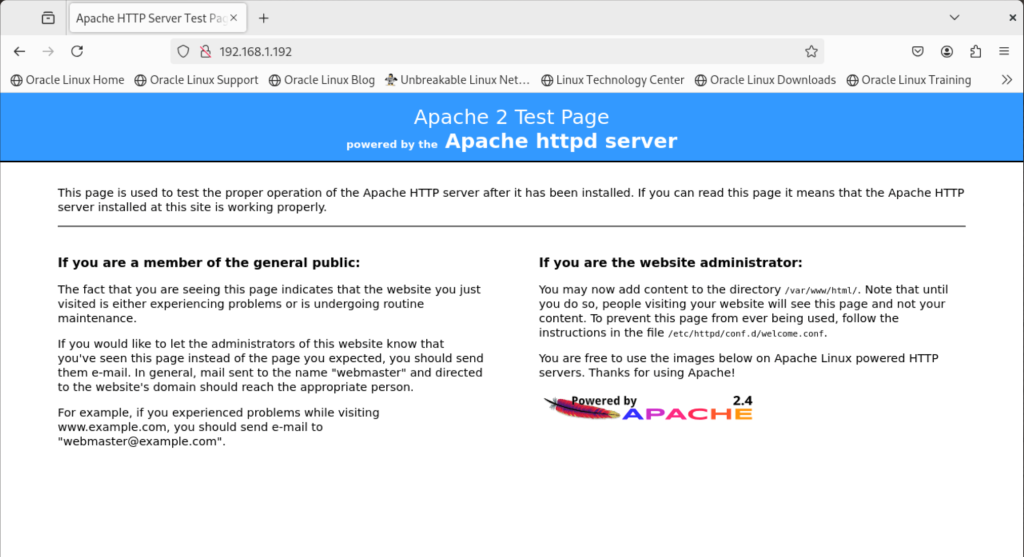
sudo firewall-cmd --reloadVerify Apache web server successful installation from your browser. On your browser, type http://<your-server-ip>. You should be able to open Apache default page as shown:
Step 2: Install PHP on Oracle Linux 9
Just like httpd, PHP is included in Oracle Linux 9 official repository and this makes it easy for us to install. Also install the below shown php modules. Please note that the below command will install php 8.0 which is currently available on Oracle Linux 9.
sudo dnf -y install php php-fpm php-mysqlnd php-opcache php-gd php-xml php-mbstringBy default, Oracle Linux 9 uses php-fpm instead of mod_php. We need to start php-fpm and enable it on system boot.
sudo systemctl start php-fpm
sudo systemctl enable php-fpm
Verify that php-fpm is running by checking on its status.
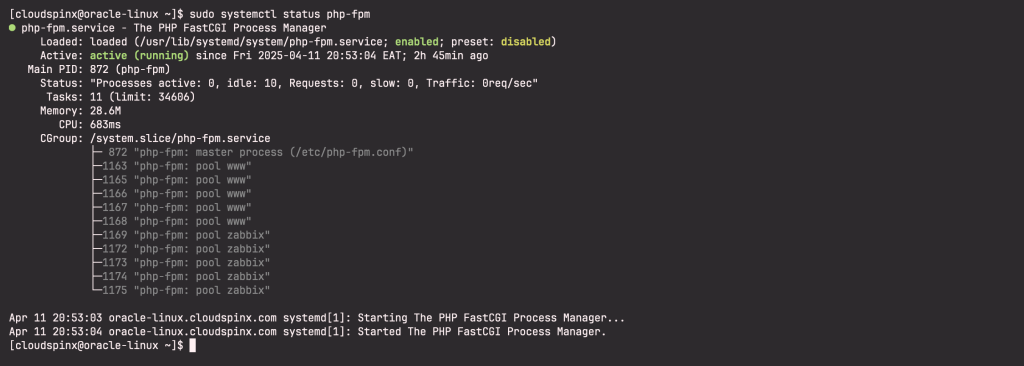
sudo systemctl status php-fpmThe output should be as shown:
Now restart httpd to use php.
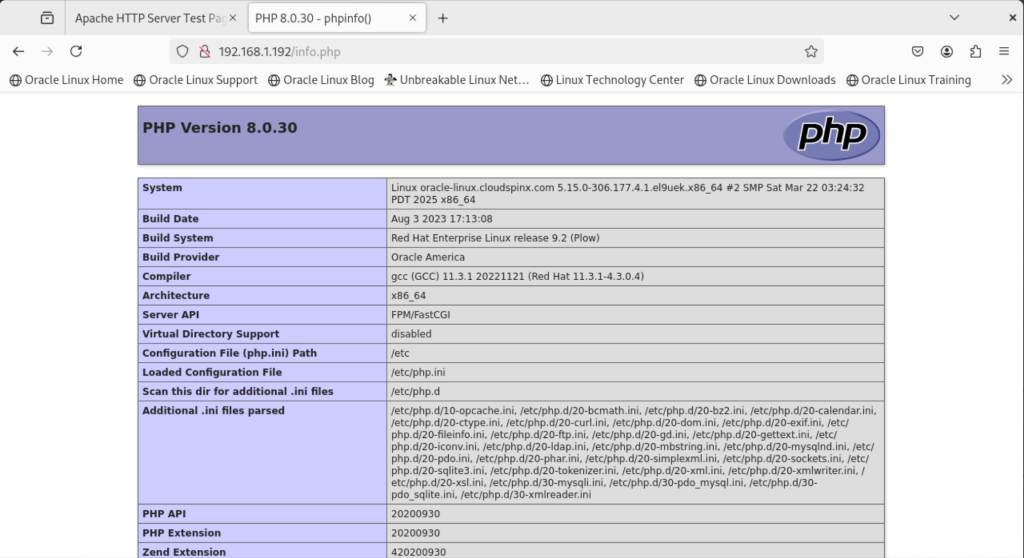
sudo systemctl restart httpdWe also need to test php on the browser. Create a file called info.php in /var/www/html
sudo vim /var/www/html/info.phpPut the below content and save the file.
<?php
phpinfo();
?>
After saving, restart httpd:
sudo systemctl restart httpdNow on your browser, open http://<your-server-ip>/info.php.
Step 3: Install MariaDB server on Oracle Linux 9
The other component of LAMP is MariaDB which is used for managing web application databases. Run the command below to install it on Oracle Linux 9:
sudo dnf -y install mariadb mariadb-serverOnce installed, start MariaDB and enable it to start on system reboot.
sudo systemctl start mariadb
sudo systemctl enable mariadb
Now secure MariaDB and set root password by running the below command:
sudo mariadb-secure-installationYou will be prompted to enter root password if you have one or just press Enter and go ahead to set new root password as well as other parameters as below:
Enter current password for root (enter for none): Just press Enter
Set root password? [Y/n] Y
New password:  New-root-password
Re-enter new password: Re-enter New-root-password
Remove anonymous users? [Y/n] Y
Disallow root login remotely? [Y/n] Y
Remove test database and access to it? [Y/n] Y
Reload privilege tables now? [Y/n] Y
Thanks for using MariaDB!
You can go ahead to configure a database for our application and set a database user. Connect to myariadb by running the below command:
mariadb -u root -pProvide the root password that you set above. Once connected run the commands below:
CREATE DATABASE mydb;
CREATE USER 'mydbuser'@'localhost' IDENTIFIED BY 'StrongP@asswd';
GRANT ALL PRIVILEGES ON mydb.* TO 'mydbuser'@'localhost';
FLUSH PRIVILEGES;
EXIT;
Step 4: Create Apache virtual host for your site
Using your preferred editor, create a virtual host for your site as shown below:
sudo vim /etc/httpd/conf.d/yourdomain.confAdd the following content:
<VirtualHost *:80>
    ServerName www.yourdomain.com
    ServerAlias yourdomain.com
    DocumentRoot /var/www/yourdomain
    ErrorLog /var/www/yourdomain/error.log
    CustomLog /var/www/yourdomain/requests.log combined
</VirtualHost>
Now let’s create a demo web page:
sudo mkdir /var/www/yourdomain
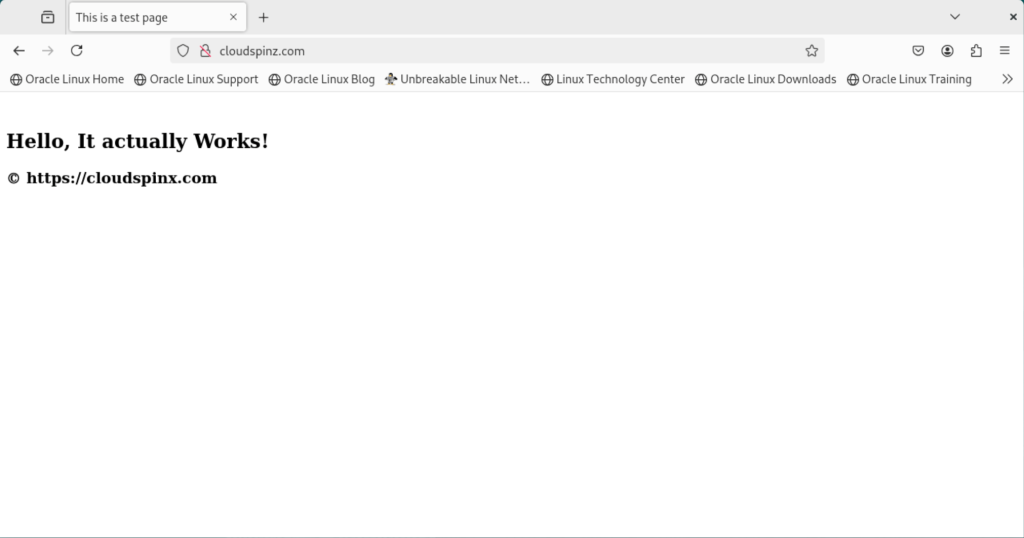
sudo vim /var/www/yourdomain/index.htmlAdd the following contents:
<html>
  <head>
    <title>This is a test page</title>
  </head>
  <body>
    <h2>Hello, It actually works!</h2>
  </body>
</html>
Save the file and let Apache own the root directory then restart httpd:
sudo chown -R apache:apache /var/www/*
sudo touch /var/www/cloudspinz/error.log /var/www/cloudspinz/requests.log
sudo chmod -R 755 /var/www/*
sudo systemctl restart httpd
Configure SELinux
You need to configure SELinux policy to allow Apache access to your domain error files. Run the commands below to set SELinux policy permanently using semanage:
sudo semanage fcontext -a -t httpd_sys_rw_content_t "/var/www/yourdmain(/.*)?"
sudo restorecon -Rv /var/www/yourdomain
Now open your demo web page on the browser to confirm that your virtual host is working properly. If well set, you should see the content from your demo html file.
That’s it. You have successfully installed LAMP stack on Oracle Linux 8 and configured Virtual Host. Enjoy! Do not forget to check more Linux guides below:


