
MongoDB is a NoSQL database server that is used to create current dynamic apps. It is a general-purpose, object-oriented, simple, and dynamic database server. In contrast to typical relational databases, which employ rows and columns, data items are kept as individual documents in a collection. MongoDB is designed in C++ for enormous scalability and flexibility, as well as developer-friendly querying and indexing.
Advantages of Using MongoDB
Below are the advantages of using MongoDB database:
- As values, it accepts arrays and nested objects, allowing for flexible and dynamic schemas.
- It’s simple to create queries that allow for hierarchical sorting and filtering, as well as aggregation, geo-location, time-series, graph search, and more.
- Supports sharding, which divides big datasets into several dispersed collections, making querying easier.
- Multiple storage engines are supported.
- High scalability and flexibility are provided, as well as automated failover and data redundancy.
- Provides a simple-to-learn and-use expressive query language.
- Real-time analytics using ad-hoc queries.
MongoDB 8.0 New Features
The following are the new features offered by MongoDB 8.0:
- There are a variety of cloud security technologies available.
- The map-reduce procedure is being phased out.
- Your applications are future-proofed with the Versioned API.
- MongoDB Atlas is a serverless database.
- Data redistribution that is seamless.
- Allow for the configuration of auditing filters at runtime.
- Resharding in real time.
- Native time-series characteristics for storing sequences of measurements over a period of time in an effective manner.
MongoDB comes in two flavors: Community and Enterprise. The Community Edition is available for free download, but the Enterprise Edition is only available as part of the Mongo Enterprise Advanced subscription. LDAP, Kerberos support, on-disk encryption, and auditing are all included in the Enterprise edition. It also offers full MongoDB development assistance.
How To Install MongoDB 8.0 on Amazon Linux 2023
This article will walk you through installing MongoDB 8.0 on Amazon Linux 2023. Follow the steps below to install MongoDB 8.0 on Amazon Linux 2023.
Step 1: Update Amazon Linux 2023 Server
Let’s upgrade the operating system before we start the installation:
sudo yum -y updateBecause kernel upgrades may be required, it is suggested that the system be rebooted following a successful upgrade:
sudo rebootStep 2: Add MongoDB 8.0 YUM Repositories
Create a /etc/yum.repos.d/mongodb-org-8.0.repo file so that you can install MongoDB directly using yum:
sudo tee /etc/yum.repos.d/mongodb-org-8.0.repo<<EOL
[mongodb-org-8.0]
name=MongoDB Repository
baseurl=https://repo.mongodb.org/yum/amazon/2023/mongodb-org/8.0/x86_64/
gpgcheck=1
enabled=1
gpgkey=https://pgp.mongodb.com/server-8.0.asc
EOL
Confirm the repository is now available:
$ sudo yum repolist
repo id                                                                                repo name
amazonlinux                                                                            Amazon Linux 2023 repository
kernel-livepatch                                                                       Amazon Linux 2023 Kernel Livepatch repository
mongodb-org-8.0                                                                        MongoDB Repository
Step 3: Install MongoDB 8.0 on Amazon Linux 2023
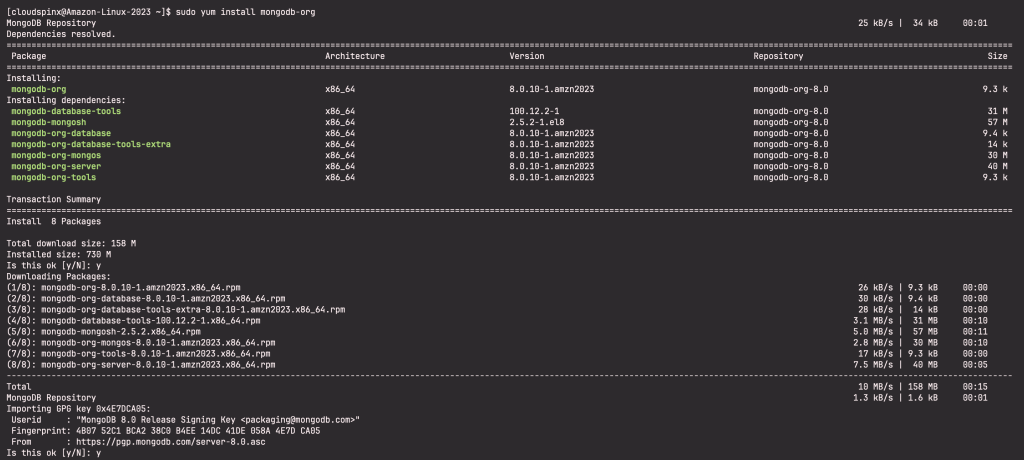
Run the following command to install the most recent stable version of MongoDB:
sudo yum install mongodb-orgAccept installation prompt and agree to import the GPG key:
To install a specific version of MongoDB, provide each component package individually and attach the version number to the package name, as shown below:
sudo yum install -y mongodb-org-8.0.10 mongodb-org-database-8.0.10 mongodb-org-server-8.0.10 mongodb-org-shell-8.0.10 mongodb-org-mongos-8.0.10 mongodb-org-tools-8.0.10Now, check the installed MongoDB version:
$ mongod --version
db version v8.0.10
Build Info: {
    "version": "8.0.10",
    "gitVersion": "9d03076bb2d5147d5b6fe381c7118b0b0478b682",
    "openSSLVersion": "OpenSSL 3.2.2 4 Jun 2024",
    "modules": [],
    "allocator": "tcmalloc-google",
    "environment": {
        "distmod": "amazon2023",
        "distarch": "x86_64",
        "target_arch": "x86_64"
    }
}
Step 4: Configure MongoDB on Amazon Linux 2023
We need to make a few configurations now that MongoDB 8.0 has been properly deployed.
Start and Enable MongoDB Service
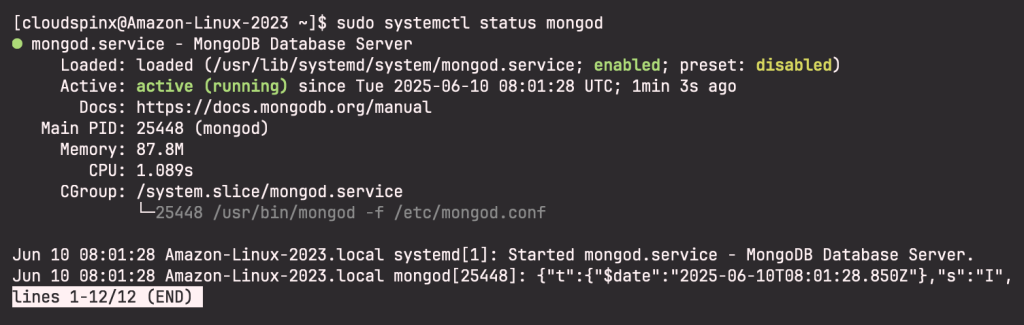
To begin, we must first start and enable the mongod service, as seen below:
sudo systemctl start mongod
sudo systemctl enable mongod
Now, check the status of the service:
Secure MongoDB instance
The MongoDB 8.0 database has no password and is freely accessible after installation, we must secure it.
Edit mongo.conf file as shown below:
sudo vim /etc/mongod.confUncomment the #Security line in the conf file and replace it with the text below. In this file, keep in mind that the syntax is extremely essential.
security:
  authorization: enabled
Then restart the service for changes to apply:
sudo systemctl restart mongodStep 5: MongoDB Enable Remote Access
MongoDB can only be accessed locally by default. If you want to be able to access the database from afar, modify the mongo.conf configuration file to include the MongoDB server IP address or hostname, as shown below.
# network interfaces
net:
  port: 27017
  bindIp: 127.0.0.1,mongodb-server-ip/hostname
Restart the mongod service after saving the modifications.
Step 6: Using MongoDB 8.0 on Amazon Linux 2023
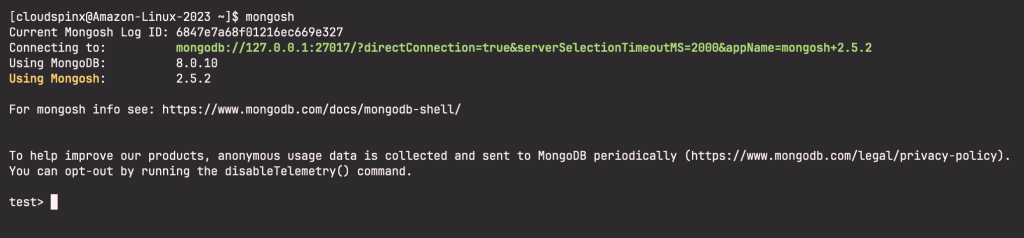
By default, MongoDB listens on port 27017. You may use the following command to go to the MongoDB shell from localhost:
$ mongoshOutput of the above command:
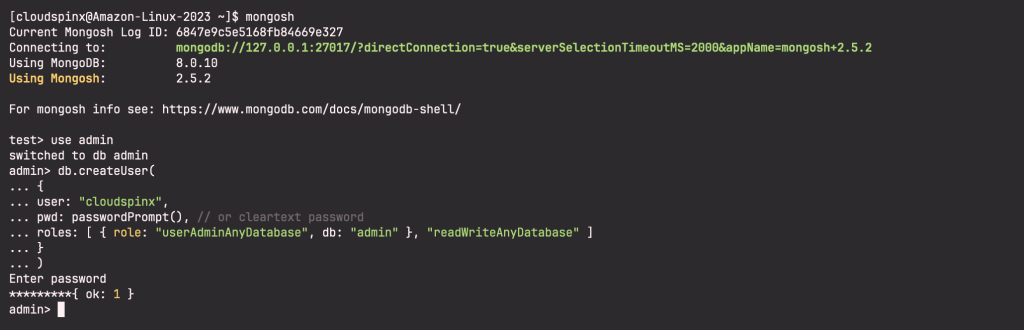
Create a User and Add Role in MongoDB 8.0
Create a user called your_user, whose name you may modify to whatever you wish. After you’ve inserted the script below, you’ll need to assign a password to the newly created user.
use admin
db.createUser(
{
user: "cloudspinx",
pwd: passwordPrompt(), // or cleartext password
roles: [ { role: "userAdminAnyDatabase", db: "admin" }, "readWriteAnyDatabase" ]
}
)
Here is the sample output of the above code:
Now exit the shell as shown below:
> exit
bye
Then login to the created user above:
mongosh -u cloudspinx -p --authenticationDatabase adminList databases in MongoDB 8.0
Run the following command to list databases in MongoDB 8.0.
> show dbs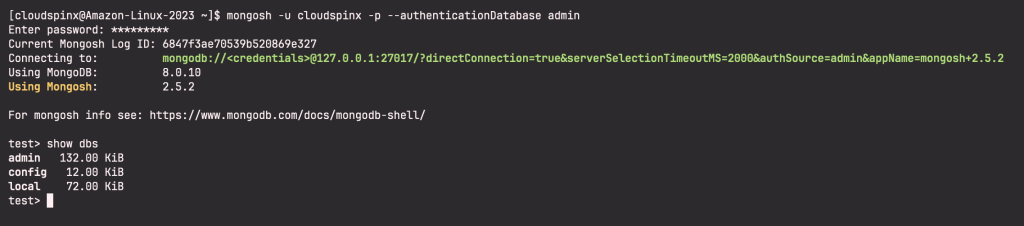
Create a Database in MongoDB 8.0
In MongoDB, a new database is established by simply switching to a non-existing database and giving it a name. Let’s start by making a database called mydb.
> use cloudspinxdb
switched to db cloudspinxdb
Create a Collection in MongoDB 8.0
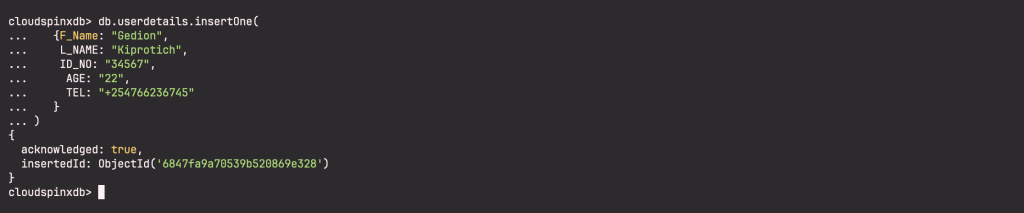
We may now add data to the database we built before. We’re going to make a table for the user information down below:
db.userdetails.insertOne(
   {F_Name: "Gedion",
    L_NAME: "Kiprotich",
    ID_NO: "34567",
     AGE: "22",
     TEL: "+254766236745"
   }
)
When we add the above data, we obtain the output below:
Check the created table or collection above:
> show collections
userdetails
Create a User with Read and Write Privileges
Use the following command to create a user with read and write capabilities in MongoDB:
use testdb
db.createUser(
   {
     user: 'myuser',
     pwd: 'P@ssWord',
     roles: [ { role: 'readWrite', db: 'testdatabase' } ]
   }
 );
Output:

Step 7: Change MongoDB default Path on Amazon Linux 2023
MongoDB keeps its data in the /var/lib/mongo directory by default. MongoDB may be configured to store data in a specific path, as illustrated below.
Before doing do, you need to to stop mongod.service first:
sudo systemctl stop mongod.serviceThen, to store MongoDB data, establish a new custom path:
sudo mkdir -p /data/mongoSet the ownership of the directory to mongod as below:
sudo chown -R mongod:mongod /data/mongoNow, edit /etc/mongod.conf.
sudo vim /etc/mongod.confThen make the following changes in the file above:
path: /data/log/mongodb/mongod.log   #where to write logging data.
dbPath: /data/mongo    #Where and how to store data.
pidFilePath: /data/mongodb/mongod.pid  # location of pidfile
Step 8: Configure SELinux for MongoDB on Amazon Linux 2023
Now that we have changed the MongoDB path, we need to configure SELinux and its enforcing mode to allow MongoDB to access /sys/fs/cgroup.
We need to install Checkpolicy before we continue to configure SELinux:
sudo yum -y install checkpolicyMake a new check policy using the following information.
cat > mongodb_cgroup_memory.te <<EOF
module mongodb_cgroup_memory 1.0;

require {
    type cgroup_t;
    type mongod_t;
    class dir search;
    class file { getattr open read };
}

#============= mongod_t ==============
allow mongod_t cgroup_t:dir search;
allow mongod_t cgroup_t:file { getattr open read };
EOF
Now, compile and load the policy created above:
checkmodule -M -m -o mongodb_cgroup_memory.mod mongodb_cgroup_memory.te
semodule_package -o mongodb_cgroup_memory.pp -m mongodb_cgroup_memory.mod
sudo semodule -i mongodb_cgroup_memory.pp
Now that you’ve created a new check policy, load the three directories as follows:
Log File Directory
To update the file and directory contexts, use the instructions below:
sudo semanage fcontext -a -t mongod_log_t '/data/log/mongodb/mongod.*'
sudo chcon -Rv -u system_u -t mongod_log_t '/data/log/mongodb/mongod.log'
sudo restorecon -R -v '/data/log/mongodb/mongod.log'
PID Directory
Do it as shown below:
sudo semanage fcontext -a -t mongod_var_run_t '/data/mongodb/mongod.*'
sudo chcon -Rv -u system_u -t mongod_var_run_t '/data/mongodb/mongod.pid'
sudo restorecon -R -v '/data/mongodb/mongod.pid'
Data Directory
Update the data directory as shown below:
sudo semanage fcontext -a -t mongod_var_lib_t '/data/mongo.*'
sudo chcon -Rv -u system_u -t mongod_var_lib_t '/data/mongo'
sudo restorecon -R -v '/data/mongo'
Step 9: Update the Firewall
Now update the firewall as shown below:
sudo firewall-cmd --zone=public --add-port=27017/tcp --permanent
sudo firewall-cmd --reload
Reload and start Mongod daemon as shown below:
sudo systemctl daemon-reload
sudo systemctl start mongod.service
If MongoDB fails to load, restart it by typing:
sudo systemctl daemon-reload
sudo systemctl start mongod
Conclusion
We learnt how to install the most recent MongoDB version, MongoDB 8.0, on Amazon Linux 2023, as well as how to create users with particular roles and create and utilize databases in MongoDB, in this article. We hope you found this information useful.
Check More Cool Articles in Our Site Below:


