In this guide, we are going to look at how to install MongoDB 8.0 on Oracle Linux 10. MongoDB is a document-oriented NoSQL database preferred for high volume data storage. Unlike the traditional databases that uses relational databases, MongoDB uses collection of documents. The documents have key-value pairs which are the basic units of data in MongoDB. The collections also have set of documents and functions equating to the relational databases tables. MongoDB offers both a Community and an Enterprise version of the database:
- MongoDB Community: The available and free to use edition of MongoDB.
- MongoDB Enterprise: This is available as part of the MongoDB Enterprise Advanced subscription and comes with comprehensive support for MongoDB deployment. It includes features such as LDAP and Kerberos support, on-disk encryption, and auditing.
In this guide, we are going to look at the installation on MongoDB 8.0 Community Edition on Oracle Linux 10.
What are the features of MongoDB?
The following are some of the important features of MongoDB that would make you want to use MongoDB.
- Indexing – you can index any field in the document
- Replication – supports master slave replication
- Support ad hoc queries – In MongoDB, you can search by field, range query and it also supports regular expression searches.
- Load balancing – It has an automatic load balancing configuration because of data placed in shards.
- Data duplication – MongoDB can run over multiple servers. The data is duplicated to keep the system up and also keep its running condition in case of hardware failure.
- Supports map reduce and aggregation tools.
- Uses JavaScript instead of Procedures.
- It is a schema-less database written in C++.
- Provides high performance.
- Stores files of any size easily without complicating your stack.
- Easy to administer in the case of failures.
- Supports JSON data model with dynamic schemas, Auto-sharding for horizontal scalability and Built in replication for high availability.
Install MongoDB 8.0 on Oracle Linux 10
Use the following steps to install MongoDB 8.0 on Oracle Linux 10. MongoDB packages are available in the official project provided repositories. This will be added to the system prior to the installation of MongoDB 8.0 on Oracle Linux 10.
Step 1: Update your system packages
Always start by ensuring your system is up to date before installations.
sudo dnf -y updateStep 2: Add MongoDB 8.0 repository
We are going to create a file /etc/yum.repos.d/mongodb-org-8.0.repo so that we can install MongoDB 8.0 directly using yum.
Add the following content and save the repository file.
sudo tee /etc/yum.repos.d/mongodb-org-8.0.repo<<EOF
[mongodb-org-8.0]
name=MongoDB Repository
baseurl=https://repo.mongodb.org/yum/redhat/9/mongodb-org/8.0/x86_64/
gpgcheck=1
enabled=1
gpgkey=https://pgp.mongodb.com/server-8.0.asc
EOF
Step 3: Install MongoDB packages
Having added repository, we will go ahead to install the latest version of MongDB using the below command:
sudo dnf install -y mongodb-orgTo install a specific release of MongoDB, you need to specify each component with the version as shown:
sudo yum install -y \
   mongodb-org-8.0.12 \
   mongodb-org-database-8.0.12 \
   mongodb-org-server-8.0.12 \
   mongodb-mongosh \
   mongodb-org-mongos-8.0.12 \
   mongodb-org-tools-8.0.12 \
   mongodb-org-database-tools-extra-8.0.12
Note that you can specify any version to install. Yum, however, upgrades the packages whenever there is a new version. To prevent this upgrade, pin the packages by editing /etc/yum.conf file. Add the below line to pin MongoDB packages.
exclude=mongodb-org,mongodb-org-server,mongodb-org-shell,mongodb-org-mongos,mongodb-org-toolsStep 4: Run MongoDB community edition on Oracle Linux 10
The next steps discuss the necessary prerequisites for running MongoDB 8.0
ulimit
Unix-like operating systems mostly limit the resources a process can have and this could affect the functionality of MongoDB. This should be adjusted accordingly. A ulimit value below 64000 will not work for MingoDB 8.0
Directory Paths
By default, MongoDB uses the below directories with the user mongod
/var/lib/mongo(the data directory)/var/log/mongodb(the log directory)
Note that if you installed MongoDB using repository, the directories will be created alongside the user mongod. However, if you installed through downloading tarballs, the directory will not be created and you will need to manually create them.
Create MongoDB directories
Run the below commands if you need to manually create MongoDB directories.
sudo mkdir -p /var/lib/mongo
sudo mkdir -p /var/log/mongodb
Set the owner and group of these directories to mongod user.
sudo chown -R mongod:mongod <directory>Use Custom Directories for MongoDB
To use other directory other that the default MongoDB directory, we will first create the directory then edit mongodb.conf file and modify the path parameters.
sudo mkdir /some/data/directory
sudo mkdir  /some/log/directory/mongod.log
Open /etc/mongodb.conf file and edit as shown then save.
sudo vim /etc/mongodb.confLook out for systemLog and storage parameters and update your new directories accordingly.
storage:
  dbPath /some/data/directory
systemLog:
  path  /some/log/directory/mongod.log
Ensure that mongod user has access to the created directories.
sudo chown -R mongod:mongod <directory>Step 6: Managing MongoDB on Oracle Linux 10
The following steps show how we can manage MongoDB 8.0 on Oracle Linux 10:
Start, stop, restart and Enable MongoDB
Run the following commands to start, enable, stop and restart MongoDB:
sudo systemctl start mongod
sudo systemctl enable mongod
sudo systemctl stop mongod
sudo systemctl restart mongod
If mongod fails to start, reload daemon and run the start command again:
sudo systemctl daemon-reload
sudo systemctl start mongod
Check MongoDB status
To check if MongoDB is running, we use the command:
sudo systemctl status mongodYou should get an output as below if running:

Begin using MongoDB
Start a mongo shell on the same host machine as the mongod
mongosh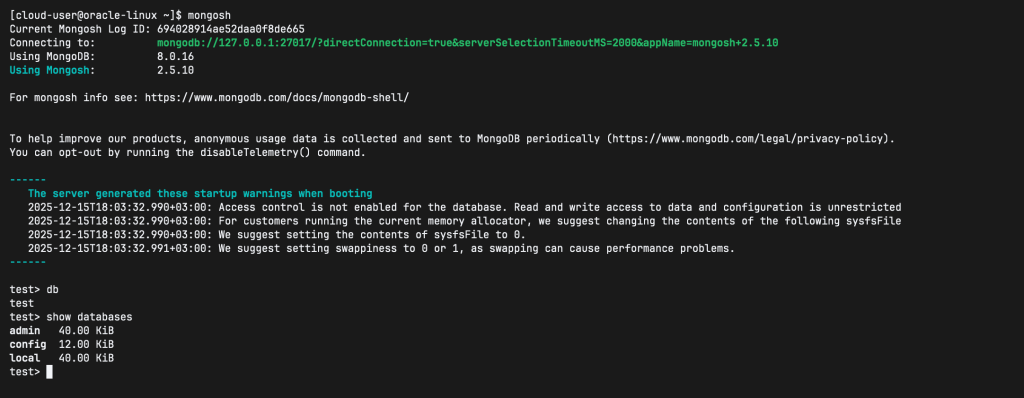
To find out the current database you are in, simply run the command db
db
test
To list databases, run the command:
show databases
admin 0.000G
config 0.000G
local 0.000G
To use a partcular database, use the command use
use <db-name>To create a new database, run the use command. In this case, since the database does not exist, it will be created.
use <new-db-name>That’s it for now. You have successfully installed MongoDB 8.0 on Oracle Linux 10. Enjoy your usage and check below more interesting Linux guides.