In today’s guide, we will learn how to install Node.js 20,18,16 on Debian 12 (Bookworm). Node.js has evolved into a powerful and versatile platform, empowering developers to build scalable, event-driven, and real-time applications. Its vibrant ecosystem, large community support, and emphasis on performance and developer experience have solidified its position as a leading technology in the server-side programming landscape.
To understand the JavaScript background for Node.js, it’s important to recognize the role JavaScript plays as the primary programming language for both client-side and server-side development. Here’s a brief overview of JavaScript's background its significance in the context of Node.js:
- JavaScript Origins: JavaScript was created by Brendan Eich at Netscape in 1995 as a scripting language for web browsers. Its initial purpose was to provide interactivity and dynamic behavior to HTML pages.
- Client-Side JavaScript: JavaScript gained popularity as a client-side scripting language, allowing developers to manipulate and interact with web page elements.
- AJAX and Dynamic Web Applications: AJAX enabled the retrThis facilitated the development of dynamic web applications with seamless user experiences. eval and updating data asynchronously without requiring a full page reload.
- ECMAScript Standardization: JavaScript is based on the ECMAScript specification, which defines the language’s syntax, semantics, and core features. ECMAScript versions, such as ECMAScript 5 (ES5), ECMAScript 6 (ES6/ES2015), and subsequent versions, introduced new language features and syntax enhancements.
- Node.js and Server-Side JavaScript: Node.js leverages the V8 JavaScript engine, originally developed for the Chrome browser, to execute JavaScript code on the server side. Node.js introduced event-driven, non-blocking I/O, making it well-suited for building scalable network applications and servers.
- Full-Stack JavaScript: The rise of Node.js brought the concept of full-stack JavaScript development, where developers could use JavaScript for both front-end and back-end development.
- NPM and the JavaScript Ecosystem: NPM (Node Package Manager) emerged as a central repository for sharing and managing JavaScript packages, libraries, and modules.
- Modern JavaScript Tools and Frameworks: The JavaScript ecosystem expanded with the emergence of powerful frameworks and libraries like React, Angular, and Vue.js for front-end development. Express.js became a popular choice for server-side development with Node.js, providing a minimalist web application framework.
Node.js is a JavaScript runtime environment built on Chrome’s V8 JavaScript engine. It allows developers to run JavaScript code outside of the browser, enabling server-side and command-line scripting.
Common use cases of Node.js:
- Web Application Development: Node.js is widely used for building web applications, both for server-side logic and client-side interactions.
- API Development: Node.js is well-suited for building APIs (Application Programming Interfaces) due to its lightweight nature and ability to handle multiple requests concurrently.
- Real-time Applications: Node.js is often used for building real-time applications that require instant data updates and bidirectional communication between the server and clients.
- Microservices Architecture: Node.js is a popular choice for developing microservices due to its lightweight and modular nature.
- Command-line Tools and Scripts: Node.js can be used to build command-line tools and scripts, making it valuable for automating tasks, performing system operations, or creating build tools.
- Serverless Functions: Node.js is widely supported by serverless computing platforms like AWS Lambda, Google Cloud Functions, and Microsoft Azure Functions.
- Internet of Things (IoT) Applications: Node.js is utilized in IoT applications to handle device communication, data processing, and building IoT gateways.
Improved features of the latest Node.js 20 LTS
- Node.js Permission Model: enables developers to restrict access to specified resources such as file systems and storage during program execution. This is accomplished by using the -experimental-permission switch, which restricts access to all possible permissions. Use the flags -allow-fs-read and –allow-fs-write to administer the file system. Use the flag -allow-child-process to manage a child process, and the flag -allow-worker to control worker threads.
- Stable Test Runner: This makes it simple to develop and execute test suites without the requirement for extra dependencies to be installed. using this enhancement, it is now possible to run command-line tests using the -test node. Invoke configurable and custom test reporters with -test-reporter. -experimental-test-coverage can be used to activate the experimental test coverage. This includes mocking capabilities as well.
- Custom ESM loader hooks: run in a separate thread – ESM hooks supplied by loaders (–experimental-loader=foo.mjs) run in a separate thread from the main thread. This prevents loaders and application code from becoming contaminated.
- Single Executable Applications (SEA): this allows you to bundle your application with the Node.js binary so that end users can distribute and operate it as a single executable file.
- Tracing channel: This allows diagnostic channels to be grouped for use in creating and consuming trace data.
- WASI (Web Assembly System Interface): the command line parameter and version are no longer required. The -experimental-wasi-unstable-preview1 flag is no longer required in the current release. Furthermore, when constructing a WASI object, the version option is now required. An error is thrown if the version is not supplied. Each program must identify the WASI version on which it relies.
- V8 JavaScript engine update to 11.3: Chromium 113 contains this. V8 is written in C++ and requires Node.js to maintain and improve it across diverse hardware and operating system combinations.
- Ada’s URL parser has been updated to 2.0: which considerably improves URL parsing. There are also improvements to the url.domainToASCII and url.domainToUnicode functions in node: URL. Look over the Changelog documentation for more features.
How To Install Node.js 20,18,16 on Debian 12 (Bookworm)
On Debian 12, there are two methods for installing Node.js 20,18,16.
- Method 1: Install Node.js using APT repository
- Method 2: Install Node.js using NVM package manager
Method 1: Install Node.js on Debian 12 using APT repository
First update the APT index using the command below.
sudo apt update && sudo apt dist-upgrade -yRemove the previous PPA (Optional). The instructions below won’t produce anything if there were no earlier installations of any versions.
sudo rm -f /etc/apt/sources.list.d/chris-lea-node_js-*.list
sudo rm -f /etc/apt/sources.list.d/chris-lea-node_js-*.list.save
The NodeSource package signing key should be added using the command given below.
sudo apt install curl gpg gnupg2 software-properties-common apt-transport-https lsb-release ca-certificates
sudo mkdir -p /etc/apt/keyrings
curl -fsSL https://deb.nodesource.com/gpgkey/nodesource-repo.gpg.key | sudo gpg --dearmor -o /etc/apt/keyrings/nodesource.gpg
If you want to see your GPG signing key list, type:
$ gpg --no-default-keyring --keyring "$KEYRING" --list-keys
/usr/share/keyrings/nodesource.gpg
----------------------------------
pub   rsa4096 2014-06-13 [SC]
      9FD3B784BC1C6FC31A8A0A1C1655A0AB68576280
uid           [ unknown] NodeSource <[email protected]>
sub   rsa4096 2014-06-13 [E]
Insert the nodesource repository.
### Node.js 20 ###
NODE_MAJOR=20
echo "deb [signed-by=/etc/apt/keyrings/nodesource.gpg] https://deb.nodesource.com/node_$NODE_MAJOR.x nodistro main" | sudo tee /etc/apt/sources.list.d/nodesource.list

### Node.js 18 ###
NODE_MAJOR=18
echo "deb [signed-by=/etc/apt/keyrings/nodesource.gpg] https://deb.nodesource.com/node_$NODE_MAJOR.x nodistro main" | sudo tee /etc/apt/sources.list.d/nodesource.list

### Node.js 16 ###
NODE_MAJOR=16
echo "deb [signed-by=/etc/apt/keyrings/nodesource.gpg] https://deb.nodesource.com/node_$NODE_MAJOR.x nodistro main" | sudo tee /etc/apt/sources.list.d/nodesource.list
In order for the modifications to take effect, update your APT index.
sudo apt update && sudo apt install nodejsVerify the installation.
$ node -v
v20.9.0

$ node -v
v18.13.0

$ npm -v
9.6.7
If you need development tools install with the following command:
sudo apt-get install gcc g++ makeFor Yarn package manager use:
curl -sL https://dl.yarnpkg.com/debian/pubkey.gpg | gpg --dearmor | sudo tee /usr/share/keyrings/yarnkey.gpg >/dev/null
echo "deb [signed-by=/usr/share/keyrings/yarnkey.gpg] https://dl.yarnpkg.com/debian stable main" | sudo tee /etc/apt/sources.list.d/yarn.list
sudo apt-get update && sudo apt-get install yarn
Method 2: Install Node.js on Debian 12 using NVM
NVM is the alternative method of installing Node.js. Through the command line, Node Version Manager (NVM) enables developers to swiftly install and use several Node.js versions.
- Install NVM
First, get rid of the current Node.js package in Debian 12 Then visit the NVM Github official page website and download the NVM script.
sudo apt purge --autoremove nodejs npm
wget -qO- https://raw.githubusercontent.com/nvm-sh/nvm/master/install.sh|bash
Source your profile:
## For  Bash
 source ~/.bashrc

##For  Zsh
 source ~/.zshrc

##Confirm
 $ echo $NVM_DIR
/root/.nvm
Next, verify the version of NVM.
$ nvm -v
0.39.5
List the Node.js versions that can be installed.
$ nvm list-remote
..............................
       v18.18.2   (Latest LTS: Hydrogen)
        v19.0.0
        v19.0.1
        v19.1.0
        v19.2.0
        v19.3.0
        v19.4.0
        v19.5.0
        v19.6.0
        v19.6.1
        v19.7.0
        v19.8.0
        v19.8.1
        v19.9.0
        v20.0.0
        v20.1.0
        v20.2.0
        v20.3.0
        v20.3.1
        v20.4.0
        v20.5.0
        v20.5.1
        v20.6.0
        v20.6.1
        v20.7.0
        v20.8.0
        v20.8.1
        v20.9.0   (Latest LTS: Iron)
        v21.0.0
        v21.1.0
Run the commands below to install Node.js, just enter the version you want to install.
### Node.js 20 ###
nvm install v20

### Node.js 18 ###
nvm install v18

### Node.js 16 ###
nvm install v16
Example with output:
$ nvm install v20
Downloading and installing node v20.9.0...
Downloading https://nodejs.org/dist/v20.9.0/node-v20.9.0-linux-x64.tar.xz...
############################################################################################################################################################################################### 100.0%
Computing checksum with sha256sum
Checksums matched!
Now using node v20.9.0 (npm v10.1.0)
Creating default alias: default -> v20 (-> v20.9.0)
List installed versions:
$ nvm list
->      v20.9.0
default -> v20 (-> v20.9.0)
iojs -> N/A (default)
unstable -> N/A (default)
node -> stable (-> v20.9.0) (default)
stable -> 20.9 (-> v20.9.0) (default)
lts/* -> lts/iron (-> v20.9.0)
..
After installation verify the version installed.
$ node -v
v20.9.0
To change the NodeJS version to your preferred version run the command below.
nvm use <node_version>Example:
$ nvm use v16
Now using node v16.20.1 (npm v8.19.4)

$ node -v
v16.20.1
Select the Node.js version to be the default.
nvm alias default <node version>Getting Started with Node.js on Debian 12 (Bookworm)
Use of the installed Node.js version requires the installation of the development modules needed by npm to create native modules.
sudo apt install gcc g++ makeAfter installation, Node.js may now be used to build the required web apps. Create a straightforward Hello World web page first, as demonstrated:
cd ~
mkdir helloworld && cd helloworld
vim Helloworld.js
Now add the contents below:
const http = require('http');

const hostname = '0.0.0.0';
const port = 3000;

const server = http.createServer((req, res) => {
  res.statusCode = 200;
  res.setHeader('Content-Type', 'text/plain');
  res.end('Hello World! Node.JS is amazing!');
});

server.listen(port, hostname, () => {
  console.log(`Server running at http://${hostname}:${port}/`);
});
Now start the Node.js application by issuing the below command.
$ node Helloworld.js
Server running at http://0.0.0.0:3000/
Access the webpage http://IP_Address:3000 now using the browser. You ought to see the window below;

Configuring PM2 for Node.js Applications
The program was made with Node.js, and it does not run in the background. The Node.js application can be managed using the pm2 global NPM module.
- Install pm2
$ npm install -g pm2
npm WARN deprecated [email protected]: Please upgrade  to version 7 or higher.  Older versions may use Math.random() in certain circumstances, which is known to be problematic.  See https://v8.dev/blog/math-random for details.

added 184 packages in 9s

12 packages are looking for funding
  run `npm fund` for details
npm notice
npm notice New minor version of npm available! 9.6.7 -> 9.7.2
npm notice Changelog: https://github.com/npm/cli/releases/tag/v9.7.2
npm notice Run npm install -g [email protected] to update!
Build an ecosystem file for the application and add the lines below:
$ vim ecosystem.config.js
module.exports = {
  apps : [{
    name   : "Helloworld",
    script : "./Helloworld.js"
  }]
}Y
Instead of using the helloworld.js use the name of your application.
$ pm2 start ecosystem.config.js

[PM2][WARN] Applications Helloworld not running, starting...
[PM2] App [Helloworld] launched (1 instances)
┌────┬────────────────────┬──────────┬──────┬───────────┬──────────┬──────────┐
│ id │ name               │ mode     │ ↺    │ status    │ cpu      │ memory   │
├────┼────────────────────┼──────────┼──────┼───────────┼──────────┼──────────┤
│ 0  │ Helloworld         │ fork     │ 0    │ online    │ 0%       │ 39.7mb   │
└────┴────────────────────┴──────────┴──────┴───────────┴──────────┴──────────┘
To enable the program to launch immediately after booting execute the command below.
pm2 startupSave the changes after doing so.
pm2 saveBasics on using PM2 to manage apps
PM2 Plus (PM2 Web-Based Dashboard) is a sophisticated monitoring and diagnostics solution. You can connect up to four servers/applications with the free plan. To begin testing PM2 plus, go to app.pm2.io and sign up as seen in the screenshot below.
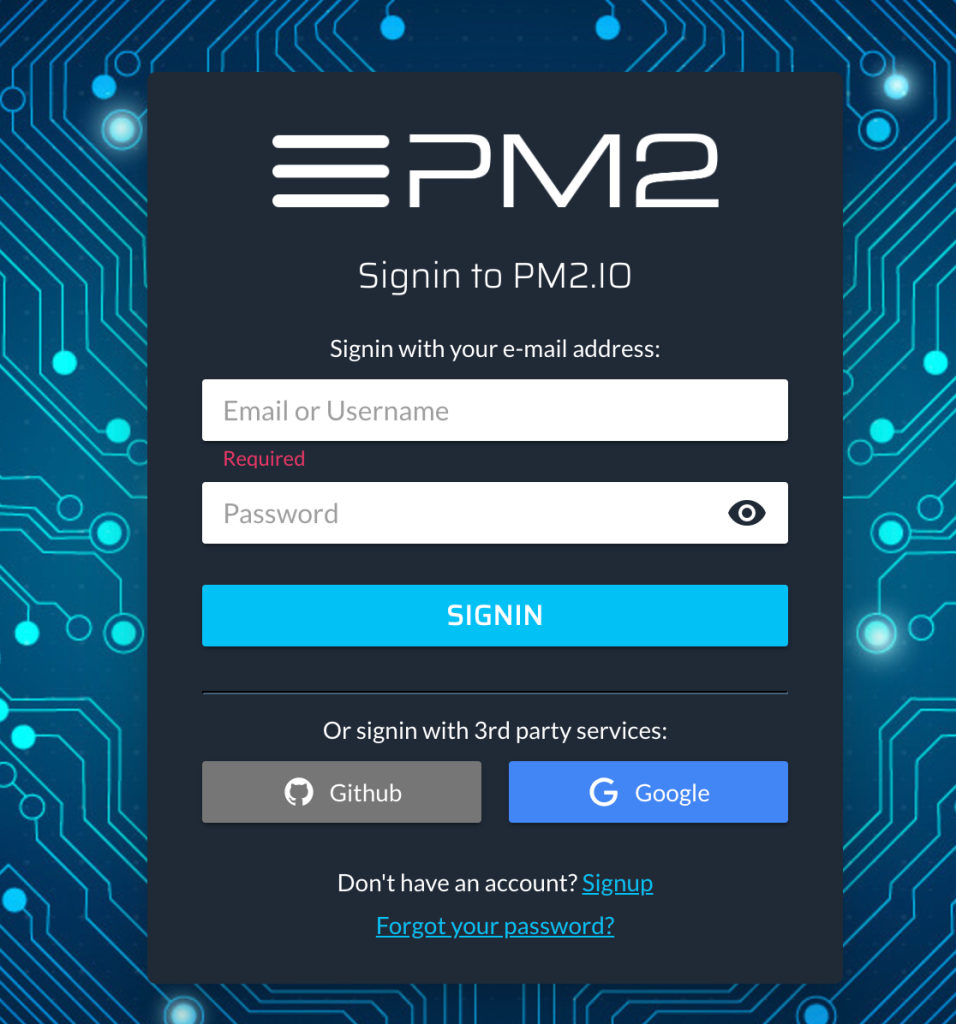
After signing in, Click Create new Bucket to create your bucket. Hence click Create.
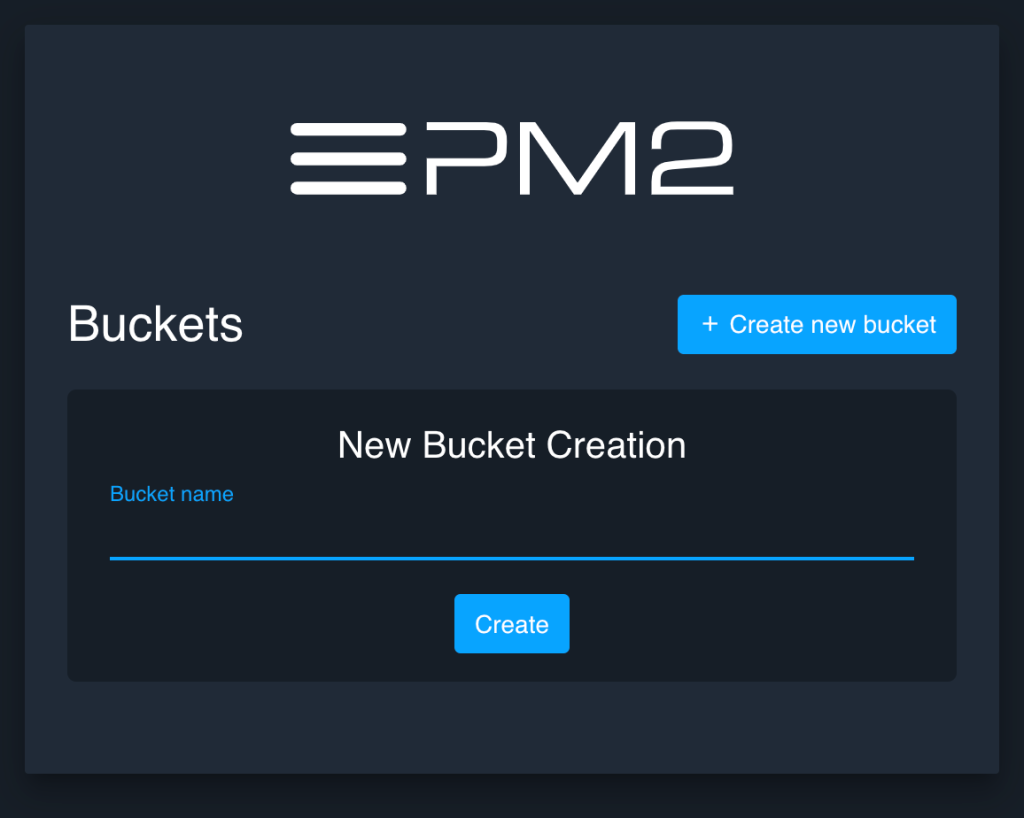
Next, connect PM2 to PM2.io and copy the command displayed in the interface below.
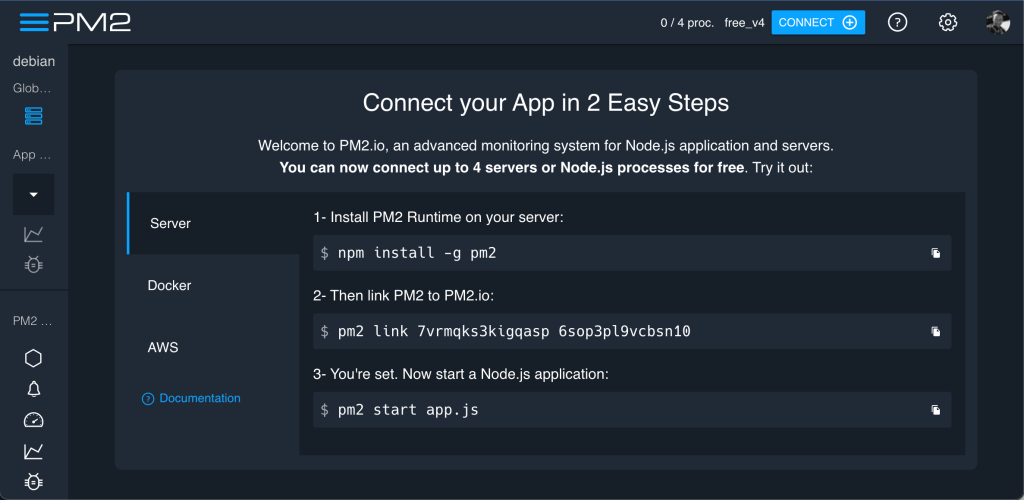
Then, on the Nodejs application server, perform the above command.
You can see the proportion of CPU and RAM used by each process, as well as other information. If you use version control, it also displays the branch and last merge information.

Monitoring Your Server Resources Using pm2-server-monit
Using the PM2 module pm2-server-monit, you can automatically keep an eye on important server metrics including CPU average utilization, free and used memory, free and used disc space, all processes that are running, TTY/SSH connections open, the total number of open files, and network speed (both input and output).
Install the command:
pm2 install pm2-server-monitPM2-server-monit should instantly show up in the list of monitored processes if PM2 is linked to app.pm2.io. As seen in the accompanying screenshot, you may now check your server’s resources from the online dashboard.
To unlink a server from the app.pm2.io monitoring dashboard, execute the following command on the server:
pm2 unlinkVerdict
Overall, Node.js has revolutionized the way JavaScript is used, allowing developers to build high-performance, scalable, and real-time applications across a wide range of domains. Its success lies in its ability to combine JavaScript’s simplicity and ubiquity with a robust and efficient runtime environment.
making it a valuable tool for modern web development and server-side scripting.
Other related materials:

