
In this short tutorial I’ll guide you through the installation of PostgreSQL 17 on Amazon Linux 2023. PostgreSQL is a powerful, free and open-source relational database management system with SQL compliance. The original name was POSTGRES, referring to its origins as a successor to the Ingres database developed at the University of California, Berkeley. As of this article writing the latest available release of PostgreSQL database server is version 17.
The PostgreSQL database server have been in active development for over 30 years that has earned it a strong reputation for reliability, feature robustness, and performance. The official documentation has vast amount of information on the architecture, features, installation and day 2 related usage of PostgreSQL database server.
Install PostgreSQL 17 on Amazon Linux 2023
This installation will be performed on Amazon 2023 Linux server. It doesn’t need to be running in an AWS cloud but can also be in a Virtualized environment within your Infrastructure or Laptop with use of VirtualBox, KVM, VMware or with the help of tools like Vagrant. Before you begin installation confirm you have met the following minimum requirements.
- Amazon Linux 2023 Virtual Machine
- 2GB of RAM
- 1 virtual cpu core
- 1GB of disk space for installation
- User account with sudo or root user credentials
Once the system is ready, update installed packages to the latest available releases.
sudo yum -y updateStep 1: Update System Packages
Update your system packages:
sudo dnf update -yThen check for PostgreSQL 17 on Amazon Linux repositories:
$ sudo dnf search postgresql17
Last metadata expiration check: 0:11:25 ago on Thu Dec 11 16:56:41 2025.
=========================================================================================== Name Exactly Matched: postgresql17 ===========================================================================================
postgresql17.x86_64 : PostgreSQL client programs
=============================================================================================== Name Matched: postgresql17 ===============================================================================================
postgresql17-contrib.x86_64 : Extension modules distributed with PostgreSQL
postgresql17-docs.x86_64 : Extra documentation for PostgreSQL
postgresql17-llvmjit.x86_64 : Just-in-time compilation support for PostgreSQL
postgresql17-plperl.x86_64 : The Perl procedural language for PostgreSQL
postgresql17-plpython3.x86_64 : The Python3 procedural language for PostgreSQL
postgresql17-pltcl.x86_64 : The Tcl procedural language for PostgreSQL
postgresql17-private-devel.x86_64 : PostgreSQL development header files for this build of PostgreSQL server
postgresql17-private-libs.x86_64 : The shared libraries required only for this build of PostgreSQL server
postgresql17-server.x86_64 : The programs needed to create and run a PostgreSQL server
postgresql17-server-devel.x86_64 : PostgreSQL development header files and libraries
postgresql17-static.x86_64 : Statically linked PostgreSQL libraries
postgresql17-test.x86_64 : The test suite distributed with PostgreSQL
postgresql17-test-rpm-macros.noarch : Convenience RPM macros for build-time testing against PostgreSQL server
postgresql17-upgrade.x86_64 : Support for upgrading from the previous major release of PostgreSQL
postgresql17-upgrade-devel.x86_64 : Support for build of extensions required for upgrade process
Step 2: Install PostgreSQL 17 on Amazon Linux 2023
Now that we know that PostgreSQL 17 is available on the Amazon repos, we can install PostgreSQL server and client packages on Amazon Linux 2023 by using the following commands.
sudo yum install postgresql17 postgresql17-serverReview the list of dependencies to be installed and agree to proceed with the installation.
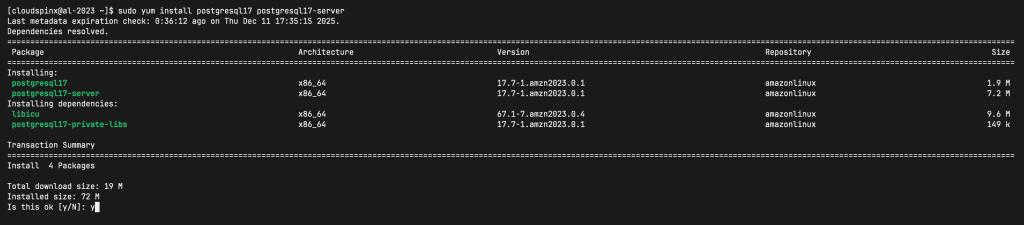
For any successful installation on Amazon Linux 2023 a Complete message should be printed.
Step 3: Initialize and start database service
We need to initialize the database server for configuration files to be generated. This is done by calling the setup script.
$ sudo postgresql-setup initdb
 * Initializing database in '/var/lib/pgsql/data'
 * Initialized, logs are in /var/lib/pgsql/initdb_postgresql.log
PostgreSQL 17 server uses configuration file in /var/lib/pgsql/data/postgresql.conf . You can review all default values and tune to your liking before using the database server for your Production workloads.
To start and enable the service to start at OS boot, run the following command:
sudo systemctl enable --now postgresqlThis is the expected execution output:
Created symlink /etc/systemd/system/multi-user.target.wants/postgresql.service → /usr/lib/systemd/system/postgresql.service.Check service status to confirm it is in running state.
$ sudo systemctl status postgresql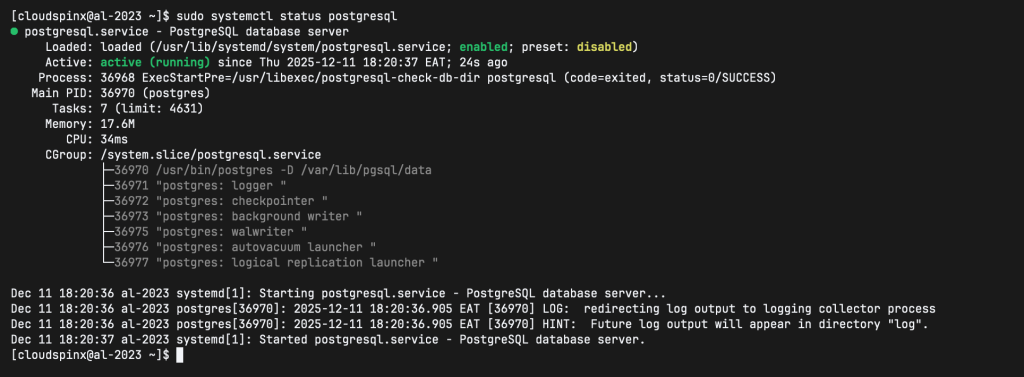
Step 4: Set PostgreSQL admin user’s password
Set PostgreSQL admin user password that you’ll use to escalate privilege for DB operations.
$ sudo su - postgres
$ psql -c "alter user postgres with password 'StrongPassword'"
ALTER ROLE
$ exit
logout
BG5^x3Eq
Step 5: Cofigure PostgreSQL
Access the primary configuration file of PostgreSQL located at /var/lib/pgsql/data/postgresql.conf. Before making any changes, back up the configuration file:
sudo cp /var/lib/pgsql/data/postgresql.conf /var/lib/pgsql/data/postgresql.conf.bakBy default, PostgreSQL only listens to localhost, if you want to listen all IP addresses, then you need to edit the /var/lib/pgsql/data/postgresql.conf file as follows:
listen_addresses = '*' # what IP address(es) to listen on;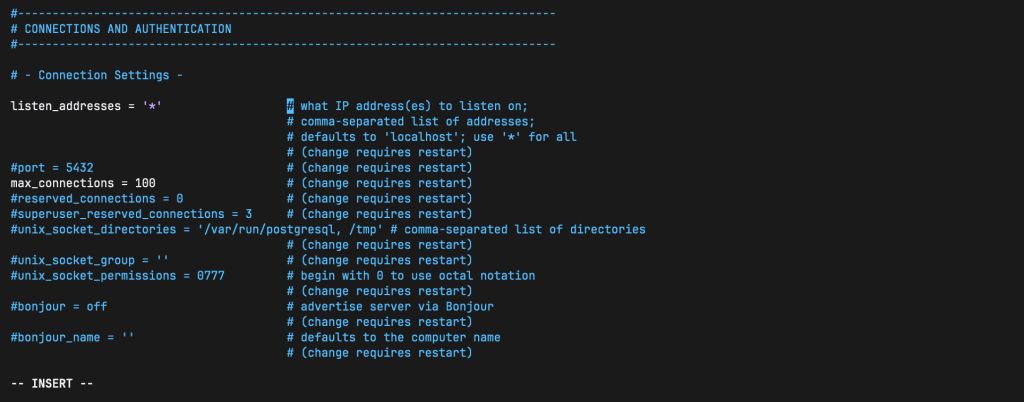
Then you need to configure the /var/lib/pgsql/data/pg_hba.conf file to allow connections, open the file and add the following entry at the end of the file to allow connections:
# You can change ident as md5 To allow connections from absolutely any address with password authentication
host     all     all     0.0.0.0/0     md5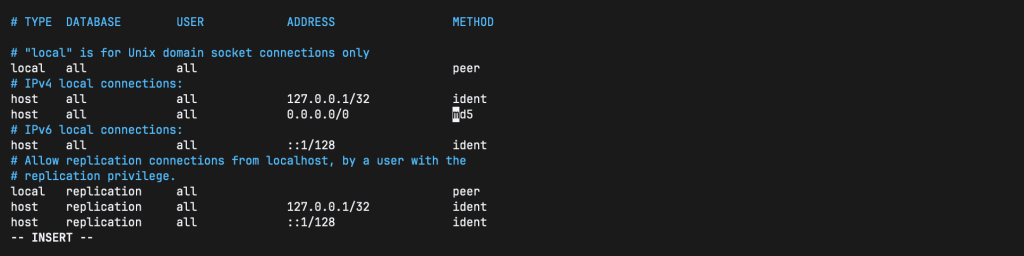
To apply all the changes, restart the PostgreSQL:
sudo systemctl restart postgresqlStep 6: Create User and Database
Test your new installation by creating a user and a database as follows:
# Connect to the PostgreSQL server as the Postgres user:
sudo -i -u postgres psql

# Create a new database user:
CREATE USER yourusername WITH PASSWORD 'password';

# Create a new database:
CREATE DATABASE database_name;

# Grant all privileges on the database to the user:
GRANT ALL PRIVILEGES ON DATABASE database_name TO yourusername;

# To list all available PostgreSQL users and databases:
\l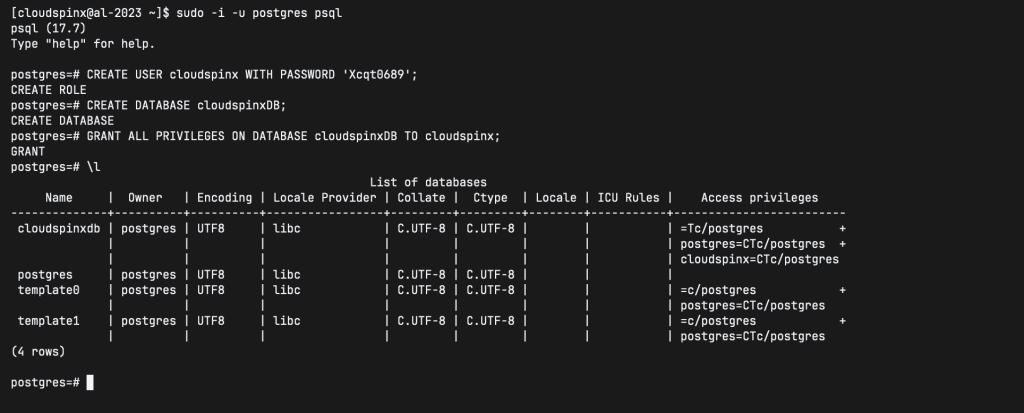
That’s it for this guide.


