Preboot Execution Environment (PXE) booting is a network-based boot process that allows a virtual machine to boot an OS or installer over the network without requiring local storage or preloaded boot media. In the context of KVM, PXE booting is a powerful method for automating operating system provisioning, testing network boot configurations, and managing large-scale virtualized environments.
With virt-installsetting up a PXE-booted virtual machine becomes straightforward. This setup combines the flexibility of network booting with the efficient resource utilization provided by virtualization, enabling streamlined workflows for system administrators, developers, and DevOps engineers.
Why PXE Boot in KVM is Important
- Automated OS Provisioning: With PXE booting there is no need to attach ISO Images or other boot media to virtual machines. In environments with numerous VMs, this is particularly useful since OS deployment can be fully automated using network-based configurations.
- Ease of scaling – It is a common requirement to deploy multiple instances in a cloud and virtualized infrastructures. By using PXE booting, it is easy to provision virtual machines with minimal manual intervention, reducing deployment time for large-scale environments.
- Standardization and Consistency – When using PXE booting, System Admnistrators can enforce consistent OS and software configurations across all virtual machines. All nodes receive identical setups since boot configurations are managed centrally, thus reducing configuration drift.
- Diskless Systems – If the virtual machine doesn’t require persistnent local storage, PXE booting offers a way to operate entirely from network-based storage or live systems, optimizing resource usage.
- Disaster Recovery – PXE boot can be an integral part of disaster recovery strategies, allowing administrators to rapidly redeploy systems or load recovery tools over the network in the event of failure.
Mastering KVM Virtualization - The Ultimate eBook
From home labs to production clouds - master KVM Host management, automating KVM administration using Terraform, Vagrant, and cloud automation. This eBook will enable you to build scalable virtual infrastructure that works whether you're learning at home or deploying enterprise solutions. Get your full copy today
Setup PXE boot environment
In this section we will cover the installation and configuration of a PXE boot environment for use with KVM hypervisor. Our PXE server of choice is netboot.xyz which is a network-based bootable operating system installer based on iPXE. The iPXE project is used to provide a user friendly menu within BIOS from where you can choose an operating system to install while customizing boot flags.
1 – Install Docker Engine / Compose
The netboot.xyzwill be running in a Docker container. For this purpose, a docker engine is required to be available on the machine (VM or physical host) where PXE server will run. The virt-builder utility can as well be utilized to quickly provision a VM instance used to run netboot.xyz.
Ensure that Docker Engine is installed on your system by running the following commands:
curl -fsSL get.docker.com -o get-docker.sh
sudo sh get-docker.sh
If the commands above doesn’t work on your Linux distribution, refer to the [official docker installation guides](Install | Docker Docs).
Start and enable docker service:
sudo systemctl enable --now dockerAdd current user account to docker system group:
sudo usermod -aG docker $USER
newgrp docker
To confirm the installation was successful , check the version of Docker:
docker --version
docker compose version
2 – Setup netboot.xyz environment
mkdir -p mkdir netboot_xyz/{assets,config}Change into the netboot_xyz directory
cd netboot_xyzCreate docker-compose.yaml file
vim docker-compose.yamlHere is the baseline docker compose file contents:
---
services:
  netbootxyz:
    image: lscr.io/linuxserver/netbootxyz:latest
    container_name: netbootxyz
    environment:
      - PUID=1000
      - PGID=1000
      - TZ=Etc/UTC
      #- MENU_VERSION=1.9.9 #optional
      - PORT_RANGE=30000:30010 #optional
      - SUBFOLDER=/ #optional
      - NGINX_PORT=80 #optional
      - WEB_APP_PORT=3000 #optional
    volumes:
      - ./config:/config
      - ./assets:/assets #optional
    ports:
      - 3000:3000
      - 69:69/udp
      - 8080:80 #optional
    restart: unless-stopped
Start the services:
docker compose up -dCheck to be sure the container is running:
$ docker compose ps
NAME         IMAGE                                   COMMAND   SERVICE      CREATED          STATUS          PORTS
netbootxyz   lscr.io/linuxserver/netbootxyz:latest   "/init"   netbootxyz   11 minutes ago   Up 11 minutes   0.0.0.0:69->69/udp, :::69->69/udp, 0.0.0.0:3000->3000/tcp, :::3000->3000/tcp, 0.0.0.0:8080->80/tcp, [::]:8080->80/tcp
To access container shell while it’s running use:
docker exec -it netbootxyz /bin/bashGet container version number:
docker inspect -f '{{ index .Config.Labels "build_version" }}' netbootxyzGet image version number:
docker inspect -f '{{ index .Config.Labels "build_version" }}' lscr.io/linuxserver/netbootxyz:latestIf you want to see container logs run:
docker logs netbootxyzThe container homepage is accessible at http://ServerIP:3000/
3 – DHCP Configurations
To PXE boot a system you will need an existing DHCP server where you can set this TFTP server as your DHCP boot destination.
There is an option of setting up your own DHCP server and configuring next-server parameter in the settings. See example below for /etc/dhcp/dhcpd.conf configuration.
authoritative;
ddns-update-style interim;
default-lease-time 14400;
max-lease-time 14400;
allow booting;
allow bootp;
option arch code 93 = unsigned integer 16;

subnet 192.168.177.0 netmask 255.255.255.0 {
  range 192.168.177.100 192.168.177.254;  # Change this range as appropriate for your network
  next-server 192.168.177.2;              # Change this to the address of your netboot.xyz TFTP server
  option subnet-mask 255.255.255.0;
  option routers 192.168.177.1;           # Change this to the address of your router
  option broadcast-address 192.168.177.255;
  option domain-name "mylab.example.com";  # This is optional
  option domain-name-servers 1.1.1.1;
  if exists user-class and ( option user-class = "iPXE" ) {
    filename "http://boot.netboot.xyz/menu.ipxe";
  } elsif option arch = encode-int ( 16, 16 ) {
    filename "http://boot.netboot.xyz/ipxe/netboot.xyz.efi";
    option vendor-class-identifier "HTTPClient";
  } elsif option arch = 00:07 {
    filename "netboot.xyz.efi";
  } else {
    filename "netboot.xyz.kpxe";
  }
}
Where 192.168.177.254 is the IP address of netboot.xyz server.
Some router setup examples
Let’s consider some router examples on how to update DHCP server settings to configure next server address pointing to our TFFP server with boot file names.
netboot.xyz boot file types
Below is a list of bootfile names you can set as the boot file in the DHCP configuration.
| bootfile name | description |
|---|---|
netboot.xyz.kpxe | Legacy DHCP boot image file, uses built-in iPXE NIC drivers |
netboot.xyz-undionly.kpxe | Legacy DHCP boot image file, use if you have NIC issues |
netboot.xyz.efi | UEFI boot image file, uses built-in UEFI NIC drivers |
netboot.xyz-snp.efi | UEFI w/ Simple Network Protocol, attempts to boot all net devices |
netboot.xyz-snponly.efi | UEFI w/ Simple Network Protocol, only boots from device chained from |
netboot.xyz-arm64.efi | DHCP EFI boot image file, uses built-in iPXE NIC drivers |
netboot.xyz-arm64-snp.efi | UEFI w/ Simple Network Protocol, attempts to boot all net devices |
netboot.xyz-arm64-snponly.efi | UEFI w/ Simple Network Protocol, only boots from device chained from |
netboot.xyz-rpi4-snp.efi | UEFI for Raspberry Pi 4, attempts to boot all net devices |
OPNsense
Navigate to Services -> DHCP Server, then choose the network name to change DHCP settings for. Set TFTP server IP

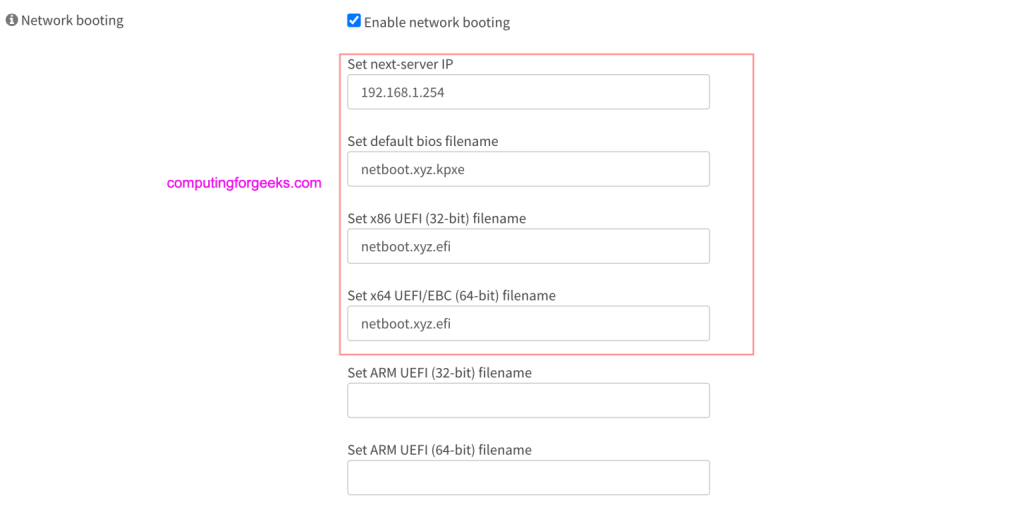
Set IP address of your server under “Network Booting” > Advanced section.

Set as below.
- Tick to enable network booting
- Set next-server IP to your server IP address
- Set Default BIOS file name to
netboot.xyz.kpxe - Set UEFI 32 and 64 bit filename to
netboot.xyz.efi

pfSense
The settings are similar to OPNsense. See screenshot below.

Dnsmasq/DD-WRT/OpenWRT/Tomato/PIHOLE
Various locations to set Additional/Custom DNSMASQ options in UI or config files Set the following lines:
dhcp-match=set:bios,60,PXEClient:Arch:00000
dhcp-boot=tag:bios,netboot.xyz.kpxe,,YOURSERVERIP
dhcp-match=set:efi32,60,PXEClient:Arch:00002
dhcp-boot=tag:efi32,netboot.xyz.efi,,YOURSERVERIP
dhcp-match=set:efi32-1,60,PXEClient:Arch:00006
dhcp-boot=tag:efi32-1,netboot.xyz.efi,,YOURSERVERIP
dhcp-match=set:efi64,60,PXEClient:Arch:00007
dhcp-boot=tag:efi64,netboot.xyz.efi,,YOURSERVERIP
dhcp-match=set:efi64-1,60,PXEClient:Arch:00008
dhcp-boot=tag:efi64-1,netboot.xyz.efi,,YOURSERVERIP
dhcp-match=set:efi64-2,60,PXEClient:Arch:00009
dhcp-boot=tag:efi64-2,netboot.xyz.efi,,YOURSERVERIP
Ensure you restart the DNSMASQ service after the changes.
Unifi Security Gateway (with the controller)
Navigate to Networks -> LAN (or other network you need to boot from) -> ADVANCED DHCP OPTIONS
- Tick to enable network boot
- Server – Set YOURSERVERIP
- Filename –
netboot.xyz.kpxe
Microsoft Server DHCP
- Run the DHCP program
- Under Scope/Scope Options
- check option 066 and enter the FQDN or IP of your TFTP boot server
- check option 067 and enter one of the following bootfile names:
- Default BIOS file name –
netboot.xyz.kpxe - UEFI 32 bit file name-
netboot.xyz.efi - UEFI 64 bit file name-
netboot.xyz.efi
4 – Boot VM instance from PXE
Installation from Virt-install command line interface:
sudo virt-install --connect qemu:///system \
    --name testvm \
    --network=bridge:br0 --pxe \
    --ram=2048 \
    --vcpus=2 \
    --os-type=linux --os-variant=rhl8.0 \
--disk path=/var/lib/libvirt/images/testvm.qcow2,size=40--network=bridge:br0– Configures the VM’s networking to use a bridge namedbr0. Bridged networking allows the VM to appear on the same network as the host machine, similar to a physical machine. The PXE server should be available on the same network.--pxe– Configures the VM to boot via PXE (Preboot Execution Environment). PXE allows the VM to boot from a network server, typically used for network-based installations.
Connect to the instance console from virt-manager or Cockpit to continue with the installation.

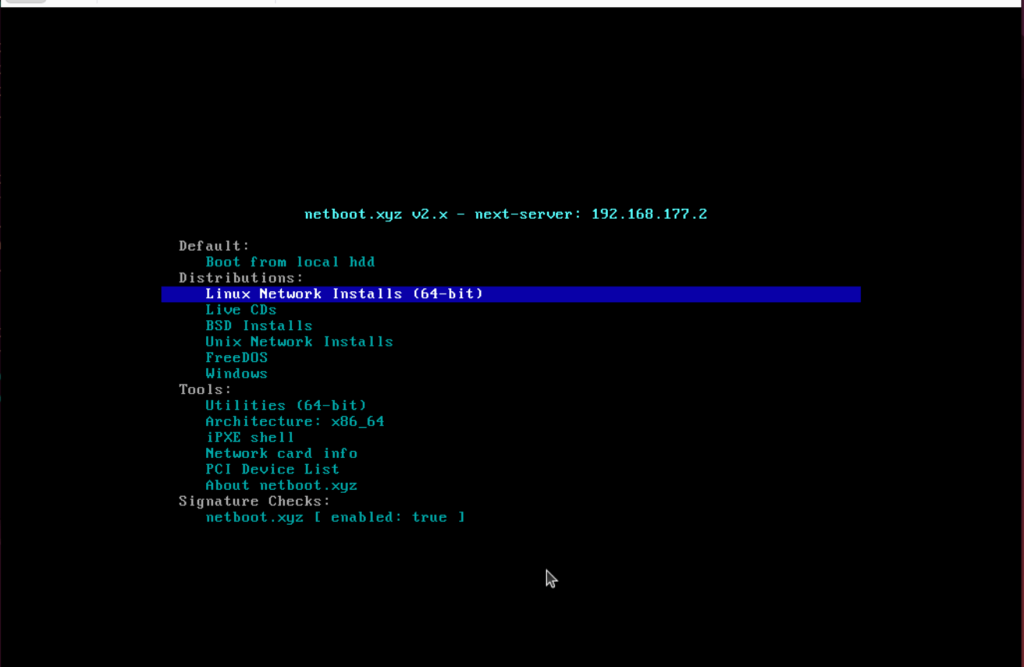
From netboot.xyz menu, you can select the operating system that you will want to install, or boot from Live CDs. There are also tools and utilities that can be accessed from the same installer.
More guides from our team:


