
In this guide, we are going to look at how to install Wiki.js on a Debian 12/11 Linux system. Wiki.js is a free and open-source wiki app built on Node.js, MongoDB, Git and Markdown. It is modern and powerful and optimized to conserve CPU resources. With Wiki.js, all content is written in markdown format, saved into markdown files and automatically synced to your remote Git repository.
Some Wiki.js features include the following:
- Free and open-source
- Beautiful design for modern web
- Access control integration
- Lightweight and powerful
- Inbuilt fast Node.js engine
- Markdown editing
- Intuitive assets management
Step 1: Update and install Required Packages
Update your Debian to packages first with the below commands
$ sudo apt-get update
$ sudo apt-get upgrade
$ sudo reboot
The following are requirements for the installation of Wiki.js:
- Node.js 6.11.1 to 10.x is required.
- MongoDB version 3.2 or later.
- Git version 2.7.4 or later.
- Web Server software such as NGINX, Apache, Caddy, H2O…
- An empty Git repository (optional).
Run the below command to install the necessary packages required for Debian OS basic administration.
$ sudo apt install -y curl wget vim git unzip socat sudo bash-completion apt-transport-https build-essential dirmngrStep 2: Install Node.js and NPM
Given that Wiki.js is based on Node.js, we will install the most recent version as shown below:
$ curl -sL https://deb.nodesource.com/setup_22.x | sudo -E bash -
$ sudo apt install -y nodejs
Step 3: Install PostgreSQL Database Server
PostgreSQL is the recommended database server for best performance and feature compatibility. Run the following command to install PostgreSQL on Debian 12.
$ sudo apt install curl ca-certificates
$ sudo install -d /usr/share/postgresql-common/pgdg
$ sudo curl -o /usr/share/postgresql-common/pgdg/apt.postgresql.org.asc --fail https://www.postgresql.org/media/keys/ACCC4CF8.asc
$ . /etc/os-release
$ sudo sh -c "echo 'deb [signed-by=/usr/share/postgresql-common/pgdg/apt.postgresql.org.asc] https://apt.postgresql.org/pub/repos/apt $VERSION_CODENAME-pgdg main' > /etc/apt/sources.list.d/pgdg.list"

$ sudo apt update
$ sudo apt -y install postgresql
Then start and enable MongoDB:
sudo systemctl enable --now postgresqlConfirm PostgreSQL status:

Create Wiki.js Database
sudo -i -u postgres
psql -c "CREATE USER wikijs WITH PASSWORD 'StrongP@assword';"
createdb wiki -O wikijs
exit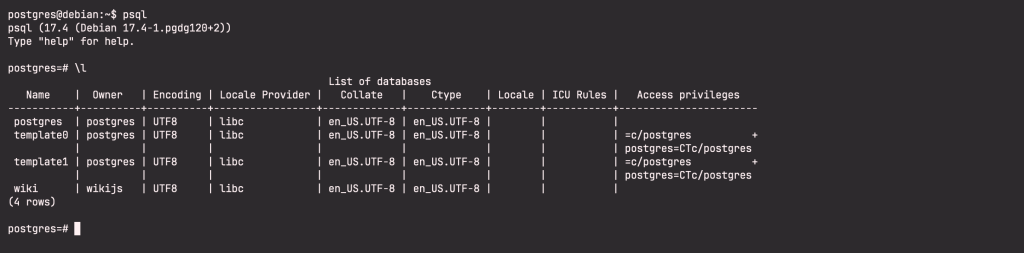
Step 4: Install Nginx Web Server
Wiki.js doesn’t need any actual web server (such as nginx or Apache). However, if you require advanced network configuration you might need to put a reverse proxy in front of Wiki.js.
We will be using Nginx as a webserver for Wiki.js. Run the following commands to install:
$ sudo apt install curl gnupg2 ca-certificates lsb-release debian-archive-keyring
$ curl https://nginx.org/keys/nginx_signing.key | gpg --dearmor \
    | sudo tee /usr/share/keyrings/nginx-archive-keyring.gpg >/dev/null
$ echo "deb [signed-by=/usr/share/keyrings/nginx-archive-keyring.gpg] \
http://nginx.org/packages/debian `lsb_release -cs` nginx" \
    | sudo tee /etc/apt/sources.list.d/nginx.list
$ sudo apt update
$ sudo apt install nginx
Step 5: Install Let’s Encrypt for Wiki.js (Optional)
Install Acme.sh to use in obtaining Let’s Encrypt certificate:
$ sudo su -
$ git clone https://github.com/Neilpang/acme.sh.git
$ cd acme.sh
$ ./acme.sh --install --accountemail [email protected]
$ source ~/.bashrc
$ cd ~
Obtain RSA and ECC/ECDSA certificates for your hostname:
# RSA 2048
acme.sh --issue --standalone -d wiki.example.com --keylength 2048
# ECDSA
acme.sh --issue --standalone -d wiki.example.com --keylength ec-256
Create folders to store your certificates
mkdir -p /etc/letsencrypt/wiki.example.com
mkdir -p /etc/letsencrypt/wiki.example.com_ecc
Copy/install the certificates to the created directories
# RSA
acme.sh --install-cert -d example.com \
--cert-file /etc/letsencrypt/wiki.example.com/cert.pem \
--key-file /etc/letsencrypt/wiki.example.com/private.key \
--fullchain-file /etc/letsencrypt/wiki.example.com/fullchain.pem \
# ECC/ECDSA
acme.sh --install-cert -d example.com --ecc \
--cert-file /etc/letsencrypt/wiki.example.com_ecc/cert.pem \
--key-file /etc/letsencrypt/wiki.example.com_ecc/private.key \
--fullchain-file /etc/letsencrypt/wiki.example.com_ecc/fullchain.pem
# Exit root
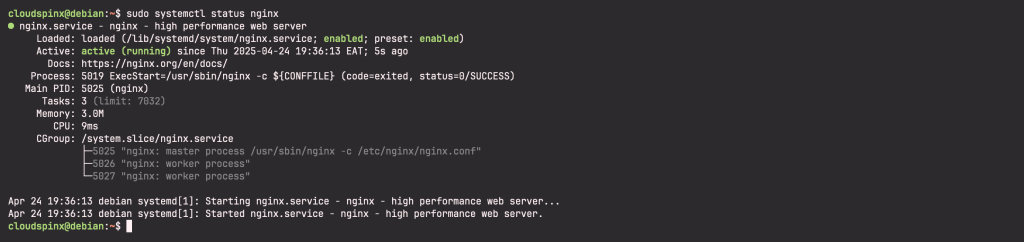
exitNow start and enable Nginx service with the following commands:
sudo systemctl enable --now nginxSample:
Step 6: Download and Install Wiki.js
Download the latest version of Wiki.js:
wget https://github.com/Requarks/wiki/releases/latest/download/wiki-js.tar.gzCreate a project directory and update ownership of the directory to your user:
sudo mkdir -p /var/www/wiki.js
sudo chown -R [your_user]:[your_user] /var/www/wiki.js
Please extract the package to the directory you have just created:
tar xzf wiki-js.tar.gz -C /var/www/wiki.js
cd /var/www/wiki.js
Rename the sample config file to config.yml:
mv config.sample.yml config.ymlIf you obtained Let’s Encrypt certificates for your domain, include the paths in the SSL section of the config.yml file. While in Wiki.js directory, run the below command to download and install Wiki.js:
node serverSample Output:
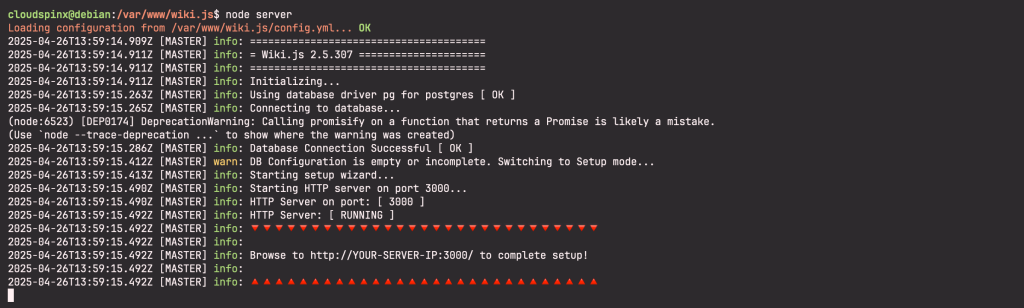
Start the configuration wizard using the below command:
node wiki configureYou will be prompted to open wiki.js from your browser to continue configuration. Visit http://<your-server-ip>:3000. Ensure to have allowed port 3000 on the firewall if you have an active firewall. On your browser, you should see a page as below:
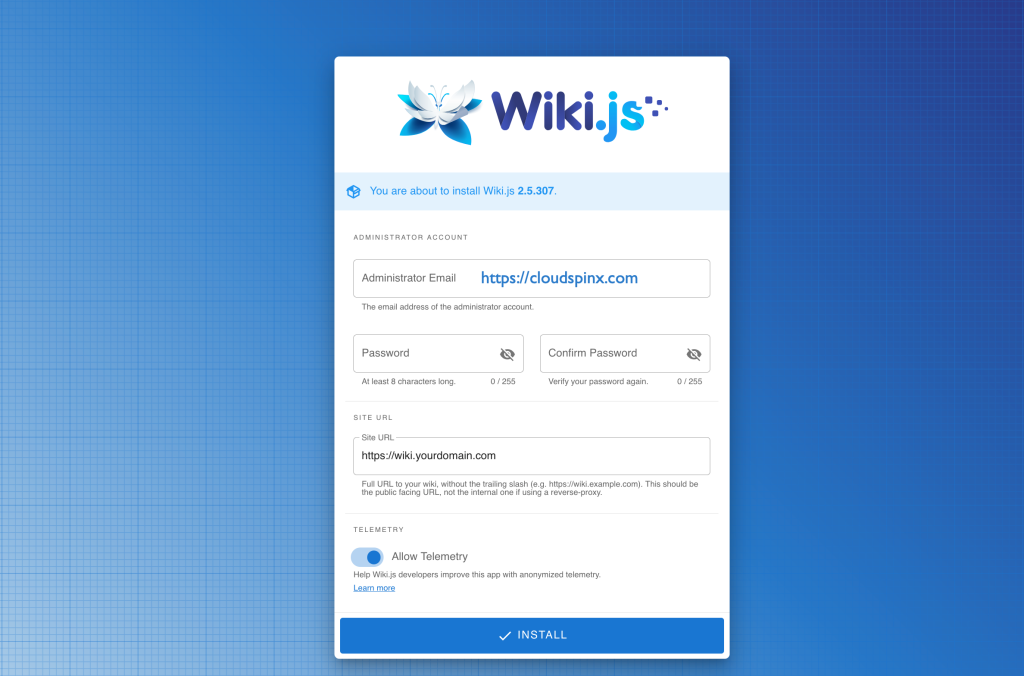
Configure the Admin account and click Install:

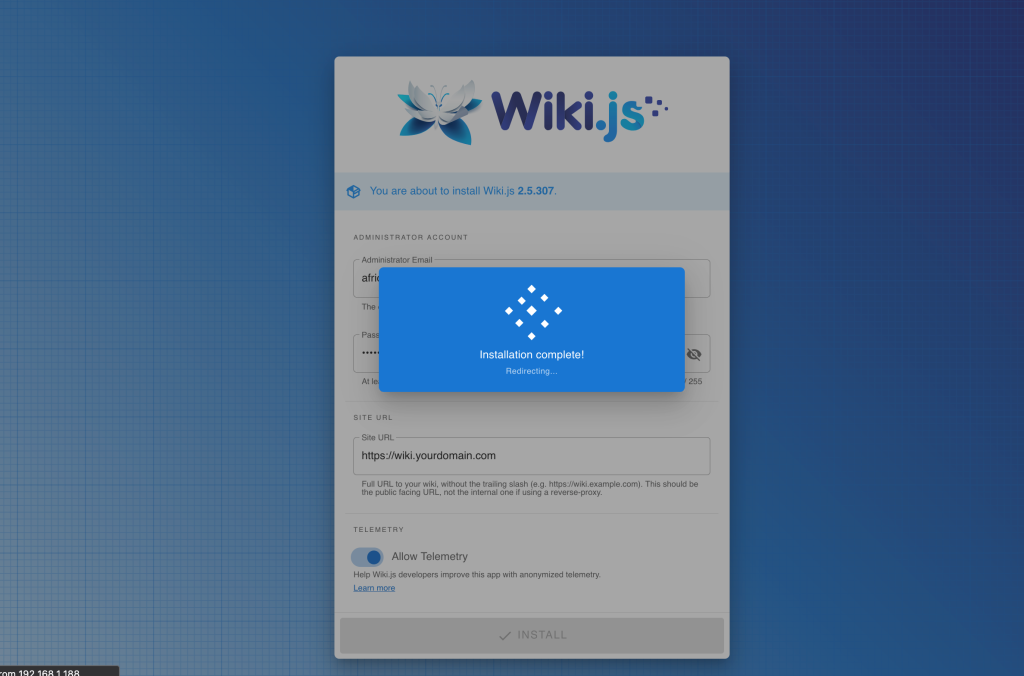
The Installation should only take a moment and should be completed shortly:
You will be redirected to Wiki.js’s login package:

Upon successful login, you will be redirected to Wiki.js’s homepage.
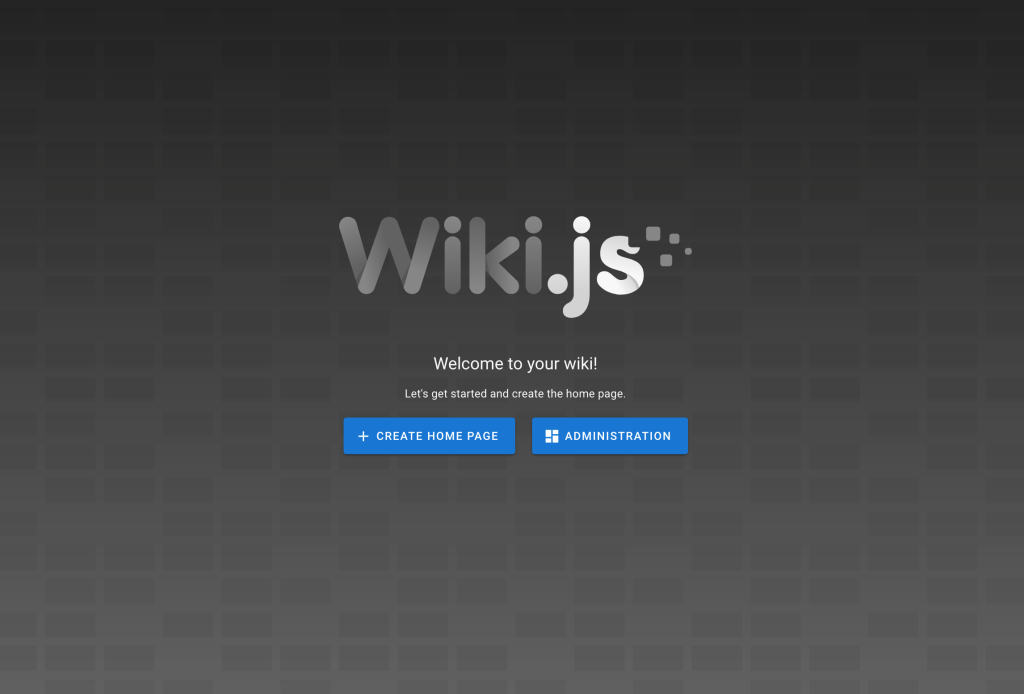
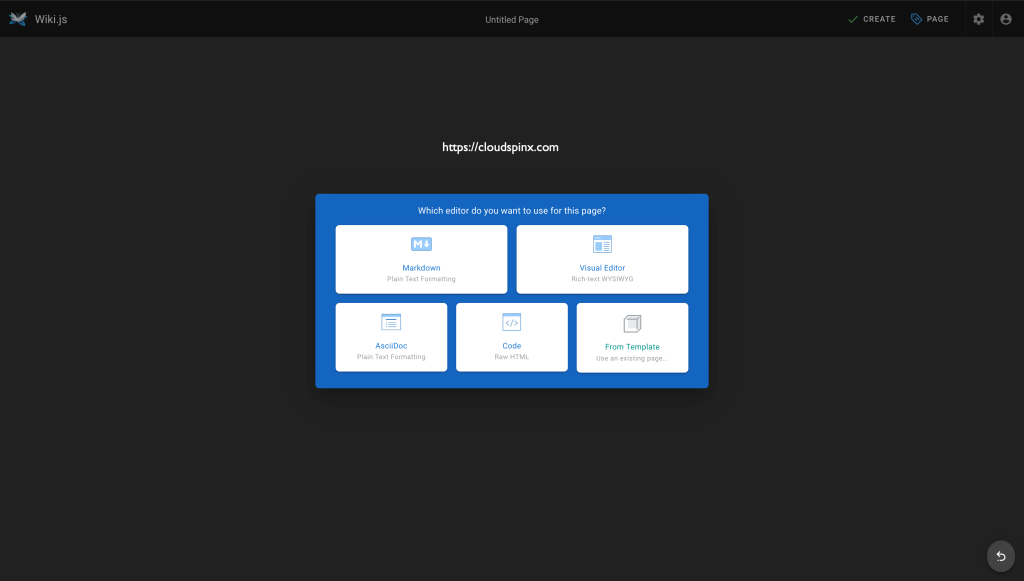
Click on CREATE HOME PAGE to create a new home page:
To acces the Administration dashboard, click ADMINISTRATION in the default home page:
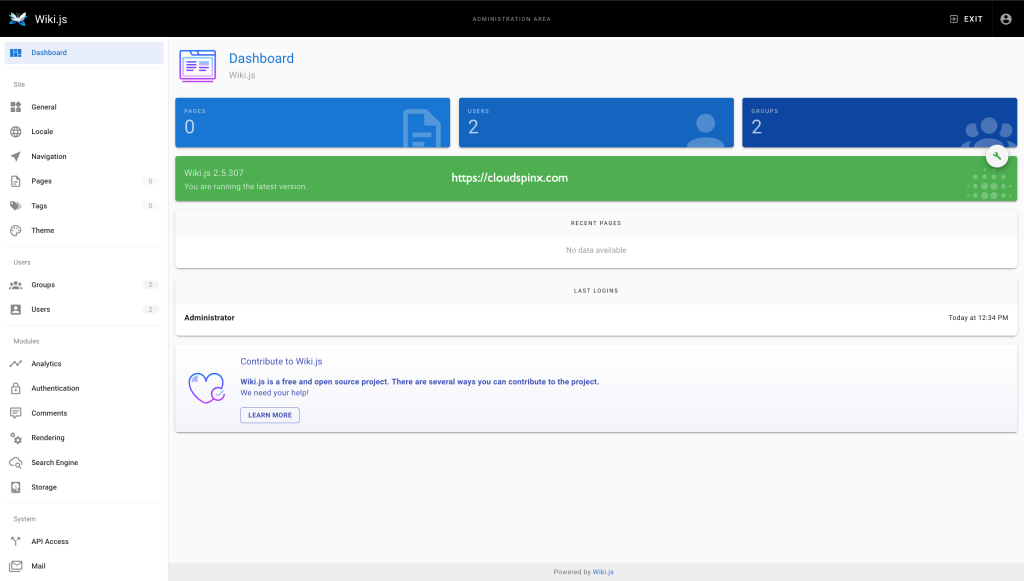
Check your system info:

Step 7: Run Wiki.js as a Service
For a smoother experience and for easire management, you can run Wiki.js as a service on your server. Create a new file named wiki.service inside directory /etc/systemd/system.
sudo vim /etc/systemd/system/wiki.serviceThen add the following contents to the file:
[Unit]
Description=Wiki.js
After=network.target

[Service]
Type=simple
ExecStart=/usr/bin/node server
Restart=always
# Consider creating a dedicated user for Wiki.js here:
User=nobody
Environment=NODE_ENV=production
WorkingDirectory=/var/www/wiki.js

[Install]
WantedBy=multi-user.target
The setup assumes that your Wiki.js is installed at /var/www/wiki.js, if that’s not the case, change the directory accordingly. Save the file and exit.
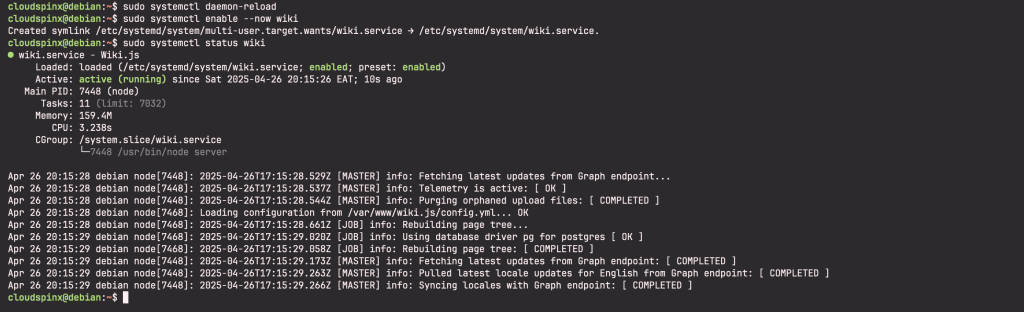
Then reload systemd and start Wiki.js:
sudo systemctl daemon-reload
sudo systemctl enable --now wiki
sudo systemctl status wiki
Wiki.js status:
We have successfully set up Wiki.js on Debian 12/11. I trust the guide has been useful. Enjoy using Wiki.js.
More articles available in our website:


