

Improving your terminal productivity is the aim of every Developer and Engineer working for many hours on a Shell environment. The default shell in macOS is Bash – good but not for all terminal operations, especially as scripting environment. Installing themes, plugins, setting default aliases and functions can proof to be a challenge on Bash. In this guide we show you how to install Zsh and oh-my-zsh framework that simplifies Zsh management.
You should have an updated macOS machine with brew installed before you continue. If brew is not available you can quickly install using the following commands:
/bin/bash -c "$(curl -fsSL https://raw.githubusercontent.com/Homebrew/install/HEAD/install.sh)"It will automatically install Developer tools if not available in your system. I also advice you install iTerm2 as your default terminal on macOS:
$ brew install --cask iterm2
Updating Homebrew...
==> Tapping homebrew/cask
Cloning into '/usr/local/Homebrew/Library/Taps/homebrew/homebrew-cask'...
remote: Enumerating objects: 590279, done.
remote: Counting objects: 100% (23/23), done.
remote: Compressing objects: 100% (21/21), done.
remote: Total 590279 (delta 10), reused 8 (delta 2), pack-reused 590256
Receiving objects: 100% (590279/590279), 260.31 MiB | 3.55 MiB/s, done.
Resolving deltas: 100% (417062/417062), done.
Tapped 3923 casks (4,003 files, 279.2MB).
==> Downloading https://iterm2.com/downloads/stable/iTerm2-3_4_9.zip
######################################################################## 100.0%
==> Installing Cask iterm2
==> Purging files for version 3.4.9 of Cask iterm2
...
1: Install Zsh on macOS
Zsh (Z shell) is a shell for Unix like operating systems that’s an improvement of the Bourne Shell(Bash). Zsh can used as an interactive login shell and as a command interpreter for shell scripting. With Oh-My-Zsh framework added to the mix management of Zsh is much simplified.
Use brew to install zsh:
brew install zshOnce the Zsh is installed we can switch our default shell from Bash to Zsh
$ chsh -s $(which zsh)
Changing shell for jkmutai.
Password for jkmutai:
chsh: /usr/local/bin/zsh: non-standard shell
Installed version can be checked with the following command:
$ zsh --version
zsh 5.8 (x86_64-apple-darwin20.1.0)
2: Install Oh My Zsh on macOS
Oh My Zsh is a free to use and an open source framework for managing your zsh configuration. It has a big community and many contributors improving the project.
To install Oh My Zsh framework on your macOS use the next command:
sh -c "$(curl -fsSL https://raw.githubusercontent.com/robbyrussell/oh-my-zsh/master/tools/install.sh)"Your installation process will have an output similar to this:
Cloning Oh My Zsh...
Cloning into '/Users/jkmutai/.oh-my-zsh'...
remote: Enumerating objects: 1241, done.
remote: Counting objects: 100% (1241/1241), done.
remote: Compressing objects: 100% (1200/1200), done.
remote: Total 1241 (delta 19), reused 1220 (delta 19), pack-reused 0
Receiving objects: 100% (1241/1241), 868.09 KiB | 1.02 MiB/s, done.
Resolving deltas: 100% (19/19), done.

Looking for an existing zsh config...
Using the Oh My Zsh template file and adding it to ~/.zshrc.

         __                                     __
  ____  / /_     ____ ___  __  __   ____  _____/ /_
 / __ \/ __ \   / __ `__ \/ / / /  /_  / / ___/ __ \
/ /_/ / / / /  / / / / / / /_/ /    / /_(__  ) / / /
\____/_/ /_/  /_/ /_/ /_/\__, /    /___/____/_/ /_/
                        /____/                       ....is now installed!


Before you scream Oh My Zsh! please look over the ~/.zshrc file to select plugins, themes, and options.

• Follow us on Twitter: https://twitter.com/ohmyzsh
• Join our Discord server: https://discord.gg/ohmyzsh
• Get stickers, shirts, coffee mugs and other swag: https://shop.planetargon.com/collections/oh-my-zsh

➜  ~
An upgrade can be performed at any point in time after the installation:
$ omz update
Updating Oh My Zsh
From https://github.com/ohmyzsh/ohmyzsh
 * branch            master     -> FETCH_HEAD
Current branch master is up to date.
         __                                     __
  ____  / /_     ____ ___  __  __   ____  _____/ /_
 / __ \/ __ \   / __ `__ \/ / / /  /_  / / ___/ __ \
/ /_/ / / / /  / / / / / / /_/ /    / /_(__  ) / / /
\____/_/ /_/  /_/ /_/ /_/\__, /    /___/____/_/ /_/
                        /____/

Oh My Zsh is already at the latest version.
To keep up with the latest news and updates, follow us on Twitter: https://twitter.com/ohmyzsh
Want to get involved in the community? Join our Discord: https://discord.gg/ohmyzsh
Get your Oh My Zsh swag at: https://shop.planetargon.com/collections/oh-my-zsh
With the installation of iTerm2, Zsh and Oh-My-Zsh framework done, restart iTerm2 to start using the new environment.
3: Changing Zsh Theme / Enable Plugins
Default configurations for your Zsh environment are stored in the file ~/.zshrc. It is usable without any customizations but you can change the theme in the line:
$ vim ~/.zshrc
ZSH_THEME="set-theme-name"
Take a look at the Themes and Plugins for more details. Pick the name of a theme you’ll want to use.
Once the theme has been changed, run the command below to apply the changes. Alternatively, launch a new shell tab or window to use the new theme.
source ~/.zshrc4: Enable Zsh Plugins
You can add plugins to your Zsh inside the plugin array in your ~/.zshrc. See example of my setup:
$ vim ~/.zshrc
plugins=(git brew ansible battery cp doctl extract history npm oc pm2 thefuck tmux vagrant vagrant-prompt  zsh-navigation-tools)
Install zsh-autosuggestions, zsh-syntax-highlighting Plugins
Clone zsh-autosuggestions plugin repository to the “Oh My ZSH” plugins directory:
git clone https://github.com/zsh-users/zsh-autosuggestions $ZSH_CUSTOM/plugins/zsh-autosuggestionsPerform the same for zsh-syntax-highlighting:
git clone https://github.com/zsh-users/zsh-syntax-highlighting.git ${ZSH_CUSTOM:-~/.oh-my-zsh/custom}/plugins/zsh-syntax-highlightingInstall zsh-completions plugin
Clone the project to plugins directory:
git clone https://github.com/zsh-users/zsh-completions ${ZSH_CUSTOM:=~/.oh-my-zsh/custom}/plugins/zsh-completionsThen activate the plugins in ~/.zshrc:
$ vim ~/.zshrc
# Add zsh-syntax-highlighting and
plugins=(zsh-autosuggestions zsh-syntax-highlighting zsh-completions)
5: Installing other Zsh themes
We have a guide on top Zsh themes you can install not provided by Oh-my-Zsh framework:
Install Spaceship theme
Install using brew:
brew install spaceshipFor initializing prompt system add this to your .zshrc:
$ vim ~/.zshrc
autoload -U promptinit; promptinit
prompt spaceship
Install starship theme
Install using brew:
brew install starshipAdd the following to the end of ~/.zshrc:
eval "$(starship init zsh)"Install powerlevel10k
powerlevel10k can be installed as shown below.
brew install romkatv/powerlevel10k/powerlevel10k
echo "source $(brew --prefix)/opt/powerlevel10k/powerlevel10k.zsh-theme" >>~/.zshrc
Installing Fonts
Powerline fonts
git clone https://github.com/powerline/fonts.git
cd fonts
./install.sh
6: Install iTerm2 Color Schemes
We also need to change iTerm2 color schemes for more beauty and look. Navigate to iTerm2-Color-Schemes and download the ZIP folder or clone folder using git.
cd Downloads
wget https://github.com/mbadolato/iTerm2-Color-Schemes/archive/refs/heads/master.zip
Then, extract the downloaded folder to get the schemes folder.
uzip master.zipNavigate to iTerm2>Preferences>Profile>Colors>Color Presets
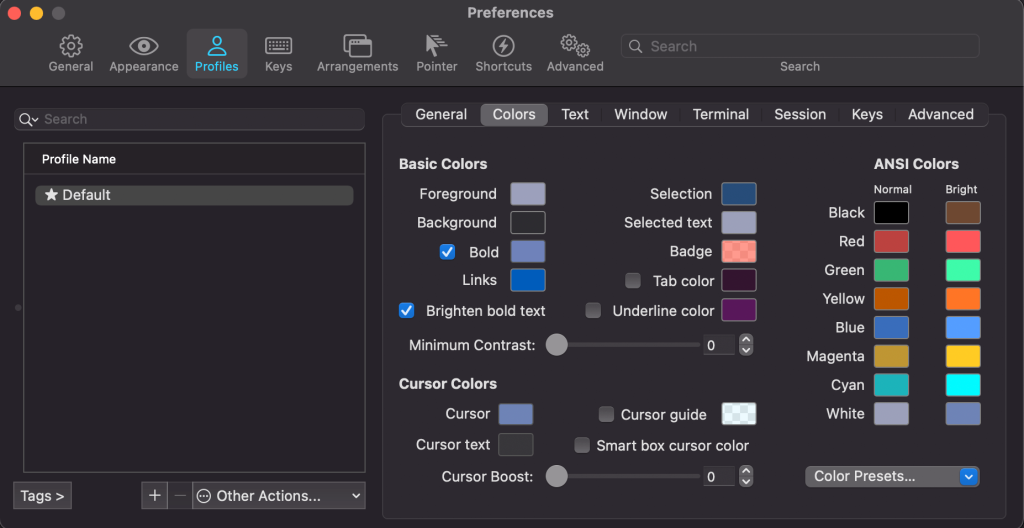
Then click on Import to import the scheme.

Navigate to schemes folder and select all .itermcolors files to import.
This should give you a functional setup of Zsh with themes and plugins enabled. Our terminal of choice is iTerm2 but you can choose another option such as Kitty and many other terminals available for macOS.
More guides on macOS:


