Do you have virtual machines running on a KVM virtualization host and want to move them to a Proxmox VE host? In this tutorial, we’ll walk you through the necessary steps to migrate your virtual machines from KVM (libvirt) to Proxmox Virtual Environment. Since Proxmox is based on KVM, the transition is smoother and much easier because the disk formats are compatible and we don’t need any disk conversion tooling.
So without further ado, let’s jump into the step-by-step migration process for a Virtual Machine from KVM into Proxmox host.
🔥 Check out the #1 best-selling eBook on KVM Virtualization – your ultimate guide to mastering it!
Step 1: List VM instances on KVM
Login to your KVM host and identify the virtual machines that you want moved to Proxmox hypervisor.
# virsh list --all
 Id   Name                State
------------------------------------
 4    vpn-server02        running
 11   monitoring-server   running
 15   radius02            running
 16   appserver-02        running
 -    appserver-ent-01    shut off
 -    dbmaster02          shut off
In this guide, we will perform migration of radius02 server to Proxmox from current KVM host.
Step 2: Identify VM Disk path
Next we need to identify the disk path and format.
sudo virsh dumpxml radius02 | grep sourceIn the output, look for “source file” – this is the actual disk for the root disk.
<resource>
  </resource>
      <source file='/var/lib/libvirt/images/radius-02.qcow2' index='2'/>
      <source bridge='br-ex2'/>
      <source path='/dev/pts/2'/>
      <source path='/dev/pts/2'/>
      <source mode='bind' path='/var/lib/libvirt/qemu/channel/target/domain-15-radius02/org.qemu.guest_agent.0'/>
The image format will be qcow2 in most instances, if not you can convert it using:
qemu-img convert -O qcow2 source-image.img destination-image.qcow2Step 3: Shut down VM and copy disk
Next ensure the virtual machine is powered off:
sudo virsh shutdown <VM>If it gets stuck, you can forcefully shut it down:
sudo virsh destroy <VM>After the virtual machine is powered off, copy the qcow2 disk to Proxmox server:
rsync -avhP --sparse <image-path> root@ProxmoxIP:/var/lib/vz/images/See example below:
rsync -avhP --sparse /var/lib/libvirt/images/radius-02.qcow2 [email protected]:/var/lib/vz/images/Step 4: Create VM on Proxmox VE
Listing available storage pools in your Proxmox server:
# pvesm status
Name         Type     Status           Total            Used       Available        %
local         dir     active      1759272388       143180092      1526652452    8.14%
In the output, you may get more than one storage pool depending on your storage configurations.
# pvesm status
Name             Type     Status           Total            Used       Available        %
local             dir     active      1884995968        10524288      1874471680    0.56%
local-zfs     zfspool     active      1875328912          857128      1874471784    0.05%
List network bridges:
# brctl show
bridge name	bridge id		STP enabled	interfaces
vmbr0		8000.9c6b004b2a70	no		eno1
							tap100i0
vmbr1		8000.9c6b004b2a71	no		eno2.4000
From KVM, confirm hardware specifications used earlier for the VM:
$ virsh dumpxml radius02|more
  <name>radius02</name>
  <uuid>eda4c3e6-b0c4-4d94-a2b9-3ad93c84afc9</uuid>
  <metadata>
    <libosinfo:libosinfo xmlns:libosinfo="http://libosinfo.org/xmlns/libvirt/domain/1.0">
      <libosinfo:os id="http://redhat.com/rhel/8.0"/>
    </libosinfo:libosinfo>
  </metadata>
  <memory unit='KiB'>4194304</memory>
  <currentMemory unit='KiB'>4194304</currentMemory>
  <vcpu placement='static'>2</vcpu>
  <resource>
    <partition>/machine</partition>
  </resource>
  <os>
    <type arch='x86_64' machine='pc-q35-rhel8.6.0'>hvm</type>
    <boot dev='hd'/>
  </os>
....
Then set the RAM, CPU, Network, Storage configurations as variables:
VMID=$(pvesh get /cluster/nextid) # ID of the VM to be created. This is auto-assigned by Proxmox VE
VMNAME=Radius-02 # Name of the VM
RAM=4096         # VM RAM size in MB
CORES=2          # CPU cores for the VM
BRIDGE=vmbr0     # Proxmox network bridge to use
STORAGE=local    # Storage pool to use
Create VM template with exported values.
qm create $VMID \
--name $VMNAME  \
--memory $RAM \
--cores $CORES \
--net0 virtio,bridge=$BRIDGE \
--scsihw virtio-scsi-pci \
--cpu host
Step 5: Import disk image exported from KVM
The VM should appear in the list:
# qm list
      VMID NAME                 STATUS     MEM(MB)    BOOTDISK(GB) PID
       100 dbmaster2            running    65536            100.00 542374
       101 Radius-02            stopped    4096               0.00 0
Set the path for the IMAGE variable to the imported disk path:
IMAGE=/var/lib/vz/images/radius-02.qcow2Confirm the disk is not empty:
# du -sh $IMAGE
36G	/var/lib/vz/images/radius-02.qcow2
Import the base image into the actual VM storage disk.
qm importdisk $VMID $IMAGE $STORAGEThe import process will begin shortly:
....
importing disk '/var/lib/vz/images/radius-02.qcow2' to VM 101 ...
Formatting '/var/lib/vz/images/101/vm-101-disk-0.raw', fmt=raw size=107374182400 preallocation=off
transferred 0.0 B of 100.0 GiB (0.00%)
transferred 1.0 GiB of 100.0 GiB (1.00%)
transferred 2.0 GiB of 100.0 GiB (2.00%)
transferred 3.0 GiB of 100.0 GiB (3.00%)
transferred 4.0 GiB of 100.0 GiB (4.00%)
...
transferred 91.0 GiB of 100.0 GiB (91.03%)
transferred 92.0 GiB of 100.0 GiB (92.03%)
transferred 93.0 GiB of 100.0 GiB (93.03%)
transferred 94.0 GiB of 100.0 GiB (94.03%)
transferred 95.0 GiB of 100.0 GiB (95.03%)
transferred 96.0 GiB of 100.0 GiB (96.03%)
transferred 97.0 GiB of 100.0 GiB (97.03%)
transferred 98.0 GiB of 100.0 GiB (98.03%)
transferred 99.0 GiB of 100.0 GiB (99.03%)
transferred 100.0 GiB of 100.0 GiB (100.00%)
transferred 100.0 GiB of 100.0 GiB (100.00%)
unused0: successfully imported disk 'local:101/vm-101-disk-0.raw'
Attach the disk into the VM. After import it is not attached.
qm set $VMID --scsihw virtio-scsi-pci --virtio0 $STORAGE:$VMID/vm-$VMID-disk-0.rawIf using LVM or ZFS Pool then use:
qm set $VMID --scsihw virtio-scsi-pci --virtio0 $STORAGE:vm-$VMID-disk-0Change boot order to start with SCSI or VirtIO block device.
qm set $VMID --boot c --bootdisk virtio0Step 6: Start VM from Proxmox UI
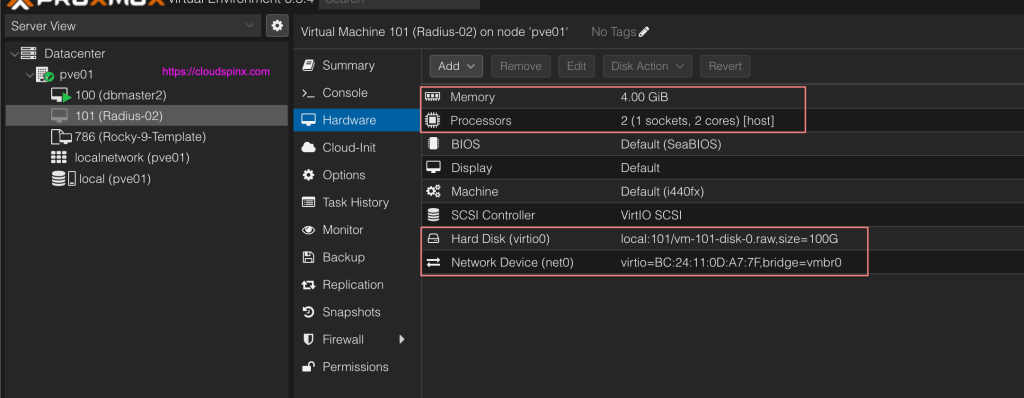
Login to Proxmox web console and confirm VM hardware specifications. The settings can be customized as required.

Attempt to start the VM and confirm it can boot up.

Step 7: Additional VM configurations
- Enable automatic VM start: VM > Options > Start at boot > (Tick to yes)
- Prevent accidental VM deletion: VM > Options > Protection > (Tick to yes)
We have another article for migrating from Proxmox to KVM:


