Databases are key in any production environment to store and organize data for an organization or application. Databases can be classified into two broad categories depending on how data is stored and retrieved. These categories are:
- Relational databases (RDBMS or SQL databases): data is stored in tables and rows, the tables are then linked using keys. They include MySQL, MariaDB, PostgreSQL, SQLite e.t.c
- Non-relational databases(NoSQL databases): data is stored using a storage model optimized for specific requirements. They include Couchbase, Apache Cassandra, MongoDB, Redis, Apache HBase e.t.c
MySQL is a popular open-source developed and distributed by the Oracle Corporation. It was first developed in 1995 in Sweden. In 2000, it was declared open-source and created another headquarter in the USA in 2002. In 2003, MySQL entered a partnership with SAP where many features were added to it. In 2008, MySQL was acquired by Sun Microsystems which was later acquired by Oracle in 2009.
MariaDB is an open-source relational database created as a fork of the MySQL database. It was developed after Oracle intended to make MySQL an enterprise/paid version in 2010. MariaDB holds a high reputation in performance, stability, openness, and the MariaDB Foundation which accepts contributions on technical merit. MariaDB also offers several other features that include advanced clustering with Galera Cluster 4 and compatibility features with the Oracle Database.
When setting up databases, it is crucial to secure/harden the installation by setting a root password. However, due to its complexity or when dealing with large environments, the password might be forgotten. You do not need to worry because this guide will sort it out! Today, we will learn how to recover the MySQL / MariaDB root user password.
Getting Started
For this guide, I assume that you have MySQL / MariaDB. If you need to make an installation, you can use any of the guides below:
If you already have MySQL / MariaDB, check the version:
mysql --versionSample Output For MySQL
##For MySQL 5.7
mysql  Ver 14.14 Distrib 5.7.40, for Linux (x86_64) using  EditLine wrapper

##For MySQL 8.0
mysql  Ver 8.0.31 for Linux on x86_64 (MySQL Community Server - GPL)
Sample Output For MariaDB:
mysql Ver 15.1 Distrib 10.6.11-MariaDB, for debian-linux-gnu (x86_64) using readline 5.2Step 1 – Stop the MySQL / MariaDB Database Server
We will begin by stopping the Database Server. This can be done using the commands below:
For MySQL
sudo systemctl stop mysql||sudo systemctl stop mysqldFor MariaDB:
sudo systemctl stop mariadbAfter stopping the server, you can now proceed and reset the password.
Step 2 – Restart the Database Server Without Permission Checking
This action will run the MySQL and MariaDB database server without loading the user privileges information. This is so vital as it will allow us to log in without providing the root password. The user privileges information is stored in the grant tables which we won’t load here. However, this action is so risky as it can allow anyone to connect to the database and manipulate your data. To mitigate this risk, we will add the –skip-networking flag to prevent other clients from connecting to our database.
The command for this can be executed in two ways:
- For MariaDB and MySQL 5.7(on some distributions):
sudo systemctl set-environment MYSQLD_OPTS="--skip-grant-tables --skip-networking"Now start the service:
##For MySQL
sudo systemctl start mysql||sudo systemctl start mysqld

##For MariaDB
sudo systemctl start mariadb- For MySQL you will need to tweak the MySQL startup:
sudo systemctl edit mysqlThis will open an editor, add the below lines to the file:
[Service]
ExecStart=
ExecStart=/usr/sbin/mysqld --skip-grant-tables --skip-networking
Now save the file and reload the system daemon and start the service:
sudo systemctl daemon-reload
sudo systemctl start mysql
To be sure that the added variables are working, they should be included in the service status
$ systemctl status mysql
● mysql.service - MySQL Community Server
     Loaded: loaded (/lib/systemd/system/mysql.service; enabled; vendor preset: enabled)
    Drop-In: /etc/systemd/system/mysql.service.d
             └─override.conf
     Active: active (running) since Fr 2025-01-25 14:03:06 EAT; 7s ago
       Docs: man:mysqld(8)
             http://dev.mysql.com/doc/refman/en/using-systemd.html
    Process: 5674 ExecStartPre=/usr/share/mysql-8.0/mysql-systemd-start pre (code=exited, status=0/SUCCESS)
   Main PID: 5713 (mysqld)
     Status: "Server is operational"
      Tasks: 38 (limit: 4575)
     Memory: 357.3M
     CGroup: /system.slice/mysql.service
             └─5713 /usr/sbin/mysqld --skip-grant-tables --skip-networking

Fri 25 14:03:04 ubuntu-noble systemd[1]: Starting MySQL Community Server...
Fri 25 14:03:06 ubuntu-noble systemd[1]: Started MySQL Community Server.
Now try connecting to the database server without the root password.
mysql -u rootOn a successful connection, you will see this:
Sample Output for MySQL:
Welcome to the MySQL monitor.  Commands end with ; or \g.
Your MySQL connection id is 2
Server version: 5.7.40 MySQL Community Server (GPL)

Copyright (c) 2000, 2022, Oracle and/or its affiliates.

Oracle is a registered trademark of Oracle Corporation and/or its
affiliates. Other names may be trademarks of their respective
owners.

Type 'help;' or '\h' for help. Type '\c' to clear the current input statement.

mysql>
Sample Output for MariaDB:
Welcome to the MariaDB monitor.  Commands end with ; or \g.
Your MariaDB connection id is 31
Server version: 11.7.1-MariaDB-ubu2404 mariadb.org binary distribution

Copyright (c) 2000, 2018, Oracle, MariaDB Corporation Ab and others.

Type 'help;' or '\h' for help. Type '\c' to clear the current input statement.

MariaDB [(none)]>
Step 3 – Set a new MySQL / MariaDB root user password
After connecting to the database, you can now set a new preferred password, but first, load the grant tables to alter its data:
FLUSH PRIVILEGES;You can now set a new password using the commands below:
- For MySQL 5.7.6 and MariaDB 10.1.20 and later, use the command:
ALTER USER 'root'@'localhost' IDENTIFIED BY 'MY_NEW_PASSWORD';
FLUSH PRIVILEGES;
Remember to replace MY_NEW_PASSWORD with the new desired root password.
If the ALTER command does not work properly, you can execute the below commands:
UPDATE mysql.user SET authentication_string = PASSWORD('MY_NEW_PASSWORD')
WHERE User = 'root' AND Host = 'localhost';
FLUSH PRIVILEGES;- For MySQL 5.7.6 and MariaDB 10.1.20 and earlier, use the command:
SET PASSWORD FOR 'root'@'localhost' = PASSWORD('MY_NEW_PASSWORD');
FLUSH PRIVILEGES;
If all goes well you should see the below output for all queries:
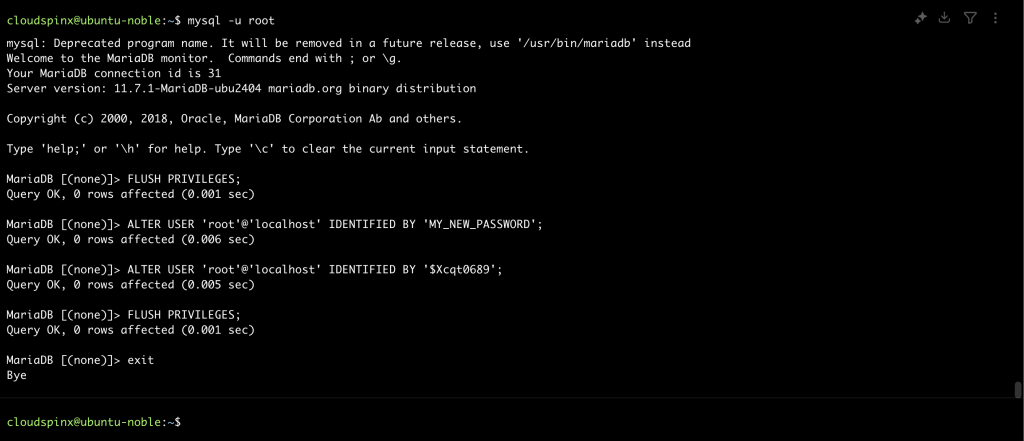
Exit the shell:
mysql> exit
Bye
Step 4 – Restart the MySQL / MariaDB Database Server Normally
Now that you have modified your MySQL / MariaDB root password as desired, you need to stop the running instance and start it normally without any exceptions.
Now reset all the made exceptions:
- For MariaDB and MySQL 5.7(on some distributions):
sudo systemctl unset-environment MYSQLD_OPTS="--skip-grant-tables --skip-networking"- For MySQL 8.0, where you tweaked the MySQL startup:
If you modified your systemd configuration for MYSQL, you will revert the configs with the command:
$ sudo systemctl revert mysql
Removed /etc/systemd/system/mysql.service.d/override.conf.
Removed /etc/systemd/system/mysql.service.d.
Now reload the system daemon
sudo systemctl daemon-reloadRestart the service:
For MySQL
sudo systemctl restart mysql
##OR
sudo systemctl restart mysqld
For MariaDB:
sudo systemctl restart mariadbVerify that the services are running before you proceed.
Step 5 – Verify the Changes
Once the desired password has been created, test if you are able to log in to the database. For this case, you will use the command:
mysql -u root -pProvide the set root password and you will be authenticated as shown:

Voila!
Verdict
We have successfully walked through how to recover the MySQL / MariaDB root user password. At this point, you should be able to access the MySQL / MariaDB instance and execute your SQL queries. I hope this was significant to you.
Related posts: