In the previous article, we evaluated how to Install the Uptime Kuma monitoring tool using Docker and running a docker-compose YAML file. Please start with that article before proceeding to this one. Definitions & features and how to install Uptime Kuma on Ubuntu, Debian, and Fedora using Docker were covered with cool screenshots on dashboard configurations.
In this article, I will show you how to run Kuma Uptime Robot Using PM2. For those new to Node.JS world, PM2 is an advanced process manager for production in Node.js applications. It is a complete daemon process manager designed to help you manage and keep your application online 24/7.
To carry out the steps below, ensure you have the following:
- A Linux system
- User with root privileges.
- Use local volume as NFS is not supported.
The Non-Docker method of installation requires the following tools.
- Node.js version 14 and above.
- git
- pm2
This method of installation is Not recommended for ARM CPU users. Let’s get started.
Update your packages cache index:
## Debian based systems ##
sudo apt update -y

## RHEL based systems ##
sudo yum -y makecache
Step 1: Install Node.js and npm
Once apt packages are updated install Node.js and npm in your system.
1.1 Install the Node.js environment
To install Node.js with all necessary dependencies:
## Debian based systems ##
cd
curl -sL https://deb.nodesource.com/setup_20.x | sudo bash -
sudo apt install nodejs -y

## RHEL based systems ##
curl -sL https://rpm.nodesource.com/setup_20.x | sudo bash -
sudo yum install -y nodejs
Confirm installed version.su
$ node -v
v20.18.3
1.2 Install Node.js using NVM
We will proceed to install and update the nvm. nvm is a version manager for Node.js
curl -o- https://raw.githubusercontent.com/nvm-sh/nvm/master/install.sh | bashThe script clones the nvm repository and sources it.
export NVM_DIR="$HOME/.nvm"
[ -s "$NVM_DIR/nvm.sh" ] && \. "$NVM_DIR/nvm.sh"  # This loads nvm
[ -s "$NVM_DIR/bash_completion" ] && \. "$NVM_DIR/bash_completion"  # This loads nvm bash_completion
Close and start your terminal to start using nvm. Let’s install v16.x.y using nvm. The article requires v14 and above.
nvm install v20The output:
Downloading and installing node v20.18.3...
Downloading https://nodejs.org/dist/v20.18.3/node-v20.18.3-linux-x64.tar.xz...
########################################################################################################################################### 100.0%
Computing checksum with sha256sum
Checksums matched!
Now using node v20.18.3 (npm v10.8.2)
Now using node v20.18.3 (npm v10.8.2)
Creating default alias: default -> v20 (-> v20.18.3)
Step 2: Install Git Version Control
Git is an open-source Distributed Version Control System.
## Debian based systems ##
sudo apt update -y
sudo apt install -y git

## RHEL based systems ##
sudo yum install -y git
2.1 : Clone Uptime Kuma
We will use the same image used in the previous article.
git clone https://github.com/louislam/uptime-kuma.gitOutput:
Cloning into 'uptime-kuma'...
remote: Enumerating objects: 33535, done.
remote: Counting objects: 100% (27/27), done.
remote: Compressing objects: 100% (20/20), done.
remote: Total 33535 (delta 16), reused 7 (delta 7), pack-reused 33508 (from 3)
Receiving objects: 100% (33535/33535), 26.71 MiB | 9.08 MiB/s, done.
Resolving deltas: 100% (25417/25417), done.
Once you have cloned uptime-Kuma, cd to that directory.
cd uptime-kuma2.2 Run setup
Run the uptime-Kuma setup with npm.
npm run setupThe output of the command:
> [email protected] setup
> git checkout 1.23.15 && npm ci --production && npm run download-dist

Note: switching to '1.23.15'.

You are in 'detached HEAD' state. You can look around, make experimental
changes and commit them, and you can discard any commits you make in this
state without impacting any branches by switching back to a branch.

If you want to create a new branch to retain commits you create, you may
do so (now or later) by using -c with the switch command. Example:

  git switch -c <new-branch-name>

Or undo this operation with:

  git switch -

Turn off this advice by setting config variable advice.detachedHead to false

HEAD is now at 32dc76a0 Update to 1.23.15
npm warn config production Use `--omit=dev` instead.
npm warn EBADENGINE Unsupported engine {
npm warn EBADENGINE   package: '@azure/[email protected]',
npm warn EBADENGINE   required: { node: '10 || 12 || 14 || 16 || 18' },
npm warn EBADENGINE   current: { node: 'v20.18.3', npm: '10.8.2' }
...
Downloading dist
https://github.com/louislam/uptime-kuma/releases/download/1.11.1/dist.tar.gz
https://objects.githubusercontent.com/github-production-release-asset-2e65be/382496361/d4c398e4-76af-42b1-8982-ccfc40cf616e?X-Amz-Algorithm=AWS4-HMAC-SHA256&X-Amz-Credential=AKIAIWNJYAX4CSVEH53A%2F20211209%2Fus-east-1%2Fs3%2Faws4_request&X-Amz-Date=20211209T113445Z&X-Amz-Expires=300&X-Amz-Signature=dd0015972f6fed6d86ecf75434519b8ab18762ce625ca296eeb0ec5190ba7741&X-Amz-SignedHeaders=host&actor_id=0&key_id=0&repo_id=382496361&response-content-disposition=attachment%3B%20filename%3Ddist.tar.gz&response-content-type=application%2Foctet-stream
Extracting dist...
Done
npm notice
npm notice New major version of npm available! 10.8.2 -> 11.1.0
npm notice Changelog: https://github.com/npm/cli/releases/tag/v11.1.0
npm notice To update run: npm install -g [email protected]
npm notice
2.3 Test the success of installation
Test the success of uptime installation in your system by running the command:
node server/server.jsSample output:
Welcome to Uptime Kuma
Your Node.js version: 20.18.3
2025-02-18T17:20:43+03:00 [SERVER] INFO: Welcome to Uptime Kuma
2025-02-18T17:20:43+03:00 [SERVER] INFO: Node Env: production
2025-02-18T17:20:43+03:00 [SERVER] INFO: Inside Container: false
2025-02-18T17:20:43+03:00 [SERVER] INFO: Importing Node libraries
2025-02-18T17:20:43+03:00 [SERVER] INFO: Importing 3rd-party libraries
2025-02-18T17:20:44+03:00 [SERVER] INFO: Creating express and socket.io instance
2025-02-18T17:20:44+03:00 [SERVER] INFO: Server Type: HTTP
2025-02-18T17:20:44+03:00 [SERVER] INFO: Importing this project modules
2025-02-18T17:20:44+03:00 [NOTIFICATION] INFO: Prepare Notification Providers
2025-02-18T17:20:44+03:00 [SERVER] INFO: Version: 1.23.15
2025-02-18T17:20:44+03:00 [DB] INFO: Data Dir: ./data/
2025-02-18T17:20:44+03:00 [SERVER] INFO: Copying Database
2025-02-18T17:20:44+03:00 [SERVER] INFO: Connecting to the Database
2025-02-18T17:20:44+03:00 [DB] INFO: SQLite config:
[ { journal_mode: 'wal' } ]
[ { cache_size: -12000 } ]
2025-02-18T17:20:44+03:00 [DB] INFO: SQLite Version: 3.41.1
2025-02-18T17:20:44+03:00 [SERVER] INFO: Connected
Step 3: Using PM2 to manage Kuma service
PM2 is a daemon process manager for managing and keeping your application online.
3.1 Install PM2
PM2 is installed in the system via NPM or Yarn.
To run the steps below, you must be inside your directory: i.e /uptime-kuma
npm install pm2@latest -g
## OR ##
yarn global add pm2
This command installs the latest version of pm2.
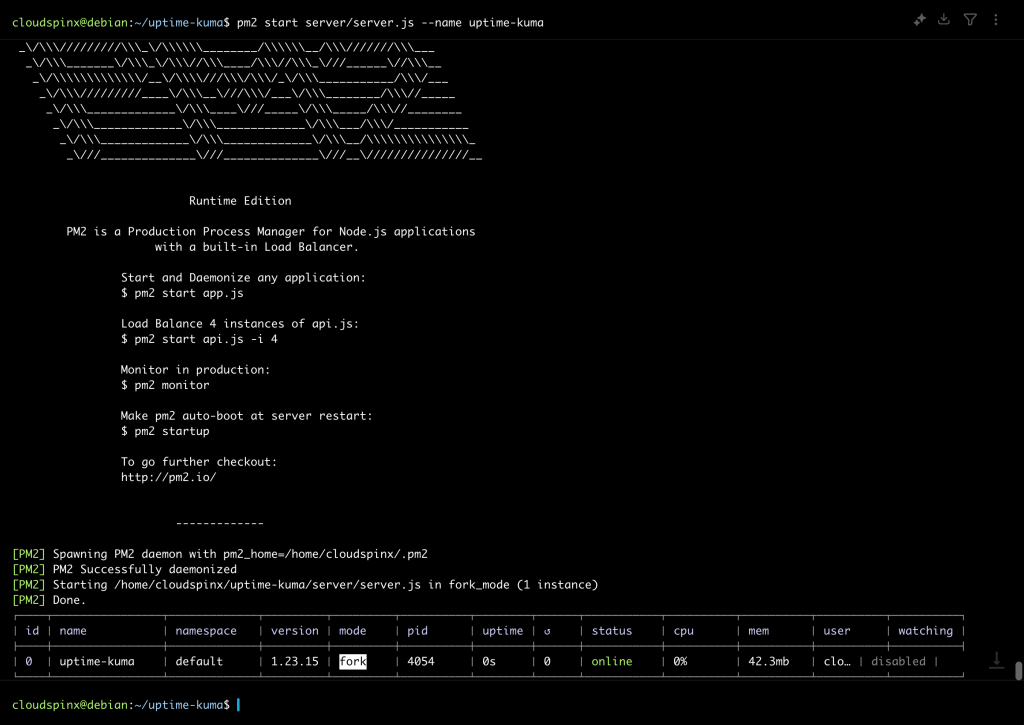
3.2 Start Uptime Kuma Server
Run this command inside your directory.
pm2 start server/server.js --name uptime-kumaThe output:

3.3 Useful commands
Run these commands to start, stop and restart Uptime Kuma.
pm2 start uptime-kuma
pm2 stop uptime-kuma
pm2 restart uptime-kuma
To Start Uptime Kuma :
pm2 start uptime-kumaThe Output:

To Stop Uptime Kuma:
pm2 stop uptime-kumaThe output:

To Restart Uptime Kuma
pm2 restart uptime-kumaThe output:

To update environment variables:
pm2 restart uptime-kuma --update-envThe output:

Step 4: Testing on the web interface
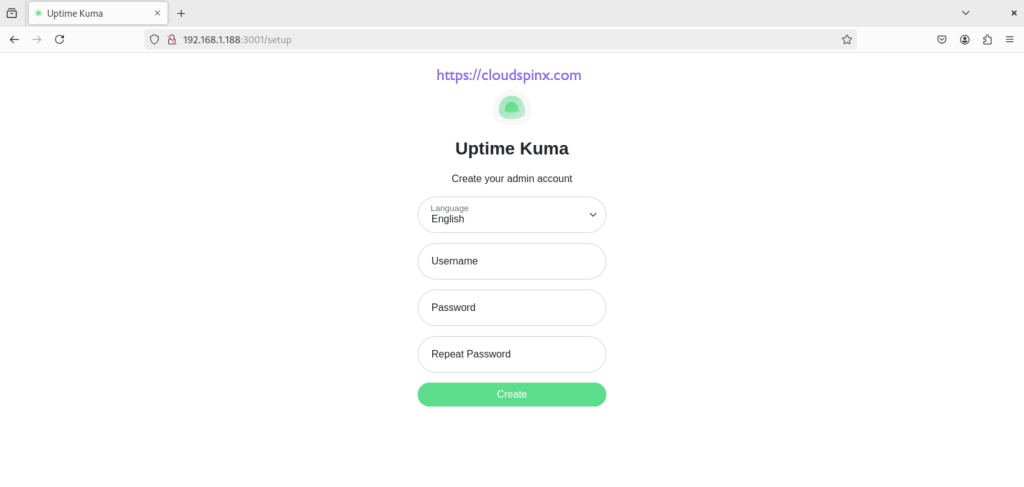
For this article, I used my Debian 12 which runs on IP Address 192.168.1.188. To access the Uptime Kuma interface on the web browser, type this address on your URL: http://server_ip:3001.
This takes me to this page:

Congratulations, you have successfully set up Uptime Kuma using non-docker i.e PM2. All that’s left to do is to set the username and password, and then you are good to go.
We hope you have enjoyed the article. In our earlier article on using docker, we did a test using the techviewleo website. Kindly refer to the article.
Well, that’s about it. If you like what we are doing, make that comment at the bottom of the article. We would like to hear from you and how we can improve to make our articles more helpful. We are eternally grateful for your continued support. That coffee motivates us to keep going.
More articles:


