
VS Code Server extends the VS Code editor experience into any remote scenario and supports coding right in the browser while still hosting workloads in the cloud, on a server, or within Kubernetes environments. Running VS Code Server on top of Kubernetes means you can create a highly available, scalable, and secure coding platform that is just right for development teams and platform engineers looking for cloud-native development environments.
Helm, the package manager for Kubernetes, makes the entire process of deploying much easier because you can use it to install, upgrade, and maintain the VS Code Server within a single chart. Rather than having to write several YAML files manually, Helm makes it possible for you to control every aspect of the process, including storage and Ingress configuration, within just one values file.
Prerequisites
- Kubernetes 1.6+
- You have the
kubectlCLI installed and configured to talk to your cluster. - You have Helm (v3+) installed locally.
- (Optional but recommended) You have a default
StorageClassin your cluster, so that persistent volumes can be automatically provisioned (useful if you enable persistence in code-server).
Run VS Code Server on Kubernetes using Helm
In this tutorial, you’ll use Helm to run VS Code Server in Kubernetes, enable access to it for Ingress, use PVCs to persist your dev environment, and secure it with TLS. By the end of it, you’ll be able to run a browser-based IDE in your Kubernetes cluster that is production-ready.
1. Install the helm chart
To install the Helm chart, clone the code-server repo:
git clone https://github.com/coder/code-server
cd code-server
Then from inside the code-server repo, run the command below to install code-server.
helm upgrade --install code-server ci/helm-chart \
  --namespace code-server --create-namespace
This will deploy code-server with default configurations.
2. Customize Code Server Configurations
By default, code-server will be deployed with built-in sensible defaults. If you want to customize — e.g. change service type, enable ingress, disable persistence, set resource requests/limits, environment variables, then you need to specify each parameter using the --set key=value[,key=value] argument to helm install, or supply your own values in a values.yaml file to override the default ones.
Using parameter spec:
helm upgrade --install code-server ci/helm-chart \
  --namespace code-server --create-namespace \
  --set persistence.enabled=false
Using a values file:
helm upgrade --install code-server ci/helm-chart -f values.yamlHave a look at the Values template and see which ones you’d like to leverage when deploying Code Server on your K8s Cluster.
3. Configure Code Server Ingress
By default, code server is only accessible from inside the cluster but it can be configured for access using port-forward but instead of using port-forwarding, we will configure Ingress using our Nginx Ingress Controller. You need to have Nginx Ingress installed on your cluster before you can do this.
I am also using Cert Manager for certifficate Management. If you aren’t using cert-manager I’d higly recommend you check it out. The ACME HTTP challenge works great and cert-manager and nginx, will auto generate certificates for you on demand.
So, let’s go ahead and configure Code Server Ingress with Nginx. This is the Ingress that I used for the Code Server:
apiVersion: networking.k8s.io/v1
kind: Ingress
metadata:
  name: code-server
  namespace: code-server
  annotations:
    cert-manager.io/cluster-issuer: letsencrypt-prod
    nginx.ingress.kubernetes.io/force-ssl-redirect: "true"
    kubernetes.io/tls-acme: "true"
spec:
  ingressClassName: nginx
  tls:
  - secretName: code-server
    hosts:
    - code-server.kloudke.dpdns.org
  rules:
  - host: code-server.kloudke.dpdns.org
    http:
      paths:
      - pathType: Prefix
        path: "/"
        backend:
          service:
            name: code-server
            port:
              number: 8080
Apply the configuration:
kubectl apply -f ingress-code-server.yamlThe Ingress deployment and the Certificate issuing should both be sucessful:

4. Accessing Code Server
To access Code Server, now that we have configured external access with Nginx Ingress, go to https://code-server.your-domain.com and you should see Code Server Welcome Page:

For the password, you can obtain it by running the following command:
echo $(kubectl get secret --namespace code-server code-server -o jsonpath="{.data.password}" | base64 --decode)
Copy and paste the password to Code Server and then submit:
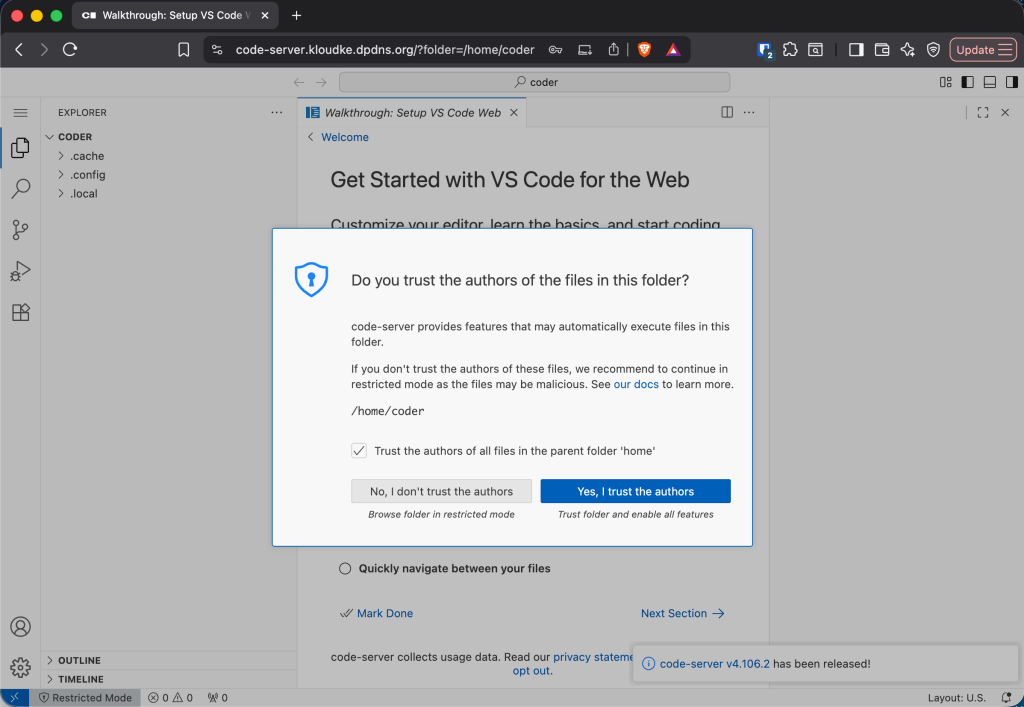
Click the Checkbox and proceed to use VSCode Code Server IDE.
And that’s how you do it. Adios folks!!


