Greetings and salutations. In our guide today we will analyze Apache Solr, a standalone, open-source enterprise search and analytics server built on Apache Lucene. Solr uses the Lucene search library and extends it. Developers prefer Apache Solr because it is highly reliable, scalable, and fault tolerant. Solr exposes Lucene Java APIs as RESTful services. It provides distributed indexing, replication, and load balancing. Furthermore, Apache Solr has strong querying capability with an automated failover and recovery mechanism. With Apache Solr, the user can upload documents in multiple formats e.g XML, JSON, CSV, or binary over HTTP. Querying can be done via HTTP GET and receive the results in several formats like XML, JSON, CSV, and binary results. Apache Solr provides real-time analytics, faceted search as well as highly scalable distributed search.
Solr was developed in 2004 by Yonik Seeley in CNET Networks. It was supposed to be an in-house project intended to add search capability for company websites. In 2006, CNET Networks published the Solr source code and donated it to Apache Software Foundation under the Lucene project. In 2008, Solr version 1.3 was released and had so many performance enhancements like distributed search capabilities. In 2012, Solr version 4.0 was released which included the SolrCloud feature.
Nowadays, Solr powers the search and navigation features of many of the world’s largest internet sites. As of this writing, Apache Solr 9.7.0 is the most recent Apache Solr release available for installation.
Key Features.
Apache Solr has very many features that this guide will not talk about. I will however list a few features associated with Apache Solr. For a comprehensive feature list, please check the Apache Solr official website. Some of the features are:-
- Advanced full-text search capabilities – Solr has powerful text-matching capabilities which include phrases, wildcards, joins, grouping, and many more data types.
- Optimized high-volume traffic – Solr is proven at extremely large scales across the globe.
- Uses standards-based open interfaces e.g. XML, JSON, and HTTP.
- Offers a comprehensive responsive administration interface to help the admin control Solr instances.
- For easy monitoring, Solr publishes metric data using JMX.
- Solr is highly scalable and fault-tolerant as it is built using Apache zookeeper it can easily scale up and down.
- Solr is very flexible and adaptable with an easy configuration.
- It employs Near Real-Time indexing to help you see updates in real-time
- Solr has an extensible plugin architecture to help the users to plugin both index and query time plugins.
- Solr is open-source and licensed under Apache. The source code can thus be modified for customization purposes.
- Has powerful extensions – ships with optional plugins for indexing e.g PDF, Word, etc
- Supports Faceted search and filtering – has a huge array of faceting algorithms.
- Geospatial search – Has the ability to enable location-based search as it has support for built-in spatial search.
- Other features include Multiple search indices, Rich document parsing, Query suggestions, Monitorable logging, Advanced storage options, rich security features e.g (SSL, Authentication, Role-based Authorization), performance optimizations, highly configurable and user-extensible caching, etc.
Install and Configure Apache Solr on Oracle Linux 9 / CentOS 9
Enough of the introduction notes, we will dive right into the ocean. Ensure your system meets the following requirements:-
- Solr supports Linux, macOS, and Windows.
- Java Runtime Environment (JRE) version 11 or higher.
- User with sudo privileges.
- Stable internet connection.
- At least 4GiB of memory.
- Minimum storage of 20GiB.
Let’s begin the installation process by updating our Oracle Linux 9 / CentOS 9 systems. Run the command below.
sudo dnf update -y The makecache command is used to download and make usable all the metadata for the currently enabled yum repos. The commands above will update and refresh your package repositories.
Step 1: Install Java on Oracle Linux 9 / CentOS 9
Solr requires Java Runtime Environment version 11 or higher. For this guide, I will install version 21.
To install Java 21, run the commands below.
sudo dnf -y install curl wgetInstall Java 21 with the command below.
sudo dnf install lsof java-21-openjdk java-21-openjdk-devel -yConfirm the Java version installed:
$ java -version
openjdk version "21.0.5" 2024-10-15 LTS
OpenJDK Runtime Environment (Red_Hat-21.0.5.0.11-1.0.1) (build 21.0.5+11-LTS)
OpenJDK 64-Bit Server VM (Red_Hat-21.0.5.0.11-1.0.1) (build 21.0.5+11-LTS, mixed mode, sharing)
If you have more than one version of Java installed, you can set the default version as shown below.
1 ) List all Java versions installed:
$ sudo alternatives --config java
There are 2 programs which provide 'java'.

  Selection    Command
-----------------------------------------------
*+ 1           java-21-openjdk.x86_64 (/usr/lib/jvm/java-21-openjdk-21.0.5.0.11-2.0.1.el9.x86_64/bin/java)
   2           java-11-openjdk.x86_64 (/usr/lib/jvm/java-11-openjdk-11.0.25.0.9-3.0.1.el9.x86_64/bin/java)

Enter to keep the current selection[+], or type selection number:
I have both Java 11 and Java 21 installed on my system. To set Java 21 as my default Java version, do the following:
To set Java 21, enter 1 as your selection number, as shown above. Then confirm your Java version.
java -versionJava 21 is now installed in your system.
Step 2: Set the JAVA_HOME Environment Variable
The JAVA_HOME Environment variable is usually used to determine the install location and exact Java version to be used when running applications.
This setting can be made in the ~/.bash.rc file. Setting up the variable in this manner will only last as long as the system is not rebooted. Rebooting the system clears the settings.
To make the settings persist, configure the JAVA_HOME Environment by editing the /etc/profile file as shown:
Edit the /etc/profile file using a text editor.
sudo vim /etc/profileNavigate toward the end of the file and add the following line of code.
export JAVA_HOME="/usr/lib/jvm/java-21-openjdk"
export PATH=$JAVA_HOME/bin:$PATH
Source the profile for the changes made to take effect.
source /etc/profileVerify the made changes:
$ echo $JAVA_HOME
/usr/lib/jvm/java-21-openjdk/bin
Step 3: Install Apache Solr on Oracle Linux 9 / CentOS 9
With Java now installed, proceed to install Apache Solr on Oracle Linux 9 / CentOS 9. By default, Apache Solr is not available on CentOS & Fedora upstream repositories. You must download and install it manually on your system.
Navigate to the Official Solr.apache website and download the latest Apache Solr release. A binary and source code exists for download. Download the Binary package to your Downloads Directory and manually install the package. To build from the source code, download the source code instead.
cd ~/
export LATEST_VER="9.7.0"
curl -O https://dlcdn.apache.org/solr/solr/$LATEST_VER/solr-$LATEST_VER.tgz
Extract the .tgz file:
tar xvf solr-${LATEST_VER}.tgzOnce the extraction is complete, run the Apache Solr service installer script to set up the Solr environment.
cd solr-${LATEST_VER}/bin/
sudo ./install_solr_service.sh ~/solr-${LATEST_VER}.tgz
The command output:
id: ‘solr’: no such user
Creating new user: solr

Extracting /home/cloudspinx/solr-9.7.0.tgz to /opt


Installing symlink /opt/solr -> /opt/solr-9.7.0 ...


Installing /etc/init.d/solr script ...


Installing /etc/default/solr.in.sh ...

Service solr installed.
Customize Solr startup configuration in /etc/default/solr.in.sh
*** [WARN] *** Your open file limit is currently 1024.
 It should be set to 65000 to avoid operational disruption.
 If you no longer wish to see this warning, set SOLR_ULIMIT_CHECKS to false in your profile or solr.in.sh
*** [WARN] ***  Your Max Processes Limit is currently 21620.
 It should be set to 65000 to avoid operational disruption.
 If you no longer wish to see this warning, set SOLR_ULIMIT_CHECKS to false in your profile or solr.in.sh
Java 21 detected. Enabled workaround for SOLR-16463
Java 21 detected. Incubating Panama Vector APIs have been enabled
Waiting up to 180 seconds to see Solr running on port 8983 [\]
Started Solr server on port 8983 (pid=73201). Happy searching!


Found 1 Solr nodes:

Solr process 73201 running on port 8983
WARNING: URLs provided to this tool needn't include Solr's context-root (e.g. "/solr"). Such URLs are deprecated and support for them will be removed in a future release. Correcting from [http://localhost:8983/solr/] to [http://localhost:8983/].
{
  "solr_home":"/var/solr/data",
  "version":"9.7.0 675a41516e3f3bacfc975590773e7abdca444ff4 - anshum - 2024-09-03 15:05:20",
  "startTime":"Wed Jan 22 15:41:22 EAT 2025",
  "uptime":"0 days, 0 hours, 0 minutes, 12 seconds",
  "memory":"38.2 MB (%7.5) of 512 MB"}
Once installation is complete:
Start Solr service:
$ sudo service solr start
*** [WARN] *** Your open file limit is currently 1024.
 It should be set to 65000 to avoid operational disruption.
 If you no longer wish to see this warning, set SOLR_ULIMIT_CHECKS to false in your profile or solr.in.sh
*** [WARN] ***  Your Max Processes Limit is currently 14685.
 It should be set to 65000 to avoid operational disruption.
 If you no longer wish to see this warning, set SOLR_ULIMIT_CHECKS to false in your profile or solr.in.sh
Java 17 detected. Enabled workaround for SOLR-16463
Waiting up to 180 seconds to see Solr running on port 8983 [|]
Started Solr server on port 8983 (pid=4539). Happy searching!
Check the Solr service status:
$ sudo service solr status
Found 1 Solr nodes:

Solr process 4539 running on port 8983
{
  "solr_home":"/var/solr/data",
  "version":"9.1.0 aa4f3d98ab19c201e7f3c74cd14c99174148616d - ishan - 2022-11-11 13:00:47",
  "startTime":"2022-12-26T10:17:54.501Z",
  "uptime":"0 days, 0 hours, 1 minutes, 34 seconds",
  "memory":"125.6 MB (%24.5) of 512 MB"}
Solr service is up and running.
Step 3: Configure the Firewall settings
By default, Solr runs on port 8938. If your server sits behind the Firewall, it’s good to allow this port through the firewall for communication with the outside world.
To allow port 8983 through the firewall, run the command:
sudo firewall-cmd  --permanent --add-port=8983/tcp
sudo firewall-cmd --reload
Once done, proceed with the next step.
Step 4: Access Solr Dashboard
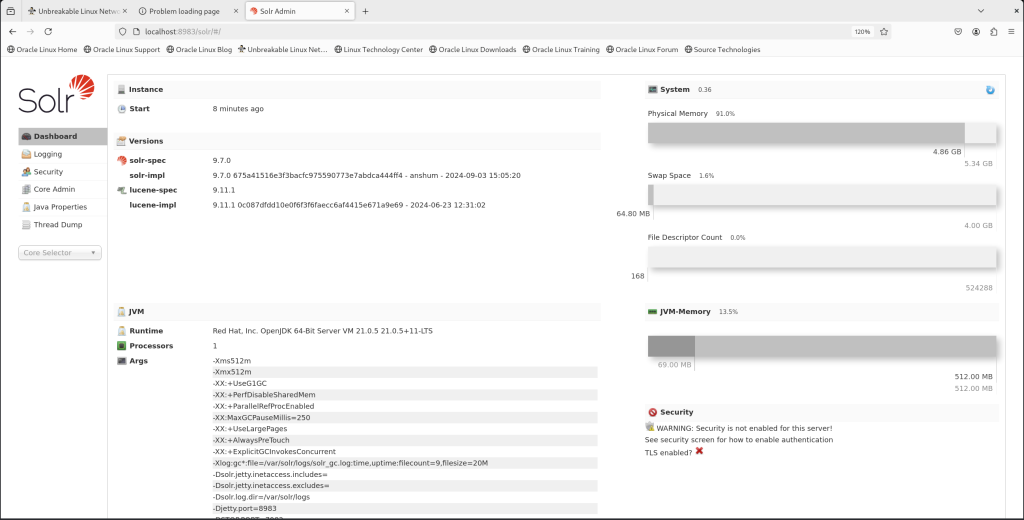
To access Solr Dashboard for administration, head to your server web browser and key in the address http://<server_ip_address:8983> or localhost:8983

Step 5: Create Solr Collection
For demonstration purposes, I will create a test collection. Run the following command:
sudo su - solr -c "/opt/solr/bin/solr create -c TestCollection -n data_driven_schema_configs"TestCollection is the name of the collection to be created.
The command output:
Neither --zk-host or --solr-url parameters provided so assuming solr url is http://localhost:8983.
WARNING: Using _default configset. Data driven schema functionality is enabled by default, which is
         NOT RECOMMENDED for production use.

         To turn it off:
            curl http://localhost:8983/solr/TestCollection/config -d '{"set-user-property": {"update.autoCreateFields":"false"}}'
         Or:
            bin/solr config -c TestCollection -s http://localhost:8983 --action set-user-property --property update.autoCreateFields --value false

Created new core 'TestCollection'
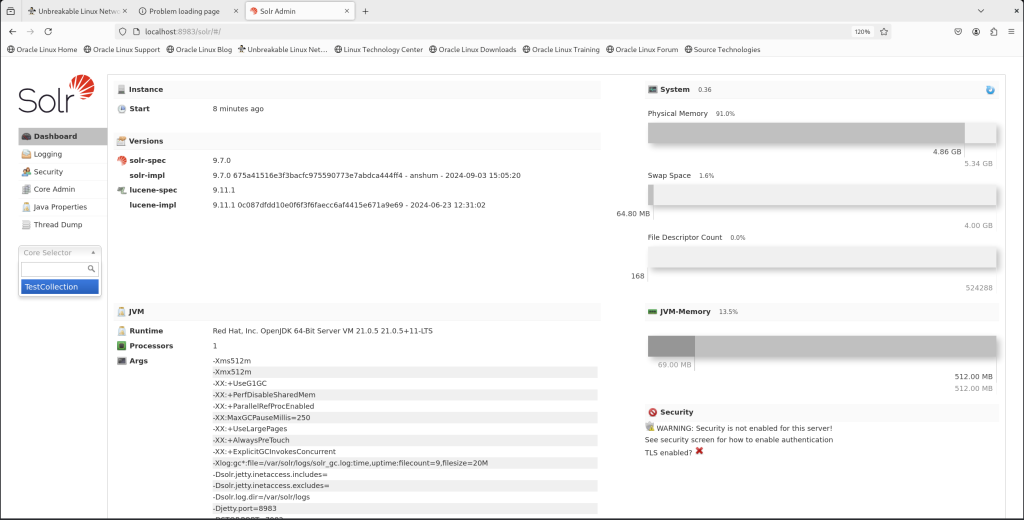
To see the created collection, Navigate to Core Selector and click on the drop-down arrow.

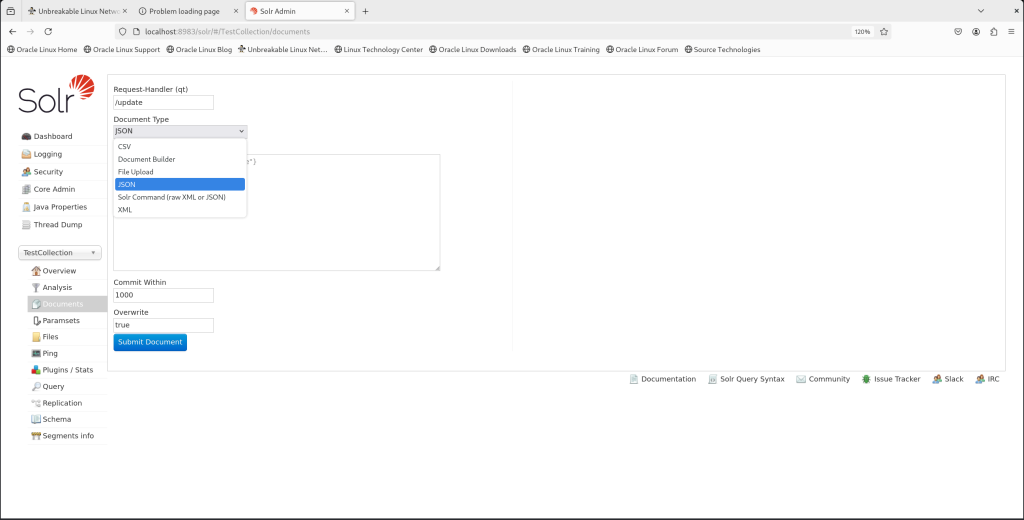
To see Document Type under the created test collection, navigate to Documents >> Document Type

For help on how to create Core in order to be able to index and search, run the command below.
$ sudo su - solr create -help
Usage:
 su [options] [-] [<user> [<argument>...]]

Change the effective user ID and group ID to that of <user>.
A mere - implies -l.  If <user> is not given, root is assumed.

Options:
 -m, -p, --preserve-environment  do not reset environment variables
 -g, --group <group>             specify the primary group
 -G, --supp-group <group>        specify a supplemental group

 -, -l, --login                  make the shell a login shell
 -c, --command <command>         pass a single command to the shell with -c
 --session-command <command>     pass a single command to the shell with -c
                                   and do not create a new session
 -f, --fast                      pass -f to the shell (for csh or tcsh)
 -s, --shell <shell>             run <shell> if /etc/shells allows it
 -P, --pty                       create a new pseudo-terminal

 -h, --help                      display this help
 -V, --version                   display version

For more details see su(1).
The command helps you to see all available options for creating a new core. From this point, you can navigate around the application.
Wrapping Up
That brings us to the end of our guide on how to install Apache Solr on Oracle Linux 9 / CentOS 9. I trust your installation was successful. To deploy Solr on Docker and Solr on Kubernetes please click on the links. For more insights, please visit the Solr documentation.
More articles:


