HAProxy stands for High Availability Proxy. It is a free and open source load balancer tool that allows one balance incoming traffic TCP and HTTP-based applications by distributing it across multiple backend servers. It is written in C programming language and with a reputation of being fast and efficient. HAProxy offers load balancing using different criteria which include:
- Roundrobin– This is the default criteria where HAProxy selects the server to serve requests in turns depending on their weights.
- Leastconn- Here the server with the least connections receives the connection. It is recommended in cases where long sessions are expected such as SQL and LDAP.
- Source– In this algorithm, the source IP is hashed and divided by the total weights of the servers running to determine which server receives the request.
HAProxy has the following features:
- Layer 4 TCP and layer 7 HTTP load balancing.
- SSL/TLS termination.
- Multithreading.
- Supports API.
- Has a simplified circuit breaking.
- Offers proxy protocol support.
- Gzip compression.
- Health checking.
- Supports gRPC.
- Suports Lua and SPOE.
This guide walks demonstrates how to install and configure HAProxy on Rocky Linux 8 or AlmaLinux 8 system.
Getting Started with the installation of HAProxy
To install HAProxy we require the following specifications.
- Memory -2GB and above
- Storage -20 GB and above
- Hostname – e.g lb.example.com
- IP_Address – 192.168.1.19
Install HAProxy on Rocky / AlmaLinux 8
Begin with running a system update:
sudo dnf update -yAfter updating your system, proceed and download HAProxy since it is available in the default repositories.
sudo dnf install haproxy -yConfigure HAProxy
With a successful installtion, let’s configure HAProxy. HAProxy has a default path for the configuration file at /etc/haproxy/haproxy.cfg . To view the configuration file without comments run:
grep -v "^ *#" /etc/haproxy/haproxy.cfg | grep -v "^$"Output:
global
    log         127.0.0.1 local2
    chroot      /var/lib/haproxy
    pidfile     /var/run/haproxy.pid
    maxconn     4000
    user        haproxy
    group       haproxy
    daemon
    stats socket /var/lib/haproxy/stats
    ssl-default-bind-ciphers PROFILE=SYSTEM
    ssl-default-server-ciphers PROFILE=SYSTEM
defaults
    mode                    http
    log                     global
    option                  httplog
    option                  dontlognull
    option http-server-close
    option forwardfor       except 127.0.0.0/8
    option                  redispatch
    retries                 3
    timeout http-request    10s
    timeout queue           1m
    timeout connect         10s
    timeout client          1m
    timeout server          1m
    timeout http-keep-alive 10s
    timeout check           10s
    maxconn                 3000
frontend main
    bind *:5000
    acl url_static       path_beg       -i /static /images /javascript /stylesheets
    acl url_static       path_end       -i .jpg .gif .png .css .js
    use_backend static          if url_static
    default_backend             app
backend static
    balance     roundrobin
    server      static 127.0.0.1:4331 check
backend app
    balance     roundrobin
    server  app1 127.0.0.1:5001 check
    server  app2 127.0.0.1:5002 check
    server  app3 127.0.0.1:5003 check
    server  app4 127.0.0.1:5004 check
From the above output, there are four Configuration sections:
- The global section with parameter to all servers running.
- The default settings with details that apply yo all proxy subsections
- The Frontend settings defines the listening sockets from the client connection
- The Backend settings, This defines the server IP address and the load balancer algorithm
Now we need to create a back up for the file
cp /etc/haproxy/haproxy.cfg{,.old}Define Settings in HAProxy
In the configuration file /etc/haproxy/haproxy.cfg we will edit the settings.
sudo vi /etc/haproxy/haproxy.cfg1. Global settings:
In the file, we will leave the global settings they appears
global
    log         127.0.0.1 local2
    chroot      /var/lib/haproxy
    pidfile     /var/run/haproxy.pid
    maxconn     4000
    user        haproxy
    group       haproxy
    daemon
    stats socket /var/lib/haproxy/stats
    ssl-default-bind-ciphers PROFILE=SYSTEM
    ssl-default-server-ciphers PROFILE=SYSTEM
2. Default Settings:
We will also leave the settings as they are:
defaults
    mode                    http
    log                     global
    option                  httplog
    option                  dontlognull
    option http-server-close
    option forwardfor       except 127.0.0.0/8
    option                  redispatch
    retries                 3
    timeout http-request    10s
    timeout queue           1m
    timeout connect         10s
    timeout client          1m
    timeout server          1m
    timeout http-keep-alive 10s
    timeout check           10s
    maxconn                 3000
3. Frontend Settings:
Here we will now define the how the our server will access the backend server. since most options are already defined, we will add this in the frontend settings.
frontend main
    bind 192.168.1.19:80
    default_backend rockylinux8apps
Here, bind definbes the IP and Port on which HAProxy listens and default_backend is the name of the backend giving traffic.
4. Backend Settings
On the backend, we will be required to set the Backend IP addresses and the load balancer scheduling algorithm.
backend rockylinux8apps
    balance roundrobin
    server node1  192.168.1.10:80 check
    server node2  192.168.1.20:80 check
In this configuration, roundrobin is the balancing algorithm, node1 and node 2 are servers available in the backend, check enables health check of the servers.
5. Statistics settings
This is optional, you can add the listen settings to enable HAProxy statistics provided in the HAProxy Stats page. In this page, the health,request rates and response times are given. The listen settings can be enabled by adding the below lines:
listen stats
    bind  192.168.1.19:8088       # Bind stats to port 8088
    log   global                    # Enable Logging
    stats enable                    # enable statistics reports
    stats hide-version              # Hide the version of HAProxy
    stats refresh 30s               # HAProxy refresh time
    stats show-node                 # Shows the hostname of the node
    stats auth admin:P@ssw0rd     # Authentication for Stats page
    stats uri /stats             # Statistics URL
Then allow the stats port on the firewall:
sudo firewall-cmd --add-port=8088/tcp --permanent
sudo firewall-cmd --reload
In cases where the its inaccessible, edit SELinux settings.
sudo setenforce 0
sudo sed -i 's/SELINUX=enforcing/SELINUX=permissive/g' /etc/selinux/config
The new configuration file grep -v "^ *#" /etc/haproxy/haproxy.cfg | grep -v "^$" without comments looks like this:
global
    log         127.0.0.1 local2
    chroot      /var/lib/haproxy
    pidfile     /var/run/haproxy.pid
    maxconn     4000
    user        haproxy
    group       haproxy
    daemon
    stats socket /var/lib/haproxy/stats
    ssl-default-bind-ciphers PROFILE=SYSTEM
    ssl-default-server-ciphers PROFILE=SYSTEM
defaults
    mode                    http
    log                     global
    option                  httplog
    option                  dontlognull
    option http-server-close
    option forwardfor       except 127.0.0.0/8
    option                  redispatch
    retries                 3
    timeout http-request    10s
    timeout queue           1m
    timeout connect         10s
    timeout client          1m
    timeout server          1m
    timeout http-keep-alive 10s
    timeout check           10s
    maxconn                 3000
frontend main
    bind 192.168.1.19:80
    default_backend   rockylinux8apps
backend rockylinux8apps
    balance     roundrobin
    server      node1 192.168.1.10:80 check
    server      node2 192.168.1.20:80 check
listen stats
    bind  192.168.1.19:8088       # Bind stats to port 8088
    log   global                    # Enable Logging
    stats enable                    # enable statistics reports
    stats hide-version              # Hide the version of HAProxy
    stats refresh 30s               # HAProxy refresh time
    stats show-node                 # Shows the hostname of the node
    stats auth admin:P@ssw0rd     # Authentication for Stats page
    stats uri /stats             # Statistics URL
Proceed and verify if the configuration file as below.
$ haproxy -c -f /etc/haproxy/haproxy.cfg
Configuration file is valid
Then open the HAProxy port on the firewall.
sudo firewall-cmd --add-port=80/tcp --permanent
sudo firewall-cmd --reload
Run HAProxy Service
We need to start and enable the service to run on boot.
sudo systemctl enable --now haproxyCheck the status of the service.
$ systemctl status haproxy
haproxy.service - HAProxy Load Balancer
   Loaded: loaded (/usr/lib/systemd/system/haproxy.service; enabled; vendor preset: disabled)
   Active: active (running) since Tue 2024-07-13 09:57:27 EDT; 11min ago
 Main PID: 1144 (haproxy)
    Tasks: 2 (limit: 6889)
   Memory: 4.4M
   CGroup: /system.slice/haproxy.service
           ├─1144 /usr/sbin/haproxy -Ws -f /etc/haproxy/haproxy.cfg -p /run/haproxy.pid
           └─1162 /usr/sbin/haproxy -Ws -f /etc/haproxy/haproxy.cfg -p /run/haproxy.pid

Jul 13 09:57:27 haproxy.rockylinux.com systemd[1]: Starting HAProxy Load Balancer...
Jul 13 09:57:27 haproxy.rockylinux.com systemd[1]: Started HAProxy Load Balancer.
Configure HAProxy logging
Configure the standard logging in HAproxy by editing /etc/rsyslog.conf enable UDP syslog by un-commenting the lines module(load=”imudp”) and input(type=”imudp” port=”514″) as below:
sudo vi /etc/rsyslog.confThen remove the # commenting as below
# Provides UDP syslog reception
# for parameters see http://www.rsyslog.com/doc/imudp.html
module(load="imudp") # needs to be done just once
input(type="imudp" port="514")
STill in the file, we then need to disable private authentication messages logs sent to local2, local2.none in /var/log/messages and enable in /var/log/haproxy.log
# Don't log private authentication messages!
*.info;mail.none;authpriv.none;cron.none,local2.none                 /var/log/messages
local2.* /var/log/haproxy.log
Save the the file and verify it as below:
$ rsyslogd -N1
rsyslogd: version 8.1911.0-7.el8_4.2, config validation run (level 1), master config /etc/rsyslog.conf
rsyslogd: End of config validation run. Bye.
With a successful verification, restart rsyslog ad=nd HAProxy.
sudo systemctl restart rsyslog haproxyConfirm if you have HAProxy logs in /var/log/haproxy.log.
sudo tail -f /var/log/haproxy.logConfigure Apache X-Forwarded-For Logging on the Backend Servers
On the backend servers, we need to make a few configurations since we enabled HAProxy to add HTTP header “X-Forwarded-For” to all requests sent to the backend server. We have to do a similar thing on the backend servers.
On the servers,configure Apache to log-X-Fowarded-For headers. If you don’t have Apache on Rockt Linux 8, install it using sudo yum -y install httpd
Edit the file by running:
sudo vi /etc/httpd/conf/httpd.confIn the file find:
LogFormat "%h %l %u %t \"%r\" %>s %b \"%{Referer}i\" \"%{User-Agent}i\"" combined
LogFormat "%h %l %u %t \"%r\" %>s %b" common
Replace these lines with:
LogFormat "\"%{X-Forwarded-For}i\" %l %u %t \"%r\" %>s %b \"%{Referer}i\" \"%{User-Agent}i\"" combined
LogFormat "%h %l %u %t \"%r\" %>s %b" common
Save and check the syntax of the file
$ sudo apachectl configtest
Syntax OK
Restart Apache on the servers
sudo systemctl restart httpdAllow the ports through the firewall on the backend servers.
sudo firewall-cmd --add-port=80/tcp --permanent
sudo firewall-cmd --reload
Test HAProxy Load Balancer
To test if HAProxy has the ability to balance http requests, go to the web browser and access it using http://IP_Address
With roundrobin algorithm set, you should be able to receive content from both backeend servers when you refresh.

On refresh, the second backend server should serve the request.

Check Statistics in HAProxy
To check statistics of the frontend and backend servers use the URL http://IP_Address:8088/stats or http://HOSTNAME:8088/stats
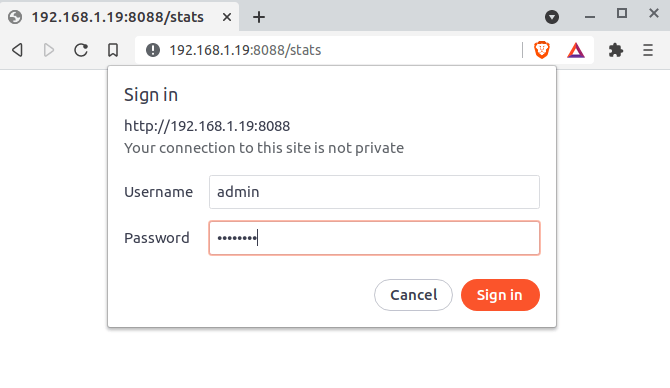
You will be prompted to login. Use the credentials you set earlier in the listen section for me this guide, I set the username as admin with password as P@ssw0rd .
On login, you should see a page similar to this.
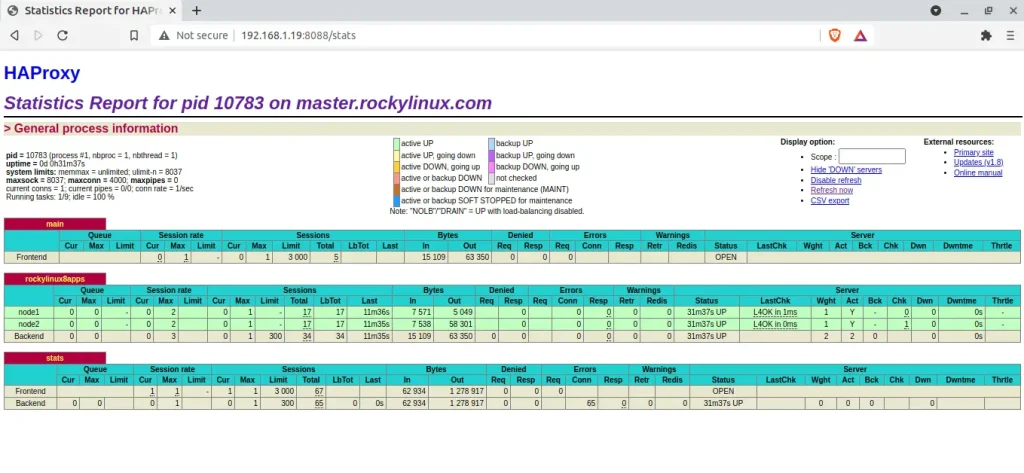
When a backend node is down, example Node 2. All the traffic will be redirected to the active Nodes. You will also notice the same from the stats dashboard as shown below.
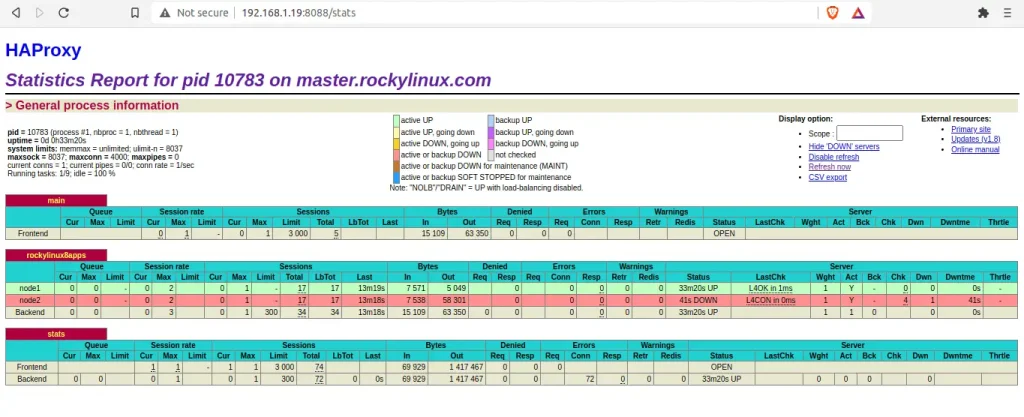
When the Node is back online, HAProxy will automatically resume traffic redirects to all the Nodes using roundrobin.
Conclusion
In the above Guide, we have walked through the installation and configuration of HAProxy on Rocky or AlmaLinux. We have also tested and seen the amazing load balancing features of HAProxy. I hope this Guide was helpful.
Looking to streamline your cloud infrastructure? CloudSpinx, your cloud solutions partner.
Check out more articles:


