
Nagios is a powerful open source IT monitoring tool. It monitors the entire IT infrastructure, ensuring that all systems, applications, services and business processes function properly. It sends alerts whenever there is a failure so that the IT team can begin investigations. Once the issue is resolved, Nagios sends another alert notifying on the resolution. In this article, we are going to see how to install Nagios Core for source on Oracle Linux 8.
Features and Capabilities of Nagios
The following are the most important features and capabilities of Nagios that makes it an enterprise monitoring tool:
- Comprehensive monitoring – A single tool is capable of monitoring an entire infrastructure, covering services, applications, operating systems, network protocols, system metrics and infrastructure components. Powerful script APIs enables easy monitoring of in-house and custom applications and services.
- Problem Remediation – Alerts communicate of known issues and allow problem response. Event handlers also allow automatic restart of failed services.
- Reporting – Reports enable sharing of SLAs. Historical reports also enables keeping track of events. You can also integrate with third party applications to provide more comprehensive reports.
- Extendable Architecture – Easy to integrate with third party applications.
- Vibrant Community – Millions of user worldwide. Many community-developed Addons extend nagios core functionality.
- Stable, Reliable and respected Platform.
- Multi-tenant capabilities.
- Customizable code.
Installing Nagios 4.x on Oracle Linux 9
For my installation, I have SElinux disabled and you can do so with the following commands:
sudo sed -i 's/SELINUX=.*/SELINUX=permissive/g' /etc/selinux/config
sudo setenforce 0
Install Required Packages
Run the below commands to install the packages required for Nagios installation.
sudo dnf install -y gcc glibc glibc-common perl httpd php php-fpm wget gd gd-devel
sudo dnf install -y openssl-devel
sudo dnf update -y
Install Nagios 4 on Oracle Linux
Now download Nagios source with the following commands:
cd /tmp
wget -O nagioscore.tar.gz https://github.com/NagiosEnterprises/nagioscore/releases/download/nagios-4.5.9/nagios-4.5.9.tar.gz
tar xzf nagioscore.tar.gz
And compile using the following commands:
cd /tmp/nagios-*/
./configure
make all
Next, create Nagios user and group and also add apache user to nagios group:
sudo make install-groups-users
sudo usermod -a -G nagios apache
Install binary files, the command below will install the binary files, CGIs, and HTML files.
sudo make installInstall Nagios Service/ Daemon
The commands below installs Nagios daemon and also configures it to start on system boot. Apache httpd service is enabled as well.
sudo make install-daemoninit
sudo systemctl enable httpd.service
Install Command Mode
Run the command below to install and configure the external command line.
sudo make install-commandmodeNext, install configuration files with the below command. This is going to install ‘SAMPLE’ configuration files which are important for Nagios to start.
sudo make install-configInstall Apache Config Files
Run the below command to install Apache web server configuration files
sudo make install-webconfConfigure Firewall
If you are running an active firewall, you need to allow port 80 to serve Nagios web services.
sudo firewall-cmd --zone=public --add-port=80/tcp
sudo firewall-cmd --zone=public --add-port=80/tcp --permanent
sudo firewall-cmd --reload
Create Nagios Admin User
We are going to create an Apache admin user for logging in to Nagios. Run the below command to create an admin user. You will be prompted to provide a password for the user ‘Admin’. Key in a password and keep it safe as it is the one you will use to login to Nagios web UI.
sudo htpasswd -c /usr/local/nagios/etc/htpasswd.users nagiosadminNote that the default admin user is ‘nagiosadmin’. If you create another admin user with a different name, ensure to give the new user rights to various system configurations to avoid getting permission error on the web UI. You need to edit nagios configuration file in /usr/local/nagios/etc/cgi.cfg. Look for the lines for configuration permissions, example below:
authorized_for_system_information=nagiosadmin,username,username2Also note that when adding more users in future, you need to omit -c tag to avoid replacing the existing admin user or any other user already added.
Start Nagios Services
We need to start php-fpm, httpd and nagios services. Run the below commands:
sudo systemctl start httpd.service
sudo systemctl start nagios.service
sudo systemctl start php-fpm
sudo systemctl enable php-fpm
Install Nagios Plugins
The above steps only installed Nagios core but Nagios plugins are needed for Nagios to operate properly. Run the below commands to install prerequisites.
sudo yum install -y yum-utils
cd /tmp
sudo wget https://dl.fedoraproject.org/pub/epel/epel-release-latest-9.noarch.rpm
sudo rpm -ihv epel-release-latest-9.noarch.rpm
sudo yum install -y gcc glibc glibc-common make gettext automake autoconf wget openssl-devel net-snmp net-snmp-utils
dnf config-manager --set-enabled crb
sudo yum install -y perl-Net-SNMP
Next, download Nagios Plugins source with the following commands:
cd /tmp
wget --output-document="nagios-plugins.tar.gz" $(wget -q -O - https://api.github.com/repos/nagios-plugins/nagios-plugins/releases/latest  | grep '"browser_download_url":' | grep -o 'https://[^"]*')
tar zxf nagios-plugins.tar.gz
Compile and install with the following commands:
cd nagios-plugins-*/
./configure
make
sudo make install
Plugin Installation Location
The plugins will now be located in:
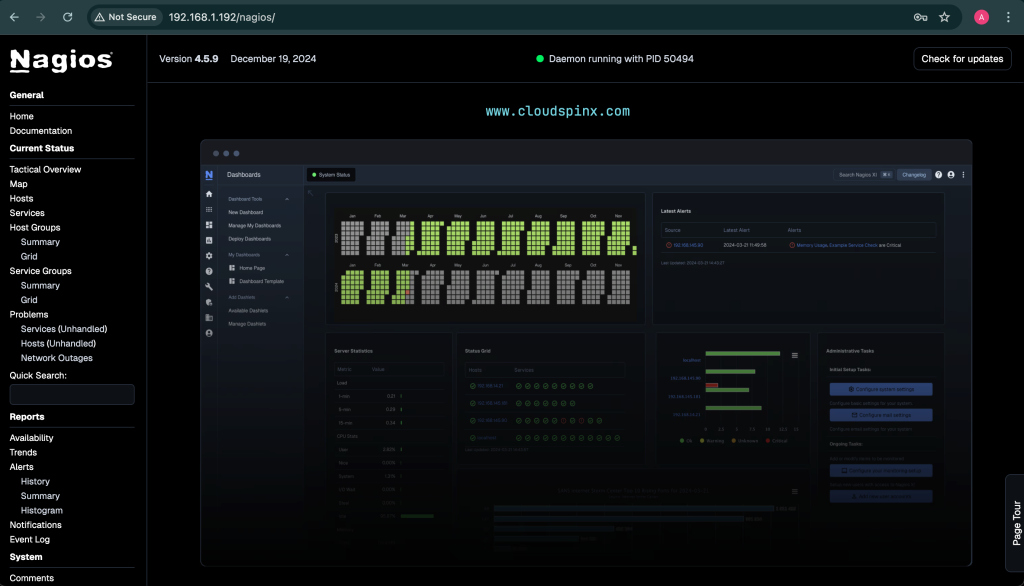
/usr/local/nagios/libexec/Nagios should now be successfully installed. Open your browser and key in your IP address or hostname: http://<your-ip-address>/nagios or http://<your-hostname>/nagios. You should see a screen as below, where you are prompted to login. Use the ‘Admin’ user and password you set in the previous steps.

Once you log in, you should get the below page.
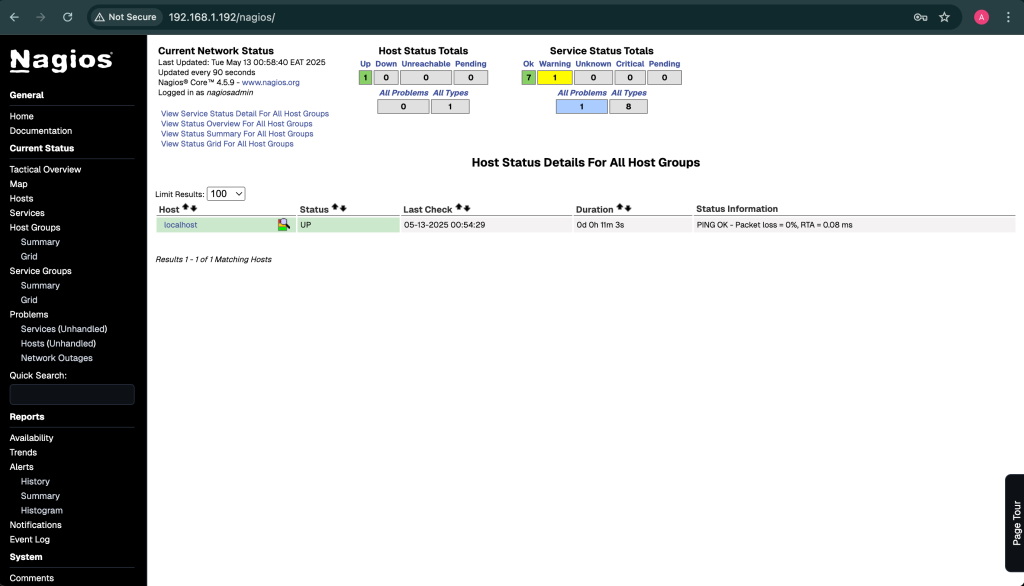
If you click on ‘Hosts’ you should be able to see the status of the localhost since you have not yet configured any hosts.
.Below is a detailed guide that covers adding remote hosts for Monitoring
Wrapping Up
In this article, we have covered how to install Nagios Core 4 on Oracle Linux 9. Nagios is a very powerful monitoring tool that enables you to detect problems within your infrastructure, ranging from servers, services and applications to network components, all on one server. It is a very useful tool for enterprise usage.
Nagios provides alerts when a problem occurs and when the problem has been corrected. I hope the guide has been useful. Stay tuned for the article on how to add a remote host to Nagios monitoring server. Also check other interesting guides below:


