

In our guide today, we are looking at how to install nfs server on Oracle Linux 10 and configure it. NFS is short for Network File System. It is a type of a distributed file system mechanism which enables storing and retrieving of data from multiple disks and directories on a shared network. Users are able to access remote files and directories and just the way they access locally.
NFS is utilized in computing environments where central management of data is critical. It uses Remote Procedure Call (RPC) to route requests between servers and clients, sharing file system over a network. It works in all IP-based systems, using TCP and UDP protocols to access and deliver data. The act of making file systems available to clients is called exporting.
Benefits of NFS Storage
- Multiple computers can use the same file, enabling everyone on the network to access the same files.
- Reduces storage costs. Computers on the network share applications, avoiding the need of every computer to have their dedicated local storage.
- Promotes data consistency and reliability since all users are reading from the same set of files.
- File system mounting is made transparent to the users.
- Reduces system administration overhead
- Supports heterogenous environments
- Makes accessing of remote files transparent to users.
Install and Configure NFS Server on Oracle Linux 10
To install and configure NFS server on Oracle Linux 10, we are going to be using the preceding steps.
Step 1: Update system packages
Ensure to first have your system packages up to date before installation. Run the following commands:
sudo dnf update
sudo dnf -y upgrade
sudo reboot
Step 2: Install Required Packages
We need to install nfs-utils which provide a daemon for kernel nfs server. Run the below command to install:
sudo dnf install nfs-utilsStep 3: Start and Enable nfs service
Once installation on step 2 is complete, start and enable nfs service using the commands below:
sudo systemctl enable --now nfs-server.serviceConfirm nfs service status
sudo systemctl status nfs-server.serviceIf running, you should see an output as below:
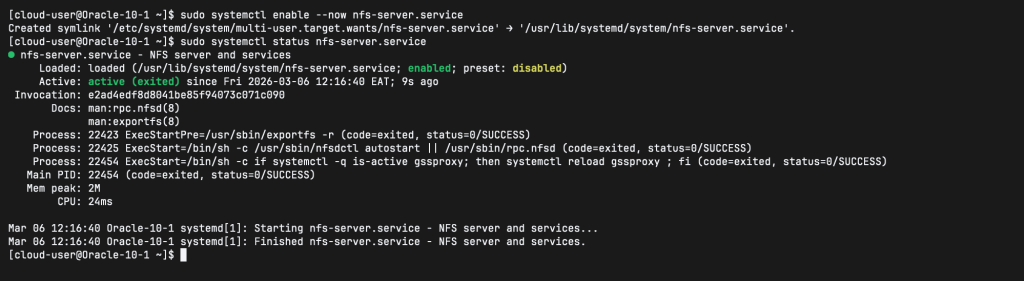
Note that other nfs services such as nfsd, rpcbind, lockd, nfs-idmapd, rpc.statd, rpc.idmapd and rpcmountd will be automatically started.
NFS configuration files are:
/etc/nfs.conf– main configuration file for the NFS daemons and tools./etc/nfsmount.conf– an NFS mount configuration file.
Step 4: Create and Export NFS share
I have the following servers for my set up:
- 192.168.1.148 – NFS Server
- 192.168.1.147 – NFS Client
We are now going to create file systems that will be exported/shared with nfs clients. In my example, I have a raw 20GB disk attached to the server:
NAME                MAJ:MIN RM  SIZE RO TYPE MOUNTPOINTS
sda                   8:0    0   50G  0 disk
├─sda1                8:1    0    1M  0 part
├─sda2                8:2    0  200M  0 part /boot/efi
├─sda3                8:3    0    1G  0 part /boot
└─sda4                8:4    0 35.8G  0 part
  ├─vg_main-lv_root 252:0    0 31.8G  0 lvm  /
  └─vg_main-lv_swap 252:1    0    4G  0 lvm  [SWAP]
sdb                   8:16   0   20G  0 disk
We format the disk with an ext4 file system using fdisk:
# Add new partition /sdb1
sudo fdisk /dev/sdb
# Format the new partition system
sudo mkfs.ext4 /dev/sdb1
Then mount the partition in /mnt/nfs_shares and this is what is going to be exported. If we check, we’ll see that the partition has been mounted:
$ lsblk
NAME                MAJ:MIN RM  SIZE RO TYPE MOUNTPOINTS
sda                   8:0    0   50G  0 disk
├─sda1                8:1    0    1M  0 part
├─sda2                8:2    0  200M  0 part /boot/efi
├─sda3                8:3    0    1G  0 part /boot
└─sda4                8:4    0 35.8G  0 part
  ├─vg_main-lv_root 252:0    0 31.8G  0 lvm  /
  └─vg_main-lv_swap 252:1    0    4G  0 lvm  [SWAP]
sdb                   8:16   0   20G  0 disk
└─sdb1                8:17   0   20G  0 part /mnt/nfs_shares
Nfs shares are defined in /etc/exports as below:
$ sudo vim /etc/exports
/mnt/nfs_shares	192.168.1.147(sync,rw)
In this case, 192.168.1.147 is the remote nfs client who will be utilizing the created directory in the nfs server.
Here are the descriptions of various export options that you can use:
- rw – Grants both read and write on the nfs share.
- Sync – Requires that writing of the changes on the disk is done first before any other operation.
- no_all_squash – Maps all the UIDs and GIDs from client requests to identical UIDs and GIDs on the nfs server.
- all_squash – maps all UIDs and GIDs from client requests to the anonymous user.
- root_squash – The attribute maps requests from the root user on the client-side to an anonymous UID / GID.
Now export the created share with the command below:
$ sudo exportfs -arv
exporting 192.168.1.147:/mnt/nfs_shares
In the above command, -a shows that all directories will be exported, -r is for re-exporting all directories while -v displays verbose output.
You can also confirm the export list with the below command:
$ sudo exportfs -s
/mnt/nfs_shares  192.168.1.147(sync,wdelay,hide,no_subtree_check,sec=sys,rw,secure,root_squash,no_all_squash)
Step 5: Configure Firewall and SElinux
We need to allow nfs services through the firewall as below:
sudo firewall-cmd --permanent --add-service={nfs,rpc-bind,mountd}
sudo firewall-cmd --reload
If you have SElinux active, you need to run the below commands:
sudo setsebool -P nfs_export_all_rw 1Step 6: Configure NFS Client On Oracle Linux 10
To configure nfs client on Oracle Linux 10, install the required package as below:
sudo dnf install -y nfs-utils nfs4-acl-toolsTo configure nfs client on Ubuntu/ Debian, we use the below commands:
sudo apt-get update
sudo apt-get install nfs-common nfs4-acl-tools
Once installed, show mount information for the nfs server with the below command:
$ showmount -e 192.168.1.148
Export list for 192.168.1.148:
/mnt/nfs_shares 192.168.1.147
We now need to create a directory for mounting the exported file share. Use the below commands:
sudo mkdir -p /mnt/nfs_share
sudo mount -t nfs 192.168.1.148:/mnt/nfs_shares /mnt/nfs_share
For persistent mount even after reboot, update fstab as below:
echo "192.168.1.148:/mnt/nfs_shares /mnt/nfs_share nfs defaults 0 0">>/etc/fstabTo test that nfs share is working, create a test file on the nfs server share directory and check if you find the same file on nfs client. On nfs server, create a test file as below:
sudo touch /mnt/nfs_shares/main.pyOn the nfs client, check for the file:
$ ls -al /mnt/nfs_share
ls: /mnt/nfs_share/lost+found: Permission denied
total 20
drwxr-xr-x. 3 root root  4096 Mar  6 13:06 .
drwxr-xr-x. 3 root root    23 Mar  6 13:04 ..
drwx------. 2 root root 16384 Mar  6 12:50 lost+found
-rw-r--r--. 1 root root     0 Mar  6 13:06 main.py
That’s it. You have successfully installed and configured NFS server and Client on Oracle Linux 10. We hope this was helpful, incase of any issues, don’t hesitate to engage with us in the comment section. Adios, till next time.
More interesting guides below:


