

There is a plethora of web browsers available for Linux and Unix users, each with its own set of capabilities and features. Despite the variety of options, the majority of Linux users are familiar with only one browser: Firefox. For a long time, Firefox has been the preferred browser for Linux users. The majority of consumers are unaware that Firefox is the foundation for a number of other browsers (such as Iceweasel). These “alternative” Firefox versions are nothing more than transcript. Firefox is installed and set as the default browser on most Linux distributions.
Brave is a free next-generation browser released under an open source license by Brave Software, Inc. The source code for Brave Desktop is based on Chromium and is intended to run on Linux, Windows, and macOS. The Brave browser is designed to be secure by removing annoying advertisements and website trackers, guaranteeing that users’ privacy is preserved when browsing the internet.
I’ll show you how to install Brave Browser on Rocky Linux 8 | AlmaLinux 8 | CentOS 8 in this demonstration.
Features of Brave Browser
Here are the cool features of Brave Browser:
- Use the built-in password manager, form autofill, and the ability to turn on “Do not track” when surfing for more security.
- The majority of Chrome extensions available in the Chrome Web Store are supported by Brave.
- Ad blocking, Cookie control, Per-site shield settings, and Cookie control are some of the shields available.
- Transfer your bookmarks and settings- You can rapidly import your old browser’s bookmarks and settings.
- Tabs & Windows include a variety of features such as private windows, pinned tabs, auto-unloading, and more.
- Brave is said to load websites faster than Chrome and Firefox.
- Search- You can use the default search engine or switch to a different search engine using the keyboard keys.
- Enable Brave Rewards and contribute a little back to the websites you visit the most.
Install Brave Browser on Rocky Linux 8 | AlmaLinux 8 | CentOS 8
The following steps will take you through how to install Brave Browser on Rocky Linux 8 | AlmaLinux 8 | CentOS 8.
Step 1: Update Rocky Linux 8 | AlmaLinux 8 | CentOS 8 System
In any Linux distribution, you are required to update your system before you can make any installation to ensure the software being added will work without any issues.
sudo dnf update -yYou can optionally reboot after the system has been updated:
sudo reboot nowStep 2: Brave Browser installation on Rocky Linux 8 | AlmaLinux 8 | CentOS 8
There are two methods to install Brave Browser on Rocky Linux 8 | AlmaLinux 8 | CentOS 8.
- Install Brave Browser from Official repository.
- Install Brave Browser using Snap.
Method 1: Install Brave Browser from Official repository on Rocky Linux 8 | AlmaLinux 8 | CentOS 8
You can install the stable version of Brave Web browser or the Beta version if you want to try out the newest features. Before installing Brave Browser, we’ll need to add the Brave repository.
Add Brave Browser YUM repository:
sudo dnf install -y dnf-plugins-core
sudo dnf config-manager --add-repo https://brave-browser-rpm-release.s3.brave.com/x86_64/
Here is the output of the command below:
Adding repo from: https://brave-browser-rpm-release.s3.brave.com/x86_64/Now, import repository key:
sudo rpm --import https://brave-browser-rpm-release.s3.brave.com/brave-core.ascInstall Brave Browser on on Rocky Linux 8 | AlmaLinux 8 | CentOS 8:
sudo dnf install brave-browserAccept the installation prompt by pressing y/Y key and hit ENTER:
created by dnf config-manager from https://brave-browser-rpm-release.s3.brave.com/x86_64/                            488 kB/s | 134 kB     00:00
Dependencies resolved.
=====================================================================================================================================================
 Package                           Architecture      Version                         Repository                                                 Size
=====================================================================================================================================================
Installing:
 brave-browser                     x86_64            1.75.175-1                      brave-browser-rpm-release.s3.brave.com_x86_64_            118 M
Installing dependencies:
 brave-keyring                     noarch            1.15-1                          brave-browser-rpm-release.s3.brave.com_x86_64_             10 k
 liberation-fonts                  noarch            1:2.00.3-7.el8                  baseos                                                     19 k
 liberation-sans-fonts             noarch            1:2.00.3-7.el8                  baseos                                                    609 k
 liberation-serif-fonts            noarch            1:2.00.3-7.el8                  baseos                                                    608 k
 mesa-vulkan-drivers               x86_64            23.1.4-3.el8_10                 appstream                                                 9.8 M
 vulkan-loader                     x86_64            1.3.283.0-1.el8_10              appstream                                                 147 k

Transaction Summary
=====================================================================================================================================================
Install  7 Packages

Total download size: 129 M
Installed size: 422 M
Is this ok [y/N]: y
In your terminal, you should get the following output for a complete installation:
Running transaction
  Preparing        :                                                                                                                             1/1
  Installing       : vulkan-loader-1.3.283.0-1.el8_10.x86_64                                                                                     1/7
  Installing       : mesa-vulkan-drivers-23.1.4-3.el8_10.x86_64                                                                                  2/7
  Installing       : brave-keyring-1.15-1.noarch                                                                                                 3/7
  Running scriptlet: brave-keyring-1.15-1.noarch                                                                                                 3/7
  Installing       : liberation-serif-fonts-1:2.00.3-7.el8.noarch                                                                                4/7
  Installing       : liberation-sans-fonts-1:2.00.3-7.el8.noarch                                                                                 5/7
  Installing       : liberation-fonts-1:2.00.3-7.el8.noarch                                                                                      6/7
  Running scriptlet: brave-browser-1.75.175-1.x86_64                                                                                             7/7
  Installing       : brave-browser-1.75.175-1.x86_64                                                                                             7/7
  Running scriptlet: brave-browser-1.75.175-1.x86_64                                                                                             7/7
  Verifying        : mesa-vulkan-drivers-23.1.4-3.el8_10.x86_64                                                                                  1/7
  Verifying        : vulkan-loader-1.3.283.0-1.el8_10.x86_64                                                                                     2/7
  Verifying        : liberation-fonts-1:2.00.3-7.el8.noarch                                                                                      3/7
  Verifying        : liberation-sans-fonts-1:2.00.3-7.el8.noarch                                                                                 4/7
  Verifying        : liberation-serif-fonts-1:2.00.3-7.el8.noarch                                                                                5/7
  Verifying        : brave-browser-1.75.175-1.x86_64                                                                                             6/7
  Verifying        : brave-keyring-1.15-1.noarch                                                                                                 7/7

Installed:
  brave-browser-1.75.175-1.x86_64                  brave-keyring-1.15-1.noarch                       liberation-fonts-1:2.00.3-7.el8.noarch
  liberation-sans-fonts-1:2.00.3-7.el8.noarch      liberation-serif-fonts-1:2.00.3-7.el8.noarch      mesa-vulkan-drivers-23.1.4-3.el8_10.x86_64
  vulkan-loader-1.3.283.0-1.el8_10.x86_64

Complete!
Method 2: Install Brave Browser using Snap on Rocky Linux 8|AlmaLinux 8|CentOS 8
We will install Brave Browser using snap as follows.
Add EPEL repository:
sudo dnf install epel-releaseInstall Snap:
sudo dnf install snapdThe systemd unit that manages the main snap communication socket must be activated after installation:
sudo systemctl enable --now snapd.socketTo enable classic snap functionality, build a symbolic link between /var/lib/snapd/snap and /snap with the following command:
sudo ln -s /var/lib/snapd/snap /snapNow, run the following command to install Brave Browser:
sudo snap install braveStep 3: Launch Brave Browser on Rocky Linux 8 | AlmaLinux 8 | CentOS 8
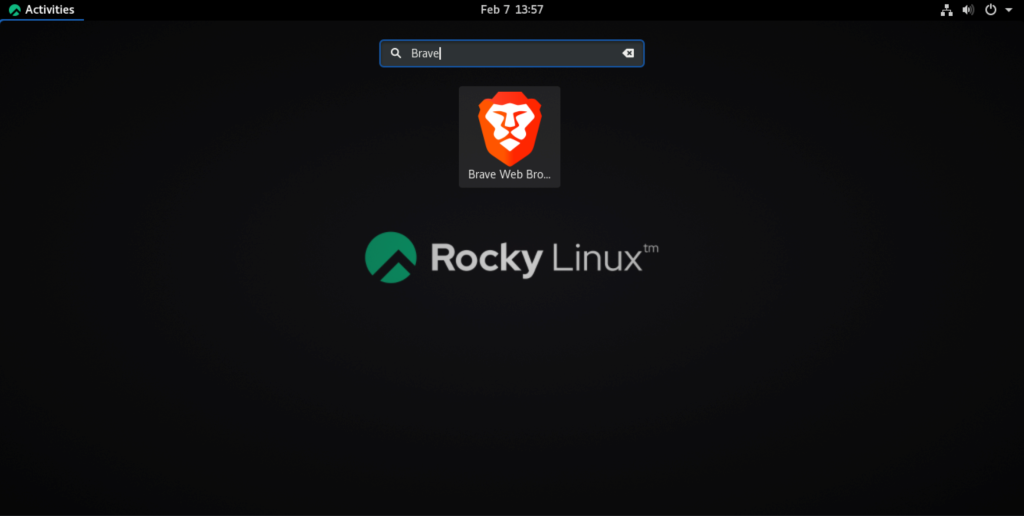
On Rocky Linux 8 | AlmaLinux 8 | CentOS 8, after successful installation you can use the terminal or the Desktop Environment Launcher to run the brave web browser:
$ brave-browserGo to your Desktop Environment and search for Brave as shown below:
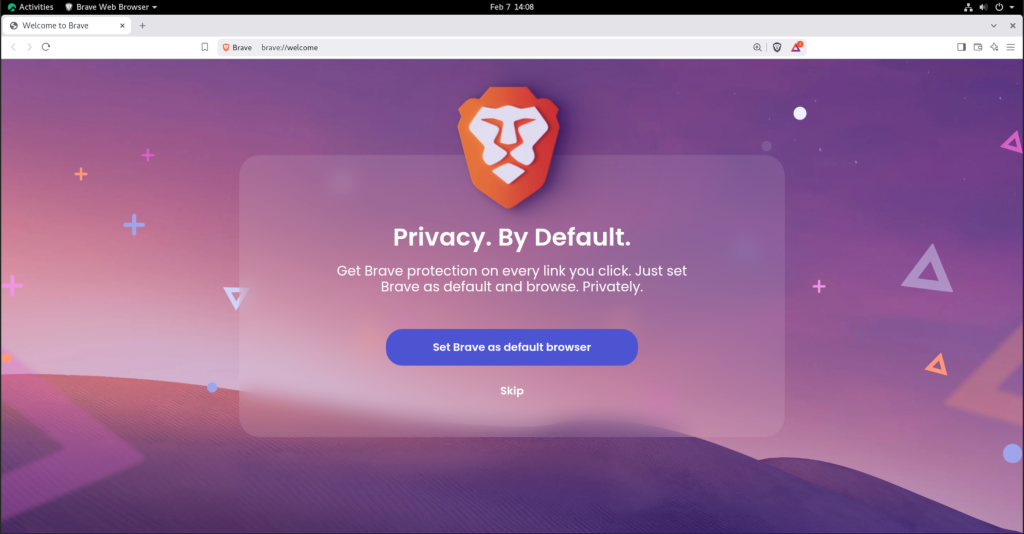
Click the “Let’s Go” button to begin configuring Brave Browser as your default web browser:
Conclusion
The installation of the Brave browser on Rocky Linux 8 | AlmaLinux 8 | CentOS 8 is now complete. I hope you will enjoy browsing on Rocky Linux 8 | AlmaLinux 8 | CentOS 8 with the Brave.
Similar Guides:


