
Istio is one of the most powerful and feature-rich service meshes available on Kubernetes, providing scale and functionality in traffic management, security, observability, and policy enforcement. But setting up Istio can be complicated, especially when trying to incorporate it into an already established GitOps or CI/CD Automation Process.
In this tutorial, you will learn how to accomplish Istio Service Mesh installation on a Kubernetes environment using ArgoCD and Helm charts. By doing this, you can easily take advantage of the flexibility and configurability inherent in Helm, as well as having a version-controlled environment provided by ArgoCD. By then, you would have successfully achieved an automated Istio installation that is managed through GitOps.
Install Istio Service Mesh on Kubernetes using ArgoCD and Helm Charts
These are the prerequisites:
- A working Kubernetes cluster (>=1.26 recommended).
kubectl,helm, andargocdCLIs installed (optional for ArgoCD CLI).- ArgoCD installed and reachable (
argocd-server). - A Git repo you control for ArgoCD manifests.
Step 1: Verify a working ArgoCD Deployment
To check if ArgoCD components are running, pull a list of running pods in the namespace:
$ kubectl get pods -n argocd
NAME                                               READY   STATUS    RESTARTS      AGE
argocd-application-controller-0                    1/1     Running   3 (22h ago)   2d10h
argocd-applicationset-controller-fc5545556-t444v   1/1     Running   3 (22h ago)   2d10h
argocd-dex-server-f59c65cff-tj2jh                  1/1     Running   3 (22h ago)   2d10h
argocd-notifications-controller-59f6949d7-xzfrm    1/1     Running   3 (22h ago)   2d10h
argocd-redis-75c946f559-2lmwr                      1/1     Running   3 (22h ago)   2d10h
argocd-repo-server-6959c47c44-hsfrz                1/1     Running   3 (22h ago)   2d10h
argocd-server-65544f4864-z89dm                     1/1     Running   4 (22h ago)   2d10h
Also check that the servcies are up and running:
$ kubectl get services -n argocd
NAME                                      TYPE        CLUSTER-IP      EXTERNAL-IP   PORT(S)                      AGE
argocd-applicationset-controller          ClusterIP   10.233.1.208    <none>        7000/TCP,8080/TCP            2d10h
argocd-dex-server                         ClusterIP   10.233.21.28    <none>        5556/TCP,5557/TCP,5558/TCP   2d10h
argocd-metrics                            ClusterIP   10.233.62.130   <none>        8082/TCP                     2d10h
argocd-notifications-controller-metrics   ClusterIP   10.233.25.236   <none>        9001/TCP                     2d10h
argocd-redis                              ClusterIP   10.233.33.155   <none>        6379/TCP                     2d10h
argocd-repo-server                        ClusterIP   10.233.42.166   <none>        8081/TCP,8084/TCP            2d10h
argocd-server                             ClusterIP   10.233.62.48    <none>        80/TCP,443/TCP               2d10h
argocd-server-metrics                     ClusterIP   10.233.24.4     <none>        8083/TCP                     2d10h
If you want to expose ArgoCD via Ingress, refer to our guide below:
Step 2: Add Istio Helm Repo
Since we’ll be using Helm Charts for the deployments, add the Istio Helm repository as follows:
helm repo add istio https://istio-release.storage.googleapis.com/charts
helm repo update
Step 3: GitOps Folder Structure
As we mentioned earlier, you need a GitHub repository where you’ll store all the manifests. This is the folder structure I went for with mine, you can structure your however you like, but you’ll need to also edit the manifests to match them.
Your GitHub repository should look something like this:
istio-gitops/
└── apps
    ├── istio
    │   ├── istio-base-app.yaml
    │   ├── istio-gateway-app.yaml
    │   ├── istio-namespace.yaml
    │   ├── istio-values
    │   │   ├── base-values.yaml
    │   │   ├── gateway-values.yaml
    │   │   └── istiod-values.yaml
    │   └── istiod-app.yaml
    └── istio-app.yaml
Step 4: Namespaces and Labels
We can use ArgoCD to create the Istio control-plane and gateway namespaces. Populate the istio-namespace.yaml manifest as follows:
# apps/istio/istio-namespace.yaml
apiVersion: v1
kind: Namespace
metadata:
  name: istio-system
---
apiVersion: v1
kind: Namespace
metadata:
  name: istio-ingress
Step 3: The Values Files
For our set up, ArgoCD will pull the chart from the Istio Helm repo and your values from your Git repo in the same Application. Populate the values files as follows:
Istio Base
Usually, no values are needed for base, it installs CRDs, but it’s always good to keep a values file for overrides if needed. Copy the default values provided here and populate the base-values.yaml manifest. Edit the values as per your requirements.
Istiod
The same applies for the Istiod values, copy the default values here and paste the in the istiod-values.yaml manifest. Edit them to suit your specific setup and needs.
Istio Gateway
Do the same for the gateway-values.yaml manifest. Copy and paste the default values here. Explicitly set values have highest priority, then profile settings, then chart defaults.
Service type is set to LoadBalancer by default, change to NodePort if you don’t have a LoadBalancer.
Step 4: Create ArgoCD Applications
Now, it’s time to create the ArgoCD Applications. As per the setup I used, ArgoCD will pull the chart from the Istio Helm repo and your values from your Git repo in the same Application. (The $values/... path comes from the ref: values source.)
Istion Base App
The Istio Base application is as follows:
apiVersion: argoproj.io/v1alpha1
kind: Application
metadata:
  name: istio-base
  namespace: argocd
  annotations:
    argocd.argoproj.io/sync-wave: "0"   # CRDs first
spec:
  project: default
  destination:
    namespace: istio-system
    server: https://kubernetes.default.svc

  sources:
    # 1. Helm chart from Istio
    - repoURL: https://istio-release.storage.googleapis.com/charts
      chart: base
      targetRevision: 1.23.0
      helm:
        valueFiles:
          - $values/apps/istio/istio-values/base-values.yaml

    # 2. Values from your Git repo
    - repoURL: https://github.com/kiprotichgidii/istio-gitops.git # Replace with your git repo url
      targetRevision: main
      ref: values

  syncPolicy:
    automated:
      prune: true
      selfHeal: true
Istiod App
The Istiod Application is as follows:
apiVersion: argoproj.io/v1alpha1
kind: Application
metadata:
  name: istiod
  namespace: argocd
  annotations:
    argocd.argoproj.io/sync-wave: "1"
spec:
  project: default
  destination:
    namespace: istio-system
    server: https://kubernetes.default.svc

  sources:
    - repoURL: https://istio-release.storage.googleapis.com/charts
      chart: istiod
      targetRevision: 1.23.0
      helm:
        valueFiles:
          - $values/apps/istio/istio-values/base-values.yaml

    - repoURL: https://github.com/kiprotichgidii/istio-gitops.git # Replace with your git repo url
      targetRevision: main
      ref: values

  syncPolicy:
    automated:
      prune: true
      selfHeal: true
Istio Gateway App
The Istio gateway application is as follows:
apiVersion: argoproj.io/v1alpha1
kind: Application
metadata:
  name: istio-ingress-gateway
  namespace: argocd
  annotations:
    argocd.argoproj.io/sync-wave: "2"
spec:
  project: default
  destination:
    namespace: istio-ingress
    server: https://kubernetes.default.svc

  sources:
    - repoURL: https://istio-release.storage.googleapis.com/charts
      chart: gateway
      targetRevision: 1.23.0
      helm:
        valueFiles:
          - $values/apps/istio/istio-values/gateway-values.yaml

    - repoURL: https://github.com/kiprotichgidii/istio-gitops.git # Replace with your git repo url
      targetRevision: main
      ref: values

  syncPolicy:
    automated:
      prune: true
      selfHeal: true
Step 5: Create the Istio App
Now let’s create the Istio Application to rule them all. We will use this for ArgoCD to create all the three Istio applications in the specific order. Create the manifest as follows:
apiVersion: argoproj.io/v1alpha1
kind: Application
metadata:
  name: istio-stack
  namespace: argocd
spec:
  project: default
  source:
    repoURL: https://github.com/kiprotichgidii/istio-gitops.git # Replace with your git repo url
    targetRevision: main
    path: apps/istio
  destination:
    server: https://kubernetes.default.svc
    namespace: argocd
  syncPolicy:
    automated:
      prune: true
      selfHeal: true
Step 6: Connect GitHub repo to ArgoCD
When you are done, commit everything and push it to your GitHub repository, then connect the repository to your ArgoCD deployment. This can be done from the CLI and also via the ArgoCD UI.
ArgoCD CLI
To use the ArgoCD CLI, you need to install the argocd CLI. Refer to this documentation on installing ArgoCD CLI. After you have installed ArgoCD CLI, login to ArgoCD with argocd login then provide the username ad password.
Then run the command below to connect your github repo:
argocd repo add https://github.com/github-username/github-repo-name.git \
  --username YOUR_USERNAME \
  --password GITHUB_TOKEN
Generate your GitHub Token via the web UI.
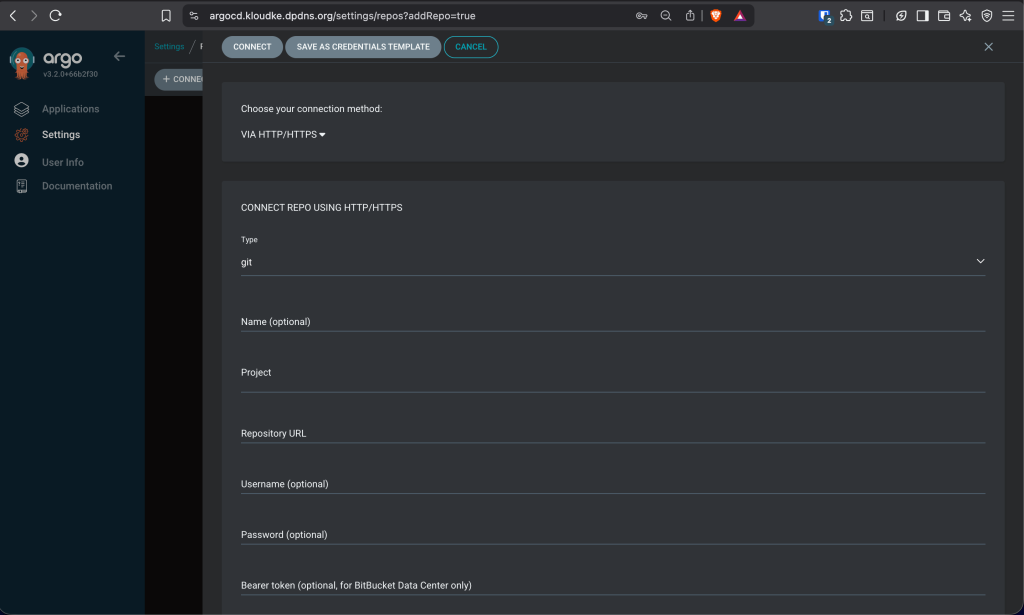
ArgoCD UI
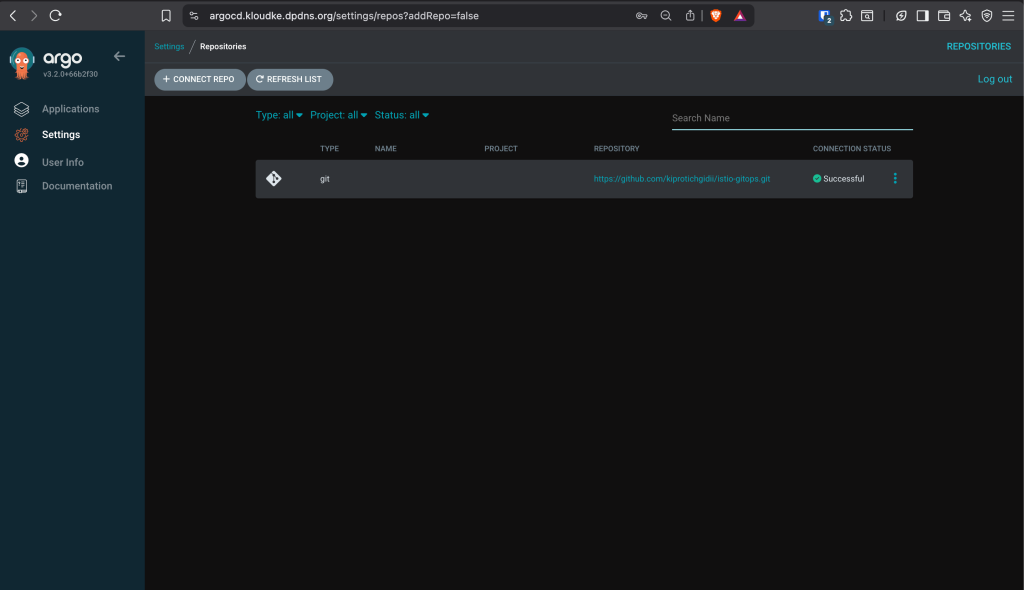
To connect using the ArgoCD UI, access your ArgoCD UI, then login and go to Settings → Repositories, then click Connect Repo:
Enter the repo url and provide you GitHub Access token, then click Connect. The repo should connect successfully:
Step 7: Deploy the ArgoCD Apps
With that done, now run the following kubect command to create the apps:
kubectl apply -f apps/istio-app.yaml -n argocdArgoCD will create istio-base → istiod → istio-ingress-gateway in the correct order.
You can verify the installation with the following commands:
Check the pods on the Istio control plane:
$ kubectl get pods -n istio-system
NAME                     READY   STATUS    RESTARTS   AGE
istiod-54f5b9cfd-7msmt   1/1     Running   0          10m
Also check the Gateway Service. If LoadBalancer was set as Service Type, you will notice the external IP:
$ kubectl get svc -n istio-ingress
NAME                    TYPE           CLUSTER-IP      EXTERNAL-IP     PORT(S)                                      AGE
istio-ingress-gateway   LoadBalancer   10.233.37.218   192.168.1.206   15021:31363/TCP,80:32132/TCP,443:30658/TCP   10h
Finally, you can check the CRDs installed:
$ kubectl get crds | grep istio.io
authorizationpolicies.security.istio.io                 2025-11-06T22:32:18Z
destinationrules.networking.istio.io                    2025-11-06T22:32:18Z
envoyfilters.networking.istio.io                        2025-11-06T22:32:18Z
gateways.networking.istio.io                            2025-11-06T22:32:18Z
peerauthentications.security.istio.io                   2025-11-06T22:32:18Z
proxyconfigs.networking.istio.io                        2025-11-06T22:32:18Z
requestauthentications.security.istio.io                2025-11-06T22:32:18Z
serviceentries.networking.istio.io                      2025-11-06T22:32:18Z
sidecars.networking.istio.io                            2025-11-06T22:32:18Z
telemetries.telemetry.istio.io                          2025-11-06T22:32:18Z
virtualservices.networking.istio.io                     2025-11-06T22:32:18Z
wasmplugins.extensions.istio.io                         2025-11-06T22:32:18Z
workloadentries.networking.istio.io                     2025-11-06T22:32:18Z
workloadgroups.networking.istio.io                      2025-11-06T22:32:18Z
In the ArgoCD UI, you should be able to see the apps:

Step 8: Demo Workflow
After we have Installed Istio Mesh, let’s deploy a demo app. First, let’s create a namespace for deploying the demo app:
kubectl apply -f https://raw.githubusercontent.com/cloudspinx/k8s-samples/main/sample-namespace-istio.yamlEnable Sidecar Injection
In order to take advantage of all of Istio’s features, pods in the mesh must be running an Istio sidecar proxy. This enabled traffic to be routed inside the mesh. You can enable injection on your app repo as follows:
kubectl label namespace istio-temp istio-injection=enabled --overwriteInjection occurs at pod creation time, so this will apply to the pods we’ll create. Now create the deployments:
kubectl apply -f https://raw.githubusercontent.com/cloudspinx/k8s-samples/main/sample-deployment-apple-banana.yaml -n istio-tempAnd create the services for those deployments:
kubectl apply -f https://raw.githubusercontent.com/cloudspinx/k8s-samples/main/sample-service-apple-banana.yaml -n istio-tempVerify:

What’s remaining is to deploy the Istio Gateway and the VirtualService. Create cat istio-gateway-service.yaml:
apiVersion: networking.istio.io/v1beta1
kind: Gateway
metadata:
  name: fruit-gateway
  namespace: istio-temp
spec:
  selector:
    istio: ingress-gateway
  servers:
  - port:
      number: 80
      name: http
      protocol: HTTP
    hosts:
    - "fruit.kloudke.dpdns.org"

---
apiVersion: networking.istio.io/v1beta1
kind: VirtualService
metadata:
  name: fruit-virtualservice
  namespace: istio-temp
spec:
  hosts:
  - "fruit.kloudke.dpdns.org"
  gateways:
  - fruit-gateway
  http:
  - match:
    - uri:
        prefix: "/apple"
    route:
    - destination:
        host: apple-service
        port:
          number: 80
  - match:
    - uri:
        prefix: "/banana"
    route:
    - destination:
        host: banana-service
        port:
          number: 80
Then run:
kubectl apply -f istio-gateway-service.yamlCheck the gateway and virtual services:
kubectl get gateways.networking.istio.io
kubectl get virtualservices.networking.istio.io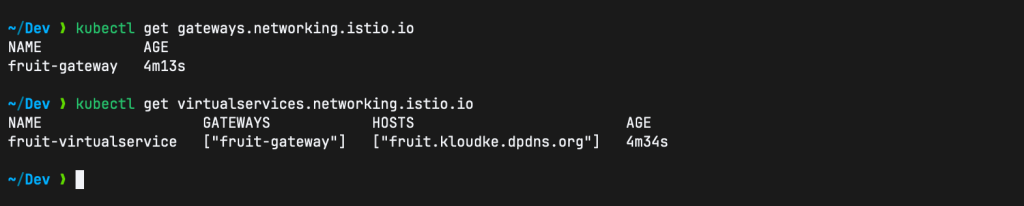
$
NAME                   GATEWAYS            HOSTS                           AGE
fruit-virtualservice   ["fruit-gateway"]   ["fruit.apps.cloudlabske.io"]   73s
To test, run the following commands:
curl http://fruit.apps.cloudlabske.io/banana
curl http://fruit.apps.cloudlabske.io/apple
We hope this guide was helpful, see you next time!


