KDE is an Open Source Desktop Environment designed to offer safety, privacy and peace of mind. It makes web surfing , keeping in touch with colleagues ,managing files, listening to music and watching your videos while at the same time being creative and productive at work. Its adaptability is what makes KDE Plasma the most preferred Desktop environment.
KDE is the short form for Kool Desktop Environment. Its development work started in 1996 with its first version released in 1998. With time KDE was no longer referring to a desktop environment but instead it specified the project’s organization and the community that supported it. KDE had many additional software projects beside the desktop environment. In 2009 , KDE’s desktop environment rebranded to KDE Plasma.
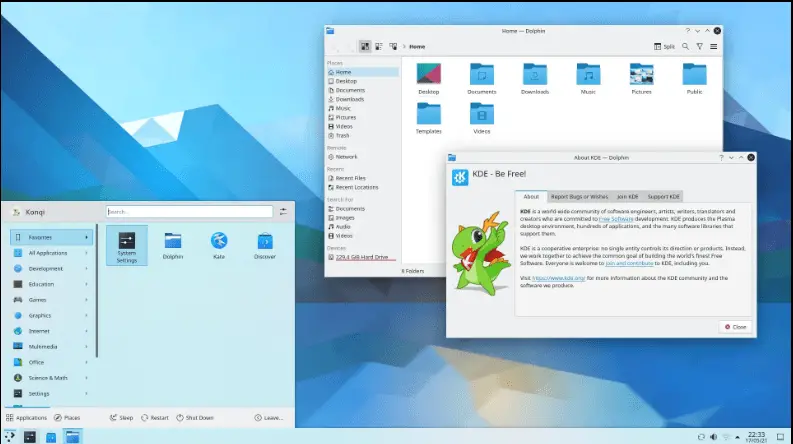
From the screenshot, notice that the panel is located at the primary UI frames bottom. This is a traditional panel location used on older systems and one of the reasons why KDE Plasma is known for being a good desktop environment for those new to Linux.
On the panels right side , we have the system tray which contains notifications, the time and other widgets.
The Application Menu which launches various programs and contains the favorite bar is on the panel’s far left-side.
Features / Components of KDE Plasma.
- Display Manager – Simple Desktop Display Manager (SDDM).
- File Manager – Dolphin.
- Favorites Bar – Displayed inside Application Menu.
- Panels – A single panel located at Primary UI frames bottom.
- System Tray – located on the right side of the single panel.
- Widgets – Also called Plasmoids.
- Windows Manager – Kwin.
In this article, we will discuss how to Install KDE Plasma Desktop Environment on Rocky / AlmaLinux Desktop OS.
Step 1: Update your Linux system
Open your terminal and run the command below to update your Linux system.
sudo dnf updateStep 2: Install EPEL Repository
EPEL is the short form for Extra Package for Enterprise Linux. The purpose for this is to help you use Centos high quality packages maintained on Red Hat Enterprise Linux (RHEL) and its compatible derivatives.
Run the command below to install the latest release of EPEL repo.
sudo dnf install epel-release
sudo dnf config-manager --set-enabled powertools
Step 3: Download and Install KDE Plasma
Run the command below to install KDE Plasma Workspaces and all dependencies.
sudo dnf groupinstall "KDE Plasma Workspaces"Execution output that shows installation packages, upgrade packages and the total size of the packages download size.
Step 4: Enable the powertools repository
EPEL packages may depend on packages from powertools repository.
Run the command below to enable packages from powertools repo.
sudo dnf config-manager --set-enabled powertoolsAn alternative command to enable EPEL repository, powertools , installation of KDE Plasma Workspaces and base-x engine.
sudo dnf --enablerepo=epel,powertools group -y install "KDE Plasma Workspaces" "base-x"Execution output showing successful installation EPEL repo, powertools, KDE Plasma Workspaces and base-x engine.
Step 5: Set KDE Plasma as default
To ensure the system starts via KDE Plasma desktop environment GUI on reboot, set default system target to graphical.
Run the command below to set default system target to graphical.
sudo systemctl set-default graphicalStep 6: Reboot your system
Reboot and login to your system to your new KDE Plasma desktop environment GUI.
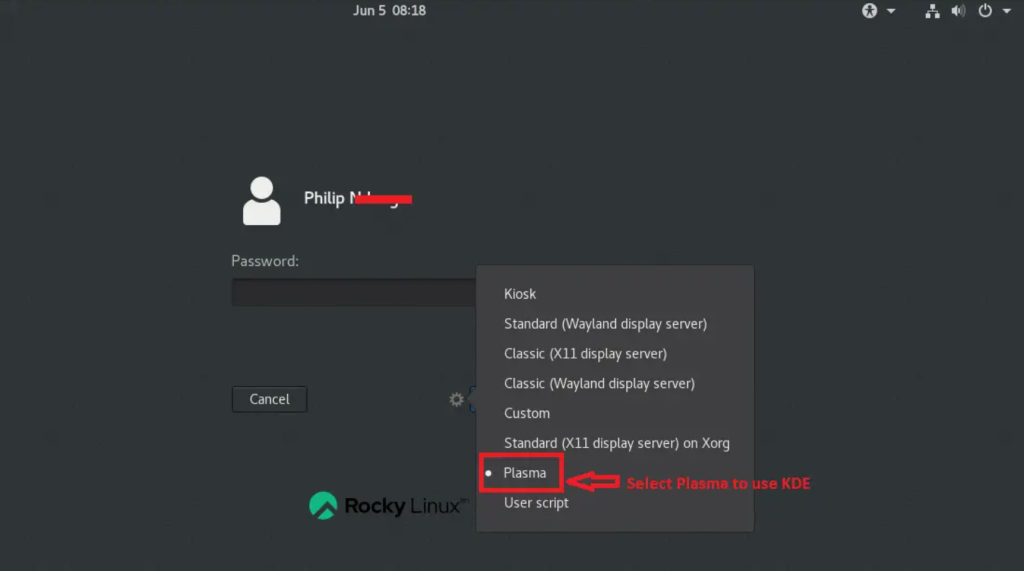
sudo rebootIn the login screen click the “settings” icon next to the “Sign In” button and choose Plasma:

On login, your KDE Plasma desktop environment looks like this.

If KDE environment is not defaulted on startup, you need to manually edit the bash profile, by adding the following script on command end.
Run the command below to edit bash profile.
vim ~/.bash_profileadd the script below at the end.
if [[ -z $DISPLAY ]] && [[ $(tty) = /dev/tty1 ]]; then exec startx /usr/bin/startkde; fiExplore More with CloudSpinx
Looking to streamline your tech stack? At CloudSpinx, we deliver robust solutions tailored to your needs.
Check out more articles:


