In this guide, we will explain how to install KVM with virt-manager and Cockpit on Debian 12 (Bookworm). KVM stands for Kernel-based Virtual Machine, and it is a virtualization infrastructure for the Linux kernel. KVM allows you to run multiple virtual machines (VMs) on a single physical machine, providing a cost-effective and efficient way to consolidate hardware resources. Here are some basics about KVM and its advantages:
- Architecture: KVM is implemented as a loadable kernel module that leverages hardware virtualization extensions (Intel VT-x or AMD-V).
- Virtualization Types: KVM supports full virtualization, enabling you to run unmodified guest operating systems, and paravirtualization.
- Features: KVM offers various good features, including live migration, snapshotting, resource allocation controls, dynamic memory management, and support for a wide range of guest operating systems, including Linux, Windows, and BSD.
- Libvirt: Libvirt is a toolkit that provides a common API for managing KVM. It simplifies the management of virtual machines, networks, and storage.
- VirtIO: KVM utilizes the VirtIO framework to optimize I/O performance between the guest and host systems. VirtIO provides para-virtualized device drivers that enhance I/O operations and reduce overhead.
🧠 Don’t just learn KVM – master it with the best-selling eBook trusted by thousands.
Now, let’s move on to some Advantages of KVM:
- Performance: KVM offers near-native performance as it utilizes hardware virtualization extensions.
- Scalability: KVM supports running multiple VMs on a single host, allowing for efficient utilization of resources.
- Wide Guest OS Support: KVM supports a wide range of guest operating systems, including various Linux distributions, Windows, BSD, and more.
- Security: KVM benefits from the security features provided by the Linux kernel.
- Open Source: KVM is an open-source project, which means it is free to use and has an active community of developers and users
Install KVM with virt-manager on Debian 12 (Bookworm)
Follow the steps below for successful installation of KVM with virt-manager and Cockpit on Debian 12 (Bookworm).
1: Check Virtualization Support
Systems with Intel or AMD processors are the only ones that can use KVM. In order to ensure support, run the command below before installing KVM on Debian 12. The command searches for virtual machine extensions (vmx) or secure virtual machines (svm) on the CPU, either Intel or AMD.
$ egrep -c '(vmx|svm)' /proc/cpuinfo
4
If the result is larger than 0, virtualization is assumed to be supported. We have validated that our server is operational based on the output shown above.
2: Install KVM on Debian 12
We are intending to install KVM after confirming that our system can support KVM virtualization. Run the following command to install KVM, virt-manager, bridge-utils, and other dependencies:
sudo apt update
sudo apt install -y qemu-kvm libvirt-daemon libvirt-clients bridge-utils virt-manager
A brief description of the packages mentioned above.
- qemu-kvm – is a package of the primary KVM software.
- libvritd-daemon – daemon for virtualization.
- bridge-utils – allows you to build a bridge connection so that users other than the host system can access a virtual machine.
- virt-manager – is a program that uses a graphical user interface to manage virtual machines.
We must verify that the virtualization daemon, libvritd-daemon, is operating before moving on. Execute the command to achieve this.
$ systemctl status libvirtd
○ libvirtd.service - Virtualization daemon
     Loaded: loaded (/lib/systemd/system/libvir>
     Active: inactive (dead) since Fri 2023-06->
   Duration: 2min 9ms
TriggeredBy: ● libvirtd.socket
             ● libvirtd-ro.socket
             ● libvirtd-admin.socket
       Docs: man:libvirtd(8)
             https://libvirt.org
    Process: 4991 ExecStart=/usr/sbin/libvirtd >
   Main PID: 4991 (code=exited, status=0/SUCCES>
        CPU: 136ms

Jun 23 16:42:16 debian systemd[1]: Starting lib
Run the following command to have it boot automatically:
sudo systemctl enable --now libvirtdUse the following command to determine whether the KVM modules are loaded:
$ lsmod | grep -i kvm
kvm_intel             380928  0
kvm                  1142784  1 kvm_intel
irqbypass              16384  1 kvm
3: Make the Network active and auto-restart
Execute the commands below to accomplish.
sudo virsh net-start default
sudo virsh net-autostart default
The output should be like as below:
$ sudo virsh net-list --all
 Name      State    Autostart   Persistent
--------------------------------------------
 default   active   yes         yes
Add “vhost_net”.(OPTIONAL)
We can add the “vhost_net” kernel module to boost network data transfer performance and minimize the burden on virtio-net.
sudo modprobe vhost_netVerify if it’s enabled.
$ lsmod | grep vhost
vhost_net              36864  0
tun                    61440  1 vhost_net
vhost                  57344  1 vhost_net
vhost_iotlb            16384  1 vhost
tap                    28672  1 vhost_net
4: Create Bridge Network
Though the KVM comes pre-configured with a bridge network interface called virbr0 due to the IP range allocated by it, we are unable to access the KVM virtual machine from the host PC using any other computer in the network. As a result, we will design our own full-bridge interface using the host system’s physical nic and the IP range of our network.
Now check the network interface of your host machine.
$ ip a
1: lo: <LOOPBACK,UP,LOWER_UP> mtu 65536 qdisc noqueue state UNKNOWN group default qlen 1000
    link/loopback 00:00:00:00:00:00 brd 00:00:00:00:00:00
    inet 127.0.0.1/8 scope host lo
       valid_lft forever preferred_lft forever
    inet6 ::1/128 scope host
       valid_lft forever preferred_lft forever
2: ens18: <BROADCAST,MULTICAST,UP,LOWER_UP> mtu 1500 qdisc fq_codel state UP group default qlen 1000
    link/ether 8e:52:72:69:33:12 brd ff:ff:ff:ff:ff:ff
    altname enp0s18
    inet 192.168.200.173/24 brd 192.168.200.255 scope global dynamic noprefixroute ens18
       valid_lft 40308sec preferred_lft 40308sec
    inet6 fe80::8c52:72ff:fe69:3312/64 scope link noprefixroute
       valid_lft forever preferred_lft forever
3: virbr0: <NO-CARRIER,BROADCAST,MULTICAST,UP> mtu 1500 qdisc noqueue state DOWN group default qlen 1000
    link/ether 52:54:00:3e:2e:da brd ff:ff:ff:ff:ff:ff
    inet 192.168.122.1/24 brd 192.168.122.255 scope global virbr0
       valid_lft forever preferred_lft forever
ens18and the IP address is 192.168.200.173. Hence, the range is between 192.168.200.173-192.168.200.255
Edit the network interface file for Debian 12 now by opening the editor file and add the lines below.
$ sudo nano /etc/network/interfaces
# Primary network interface
auto ens18
iface ens18 inet manual

# Bridge definitions
auto br0
iface br0 inet static
bridge_ports ens18
bridge_stp off
address 192.168.1.2
network 192.168.1.0
netmask 255.255.255.0
broadcast 192.168.1.255
gateway 192.168.1.1
dns-nameservers 172.20.30.252 172.20.30.251
For Static IP
To make the changes effective, restart the Network Manager.
sudo systemctl restart networking.serviceVerify the Ip-address and this time, your freshly built br0 bridge interface will be present alongside others.
$ ip ad
1: lo: <LOOPBACK,UP,LOWER_UP> mtu 65536 qdisc noqueue state UNKNOWN group default qlen 1000
    link/loopback 00:00:00:00:00:00 brd 00:00:00:00:00:00
    inet 127.0.0.1/8 scope host lo
       valid_lft forever preferred_lft forever
    inet6 ::1/128 scope host noprefixroute
       valid_lft forever preferred_lft forever
2: eno1: <BROADCAST,MULTICAST,UP,LOWER_UP> mtu 1500 qdisc fq_codel master br0 state UP group default qlen 1000
    link/ether 1c:69:7a:61:da:e9 brd ff:ff:ff:ff:ff:ff
    altname enp0s31f6
3: wlp0s20f3: <BROADCAST,MULTICAST> mtu 1500 qdisc noop state DOWN group default qlen 1000
    link/ether 08:71:90:27:5b:be brd ff:ff:ff:ff:ff:ff
4: br0: <BROADCAST,MULTICAST,UP,LOWER_UP> mtu 1500 qdisc noqueue state UP group default qlen 1000
    link/ether 26:8f:ab:9f:8b:85 brd ff:ff:ff:ff:ff:ff
    inet 192.168.1.2/24 brd 192.168.1.255 scope global br0
       valid_lft forever preferred_lft forever
    inet6 fe80::248f:abff:fe9f:8b85/64 scope link
       valid_lft forever preferred_lft forever
5: Install the Cockpit Web Console
Use the following command to install the cockpit console:
$ sudo apt install cockpit
The following NEW packages will be installed:
  bsd-mailx cockpit cockpit-bridge
  cockpit-networkmanager cockpit-packagekit
  cockpit-storaged cockpit-system cockpit-ws
  exim4-base exim4-config exim4-daemon-light
  libblockdev-mdraid2 libbytesize-common
  libbytesize1 liblockfile1 libpwquality-tools
  mdadm
0 upgraded, 17 newly installed, 0 to remove and 3 not upgraded.
Need to get 8,314 kB of archives.
After this operation, 13.1 MB of additional disk space will be used.
Do you want to continue? [Y/n] y
You must install the cockpit-machines package in addition to the cockpit in order to handle virtual machines.
sudo apt install cockpit-machines cockpit-podmanStart cockpit.
sudo systemctl enable cockpit.socket && sudo systemctl start cockpit.socketVerify the installation.
$ systemctl status cockpit.socket
● cockpit.socket - Cockpit Web Service Socket
     Loaded: loaded (/lib/systemd/system/cockpit.socket; enabled; preset: enabled)
     Active: active (listening) since Wed 2023-08-23 05:48:48 EDT; 1min 52s ago
   Triggers: ● cockpit.service
       Docs: man:cockpit-ws(8)
     Listen: [::]:9090 (Stream)
      Tasks: 0 (limit: 28431)
     Memory: 84.0K
        CPU: 9ms
     CGroup: /system.slice/cockpit.socket
6: Accessing Cockpit Web Console
Open a browser that can connect to the IP address or domain where the Cockpit is installed. However, if you are using a firewall, remember to open port 9090.
You must open port 9090 on the firewall, if you want to access Cockpit from a distance and your server is protected by the UFW firewall. Execute the below command.
sudo ufw allow 9090/tcp
sudo ufw reload
Run URL type- https://server-ip-address:9090
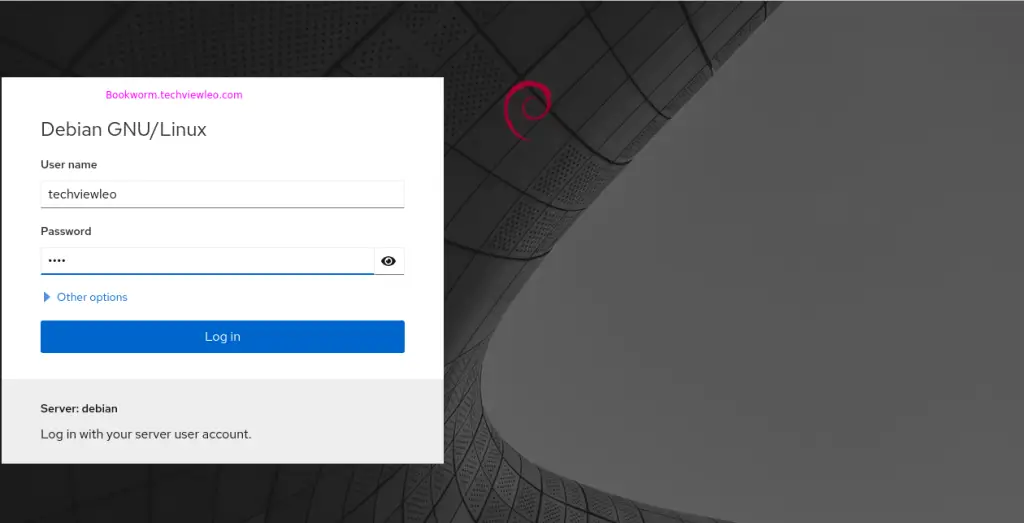
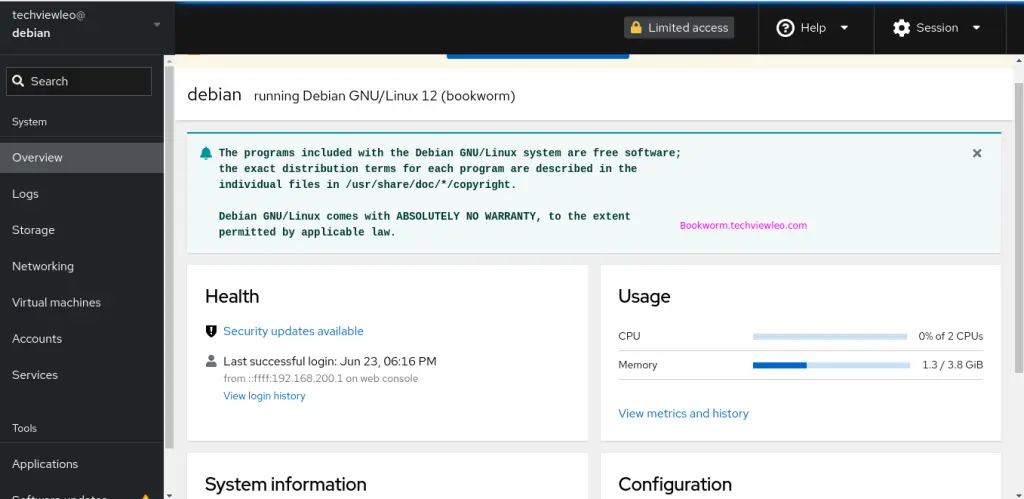
You now have access to the Cockpit’s Dashboard, which includes a number of settings and current system monitoring values. From this point on, you can keep an eye on your system’s load.
7: Install Podman for Cockpit to run containers
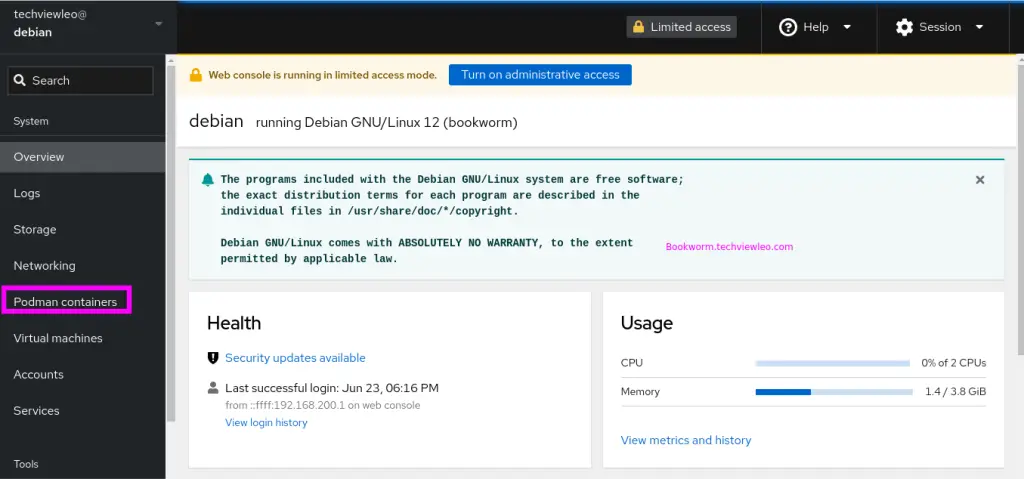
Additionally, if you wish to build and execute containers through the Cockpit interface, that is also doable. Install the cockpit-podman package in your command prompt to accomplish it.
sudo apt install cockpit-podmanThe Podman Containers option can be found on the Dashboard once the installation is complete.
8: Create KVM Virtual Machines from Cockpit
To begin establishing a virtual computer, locate and select the ‘Virtual Machines‘ option, as indicated.
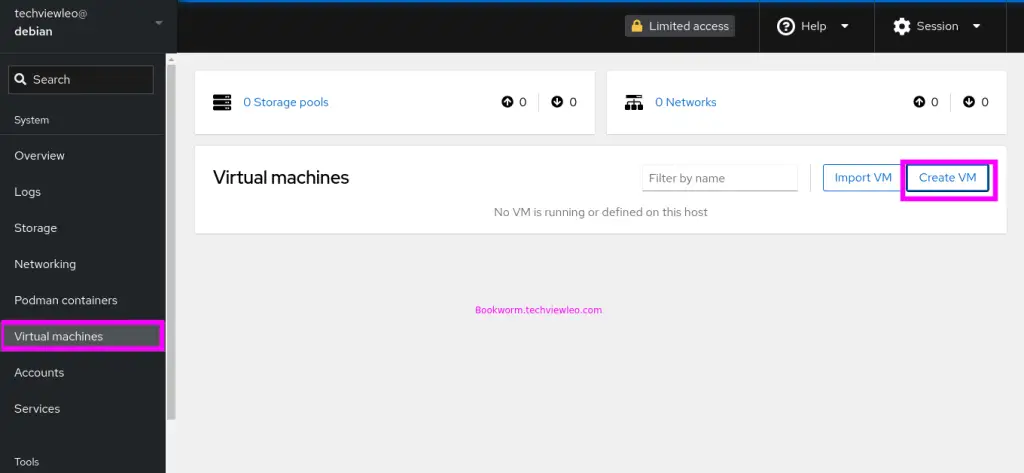
Click Create VM as shown above. Choose the machine you want to install and click Create and run.
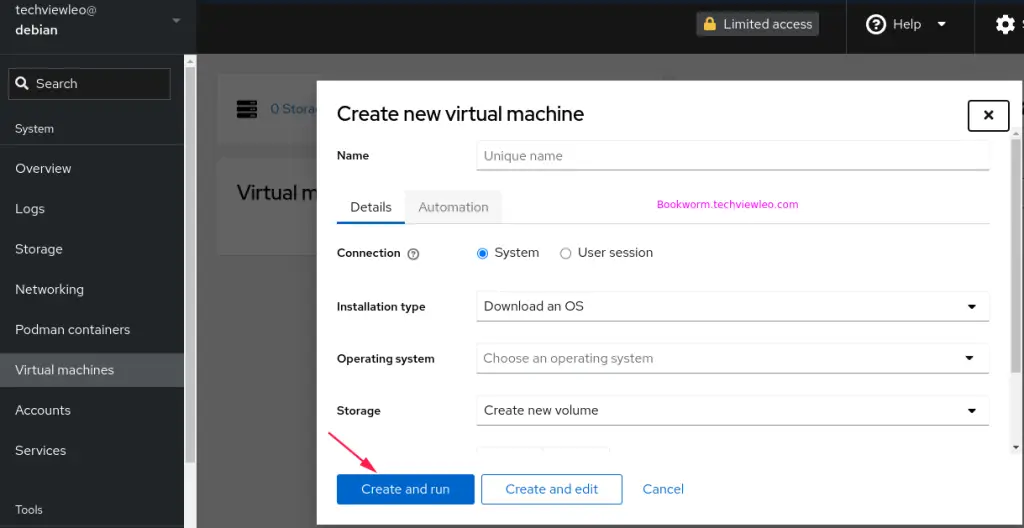
You’re ready to go!
Recommended Linux Books to read:
- Best Linux Books for Beginners & Experts
- Best Linux Kernel Programming Books
- Best Linux Bash Scripting Books
- Top RHCSA / RHCE Certification Study Books
- Best Top Rated CompTIA A+ Certification Books
- Best LPIC-1 and LPIC-2 certification study books
Finale
By deploying KVM and virt-manager with Cockpit, you can harness the power of virtualization while benefiting from a user-friendly management interface. This setup is well-suited for both small-scale deployments and larger enterprise environments, offering flexibility, efficiency, and security in managing virtual machines.

